
Challenge Missions
Create and manage Missions in a Challenge
What are missions?
Missions are series of tasks that members need to accomplish in order to win a challenge. Missions leverage our powerful Multi-Action Engine, which tracks and assesses member activities in order to drive targeted behaviors.
Creating a Mission
Before creating a mission, make sure you've set up the Action you'll use to define the behavior you want to incentivize, as well as the Challenge that will contain your mission.
Let's take a common scenario most companies have and build a mission around it. You have a product, let's call it "Product A", and you want your mission to be for your sales team to sell $1,000 worth of that product.
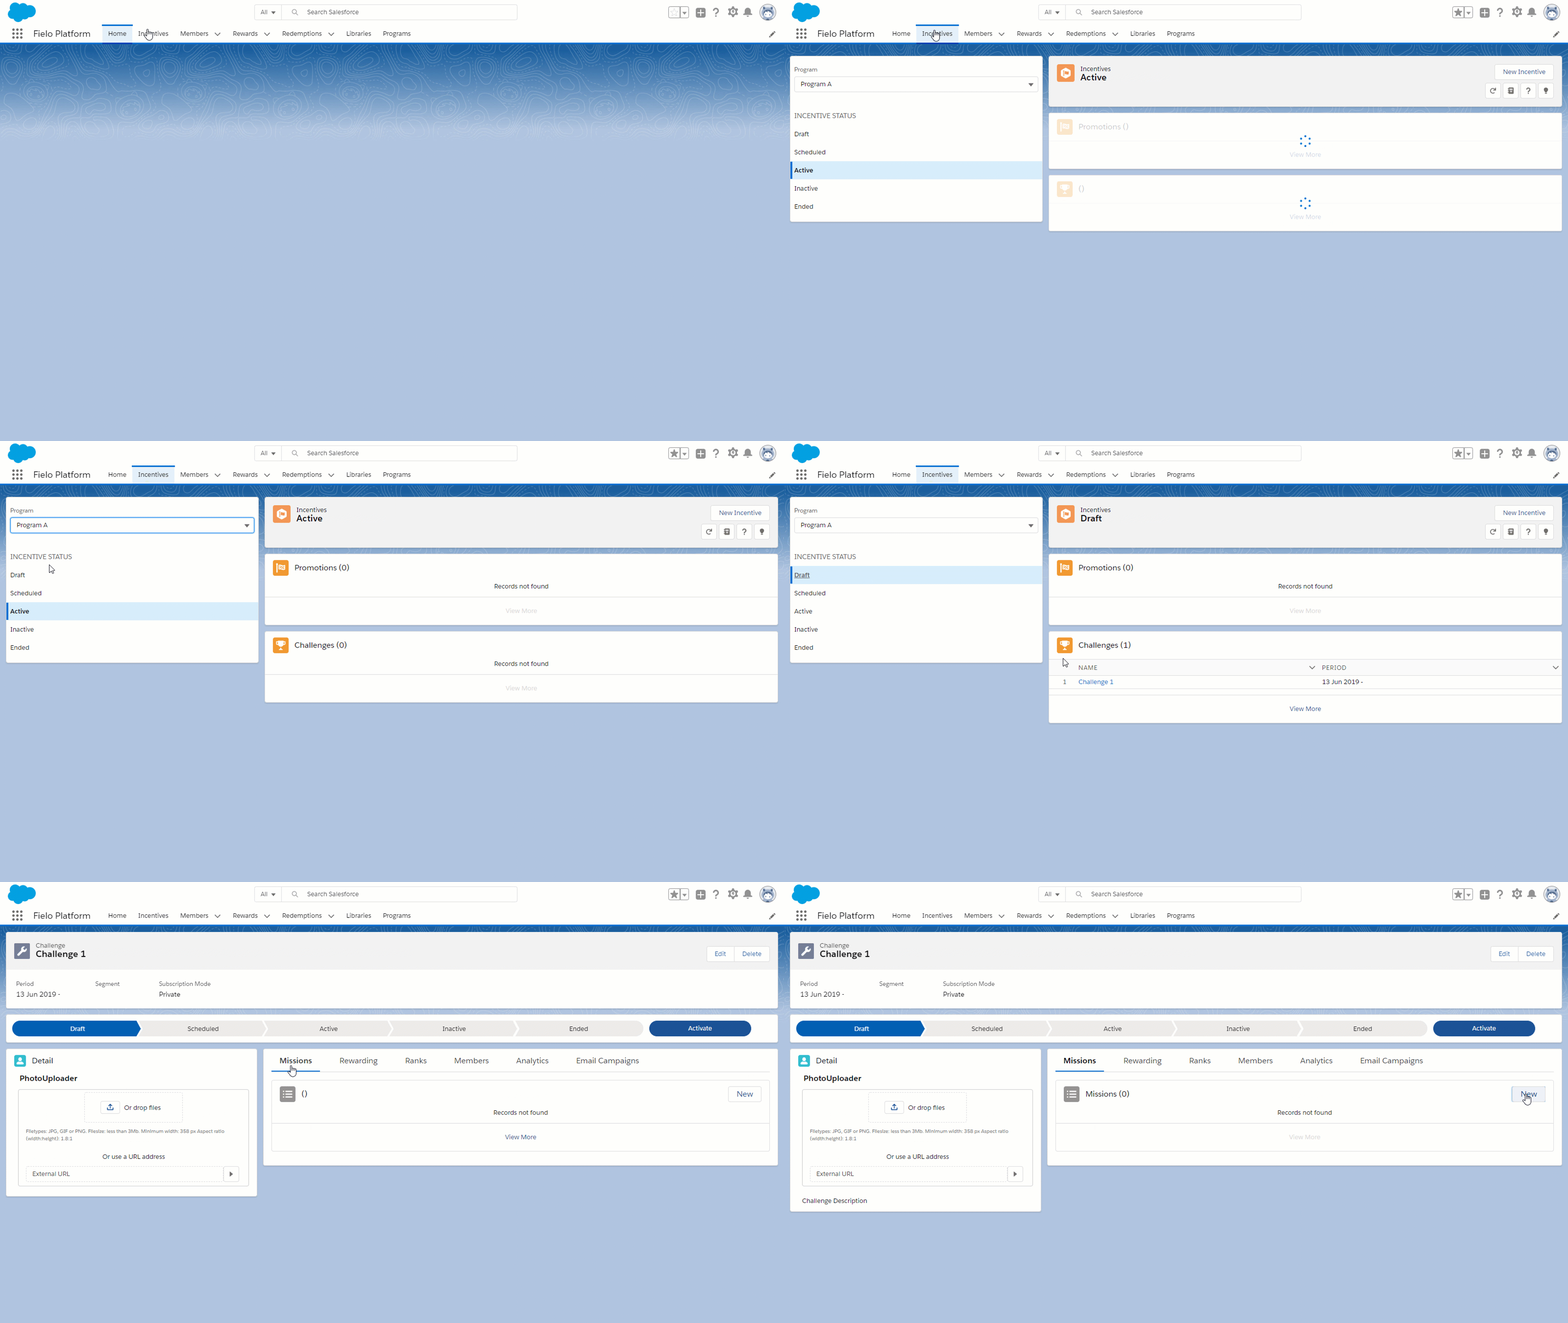
To creating your mission, go to the Incentives tab and select the program you want to work within from the Program menu. Choose a challenge you've created and, on the Missions card, click New.
Enter a Name and Description
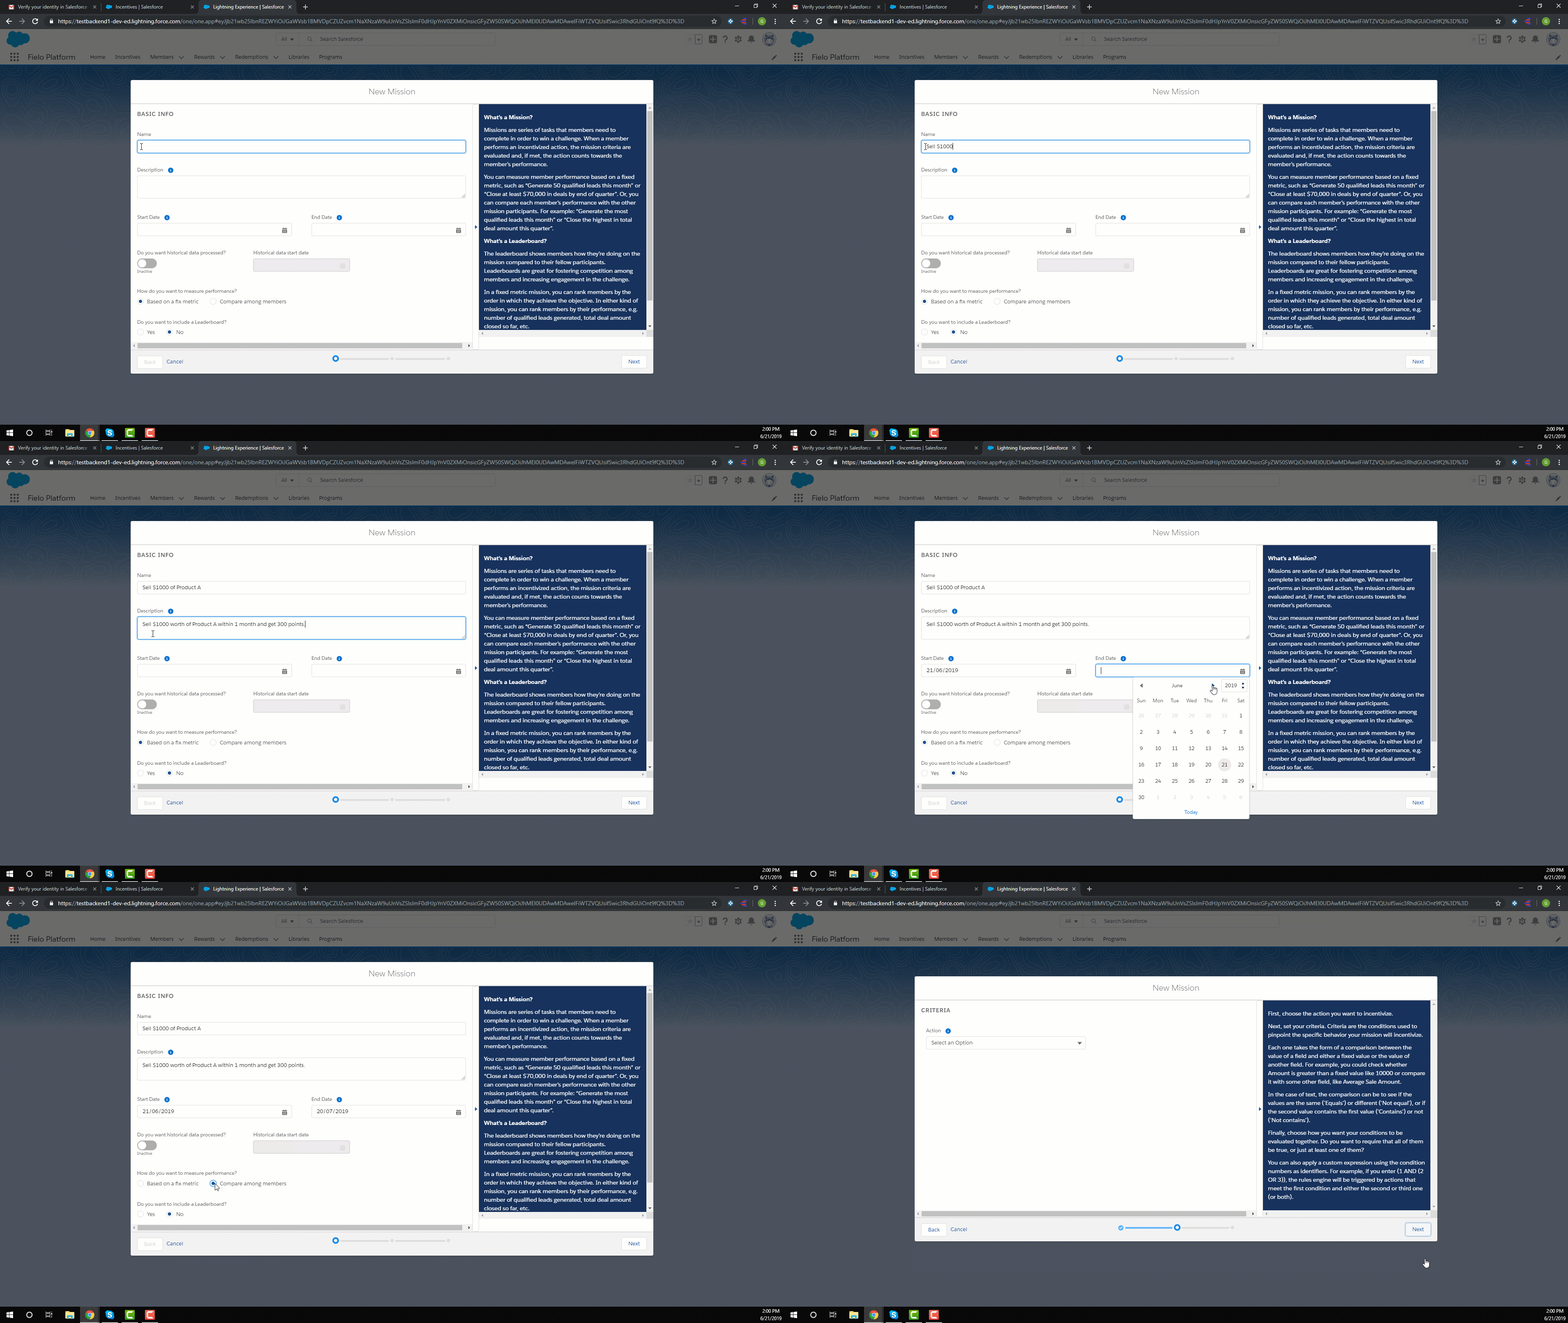
Enter a name and description for your mission. Your members will see these, so make sure they're friendly and illustrative. This mission will be given the name "Sell $1000 of Product A" and the description will be "Sell $1000 worth of Product A within 1 month and get 300 points.".
Set a Start and End Date (Optional)
You can choose start and/or end dates for your mission. Missions that don't have start and/or end dates will be processed as long as the challenge that they're a part of is set to Active. Since this example mission has a time limit of 1 month, go to the Start Date and put in today's date. Now go to the End Date and set it for 30 days from today's date.
Mission dates must always fall within the period of the challenge that they're in. For instance, a challenge that starts on May 6 and ends on May 20 can only have missions that start on or after May 6 and end on or before May 20.
Including Historical Data (Optional)
Historical Data Processing enables member’s past data to be calculated and counted towards a particular mission in a challenge. If you activate this, the Historical Data Start Date will become enabled. Choosing a date means that all previous data up until that date will be processed and calculated toward the challenge. If the start date is left blank, it will process all previous historical data. Historical data is going to be processed just once when a mission becomes active for a member. This mission will not be using historical data so leave this section Inactive.
For Point Types that have Partial Expiration Mode to expire on a regular basis, you need to schedule a batch process manually.
- From Salesforce Setup, quick find and select Apex Classes.
- Click on Schedule Apex.
- Give it the name "Partial Expiration Point Batch" and, for Apex Class, search for and select MissionReprocessBatchSchedule.
- Under Frequency, choose Weekly and check all days.
- Give it an end date of as far out into the future as possible and a preferred start time of 12:00 AM.
- Click Save.
Historical data exceptionsImagine a scenario where you have two missions, mission A and mission B. If mission B has historical data active, it will be dependent on the completion of mission A. The member subscribed to the challenge must complete the dependent mission first before moving on. So once mission A is accomplished, Fielo will process the historical data for mission B.
Measure Performance
The behaviors, or actions, tracked by the Multi-Action Engine can be measured differently depending on how you want your members to behave. For this reason, there are two different types of performance measurements.
Based on a fixed metric
Missions based on a fixed metric specify a quantifiable goal that your members must reach in order to accomplish the mission.
Compare among members
Missions that compare among members allow members to compete with one another to maximize a desired behavior. Rewarding is determined based on the relative performance of the participating members at the conclusion of the challenge.
Why not make the example mission more exciting, select Compare among members to help this mission be a bit competitive.
Include a Leaderboard (Optional)
The leaderboard shows members how they’re doing on the mission compared to their fellow participants. Leaderboards are great for fostering competition among members and increasing engagement in the challenge.
In a fixed metric mission, you can rank members by the order in which they achieve the objective. In either kind of mission, you can rank members by their performance, e.g. number of qualified leads generated, total deal amount closed so far, etc.
Leaderboards are a scorecard that displays the ranking of members who are part of a mission. Since this example mission is already comparing members performance, it's time to make things more interesting by turning on the leaderbaord.
How do you want to rank members?
Turning on the leaderboard feature will also bring up the way to rank members.
IAS includes two Leaderboard modesOrder of completion: Shows the chronological order in which each member has accomplished the mission objective.
By performance value: Shows how well a member is doing in the mission compared to the other participating members.
You will want to select By performance value for this example so that the leaderboard will show the sales progress of each member.
You are now ready to define the criteria of your mission, go to the bottom right and click Next.
Leaderboard CalculationLeaderboard rankings are calculated by the LeaderBoardBatchSchedule process, which updates members' positions in each mission. For this to work correctly, be sure that the LeaderBoardBatchSchedule process runs before the ChallengeStatusBatchSchedule process. See Batch Management for details.
Define Criteria
Criteria are the conditions that evaluate member activity on a target object to define the behavior your mission will incentivize. When a member performs an activity that meets these criteria, Fielo's Multi-Action Engine records it as an incentivized behavior and counts it toward the mission.
-
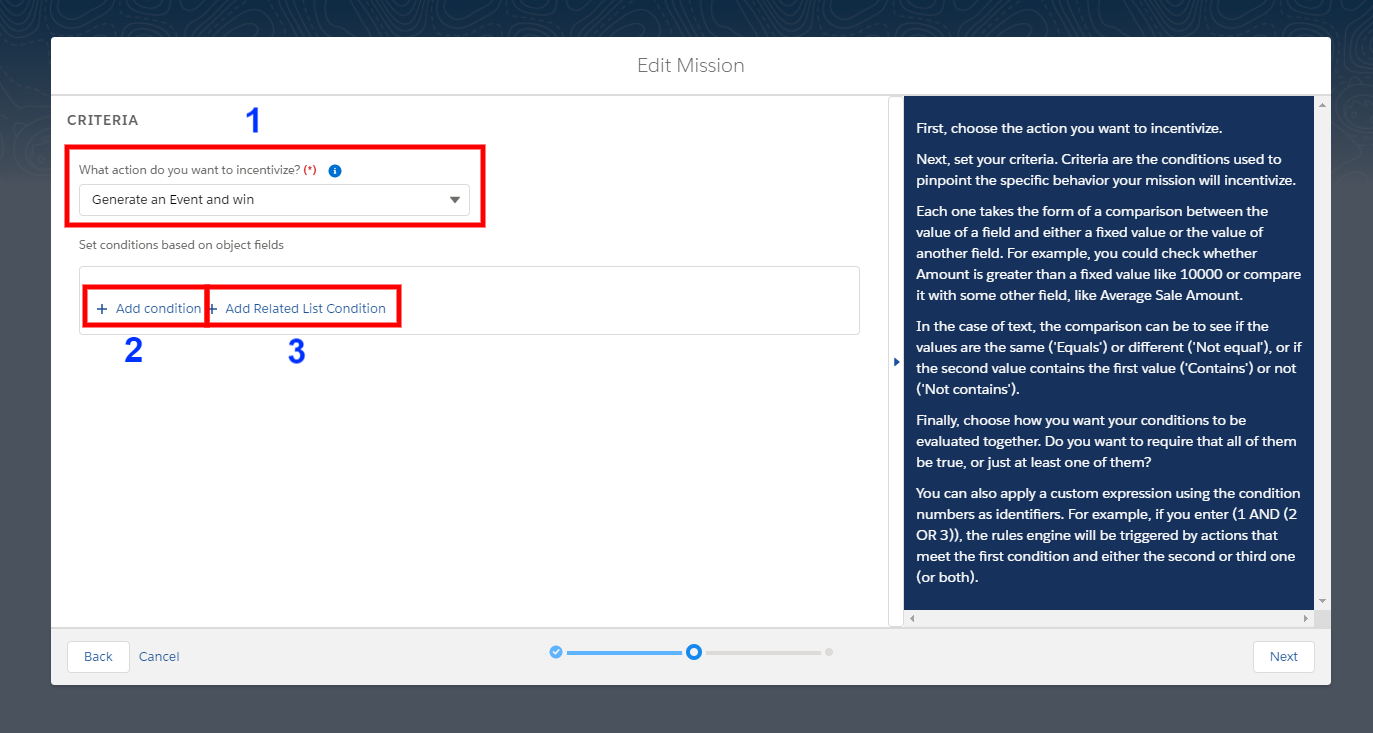
What action do you want to incentivize?
It shows the specific source for the action, which can be the same object or any other object that has a lookup relationship with it. For example, if the Action object is Transaction, you can choose Transaction or any other related object - in this case, Points - as your Target Object. -
Set conditions based on object fields
Rules also allow extra filters, which are fields from target object that refine rules conditions. Those fields can be compared to a specific value or even to another field by using relational operators such as "Equals", "Greater than", "Less than", etc. -
Add Related List Conditions
Depending on what object you have in "Use the same object or a related list?", this will allow you to create a condition based on that object.
First, click on the the Actions drop-down and select an option that you'll base your incentivized behavior on. To extend the power of your incentive program, you can create custom Action for your criteria.
Custom actionsIf you require your own custom Actions, you must first import those actions into your Local Development Library.
What are Conditions?Conditions allow you define specific thresholds that need to be met in order for the Rules Engine to be triggered. Each criterion takes the form of a logical or mathematical comparison between the value of a field and either a fixed value or the value of another field. For example, you could check whether an amount is greater than a fixed value like $10,000 or compare it with some other field, like Average Sale Amount.
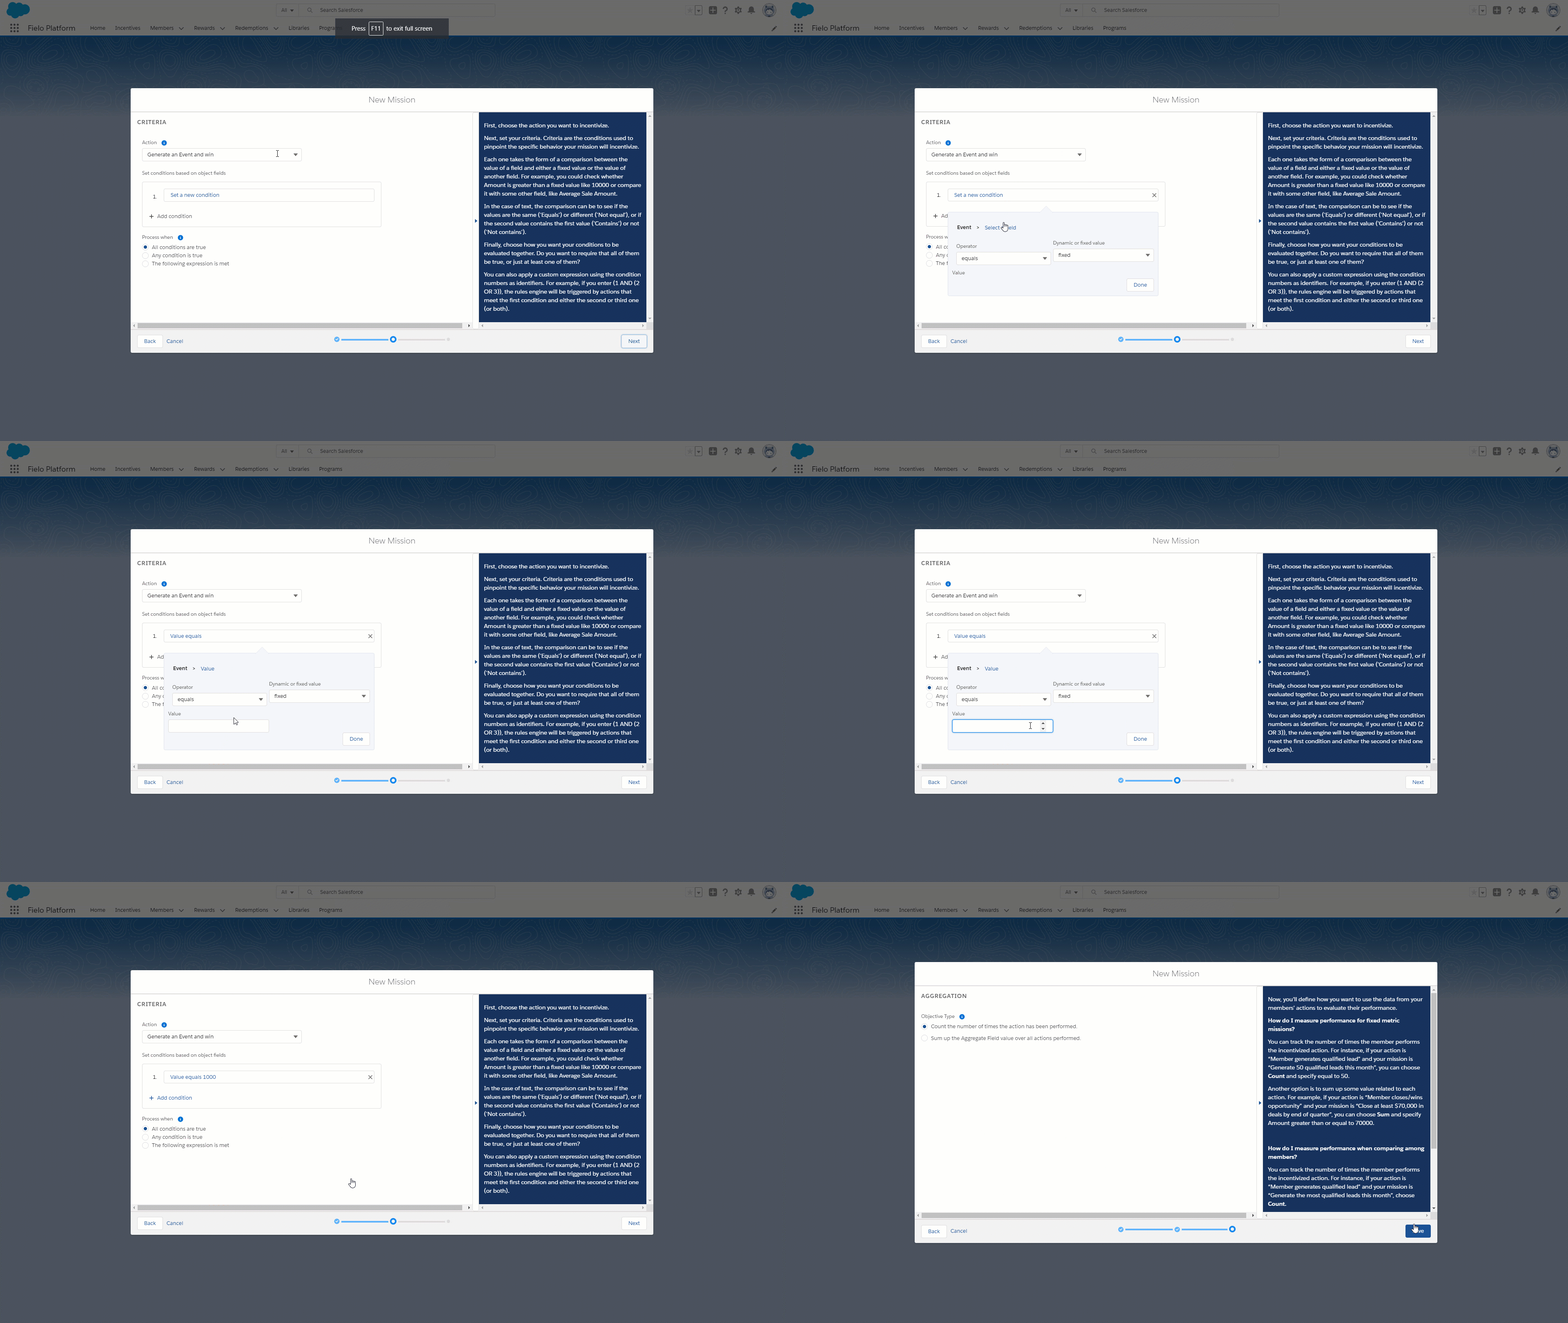
For this example, select the default option with is Generate an Event and win.
A new section will appear that allows you to set conditions based on object fields. click on Set a new condition which will provide the options of this criteria. The Select a field allows you to select one field and compare it to either a fixed value or the value of another field. Under the Select a field drop-down, select Value as the main field to compare against. Leave the Operator to equals and keep Dynamic or fixed value to fixed. Within the Value field, type 1000. What this means is that the Value field needs to be equal to the fixed value of $1,000 in order to achieve the reward.
To add another criterion, click Add condition and follow the same process to define it. You can remove a criterion by clicking .
Conditions are optionalSetting conditions can expand or enhance the functionality of you incentive program, but it is completely optional.
Process When
When you've finished adding and defining criteria, choose how you want your conditions to be evaluated together. Do you want to require that all of them be true, or just at least one of them?
Choose the best processing option
- All means that all of your criteria will need to be met for an activity to count toward the Mission.
- Any means that a member activity meeting any one of your criteria will count toward the Mission.
- Custom allows you to specify more complex criteria prioritization. If selected, you must enter a formula with logical operators and your criterion numbers. Example: "(1 AND 2) OR 3” finds records that meet either both the first two conditions or the third. While “1 AND (2 OR 3)” finds records that meet the first filter as well as either the second or third. Begin a condition with the term NOT but do not end one with NOT. For example, “NOT 1 AND (2 OR 3 OR 4)” finds records that meet any of the last three filters and excludes records that meet the first filter.
The default option All conditions are true is what will be chosen for this example.
Once you are ready, go to the bottom right and click Next.
Define Aggregation
Now, you’ll define how you want to use the data from your members’ actions to evaluate their performance.
Under Objective Type there are two options to choose from:
-
Count the number of times the action has been performed.
-
Sum up the Aggregate Field value over all actions performed.
Missions using Compare among membersIf your mission is Compare among members and you select Count the number of times the action has been performed. you click Save now. Otherwise, if you select Sum up the Aggregate Field value over all actions performed., it will present you with and event that needs to be triggered. In this example, click on Sum up the Aggregate Field value over all actions performed. and choose Value for the Event. You are now able to Save this mission.
If your mission is usingBased on a fixed metric, continue on.
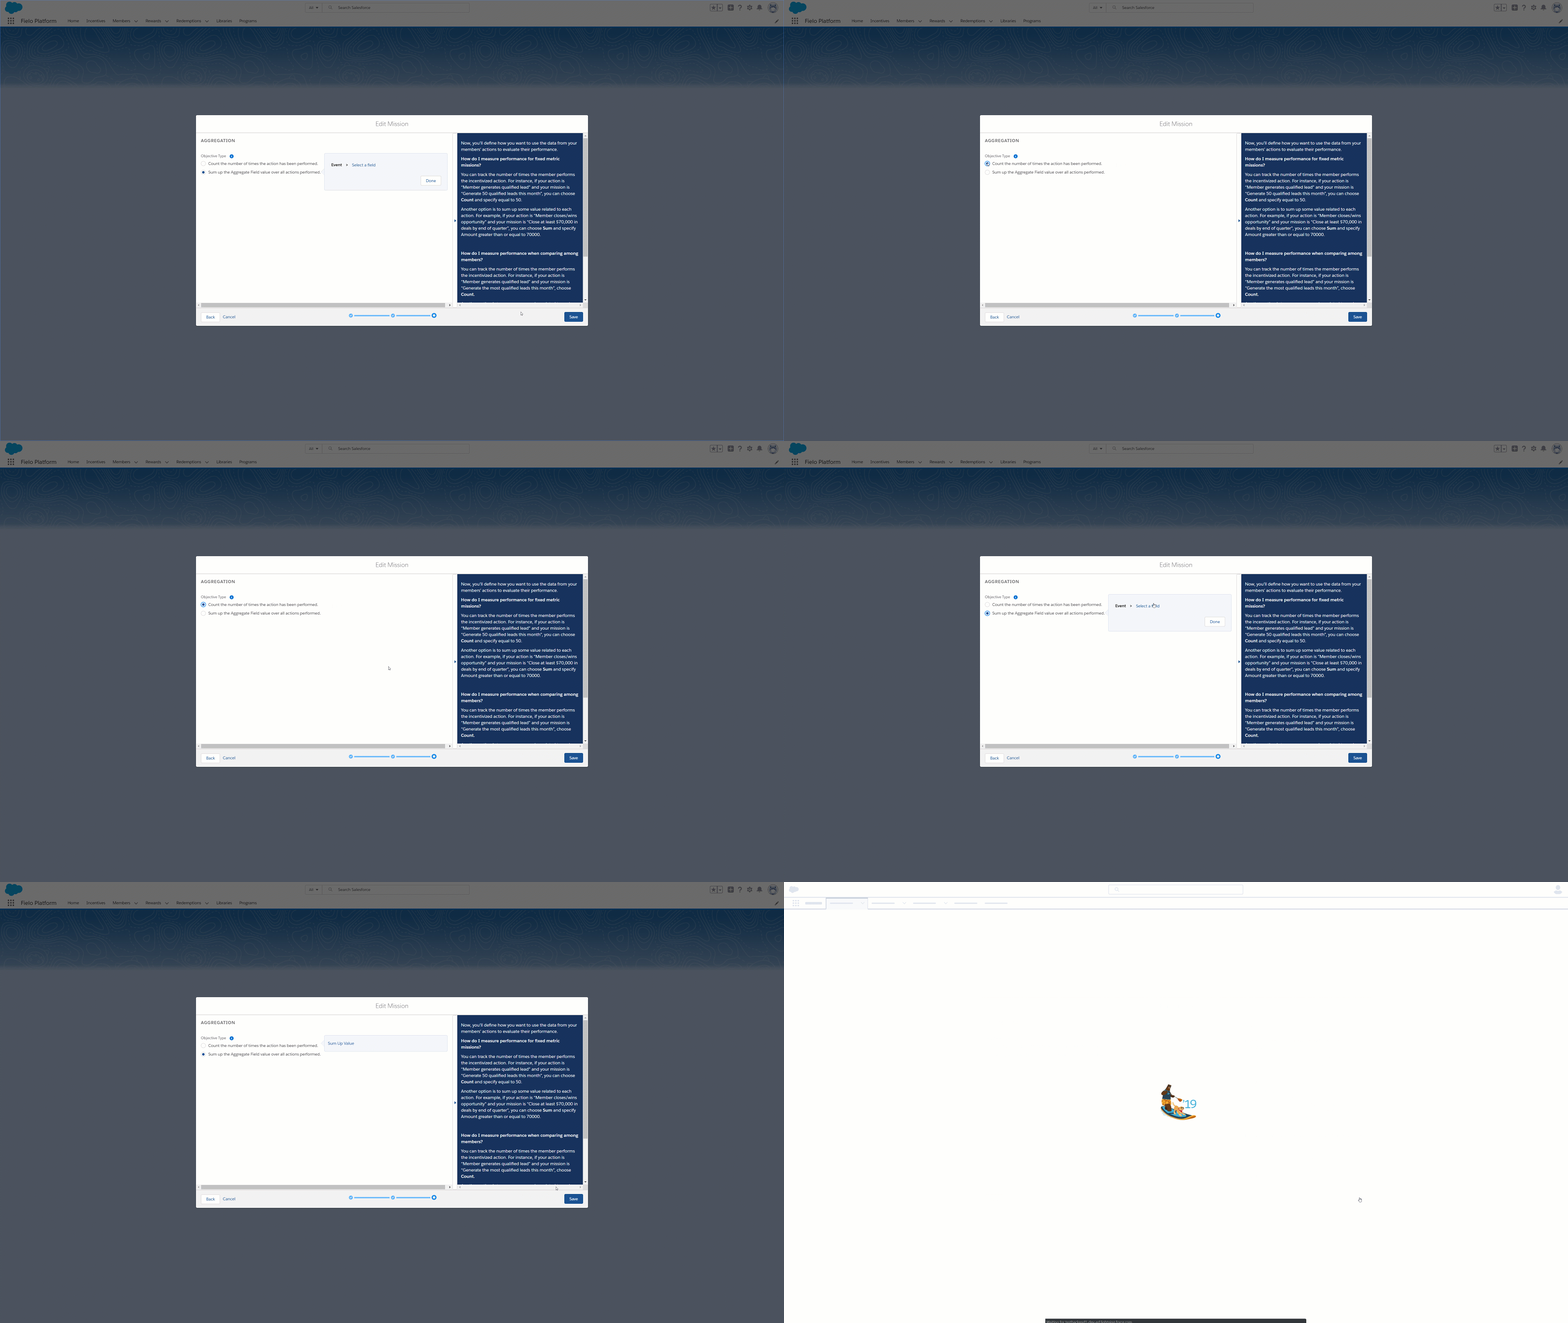
For Missions using Based on a fixed metricMissions using Based on fixed metric will have additional criteria to select. Both Aggregation options will require you choose an Operator, Dynamic or fixed value, along with the Value itself. Sum up the Aggregate Field value over all actions performed will have one additional criteria which is to select a field.
Once you have selected the option that fits best for your mission, click Save.
Mission Management Tools
Mission management tools allow you to edit, delete or extend the abilities of your missions You can edit or delete a Mission when the Challenge is in Draft or Inactive.
Edit
To edit a Mission, click in the row corresponding to the Mission and select Edit.
Prerequisite
Prerequisites require one of more missions to be accomplished before allowing participation in the next.
Mission Rewarding
Mission Rewards are a way to reward members for successfully completing an individual mission.
For more information, see mission rewards
Delete
To delete a Mission, click in the row corresponding to the Mission and select Delete.
Updated over 1 year ago