
Segments
Set up and manage segmentation on Members and other objects
Segments are identifiable characteristics shared among a group of members based on their behavioral, demographic and profile-level information (e.g. gender, location, etc.). They enable you to more effectively target your incentives and rewards by addressing them to specific member subsets.

IAS offers two types of Segments: Dynamic Segments and Manual Segments.
Dynamic Segments
Dynamic segments are based on criteria that you define. Members who meet these criteria are automatically included in the segment. For example, you could create a segment called RJ Sales Reps which includes members from Rio de Janeiro who work in sales.
Dynamic segments are continuously updated. This means that any member whose profile changes to fall within the criteria of a segment will automatically be included in that segment. As an example, a member in sales that moves from São Paulo to Rio de Janeiro will automatically become part of the RJ Sales Reps segment.
Creating a Dynamic Segment
Start by going to the Programs tab and selecting the program you want to create a segment for. Go to the Segments section and click New.
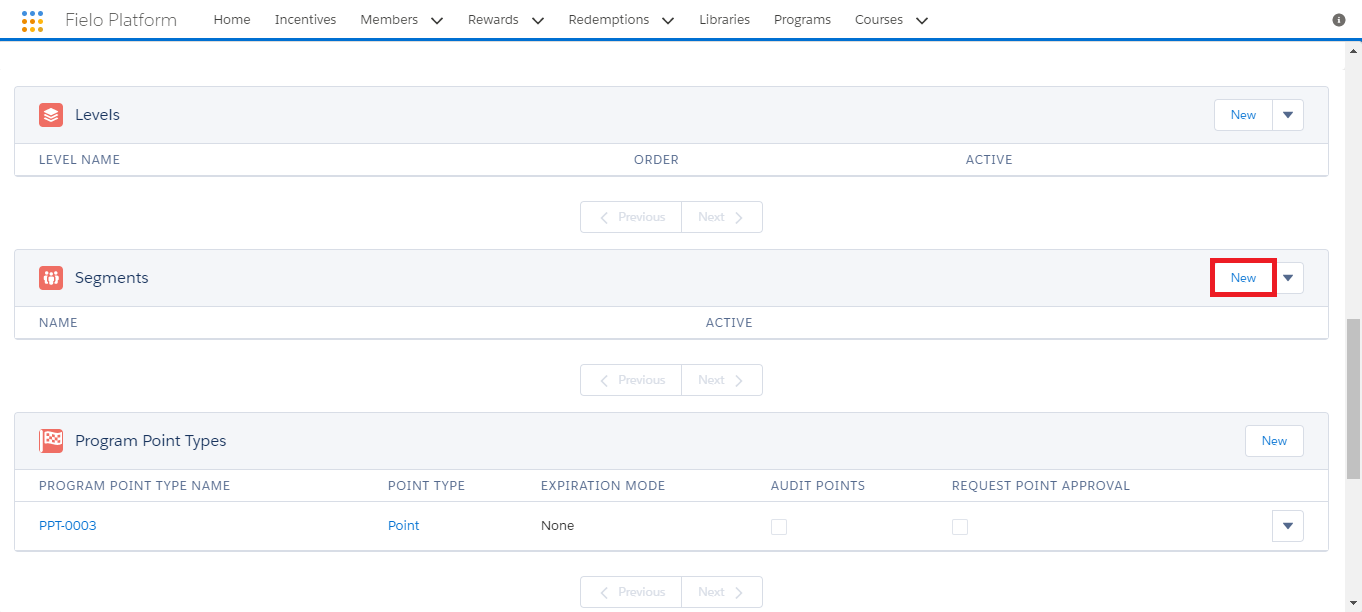
Program - Segments
Enter a relevant Name as well as a detailed Description of the segment.
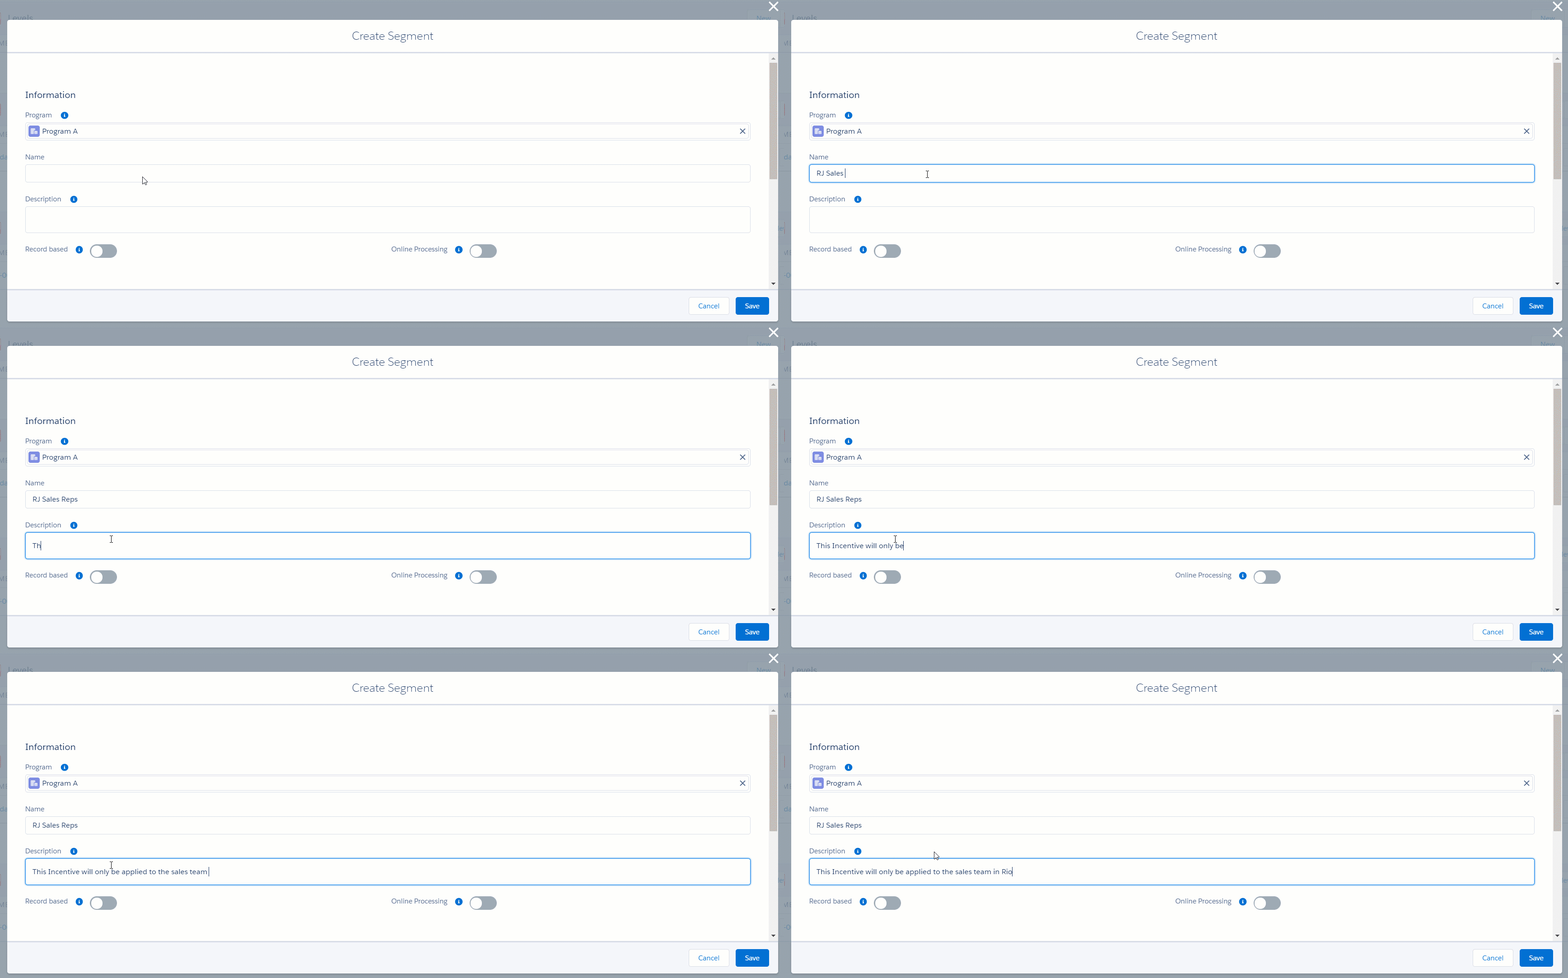
Create Dynamic Segment - Name & Description
Determine whether you need to turn on Record Based or Online Processing.
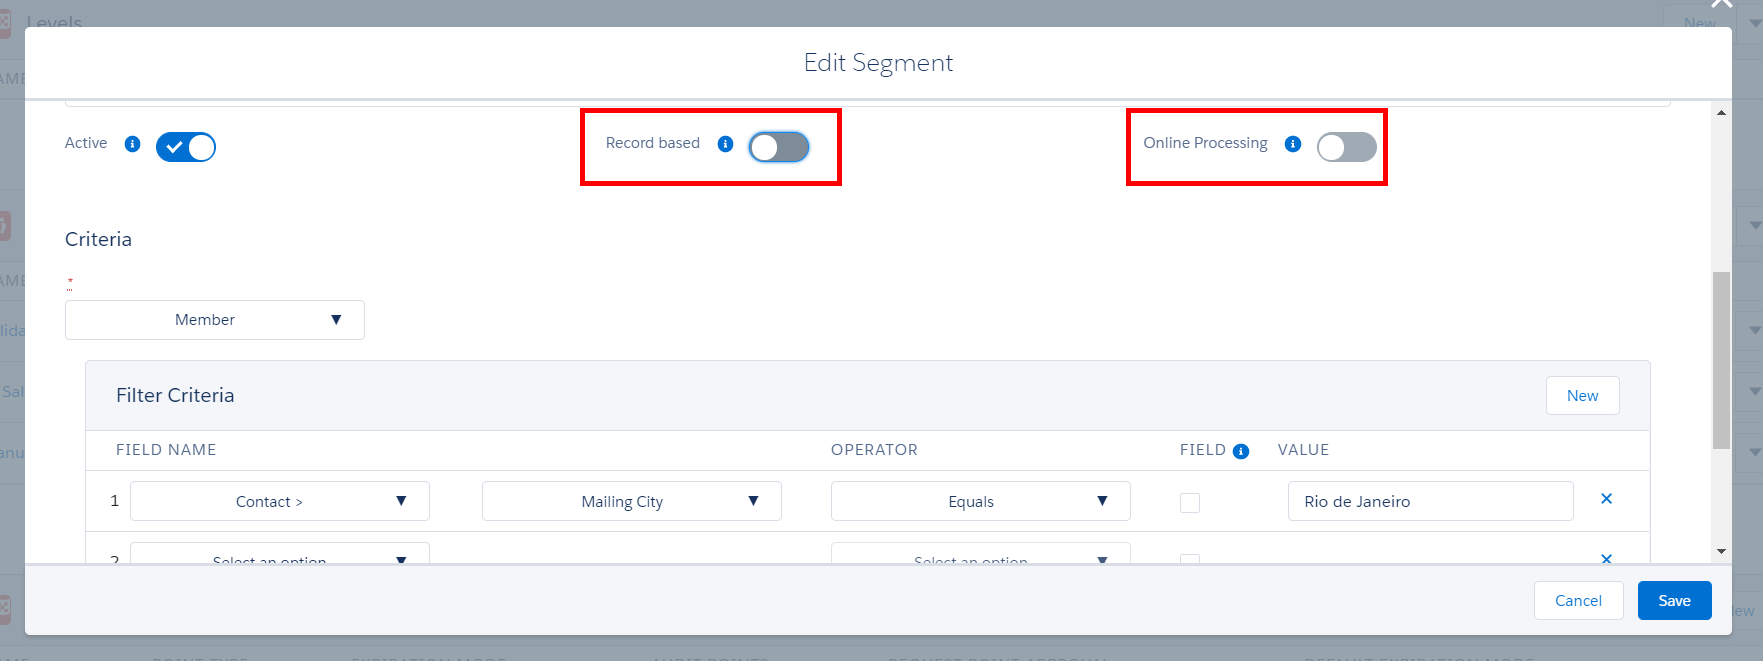
Record Based - Enabling this on will allow your segmentation to connect to the database for integration with 3rd parties, such as Marketing Cloud and to generate reports as well.
Online Processing - When enabled, segments are automatically processed in real-time.
Both options can't be chosen at the same timeYou will receive an error if you enable both options for a segment. Criteria for segments that are using both Record Based and Online Processing cannot use lookups or related lists and cross field formulas.
Pros and Cons of Record Based and Online ProcessingRecord Based - Keeping this feature disabled potentially saves on database space but the trade-off is that you won't be able to generate reports of your segmentation.
Online Processing - Keeping this feature disabled will speed up processing because it will batch all processes together and run them once a day (by default) or on a time period that works best for the business. The trade-off is that since data isn't processed in real-time, there could be errors in the data that need to be manually fixed once the batch has run. The feature is best used for critical segmentations that must be solve in real-time, e.g. online Rules Engine/Challenge processing. However, you can perform imediate updates on offline segments by running a Batch.
Now, in Filter Criteria, we'll specify the criteria for your segment. These are how your segment will be defined. Each criterion takes the form of a logical or mathematical comparison between the value of a field and either a fixed value or the value of another field. For example, you could compare a member's Contact Mailing City with either the fixed value Rio de Janeiro or some other field, like Contact Other City.
In the case of text, the comparison can be to see if the values are the same ("Equals") or different ("Not equal"), or if the second value contains the first value ("Contains") or not ("Not contains"). For numerical values, comparison operators include "Equals", "Greater than", "Less than", "Greater or equal", etc.
Let's walk through how to apply this:
- Under Field Name, select the member field or object lookup relevant to your criterion. If you choose an object lookup (such as Contact), select the field from that object that relates to your criterion.
- Under Operator, choose the operator that will compare the field with your criterion value.
- If you want to compare the value of the field in Field Name with the value of another field, tick Field. Otherwise, leave unticked .
- Under Value, enter the number or text value you want to compare with the field in Field Name or, if Field is , choose the field whose value you want to compare with the field in Field Name.
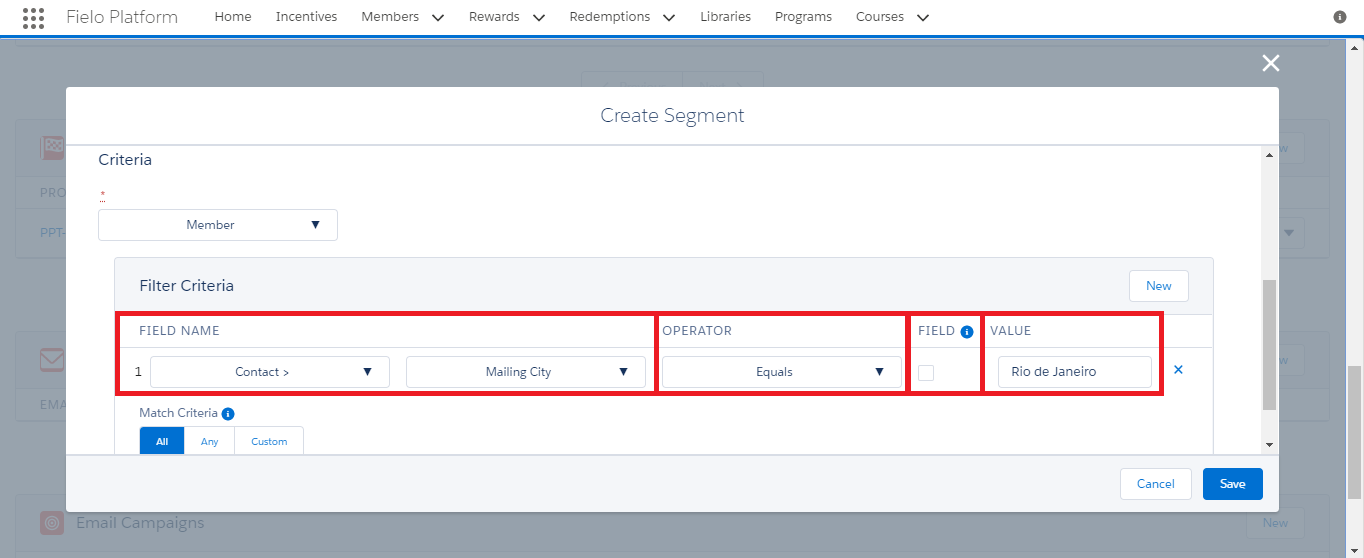
Create Dynamic Segment - Criterion
To add another criterion, click New and follow the same process to define it. You can remove a criterion by clicking .
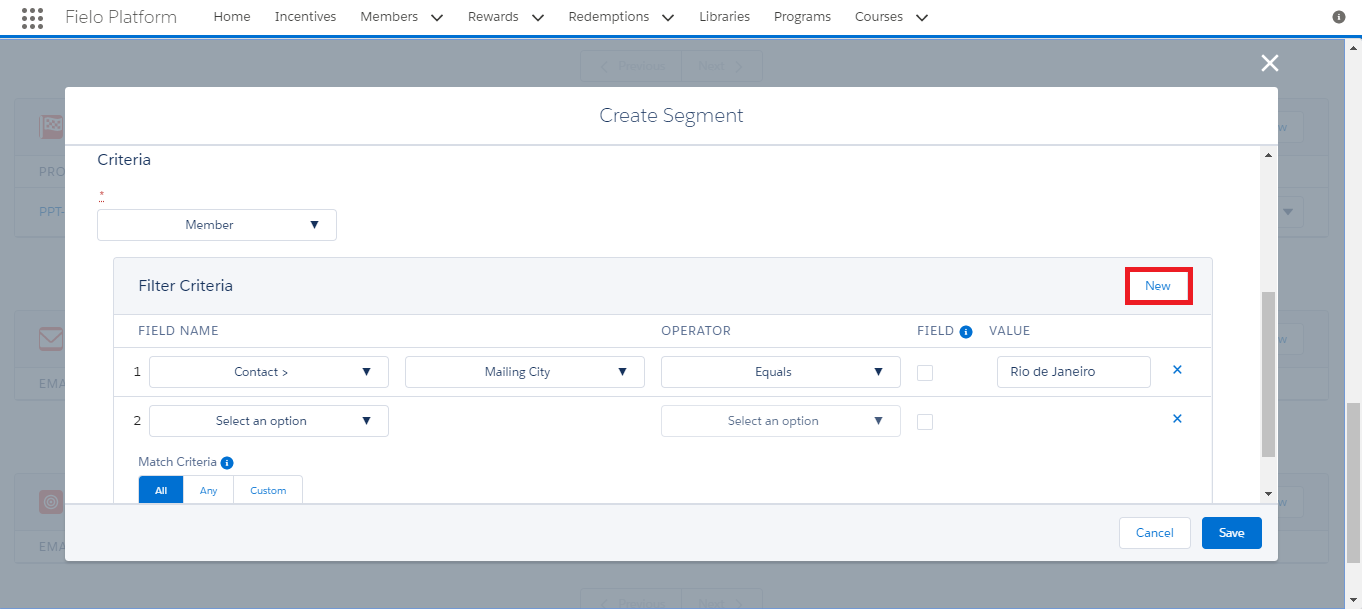
Create Dynamic Segment - New Criterion
When you've finished adding and defining criteria, you can then specify how they are evaluated via Match Criteria:
- All means that all of your criteria will need to be met for a member to be included in the segment.
- Any means that a member whose profile meets any one of your criteria will be included in the segment.
- Custom allows you to specify more complex criteria prioritization. If selected, you must enter a formula with logical operators and your criterion numbers. For example, if you enter
(1 AND (2 OR 3)), a member who meets your first criterion and your second or your third criterion (or both) will be included in the segment.
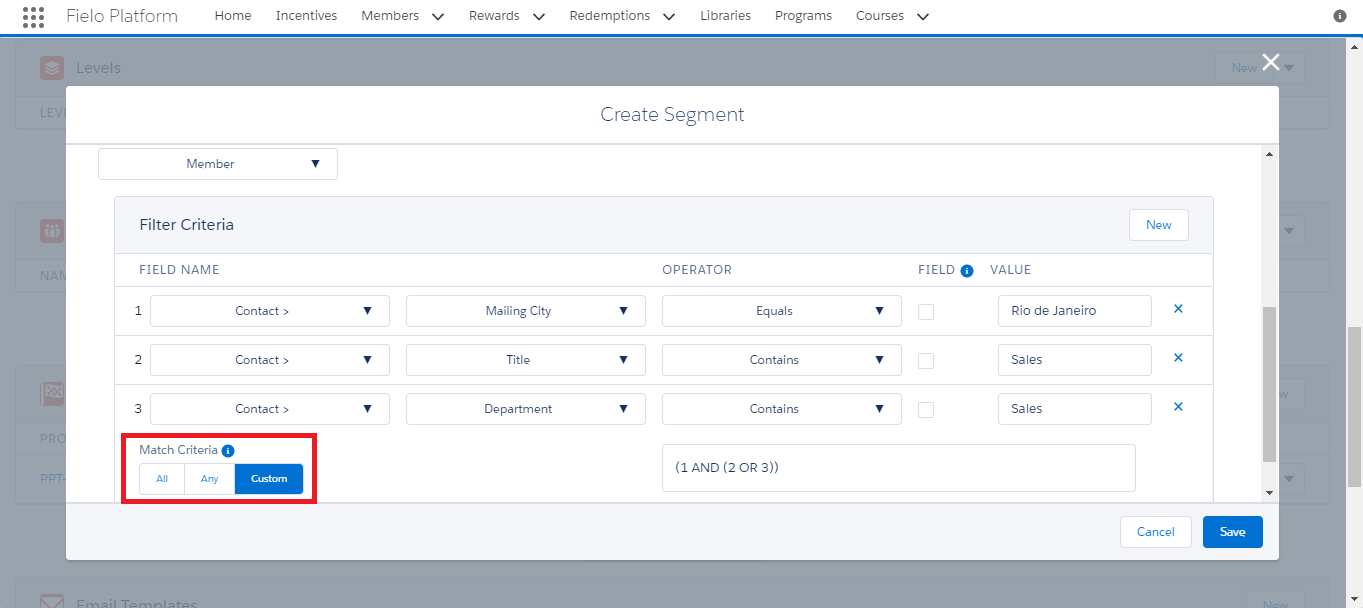
Create Dynamic Segment - Match Criteria
Once you're happy with everything, click Save.
Multi-Program SegmentsYou can create dynamic segments that are available for use across all of your programs. Simply clear the prefilled Program field upon creation.
Remember, when creating multi-program segments, make sure the criteria you set are applicable to members across all of your programs!
Manual Segments
Manual Segments are segments that you manually populate with members. You can use them to define a custom, static group of members. Let's imagine that you're launching a new product or campaign and you want to select a cross section of members to participate. You can do so by creating a Manual Segment and manually adding some members from different age groups, different locations, etc. to build a sample.
Creating a Manual Segment
Start by going to the Programs tab and selecting the Program you want to create a segment for. Go to the Segments section. Click and select New Manual.
In Name, enter a descriptive name and then click Save.
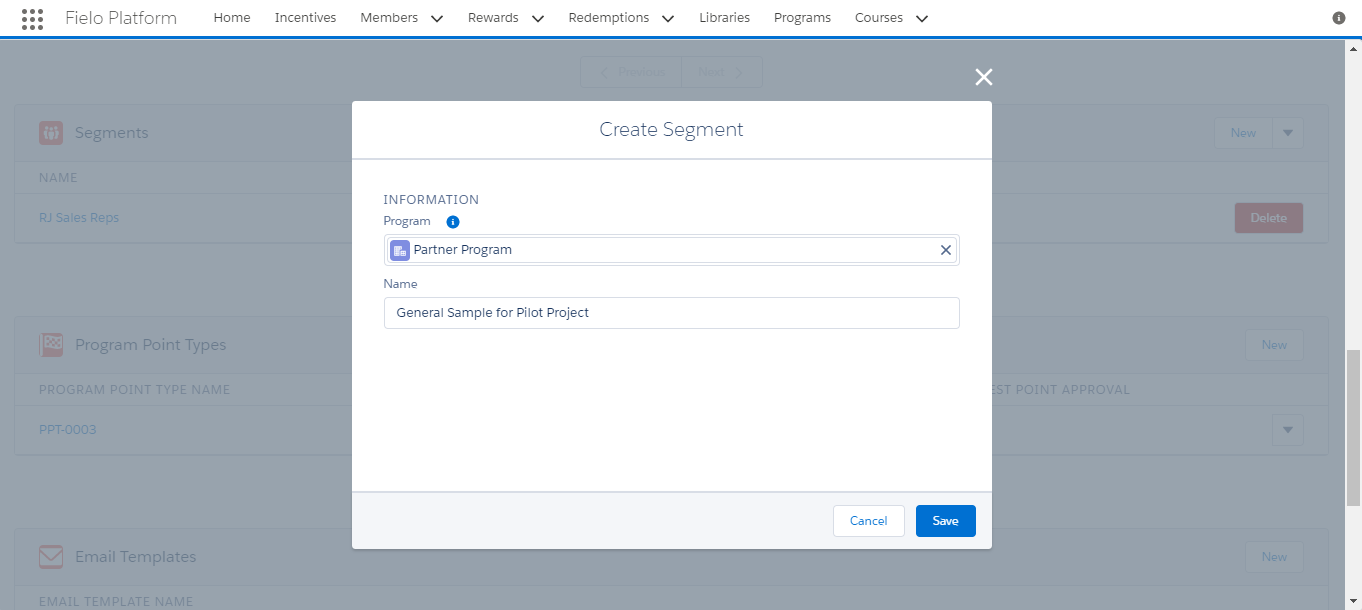
Create Manual Segment
Adding Members to a Manual Segment
Once you create a Manual Segment, you'll be directed to its detail page. You can also access this page from the Segments section of the Program detail page. From here, you can add members to your segment.
First, in the Member Segment section, click New. In the Member property, start to type the name of the member you want to add. When the name of the member you want to add appears, click on it. Confirm that the desired member has been selected and click Save.
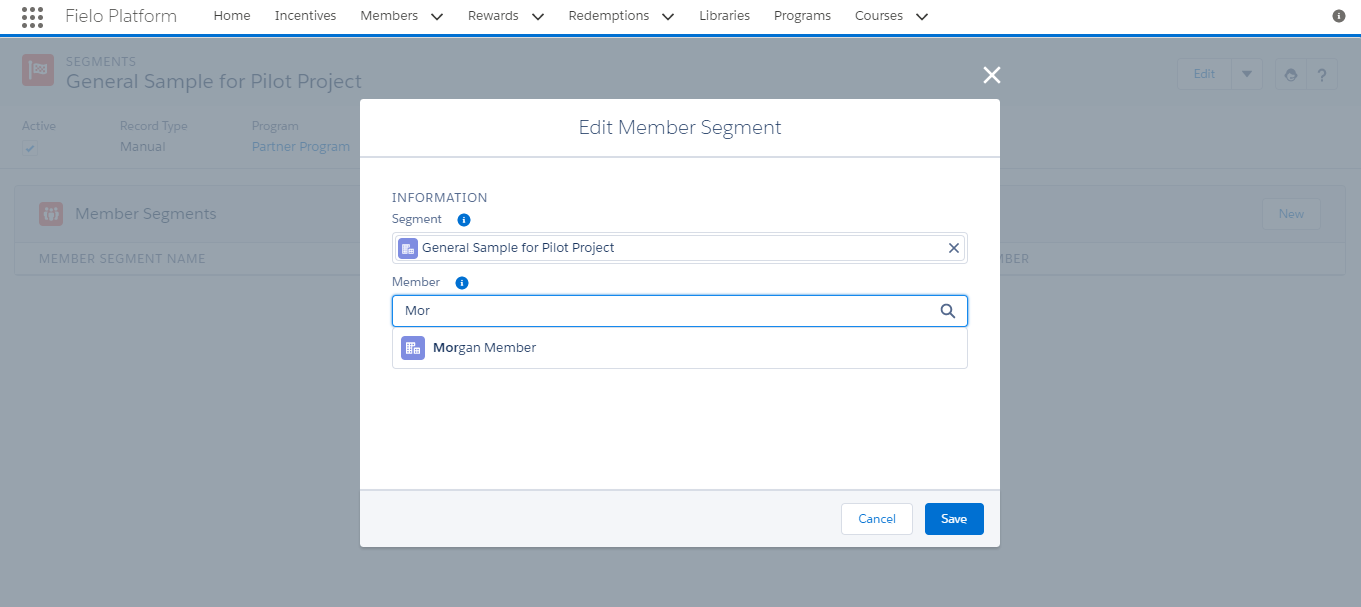
Add Member to Manual Segment
Creating Segments for any Object
Segmentation isn't limited to data in Member objects. You can segment based on fields from any object in your Salesforce ORG, including standard objects, Fielo objects and other custom objects. Let's see how!
The first thing to do is create a relationship between your object and segment. From Setup, in the Quick Find box, search for and select Object Manager. Find and select the object on which you'd like to segment.
On the object detail page menu, select Fields & Relationships and then click New.

Object Fields & Relationships - New
Choose Lookup Relationship and click Next.
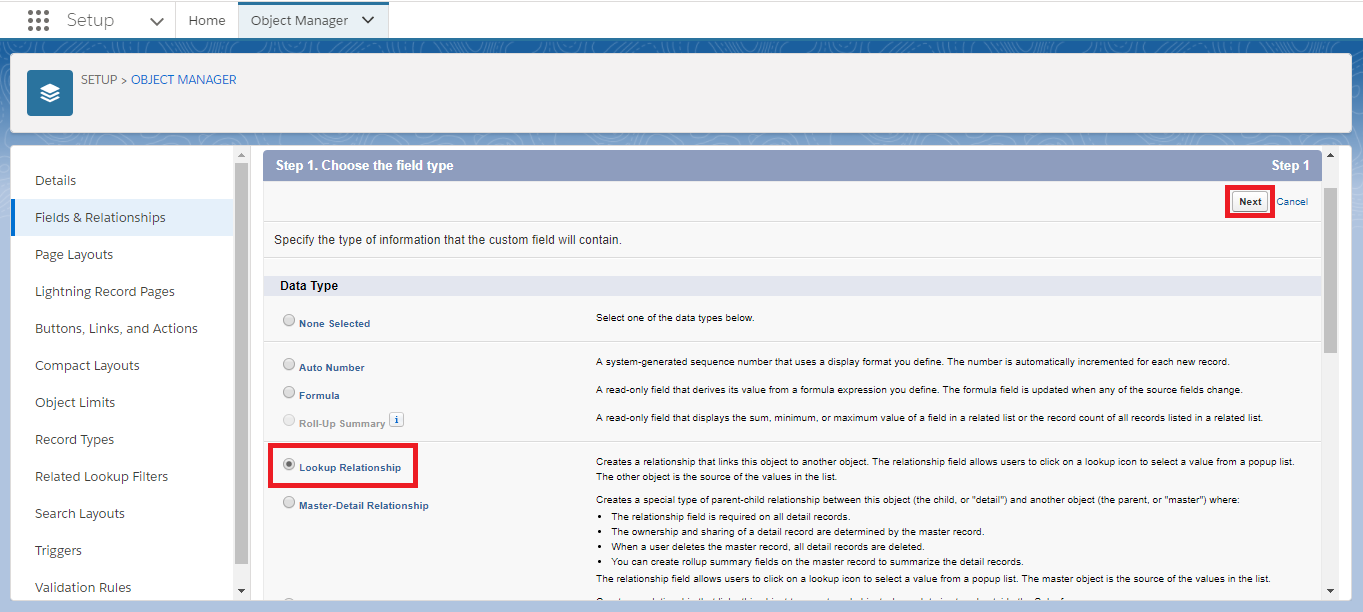
Create Segment Lookup - Step 1
For Related To, choose Segment and click Next.
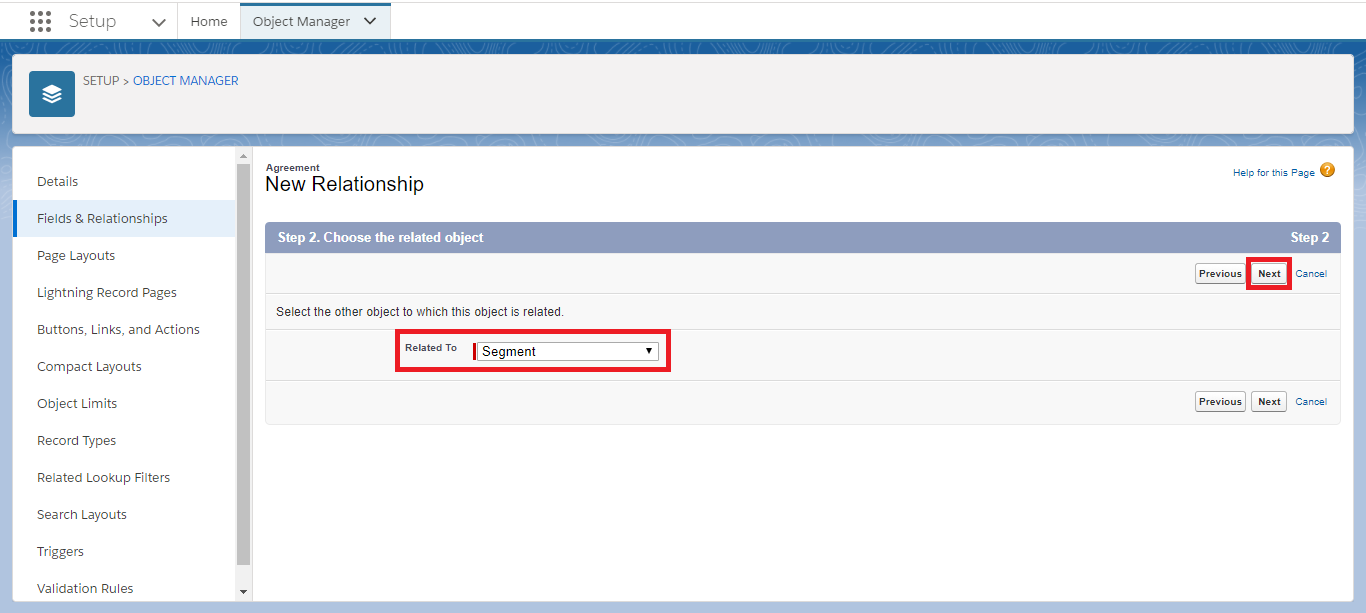
Create Segment Lookup - Step 2
In both the Field Label and Field Name properties, enter Segment. You can leave the Child Relationship Name as it is. Click Next.
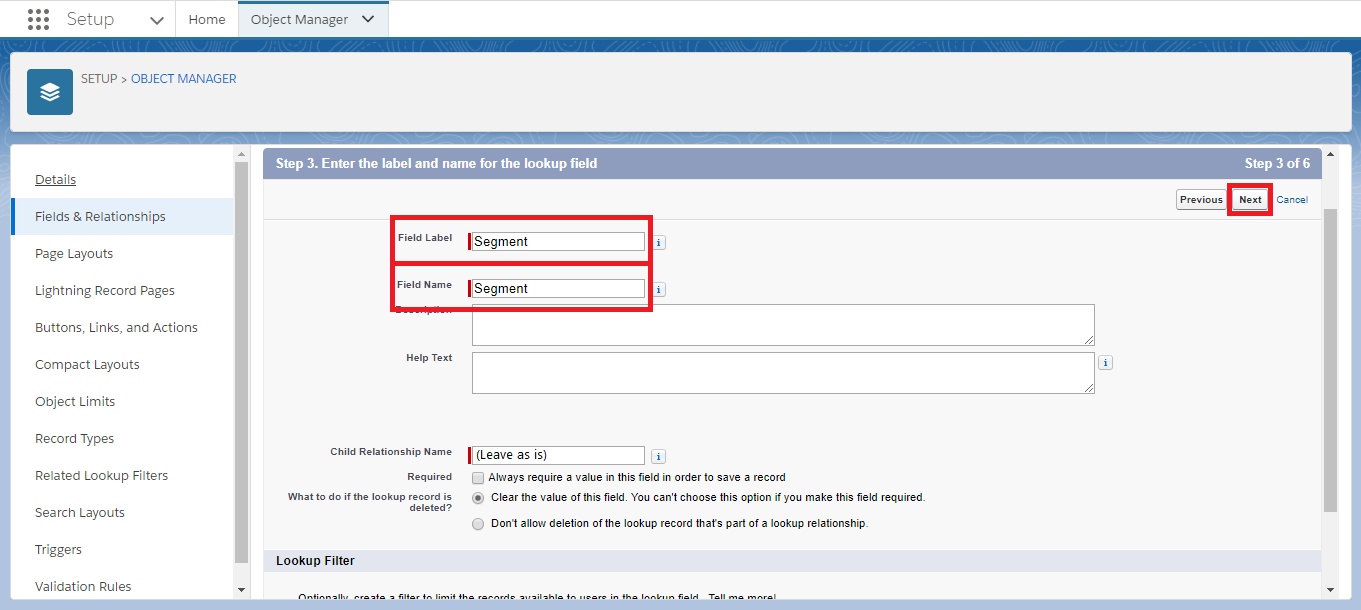
Create Segment Lookup - Step 3
Select the profiles to which you want to grant edit access to this new lookup field, then click Next.
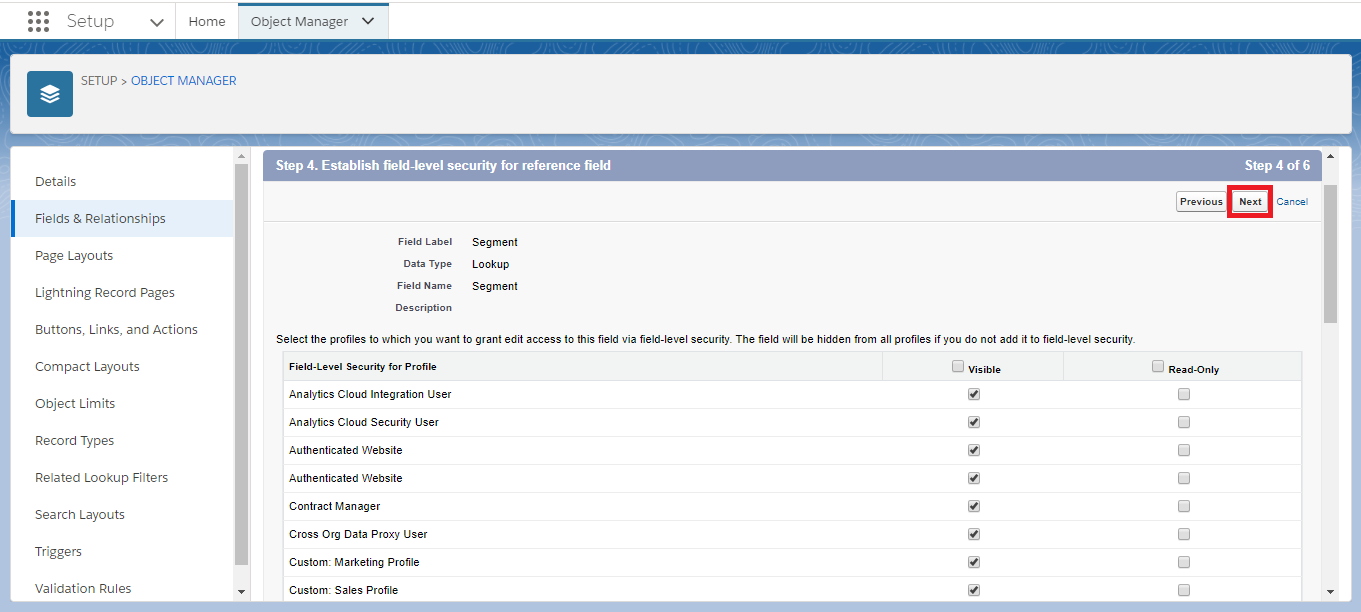
Create Segment Lookup - Step 4
Select the page layouts that you want Segment to be included in, then click Next.
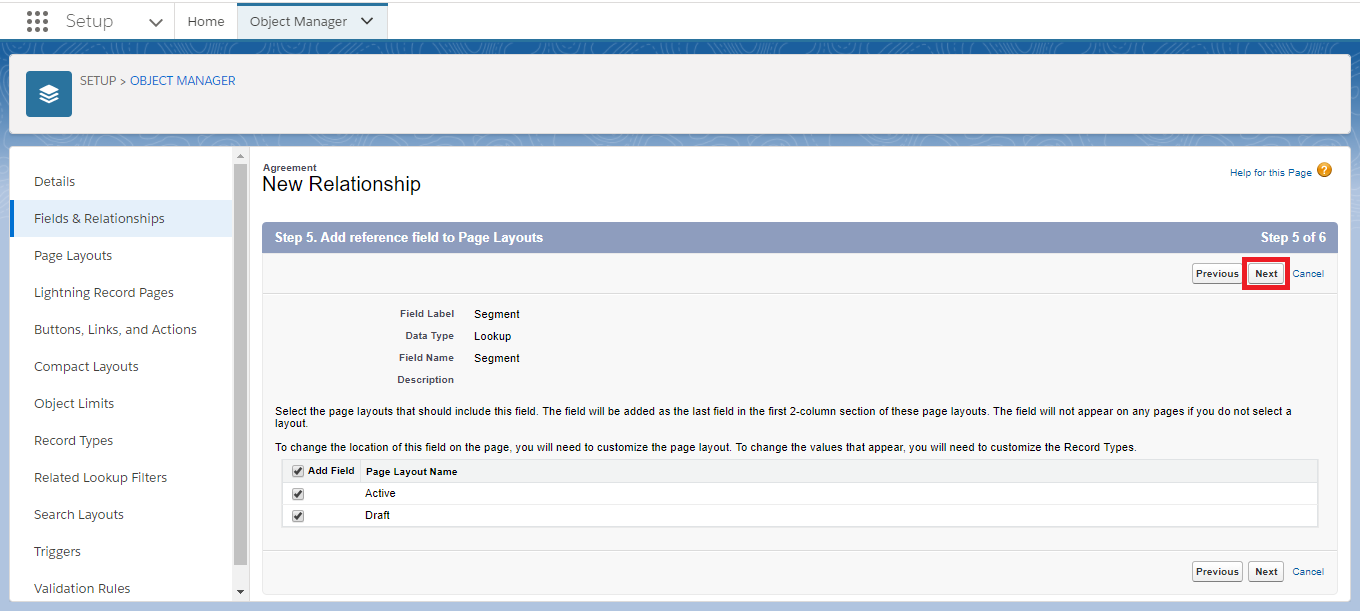
Create Segment Lookup - Step 5
Select the page layouts that you want the related list to be included in. You can leave the Related List Label as it is. Click Save.
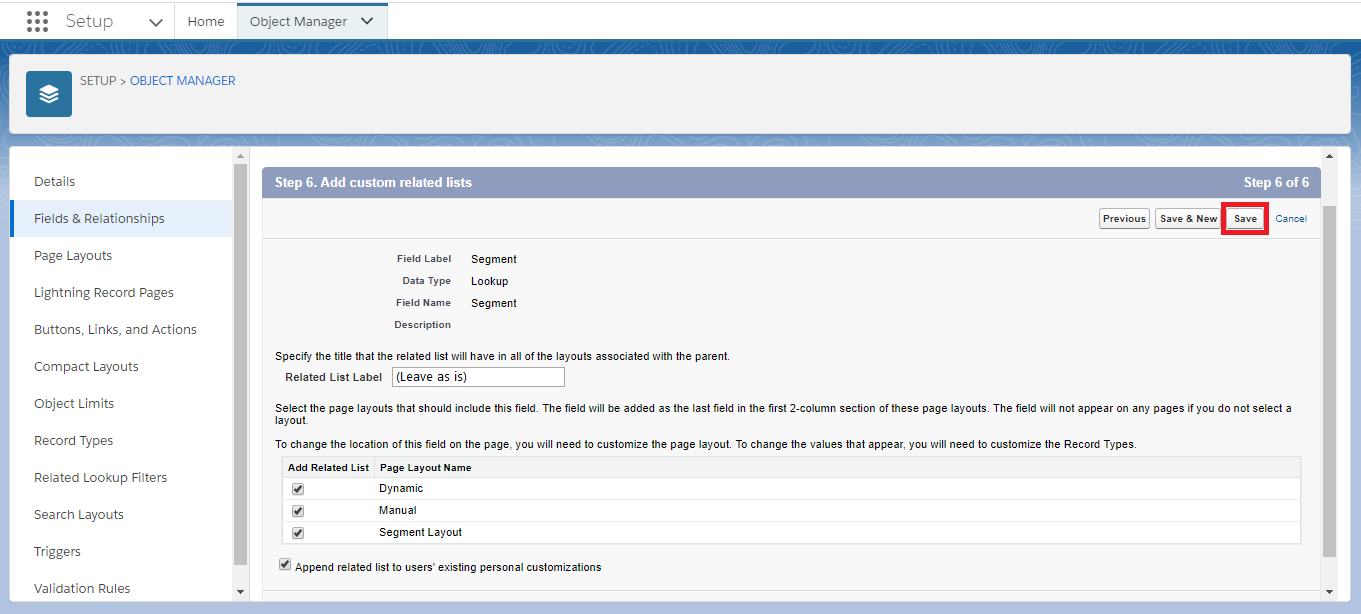
Create Segment Lookup - Step 6
Now you're ready to use segmentation on your object! When you create a new instance of your object, you'll be able to assign it a segment and target it to that member subset.
For more information on creating custom fields in Salesforce, see Create Custom Fields.
Tools
Access tools by clicking on a Segment detail page. From Tools, you can delete your Segment or manage the Page Settings for the detail page. You can also click View to access the standard detail page for your Segment.
Deleting a Manual SegmentBefore deleting a Manual Segment, you'll first need to delete all of its Member Segments.
Recalculating segments
Option 1 - Recalculating all Segments
From the Program detail page, access Tools by clicking on the button. From Tools, you can select Batch Management. You'll be taken to the Batch Execution page. On this page, scroll down to the row named Assign Segments to Members, click Run.
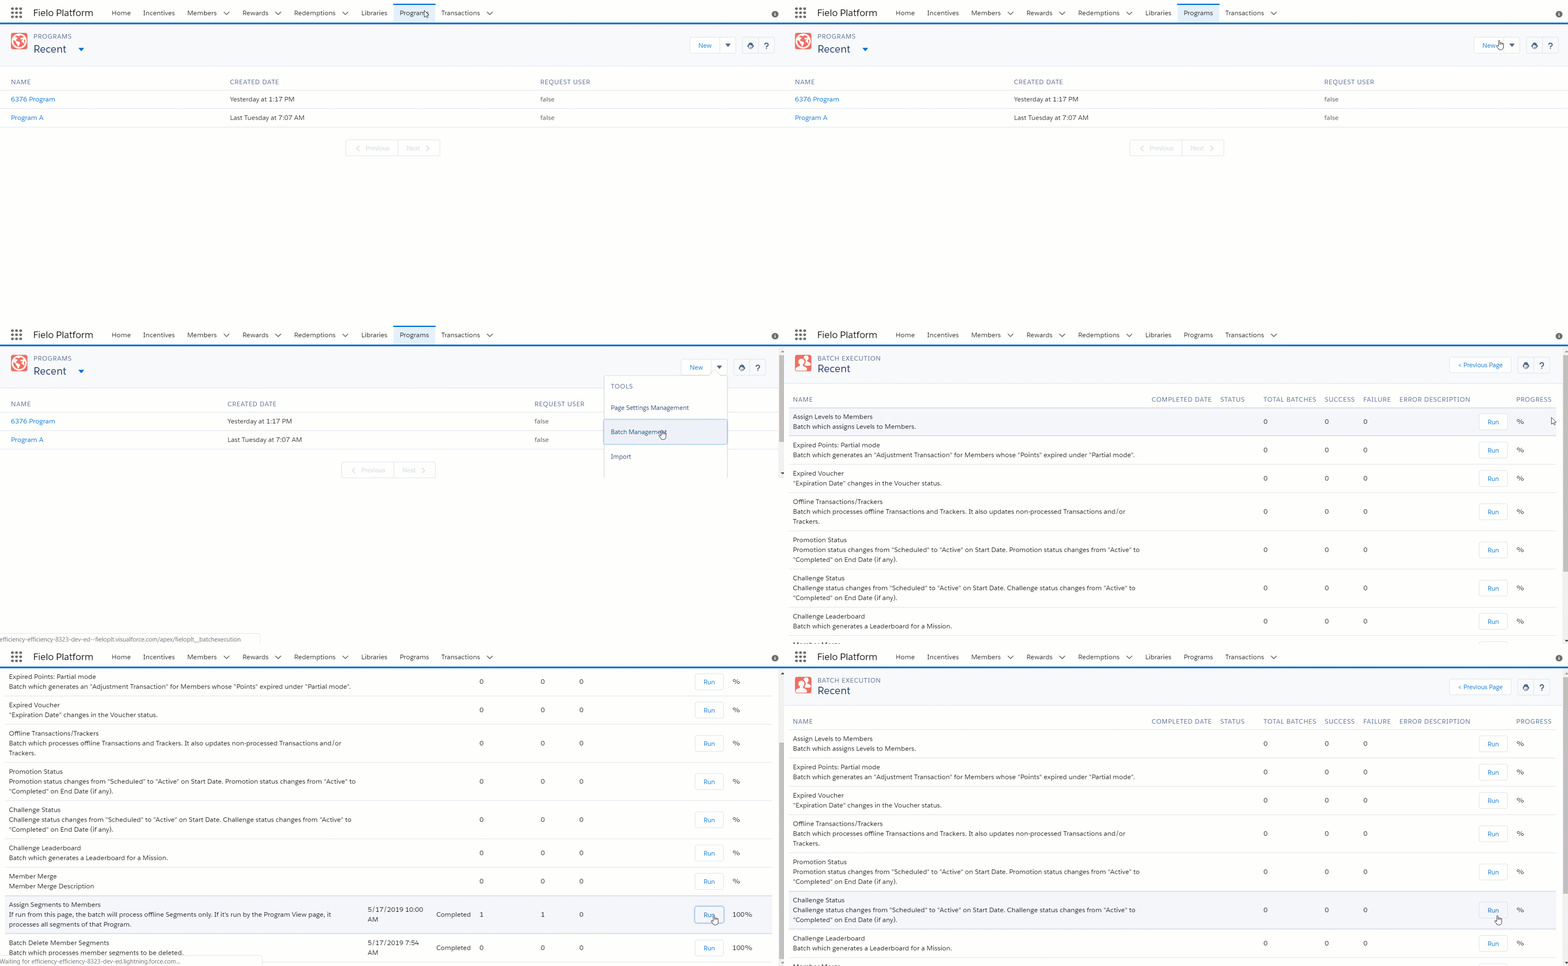
Option 2 - Recalculating a specific segment
From the Program detail page, click on the program you would like to recalculate. Scroll down to Segments and access Tools by clicking on the button. FromTools , you can selectRecalculate . You'll be taken to theBatch Execution* page. On this page, scroll down to the row named Assign Segments to Members, click Run.
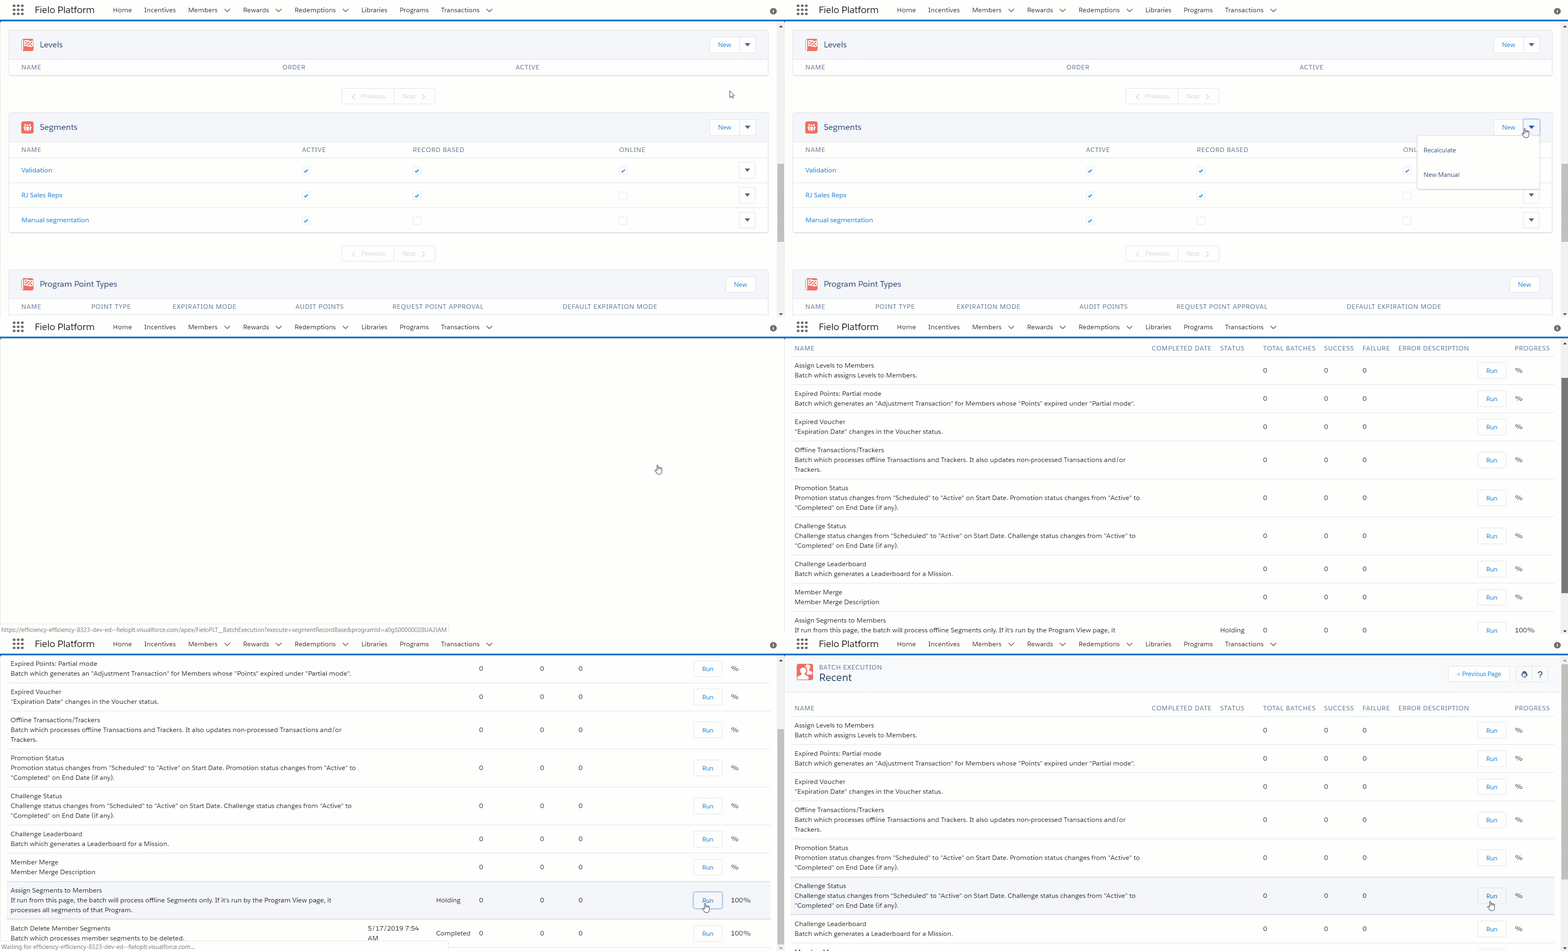
Updated over 1 year ago