
Fielo with REST API Services
FieloPLT v2.167.5
If you plan to use Fielo with Fielo REST API services, follow the steps below.
Before Starting
First thing's first: log into your Salesforce org and make sure that:
- You have system administrator permissions.
- Your org has the Authenticated Website license.
- Your Org has a Domain. Production Orgs created in Salesforce Winter ’21 version and later have a My Domain by default, but if yours doesn't, check how to create it.
1. Install Fielo
Now that you've created a profile for the REST API, you're ready to install Fielo in your org.
-
Click here to access the installation package.
-
Select Install for Admins Only.
-
Click Install. When the installation process is finished, you (or the org admin) will be notified by email.
-
Once Fielo is installed and you have gone through all of the remaining steps in this page, go ahead and configure the Fielo REST API.
2. Launch Fielo Setup
When you receive the notification that the FieloPLT installation is complete, go back to your Org and click on the App Launcher. Look for "Fielo Platform" and click on it.
As soon as you enter Fielo's Home page, the screen will present you the Fielo Setup, which is a tool that allows you to decide whether to do the first few setup steps - mandatory in order for you to be able to start using Fielo - manually, or to let the system do them for you automatically. You just need to wait for a few moments and, then, click on Yes, configure Fielo for me!.
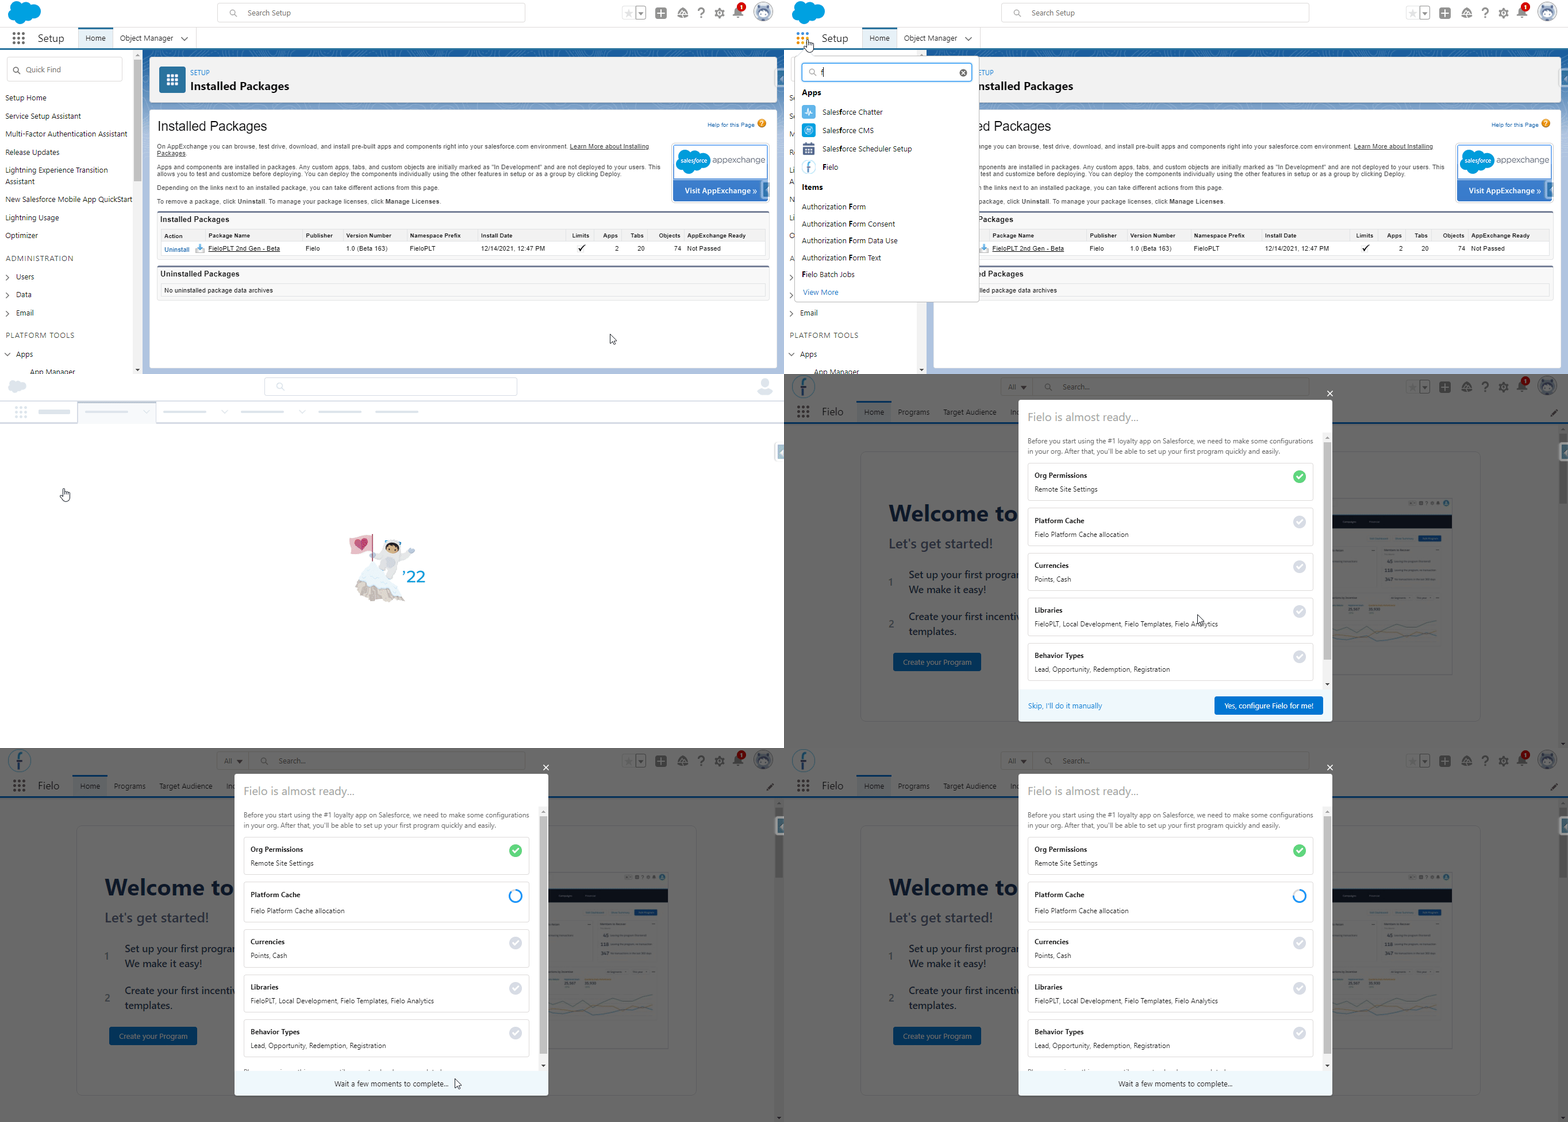
Accessing Fielo for the first time
Going into more detail, you will notice that when you enter the platform, the Fielo Setup displays a spinner on each step. This happens, because it checks if any of the setup steps have already been completed in your Org; after all, you might have already created a remote site or enabled the cache, for example. If that is the case, then the respective checkmark will be green instead of gray and when you run the Fielo Setup, it will skip that step.
Note that if anything from the step is not yet complete, then the step will be gray. For example, if you have already activated 2 libraries, but not all of them.
This is what the Setup does automatically:
- Create a remote site and enable platform cache for Fielo in your Org. The remote site is needed in order to implement any new currencies. As for the cache, it will allocate 3MB to Fielo Settings in order to allow your Org to load the Fielo pages a lot faster. Note that, if you don't have enough available cache, the Setup will do nothing and will still mark this step as complete.
- Create some currencies. By default, only the Points currency comes with Fielo, but the Setup also automatically creates the "Cash" currency - which generates payouts -, as well as activates Funds rewarding if the Org is eligible.
- Activate all of Fielo's libraries, so that you have access to our full feature set.
- Create and activate some behavior types. They will provide you with some out-of-the-box templates that you can use whenever you create your first incentive.
- Along with the behavior types, the Setup also creates everything you need to be able to incentivize members for their registration and redemptions.
When the Fielo Setup completes the process, you can go ahead and click on Done! Start using Fielo.
However, if you already have some experience with Fielo and prefer to not use the Fielo Setup, then you can click on Skip, I'll do it manually.
Enable Libraries
If you do not run Fielo Setup, you'll want to activate our full feature set by enabling the FieloPLT library.
From the Tools tab, make sure that you are in the Libraries section and click Activate next to FieloPLT.
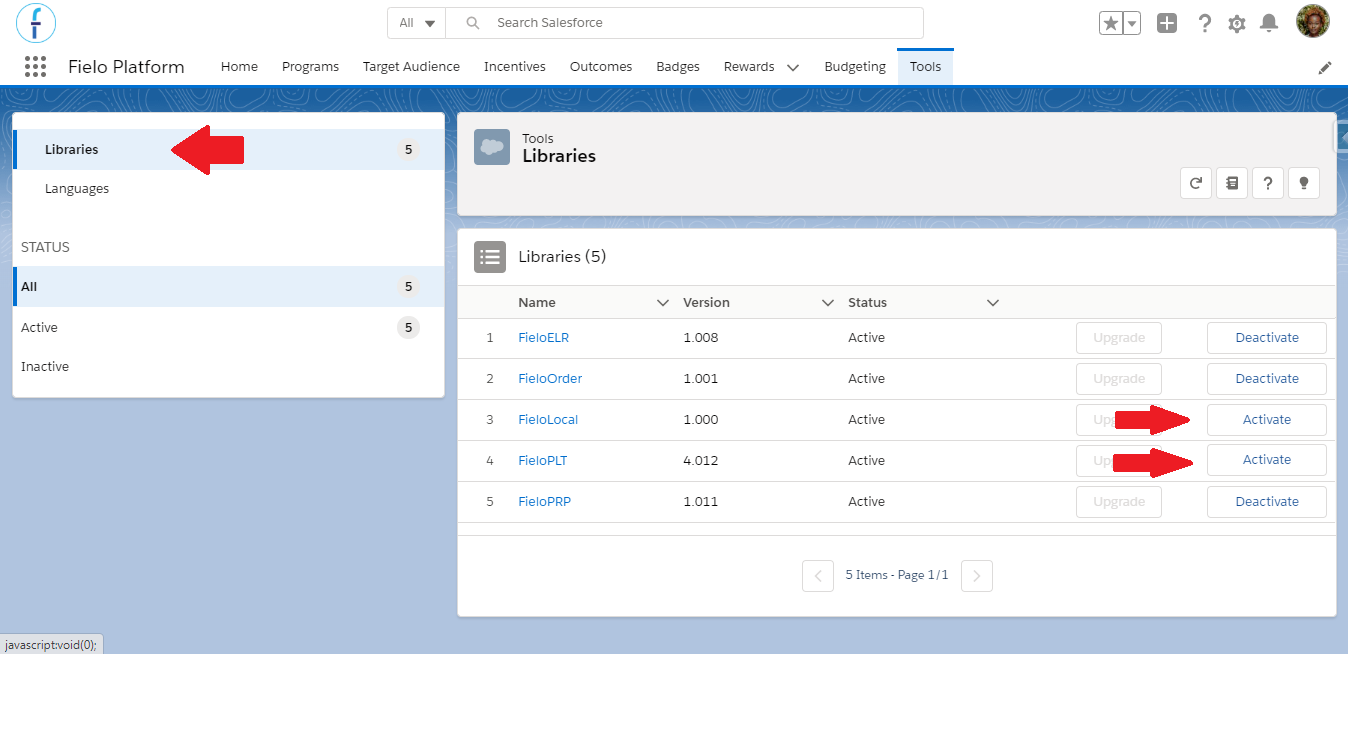
While you're here, go ahead and activate the FieloLocal library, as well. This way, you'll have a place to store any actions, models, or page settings that you create later on.
3. Ensure Email Deliverability
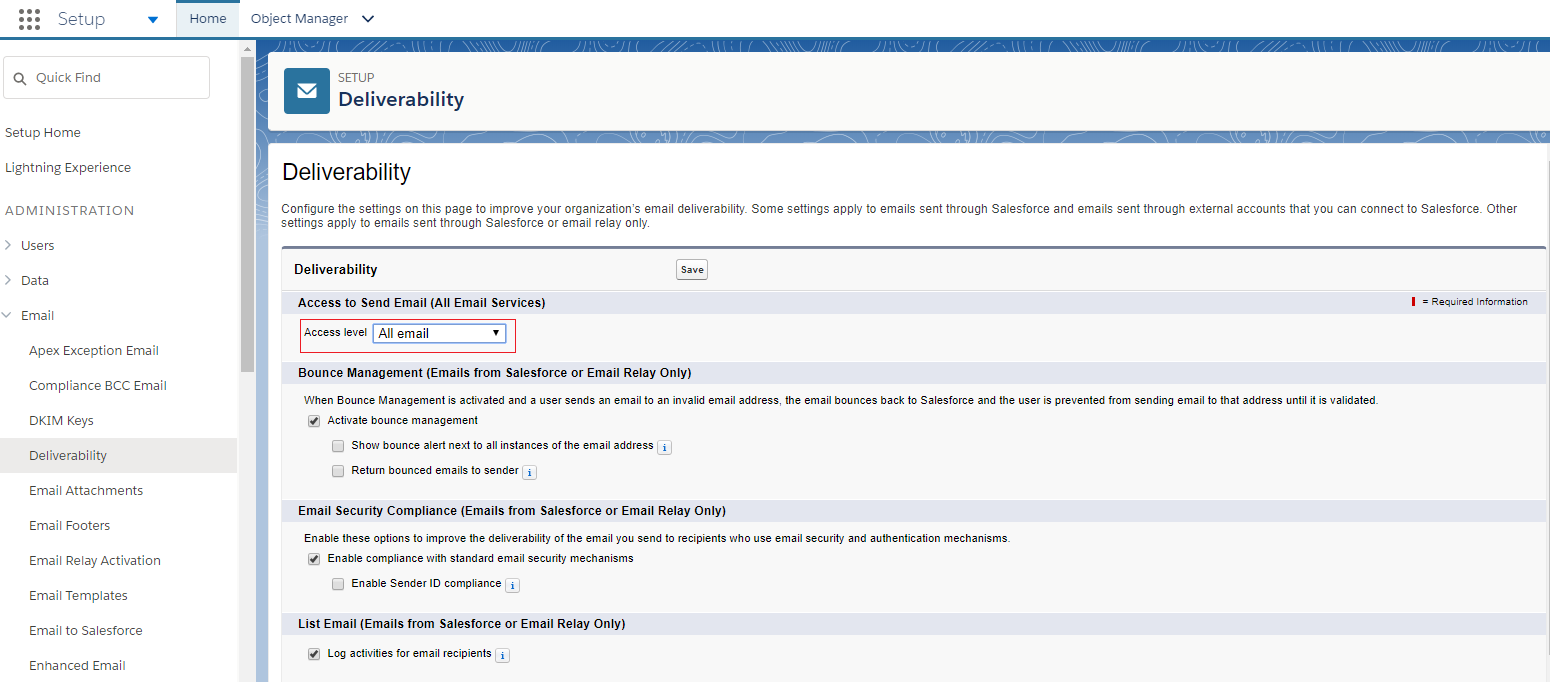
From Salesforce Setup, navigate to Deliverability. Make sure the e-mail access level is set to All email.
4. Assign Permission Set
Still on the Salesforce Setup, go to Permission Sets and click on the permission set labeled Fielo REST.
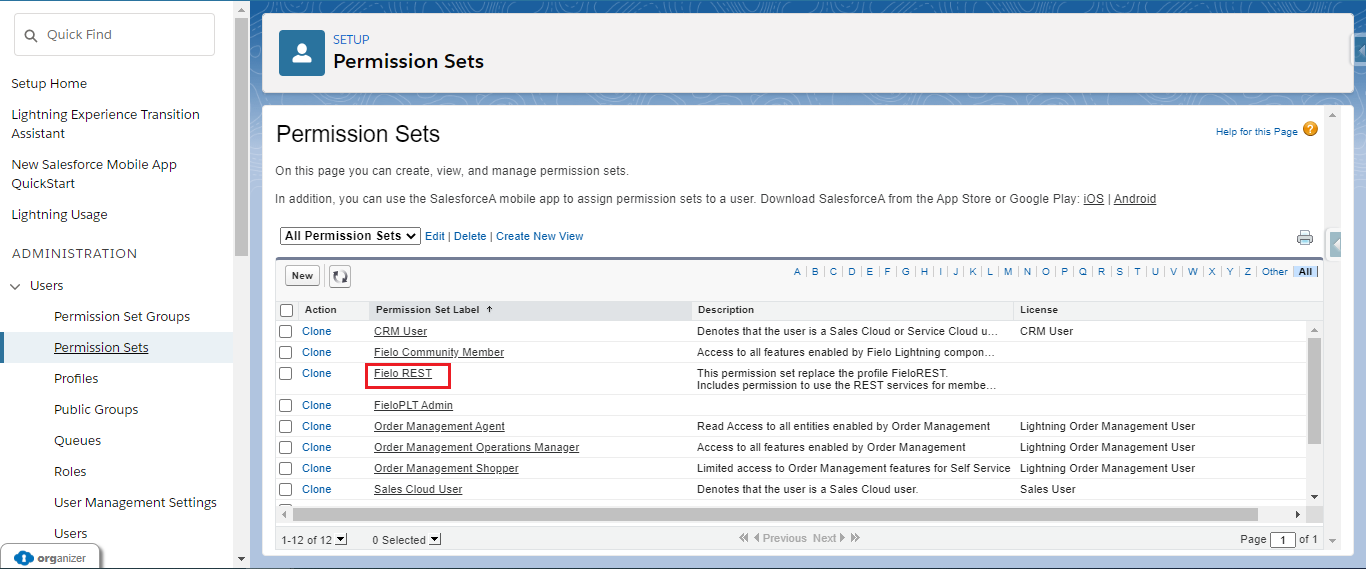
You'll find the button to Manage Assignments on the top of the page. Click it.
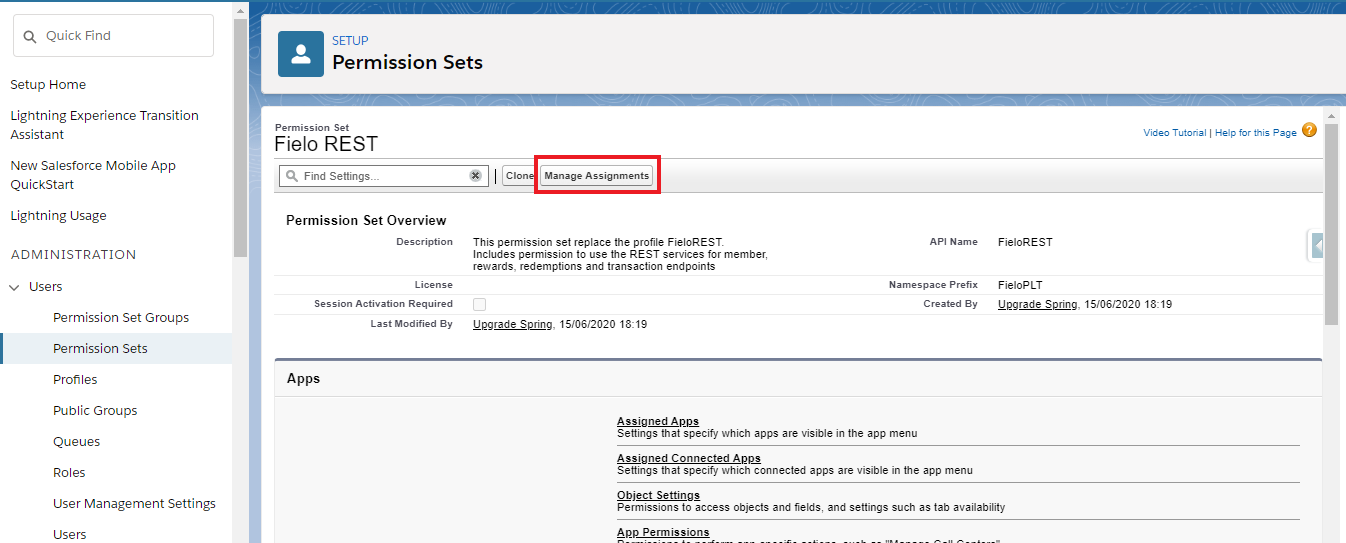
Click on Add Assignments_and select the users who will be using Fielo's REST APIs and click_Assign.
Standard permissionsOther than the Fielo REST, Fielo automatically creates a Permission Set named FieloPLT Admin, which has all the permissions needed to work with Fielo standard objects. Therefore, all users that will work with the platform should have this Permission Set assigned to them.
In case you create your own custom objects to incentivize through Fielo, you'll need to clone the FieloPLT Admin and add the new object(s) permissions to it.
Great job!You're ready to start using Fielo with our REST API.
More Details About Installing Fielo
How long does it take to install?
Our main package, FieloPLT, takes 20 to 25 minutes to install on your org.
What does my org need to have in order for me to be able to install Fielo?
FieloPLT requires at least 3MB of platform cache available to allocate.
What do I need to have in order to use Fielo?
This really depends on how you plan to use Fielo; on which features you are going to use. For example:
- If you want to create a member portal, you will need to enable Digital Experiences.
- If you want to enable our metadata automation (Behaviors, Currencies and Fund Allocation Rewarding), you'll need to configure a remote site.
- If you plan on using Funds as a rewarding type, you'll need to have Partner Lincenses in your Org and Digital Experience enabled.
Updated over 1 year ago