
Create an Incentive
Use our Quickstart Incentive to create your incentives in an easy way
Incentives track member activities related to any custom or standard Salesforce object and reward members whenever the criteria for rewarding have been met — that is, a member has performed the incentivized action(s). Those rewards can be currencies, instant rewards, Funds, badges, or rewards.
After creating a program, as we saw previously, Joan - the channel manager - goes ahead and starts creating incentives for Easytech's Incentive Program.
Remember: EasyTech's goal is to incentivize their resellers to sell more licenses, so they will reward them for the leads qualified and the opportunities that they close. Depending on the license type and the opportunity amount, the reward will vary: it can be an amount of cash or Funds Allocation.
Set up the Incentive
Joan decides that the first incentive that she will create will be to motivate the resellers to close more opportunities related to a specific type of license. This aligns with EasyTech's objective of using each type of license to give different reward types, hopefully helping to create different objectives for the resellers and keeping them interested in selling more of each license.
Not only does Joan need to create the incentive itself, but she must also decide what will be the criteria that the opportunity must accomplish before starting, so she puts together a list:
- Enterprise License
Closed opportunities with an amount of at least $100,000 will get rewarded with 10% of its amount in Funds Allocation. - Professional License
Members who sum $100,000 in opportunity amount over the period of 5 months will be rewarded with 5% of the total amount of all qualifying opportunities in Cash (a currency that generates payout). Only opportunities with an amount of at least $10,000 will qualify. - Standard License
Closed opportunities with an amount of at least $50,000 will be rewarded with 500 Points.
She decides to start with the incentive related to the Professional license.
To create the incentives, Joan accesses the company's Org and then searches for Fielo in Salesforce's App Launcher. She goes to the Home tab and, in the Command Center, she goes to Incentives. There, she clicks on Create an Incentive or on the ➕ sign to open the Quickstart Incentive.
The Quickstart Incentive allows Joan to set up the incentives in a very simple point-and-click fashion and based on a few templates that Fielo offers upon installation.

1. Behavior
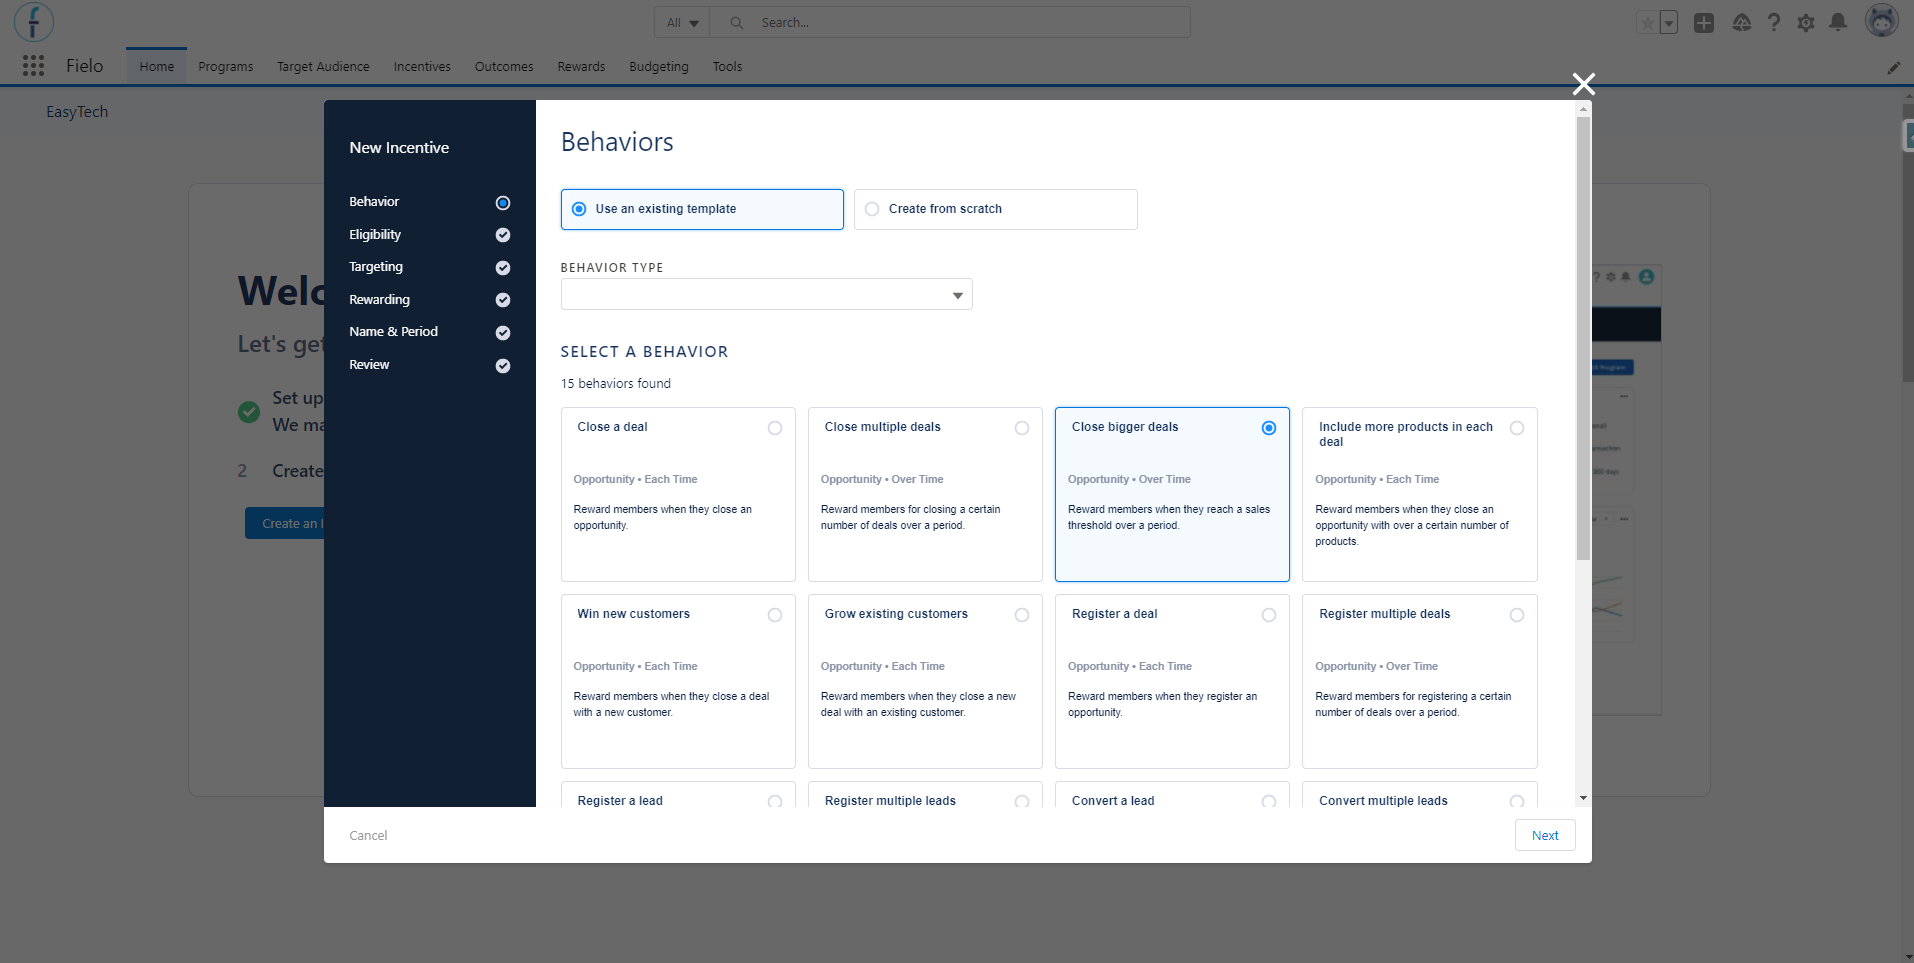
On the first page, Joan must select the behavior type template that she wants to use.
The template is a pre-configured scenario on which Joan can base her incentive, giving her some default options throughout the Quickstart Incentive that she can use or not. They are directly related to the Action(s) created within each behavior type, and it is possible to exist more than one template per behavior type or none at all.
She follows these steps:
-
Clicks on Use an existing template option, so she can select one of the templates that come with Fielo package instead of creating one from scratch.
-
In the Behavior Type filter, she selects Opportunity in order to see only the templates available for the Opportunity object. Note that if there isn't a template for an object, then it will not appear on the picklist.
-
The templates can reward each time that a member performs a behavior or reward over time, taking into consideration several actions that will be evaluated over a period that you will determine. So, Joan selects the "Close bigger deals" template marked as over time.
-
She clicks on Next.
Whenever you click on Next in the Quickstart Incentive, the system saves the configurations defined on that step. However, if you go back to the Behavior step and change the template that you selected before, all data that you might have already set in the other steps will be reset to the new template's default.
2. Eligibility
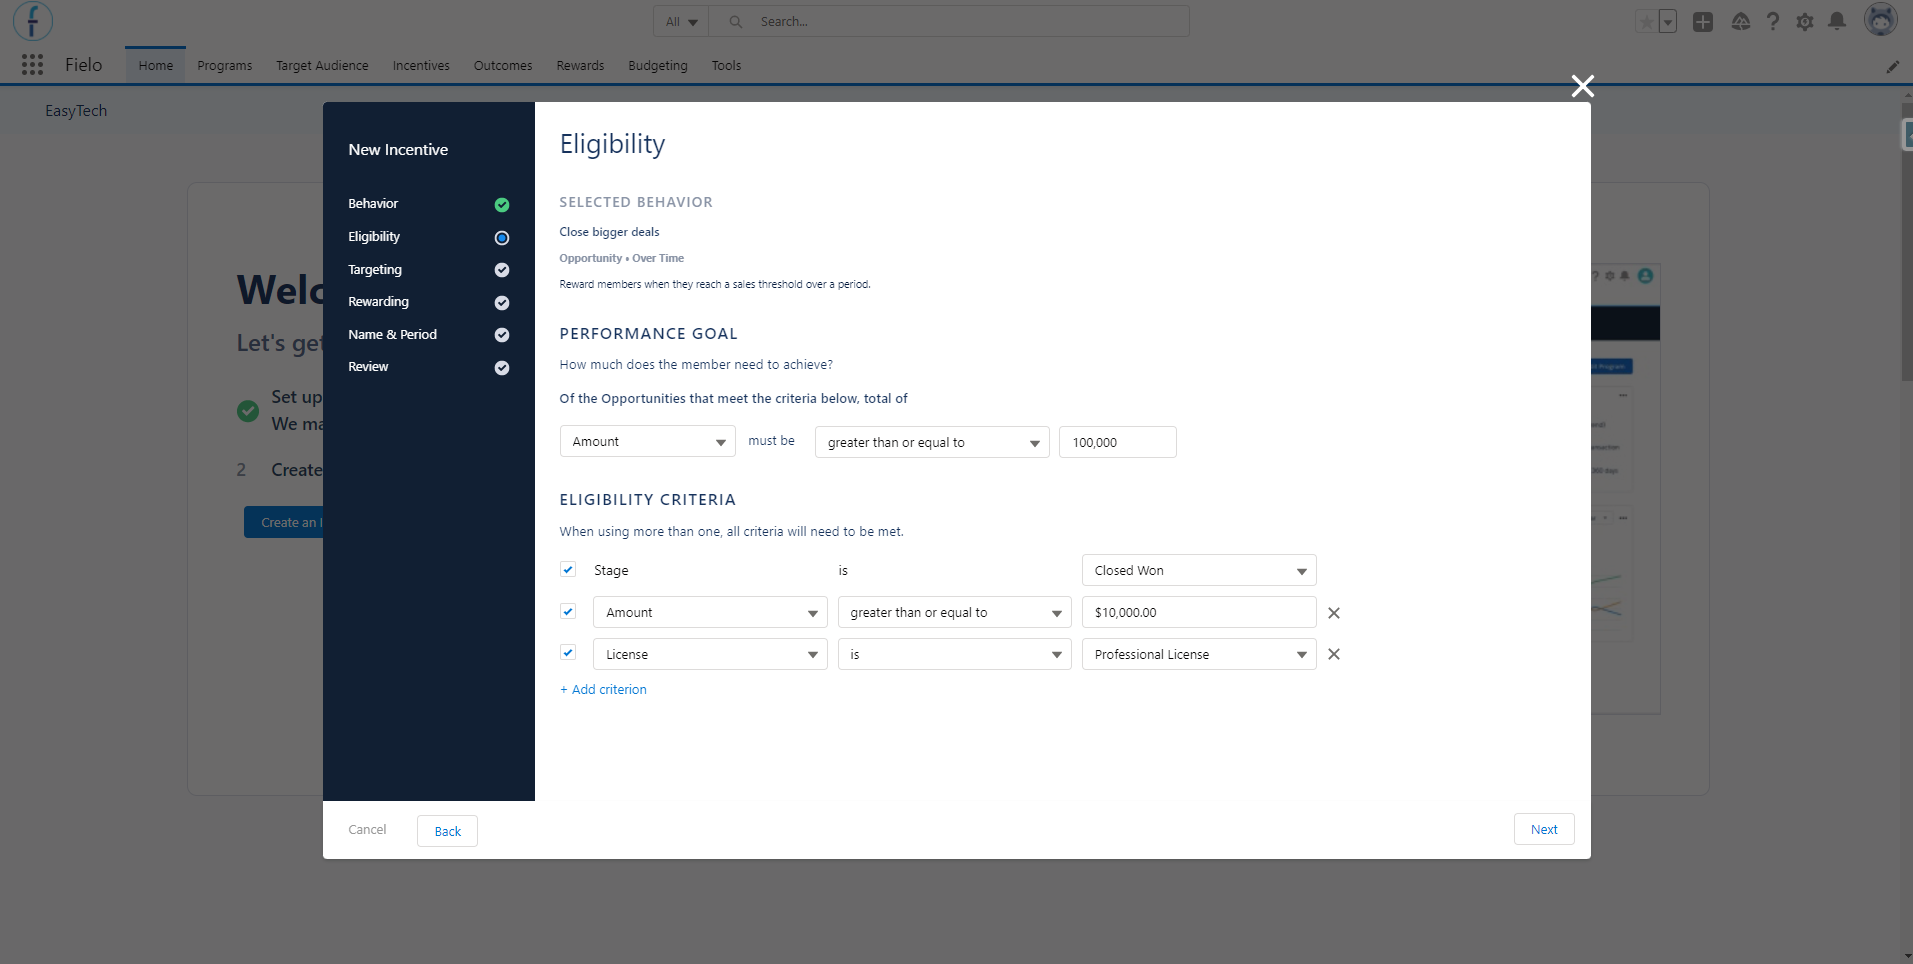
The second page is where Joan will define how to narrow down the behaviors that will be rewarded. The engine will evaluate all the actions the resellers perform and will reward only those that meet the criteria that she will set up here. Other actions, even if related to an opportunity, will not be taken into consideration.
As Joan chose to reward over time, she will also need to define the performance goal in this step. The goal can be related to how many records met the criteria (count) or to the summary of a numerical field from the object being incentivized (sum). Only when the member achieves this goal, will they receive the reward.
Joan follows these steps:
-
Joan leaves the Performance Goal related to the Amount field and using the greater or equal operator, changing the amount to 100,000. If this were an incentive that rewards each time, this step would not be necessary.
-
The template comes with 2 conditions. She edits the second criteria to define that the opportunity Amount must be greater or equal to 10,000.
-
Joan clicks on Add Criterion to add one more condition. She selects the field License which must be Professional License.
It is possible to add up to 9 more conditions, which will be saved in the template whether you leave them checked to be used or not. If you don't wish to save a condition, you can delete it by clicking on X next to it. -
She leaves the conditions checked because she wants the incentive to take the three into account. With this setup, only the resellers' opportunities who accomplish all the conditions selected will be eligible for the incentive.
-
She clicks on Next.
Action conditionSome criteria come by default with the behavior type template, but the first condition is related to the Action itself, which means that Joan you can't delete it or change the field/operator. Only the value will be editable.
If you deselect the Action's condition, the system will process the records only when they are created. It will not, for example, check when the status of an Opportunity changes later on.
3. Targeting
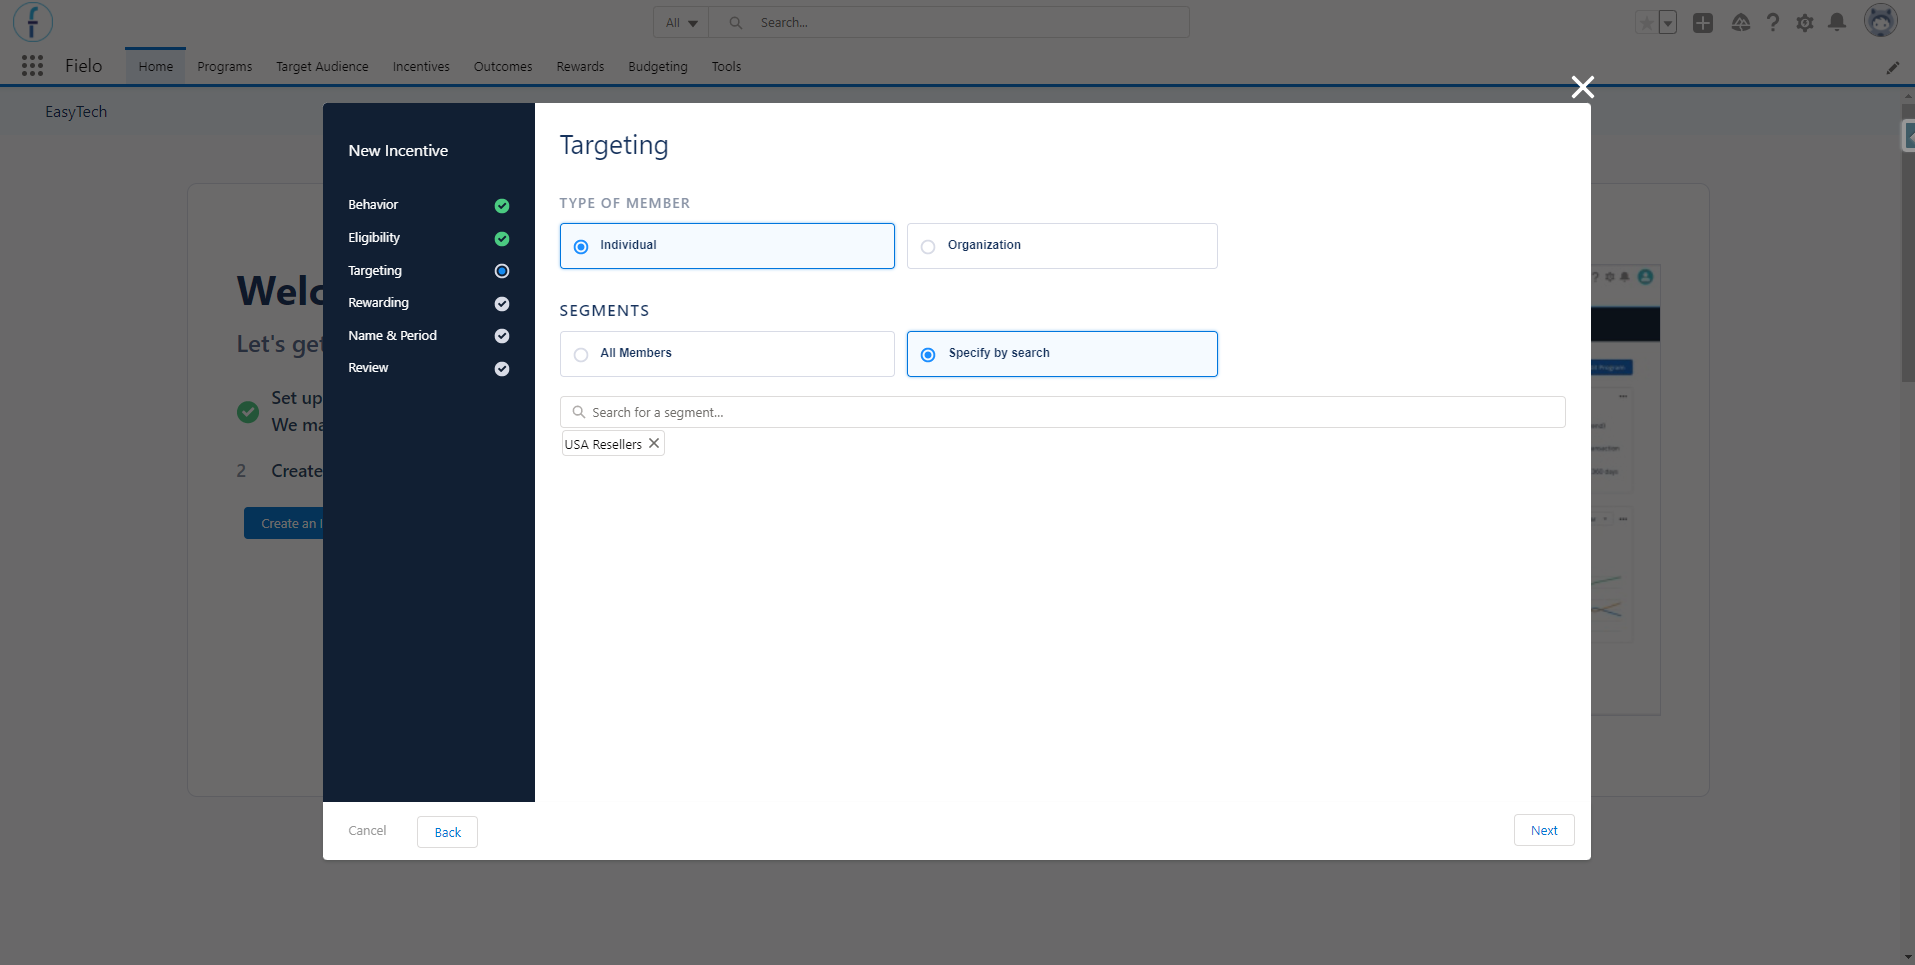
Targeting allows Joan to more effectively target her incentives, by using the segments that she created beforehand so that only the members who are part of the segments selected will be able to participate in the incentive. Since she wants this incentive to be available only for the resellers who are on the USA, she follows these steps:
-
Joan selects the type of member that she wants to target: Individual. If you choose Individual, then any rewards that the incentive gives will go to the member who performs the incentivized action. If you select Organization, the reward will go to the Organization Member to which the member is related.
-
She selects the Specify by search option to look for and select the USA Resellers segment. Note that only Active segments will show up and that, if you choose this option, but do not select any segments, then the incentive will be open to all of the members.
-
She clicks on Next.
Leave the All Members option selected if you don't want to use segments to target the incentives.
4. Rewarding
In this scenario, Joan wants to offer only one reward to the members through this incentive: Cash. However, it is possible to choose more than one reward per incentive, which can be currencies, payouts, instant rewards (prizes such as services, products, experiences, etc.), funds, or badges.
Other than that, as this is an incentive that rewards over time, Joan needs to choose when the reward will be delivered to the member. It can be either as soon as they achieve the performance goal set in the Eligibility step or only when the incentive ends.
To offer the reward that she wants, Joan follows these steps:
-
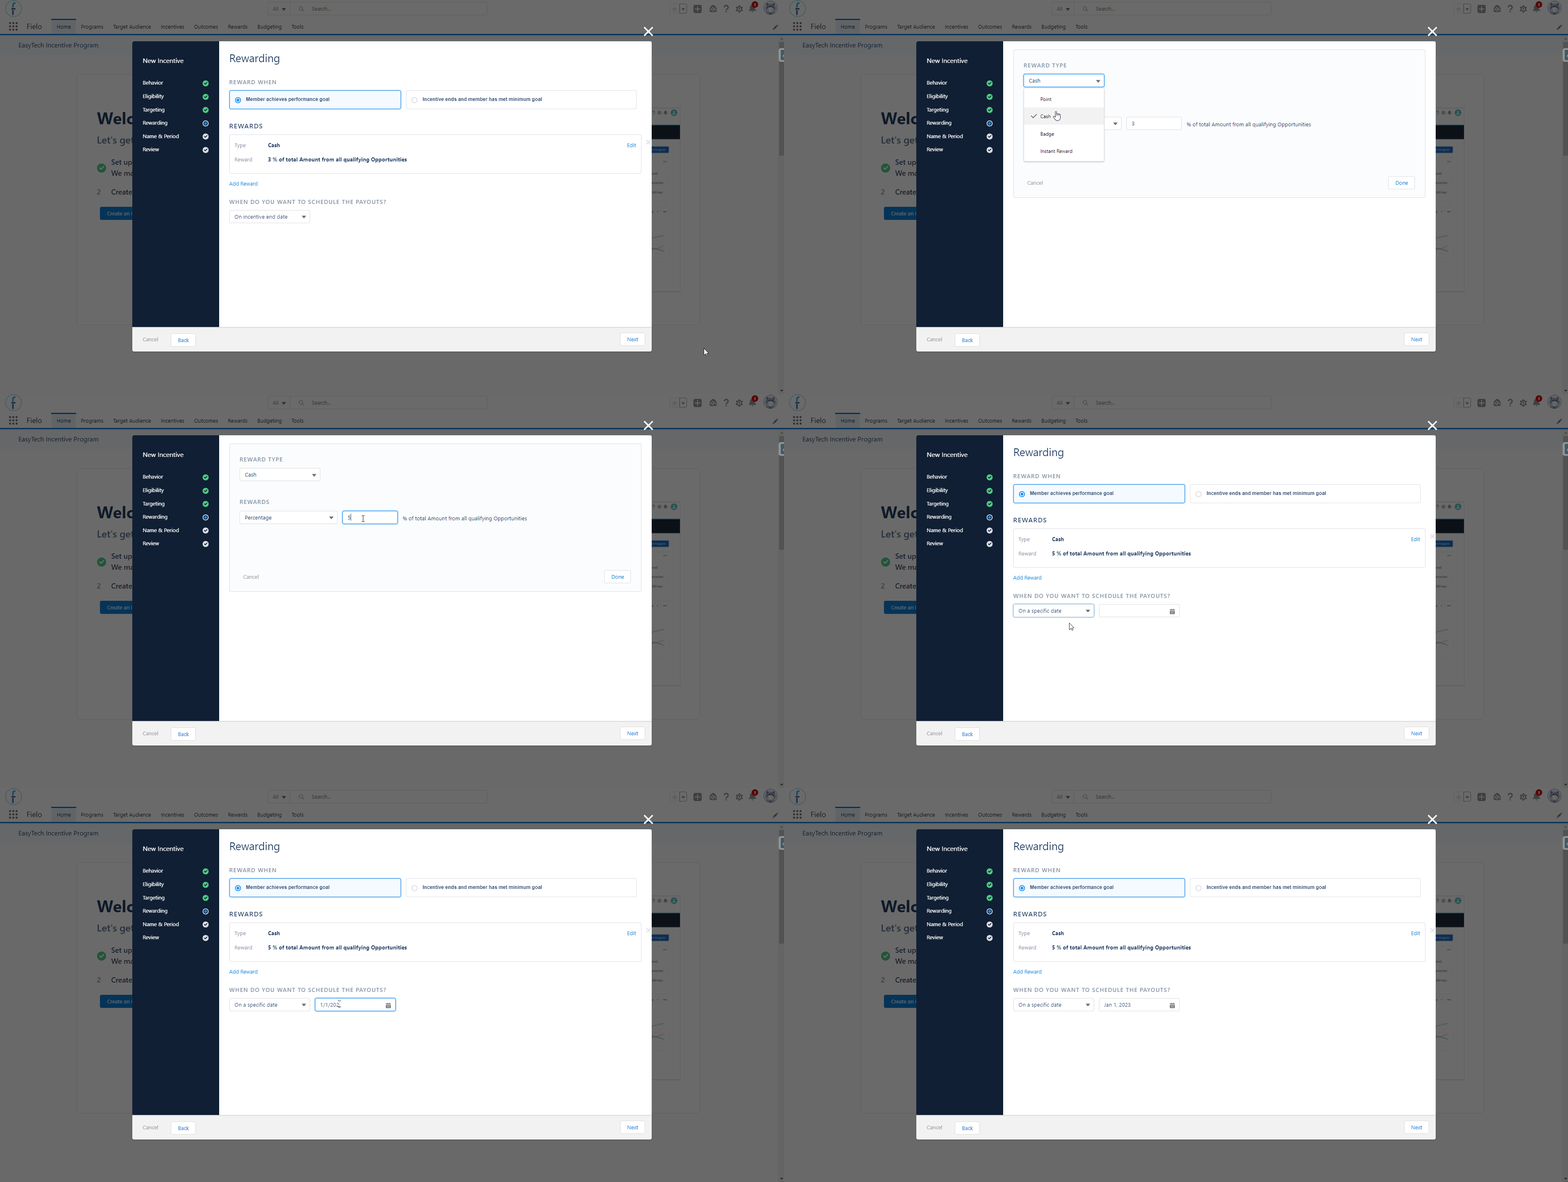
She selects the Member achieves performance goal option under Reward When. Note that, if this was an incentive that rewards each time, this step would not be necessary.
-
She clicks on Edit to edit the reward that comes with the template.
-
She leaves the Reward Type as Cash (a currency that generates payout), the Conversion Mode as Percentage, and the conversion value as 5 (percent). With this setup, she is defining that the members who accomplish the incentive will receive 5% of the qualifying opportunities amount in Cash.
-
For the Payout Date Mode, Joan chooses Specific Date and sets it to January 1st, 2023. This option allows her to set a particular date for the system to process the payout.
Note that, if there were several rewards related to a currency that generates payout, the Payout Date Mode will be the same for all of them. -
(optional) You can also add other rewards by clicking on Add Reward and following the same steps used to edit the reward.
-
She clicks on Next.
Don't forget to choose at least 1 reward for the incentive!
Other reward types
To set up an instant reward or a badge as a reward, you'll use the lookup field to look for them, where only the active instant rewards and badges will show up. Moreover, if you intend to use Funds Allocation, be sure to activate it in your Org before, as well as have a Partner Marketing Budget set up.
Whenever you choose to use a badge or a currency that doesn't generate payout, you'll need to define an expiration date for it. You'll do that by clicking on Set expiration policy after choosing one of these reward types and will define it to be in any number of Days or Months, Annually on on a specific day, or only once on a Specific Date.
By default, the expiration will be Never or what was defined in the program settings.
Also note that, by default, negative rewarding is not allowed. If your use case requires this, contact us.
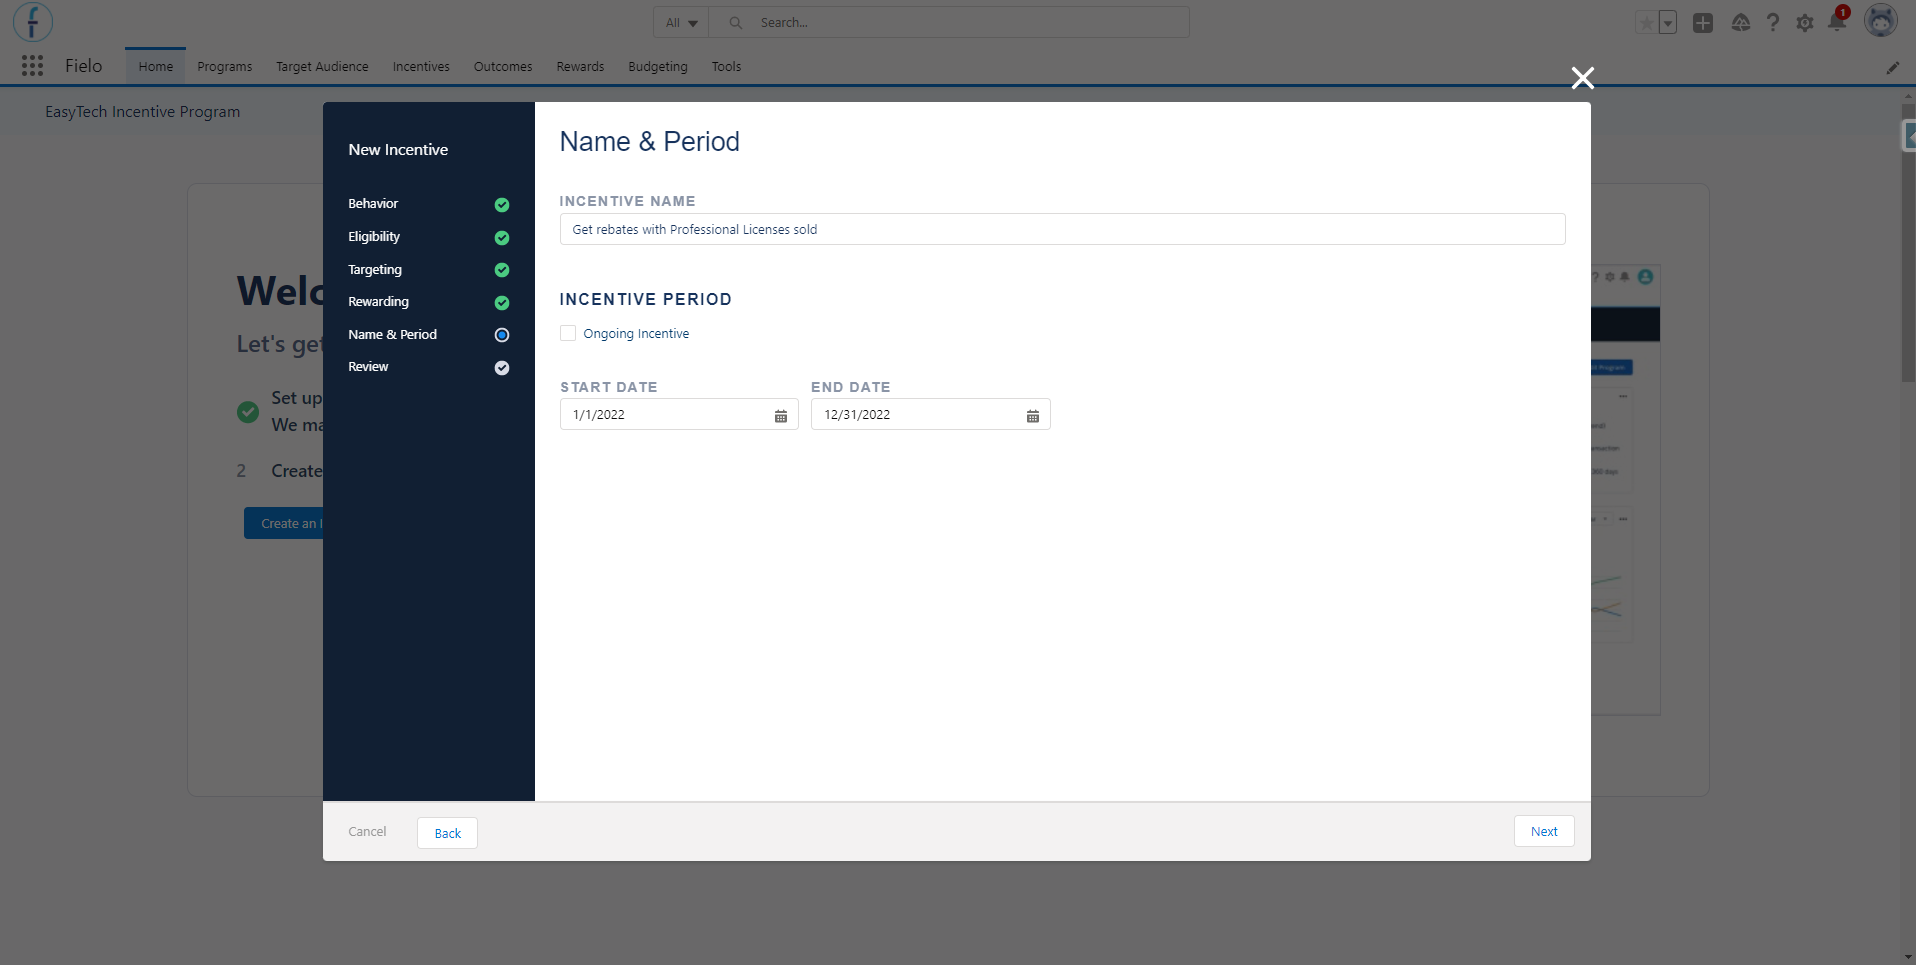
5. Name & Period
This is where Joan will give a name to the Incentive that she is creating and set the period that it will be active.
-
Joan changes the text that comes by default on the Incentive Name field (which is the same name as the template) to "Get rebates with Professional Licenses sold".
-
She also unchecks the Ongoing Incentive option, so that she can set an end date for the Incentive. Next, she changes the start date to January 1st, 2022 and sets December 31st, 2022 as the end date.
-
She clicks on Next.
The Ongoing Incentive option is disabled by default if you chose the Rewarding Time as Incentive ends and member has met minimum goal or the Payout Date was set to On incentive end date. In those cases, you must provide an end date.
6. Review
On the last screen, Joan can review the summary of the configurations done. This way, it is possible to confirm that all the incentive's details are alright: the behavior type selected, the eligibility criteria, the segments that were chosen in targeting, the rewards that the members will receive when they accomplish the incentive, and the incentive's name & period.
Moreover, Joan can go back to any of the previous steps by clicking on their name on the menu on the left in case she needs to correct anything. Note that at any time you can revisit all the steps using the navigation menu and save the incentive from there, as long as you have saved (i.e. clicked on Next) that step before, and don't change the behavior type template.
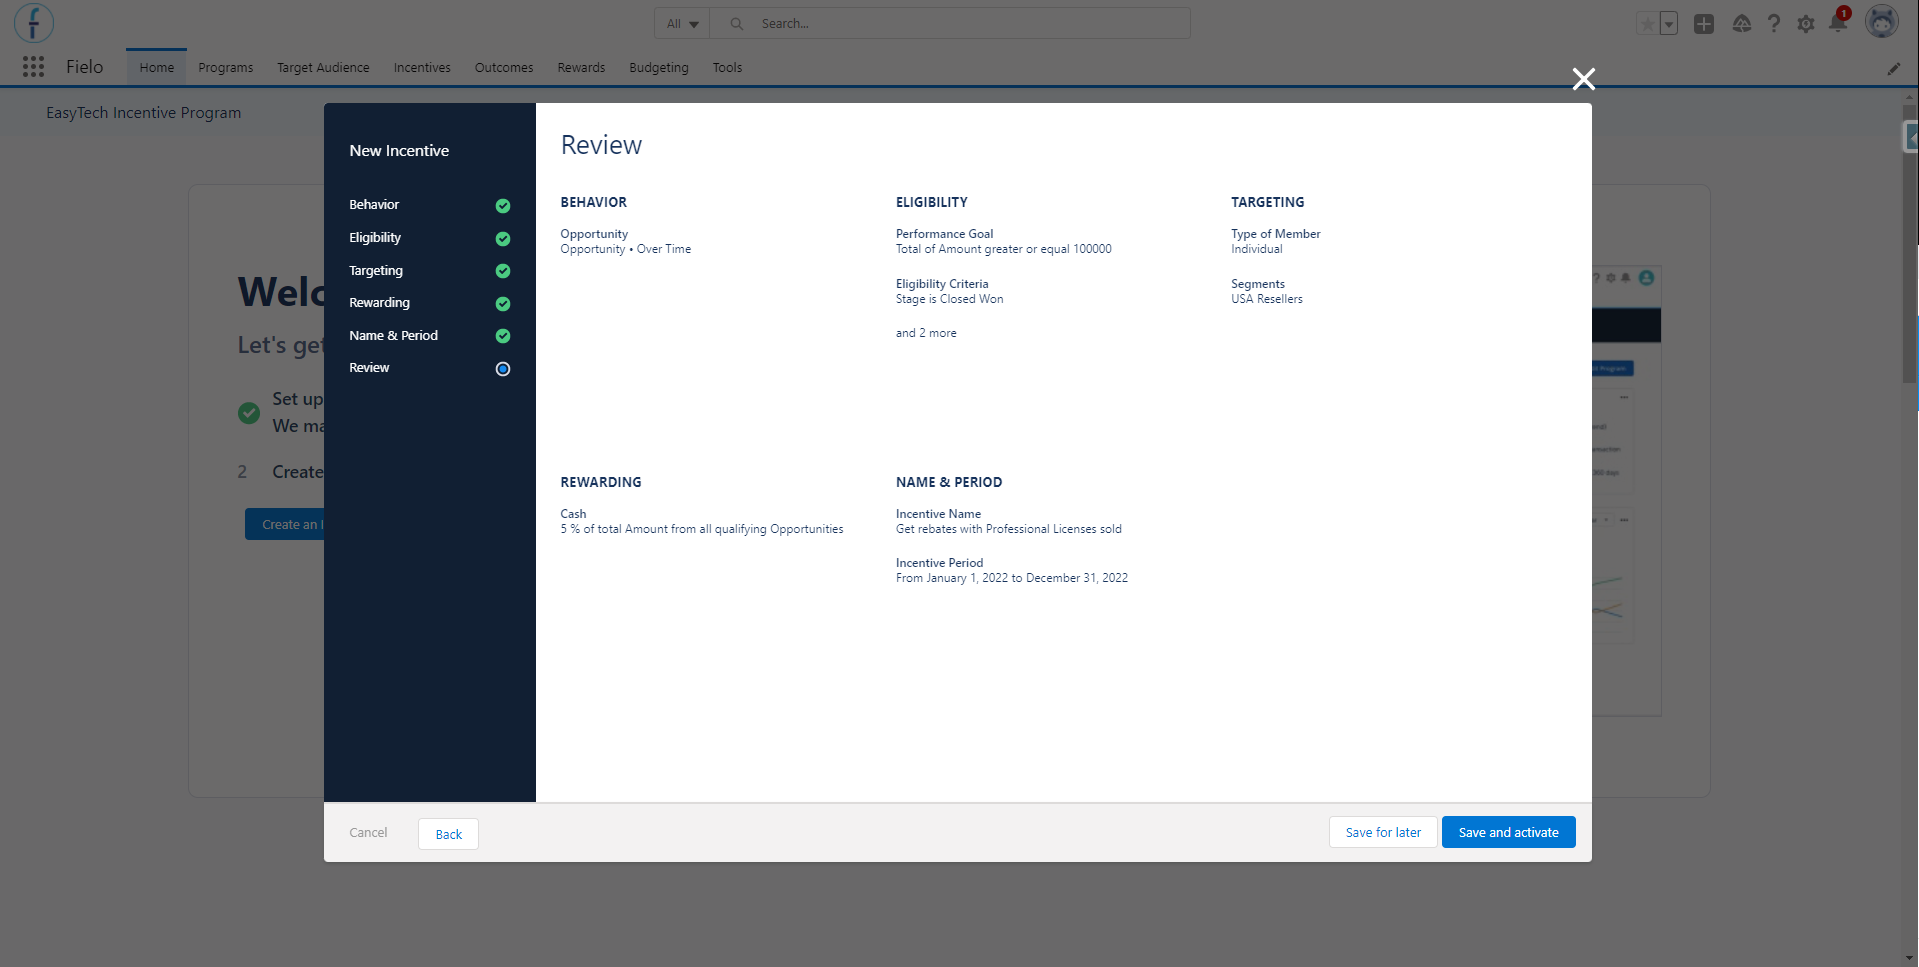
With everything set up and reviewed, Joan clicks on Save and activate so that the incentive goes live (or is scheduled) and starts rewarding members. Otherwise, she could press Save for later to only save the incentive as a draft and activate it later.
As soon as Joan saves the incentive, she sees a modal with two options: Go to Incentive Home and Create another. She clicks on the second option to create other incentives using the Quickstart Incentive, which will cover the other license types that EasyTech sells.
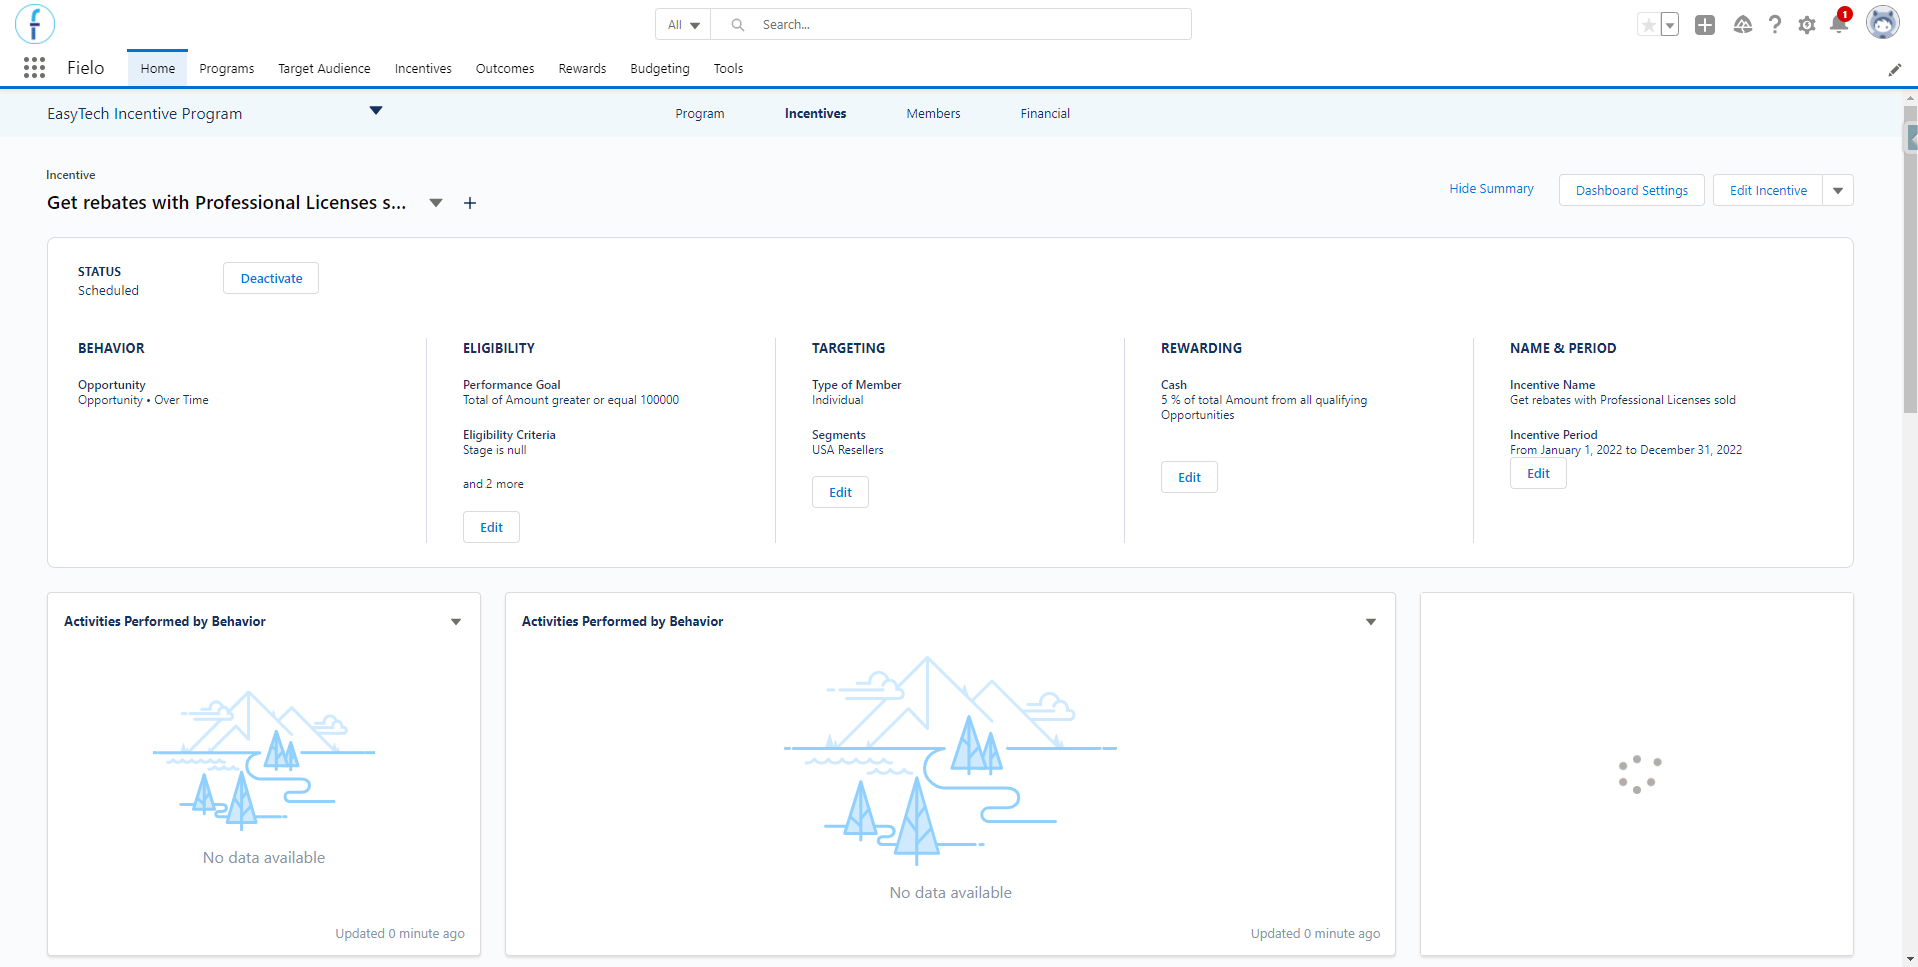
When all the incentives are ready, Joan can check their details using the command center's Summary feature. She just needs to click on Show Summary and it will show the main setup for each incentive and it even allows the admin to perform the following actions from it:
- Activate the incentive if it is a draft or inactive.
- Deactivate the incentive if it is active or scheduled.
- Apply Changes in the incentive if it is edited.
- Edit each of the mandatory steps to create an incentive using the Quickstart Incentive.
Edit Incentives using Quickstart IncentiveYou can change anything in the incentive as long as it is still in Draft.
However, if the incentive has been activated before, you will be unable to change the chosen behavior type template. Instead, you can create a new incentive for the desired behavior.
Create From Scratch
It is also possible to create an incentive through the Quickstart Incentive without using one of the available templates. This will give you the opportunity of creating the incentive the way that you want, without any pre-configured definitions.
For that, on the first page, select the Create from scratch option. Then, in the picklist, choose which behavior type you want to incentivize, which can be Opportunity, Lead, Event, or Fielo Event (which is related to activities such as registration, login, and redemption).
Once you select the behavior type, choose one of the tracking options for it:
- Each Time: reward members every time they perform a behavior.
- Over Time - Number of Times: reward members for performing a behavior a specific number of times.
- Over Time - Total Value: reward members for performing a behavior and reaching a goal. The goal can be any numerical attribute you want to track related to the behavior.
After that, it is only a matter of following the steps previously explained on this page. Define the conditions that the member must meet (Eligibility), select which member type you want to incentivize and the segments that will be able to participate (Targeting), setup the rewards that the members will receive (Rewarding), and define the incentive's name and the period that it will be active (Name & Period).
Add a New Behavior
Once you have created your incentive from scratch, and if you'd like to use it as a base to create another incentive in the future, you can create a new Behavior Type template from it.
Templates can be manually created by saving an existing incentive as a New Behavior. Once you do that, they will appear as an option the next time that you open the Quickstart tool to create an incentive.

Resources
Check out our articles where we have more in-depth information about the Fielo features that were mentioned here:
- Behaviors
- Members
- Promotions
- Challenges
- Rewarding
- Payouts
- Command Center
- Invoicing (FieloPRP)
- Learning (FieloELR)
- Saving an existing incentive as a new behavior
It is not possible to use the Command Center's Summary board with incentives that you created or have already edited before using Fielo's default Incentives feature.
It is also not possible to edit an incentive using the Quickstart if it is not Quickstart Compatible (
FieloPLT__IsQuickstartCompatible__c = false).
Updated over 1 year ago