
Notifications
Notifications let reps know which activities they need to focus on today, including urgent alerts and reminders of upcoming due dates. They can also provide positive reinforcement for a job well done.
Create a Notification
To create a notification, go to the Notifications tab and click New Notification.
Select the activity plan this notification will be used for.
Choose Category & Scope
Next, choose what type of notification you want to build. There are four types:
- Summary: Gives an overall progress report for the selected activity plan.
- Alert: Communicates a sense of urgency using differentiated orange-yellow coloring. Usually used for a milestone that is past due.
- Reminder: Gently reminds the user to pay attention to a milestone, generally because it's close to being due.
- Achievement: Positively reinforces the desired progress within a timeframe. Uses a green-light hue to convey a "let's keep going" attitude.
After choosing the notification type, you can define its scope. Summary notifications are always scoped to the activity plan. The others can be scoped to:
- Activity: Notify when the completion rate or score of a particular activity is above or below a threshold inside a certain date range.
- Account: Notify when the completion rate or score on any of a rep's accounts is above or below a threshold inside a certain date range.
Set Display Criteria
Now, you can define the circumstances under which the notification will be shown to reps.
First, set the period of time over which the notification is relevant. For example, if you have an annual product demo that you expect reps to conclude by end of Q1, you might want the notification to show from March 1st to March 31st.
Next, set the metric by which you'll determine who needs to see the notification. Following our previous example, you could choose to show it as long as less than 100% of the annual demos have been completed. Progress can be measured in the following ways:
- Count: The number of times an activity has been completed, for a given account or activity type, over the life of the plan
- Completion: The percent of expected activities that has been completed, for a given account or activity type, over the life of the plan
- Score: The scoring points that have accumulated, for a given account or activity type, over the life of the plan
Finally, choose the date format that reps will see on the notification:
- Countdown: Within a certain threshold of days (defined on the Notifications component), the rep will be shown how many days are remaining until the end of the notification period (e.g. x days left)
- Due date: The rep will always be shown the notification end date (e.g. Due: 3/31/2023)
Define Content
Lastly, you can include the messaging that you want to be shown on the notification. This includes a title, which can be automatic or of your own choosing, as well as a short message to describe the notification and/or its importance.
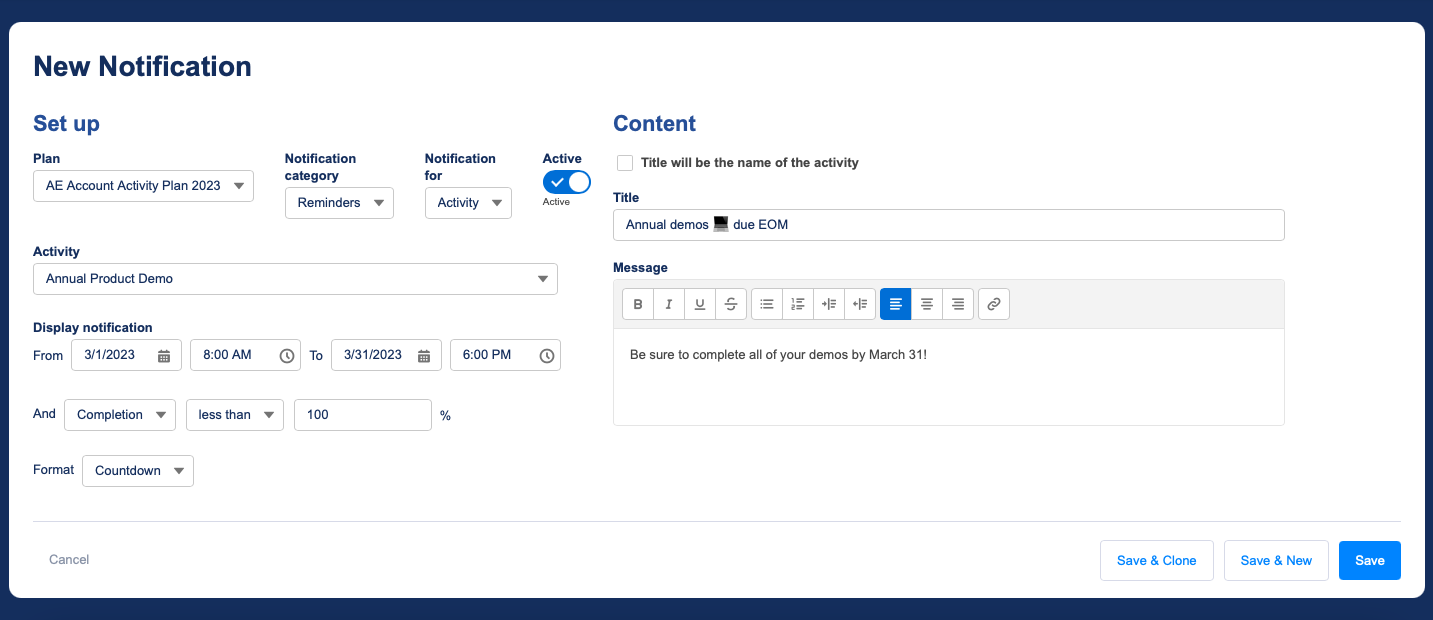
When you're all done, hit Save.
Display Notifications
Now that you've set up all of your notifications, you can surface them to your reps and managers.
Notification Cards is a Lightning Web component that shows notifications in tiles. You can place it on any Lightning page or Experience site page that your reps or managers are used to visiting.
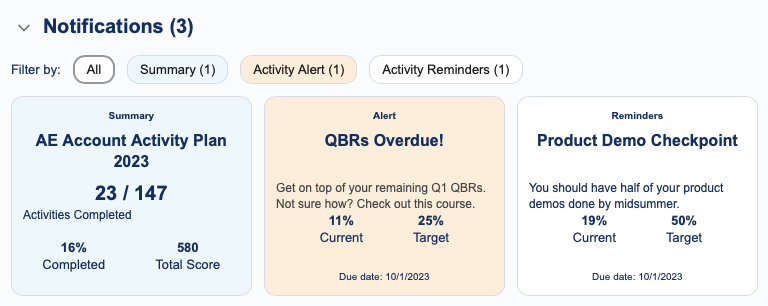
To add it to a page, go to the Lightning App Builder or Experience Builder and open the component menu. Drag and drop FieloRO - Notification Cards onto the desired area, then save or publish.
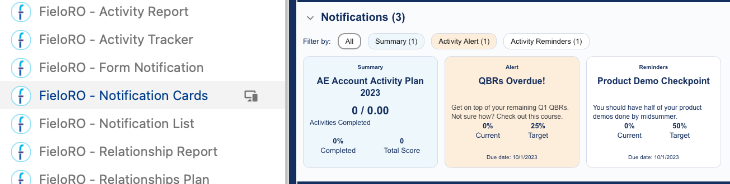
Customize Notification Cards
Once you've dragged and dropped the component onto your page, you can customize how it works using its properties:
- Categories: Choose which notification categories to display using this comma-separated list of categories. For example, on a page meant for sales managers, you may want to show only Account Alerts. Valid categories are
Summary,Activity Alert,Account Alert,Activity Reminders,Account Reminders,Activity AchievementandAccount Achievement. - Page size: Specify the number of tiles to display on initial page load. If there are more tiles to show, the rep/manager will be able to load more.
- Display completed/total activities: Choose whether you want tiles to include the number of completed activities and the total expected number of activities. (The Summary tile will always show this info.)
- Countdown: Enter the number of days before due date that you want tiles to start showing in countdown mode. This will only apply to tiles that use Countdown date formatting. If you leave this blank, tiles will not show dates in countdown mode, regardless of how they were configured.
Updated over 1 year ago