
Create a Program
Use our Quickstart Program Setup to quickly create a new program
The program is what allows you to manage the community of members that you want to incentivize and to create Incentives (i.e. promotions and challenges) that will guide them toward desired behaviors, driving their engagement with your brand. It is also within the program that you will create levels, segments, budgets, rewards, and so on.
From now on, we are going to follow Joan - EasyTech's channel manager - as she sets up the new program. For that, she accesses the company's Org and then searches for Fielo in Salesforce's App Launcher. She goes to the Home tab and clicks on Create your program.
If you already have a program, click on the ➕ sign.

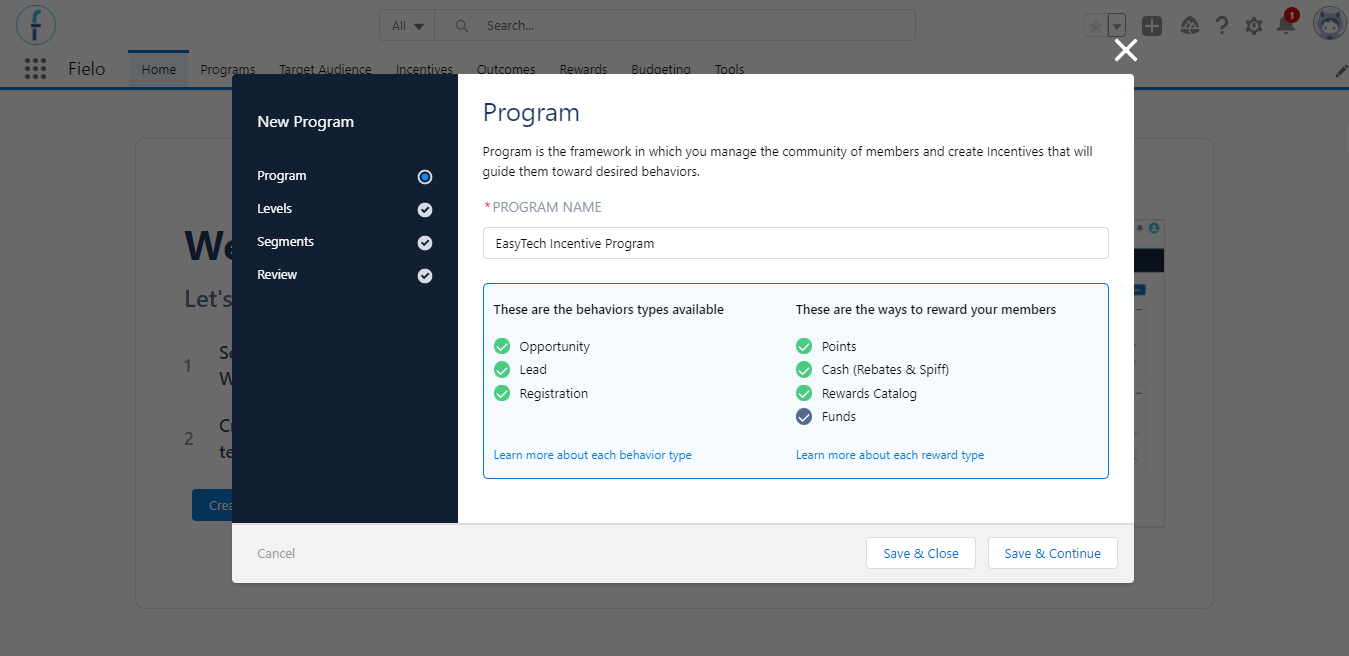
1. Program
On the first page, Joan follows these steps:
-
In Program Name, she enters a name for the program, "EasyTech Incentive Program". Since this will be one of the first things that the new members will see of your program, you should try to use something that reflects the program’s essence.
-
She checks which are the available behavior types for the members to perform. Behavior types track member activities on any Salesforce object (standard or custom) to reward them. The one that she wants to use, Opportunity is highlighted in green, signaling that it is available to be used.
-
She confirms that the rewards that she wants to use, Cash and Funds Allocation, are available too (if not, their checkmark would be gray). Rewards can be:
- Currencies - a cumulative reward type, such as Points or Miles.
- Cash - a type of currency, but one that generates payout.
- Reward catalog - offers a catalog of rewards that the member can redeem.
- Funds - reward members with funds that they can use for marketing purposes. This rewarding will be available only if activated from the Programs tab.
- She clicks on Save & Continue.
If you want to save your progress, make sure to click on Save & Continue or Save & Close. If you click on Back or Cancel, the information will not be saved.
2. Levels
The second page is related to levels. Levels rank members by including them into different groups (e.g. Bronze, Silver, Gold) based on the criteria that you will define. Members can influence their level by engaging with the program and performing incentivized behaviors.
Joan wants to have four levels for the program, so that the resellers can get access to some benefits related to each tier, such as product discounts and quick support. She will create one of the levels, but she will also use the 4 template levels that are based on the number of Points. She follows the steps below:
-
She clicks on Show Level Templates in order to load the templates available. If you don't want to use the templates or levels at all, you can just skip this step. The system will not create the levels.
-
She clicks on Activate all so the default levels will be used in the program.
-
She clicks on New. On the page that will open, she enters a name for the new level, "Platinum".
-
Under Eligibility Criteria, she clicks on Edit to define the number of Points that the member must accumulate to be part of the Platinum level.
-
Joan enters "4,000" on the blank field within the Performance Metrics section and clicks on Done.
Note that levels must always be based on the same object, fields, and performance type - in this scenario, transaction, processed, and the sum of Points. If you change any of them when creating a new level and the Attainment Period is enabled, all the other existing levels will have their object and field automatically changed too.If the Attainment Period is disabled, the changes will be applied only to the current level that you are editing.
-
Back to the New Level page, she writes a custom text that explains the level criteria, "Members become Gold level when accumulating more than 4,000 points.". This is a way to make it easier for you and the members to understand the details of what needs to be accomplished to receive the level.
-
Joan doesn't want to use this level in other programs, so she leaves Save this level to use on other programs unchecked .
This means that this level will not appear as a template when she creates another program later. As with the default levels, you can activate, edit, and/or delete level templates when creating another program. -
She makes sure that the level is active so that it will be used in the program and, then, clicks on Save.
-
Back to the Levels page, Joan uses the drag & drop system to reorder the levels. Since the Platinum is the hardest to achieve, it will be the first. The last will be Bronze, the easiest to achieve.
-
Joan goes to the Settings tab. There, she enables the Attainment Period, chooses to Re-evaluate the levels with current criteria and sets the period to be 6 months.
Note that if you have any levels that were created previously through the default Fielo platform, you won't be able to enable the Attainment Period. -
She clicks on Save & Continue.
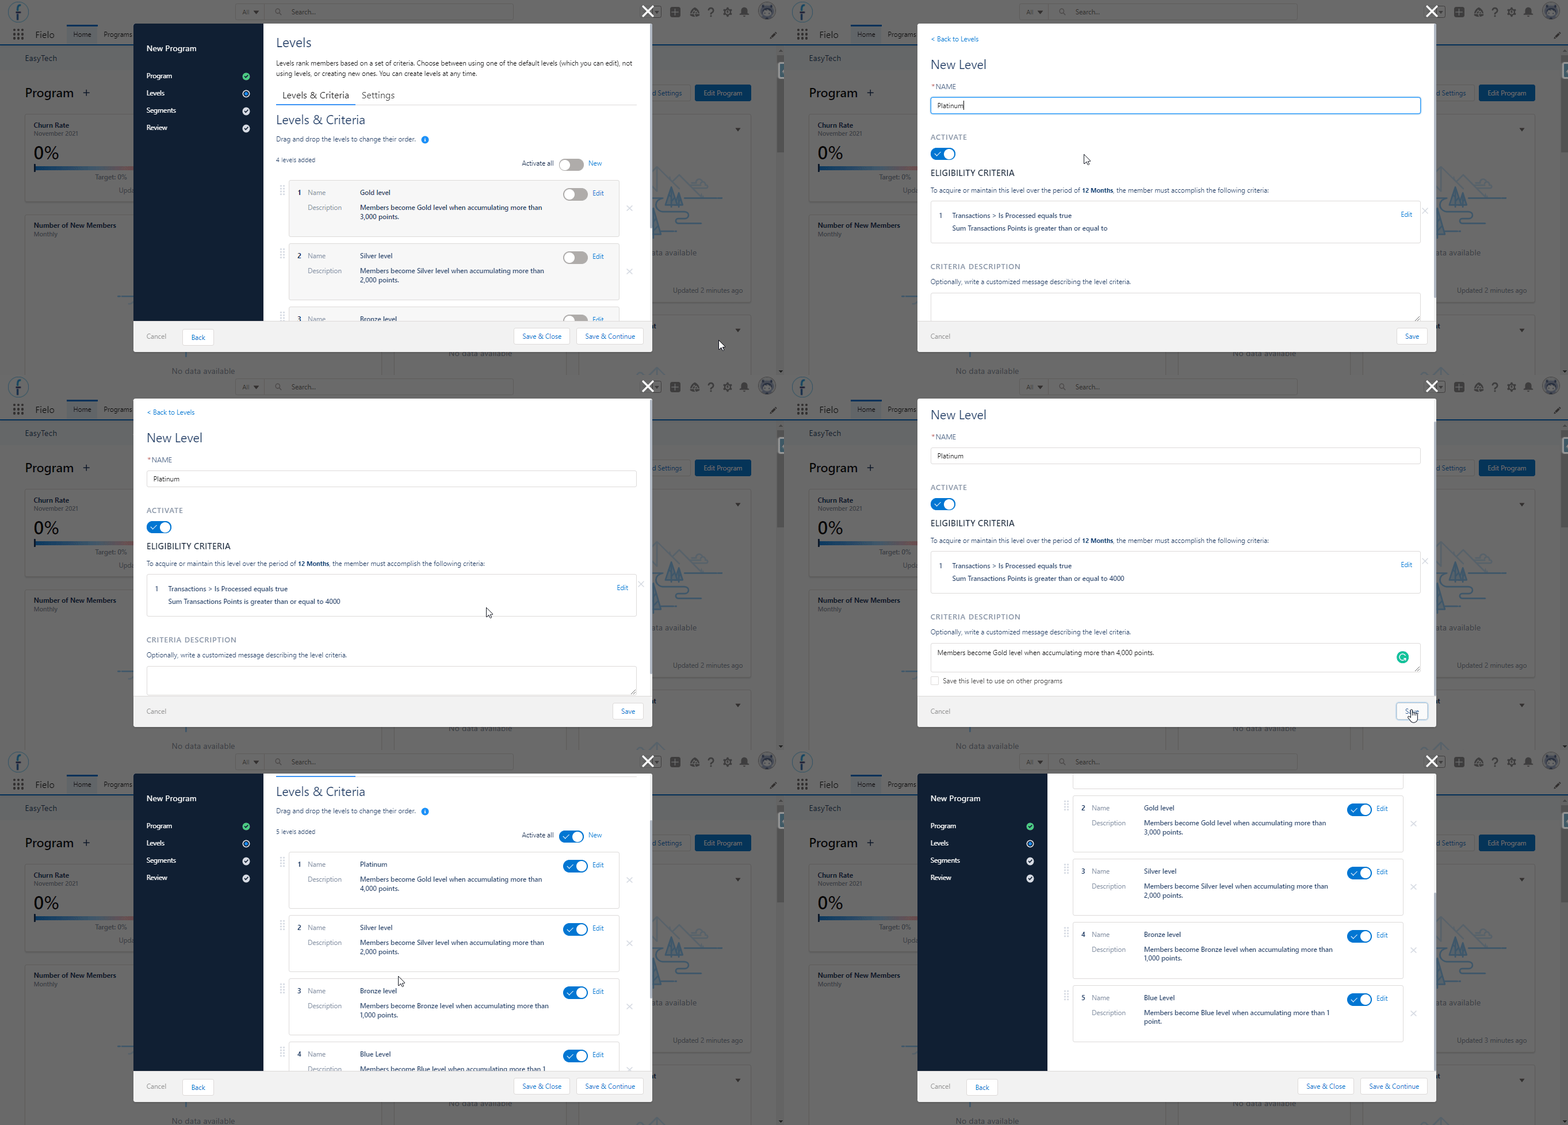
Level SettingsThe attainment period that you define in Settings means that - in this example - all the transactions older than 6 months will not be taken into account for the level evaluation. After this time has passed, the member can be demoted or maintain the level that they have, depending on the transactions that were created within the last 6 months.
Alternatively, the member can be automatically demoted to the level below in the hierarchy to their current level after the period ends. Check the Levels documentation for more details on this.
If you created one of the levels using the default Fielo platform, they will show up highlighted in the wizard.However, some of those levels might allow you to edit them through the Quickstart Program Setup. To be able to perform this action, click on Advanced Edit next to it or go to the Outcomes tab and edit the level(s) from there.
3. Segments
The third step allows the admin to create one or more segments to be used in the program. Segments are identifiable characteristics shared among a group of members based on their behavioral, demographic, profile-level information, and the activity performed within the program (e.g. gender, location, last transaction created, etc.). They make it possible to target incentives and rewards more effectively.
The Wizard brings several segments out-of-the-box, which you can activate to use in your program, edit, delete or leave inactive to just save them. These segments are divided into 6 categories that can be used in order to filter them: region, levels, activating members, bonding members, recovering members, and others. To be able to see them, click on Show Segment Templates.
Note that if the system checks that there aren't any segment templates available (i.e. the FieloTemplates library wasn't activated), the Show Segment Templates button will not appear. Moreover, if there are any segments that you created previously through the default Fielo platform, they will appear highlighted on the list.
Joan wants to create a segment that will reunite the members who are from the Bronze level and are located in the USA. For that, she:
-
Clicks on New. The name will be "USA Resellers".
-
Under Category, Joan selects Others so that the new segment will be part of this group.
-
Under Eligibility Criteria, she clicks on Add Condition.
-
Joan selects Based on member information, the field Level (Member Level > Level) with the operator is, and value "Bronze". She clicks on Done and goes back to the New Segment page, from where she adds another condition based on the Billing Country field (Account > Billing Country) with the operator is and value "USA".
-
When she finishes the configuration, Joan clicks on Done and goes back to the New Segment page, where she defines that the member must accomplish ALL conditions to receive the segment.
The other options would allow the member to receive the segment if ANY condition is accomplished or if a formula related to the conditions is met (e.g.((1 AND 2) OR 3)). -
Since this segment must be tracked by the analytics (i.e. its data will be taken into account by the Program's KPIs), Joan checks the option Enable for Analytics and Integration.
-
Joan wants to make this segment available for other programs, so she checks Save this level to use on other programs.
This means that this segment will appear as a template when she creates another program later. As with the default segments, you can activate, edit, and/or delete segment templates when creating another program. -
Joan clicks on Save.
-
Back to the Segments step in the wizard, Joan checks that the segment is active and clicks on Save & Continue.
Based on Member ActivityAlternatively:
4.1. Choose based on member activity to be able to measure the members' performance based on an object (e.g. they need to sum at least $100,000 worth of opportunities).
4.2. If you choose a Date/Time field for the condition, you can set it to compare with a relative value. If so, you'll be able to specify a rolling period in which the member must have performed an action (e.g. created a transaction in the last 30 days).
4.3. If you add more than 1 condition, choose how they will be evaluated as a whole. The members might need to meet ALL conditions, ANY, or a formula that you will specify.
4.4. In Performance Metric, define if you want to Sum a numerical field or Count the number of records that have accomplished the condition. If Sum, select which field from the target object you want to be summarized.
4.5. Enter the value that the member must obtain. When finished, click on Done.
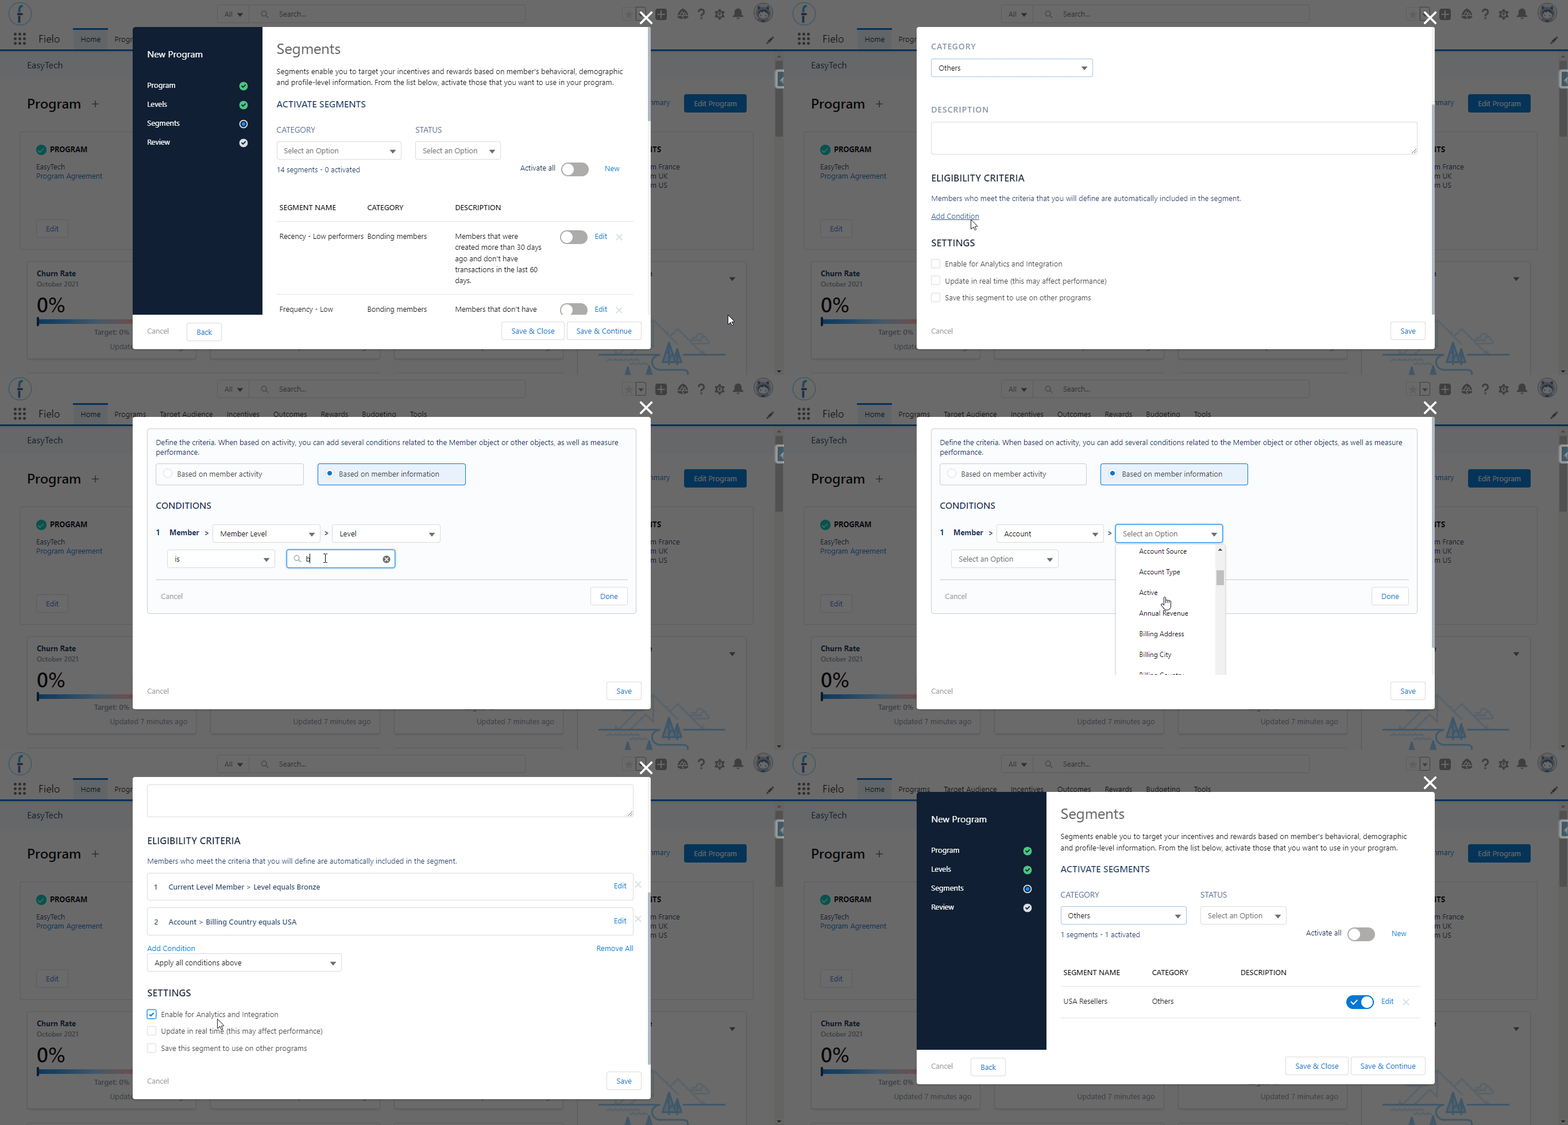
Enable for analytics exceptionSegments based on the member's activity or that have conditions based on a related list cannot be both updated in real-time and enabled for analytics. You must choose between one of those options.
If you created one of the segments using the default Fielo platform and it has a condition based on a dynamic field, it will be highlighted and you will not be able to edit this specific condition through the Quickstart Program Setup. For that, click on Advanced Edit next to it or go to the Target Audience tab and edit the segment condition(s) from there.
Note that you will still be able to edit the other conditions and the segment's name, description, and category through the Program Setup.
4. Review & Save
Joan is almost finished creating the program! On the Review page, she can check all the setup she did for the program: its name, behavior types available, reward types available, levels created, and segments.
If anything is wrong, Joan can go back to the page related to that information by clicking on its title on the menu on the wizard's left side or, if there are more than 7 items per section, click on the link provided.
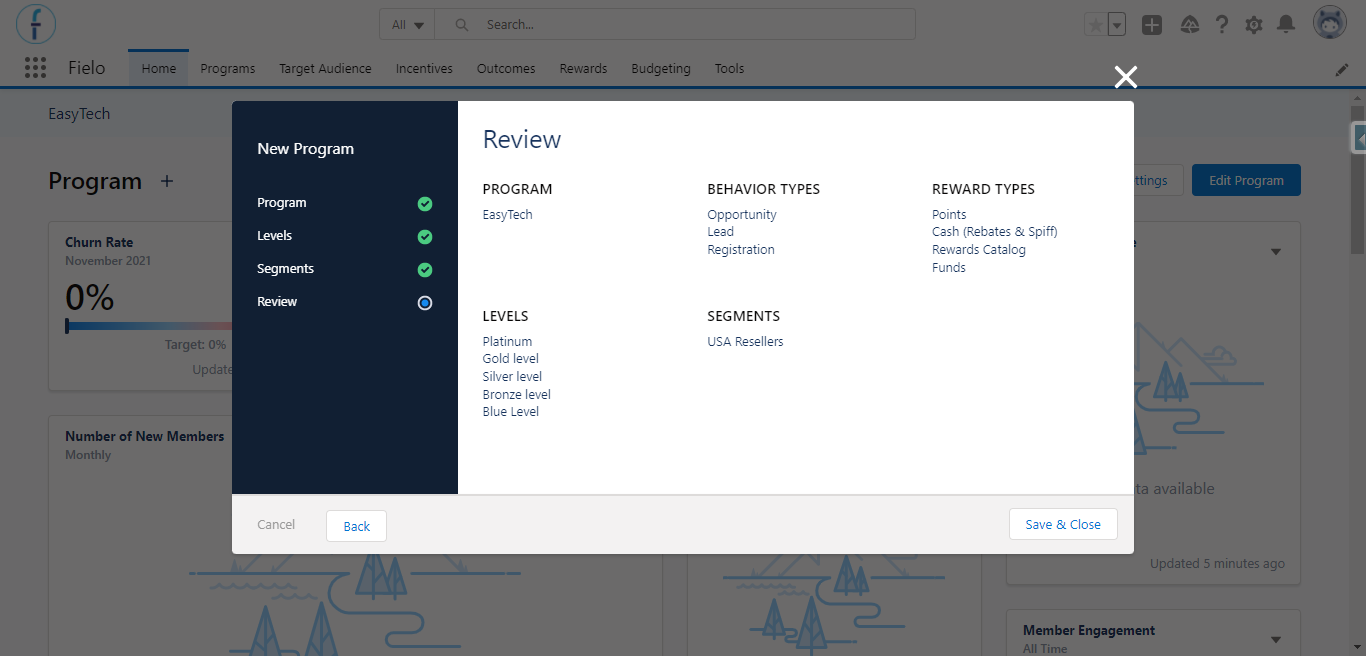
Joan takes a look at everything and confirms that the program is good to go. She clicks on Save & Close and it's done; the program is created!
She can also review all the program details within the Command Center, by clicking on the Show Summary button. The board will even mark with a gray check the steps that were not saved from the Wizard, if any.
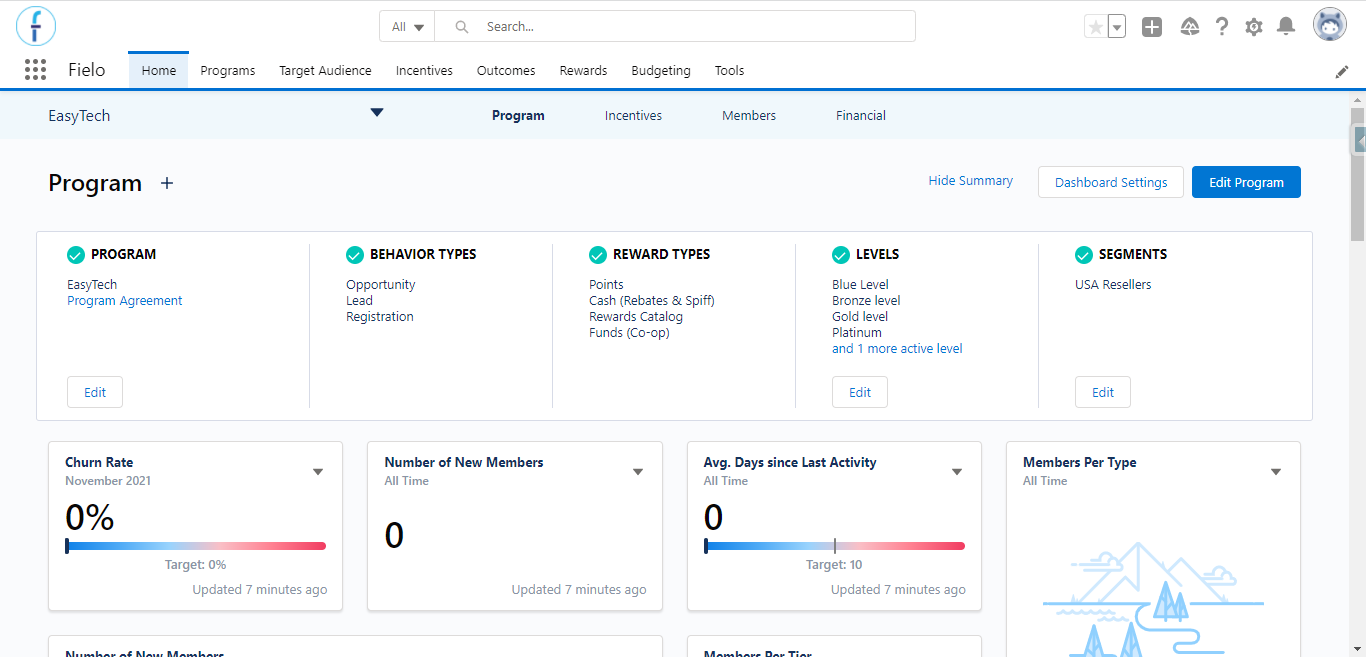
However, before going live, the program will need a few additional configurations... Such as incentives. Take a look at Create an Incentive and learn how to use the Incentive Quickstart to create your incentives.
Multi-Program Platform
Fielo is a Multi-Program platform, which means that it can handle more than one program at a time. So, if EasyTech wanted to have two programs, one for distributors and another for the resellers, they could. It’s a great way of managing members, incentives, and Salesforce Sites - other than analyzing statistics - better.
In a high level, this allows you to:
- Create different programs for different geographical areas, such as states or countries, or for different brands or product lines within your company.
- Build different loyalty portals for your different programs.
- Set up different incentives for your different programs.
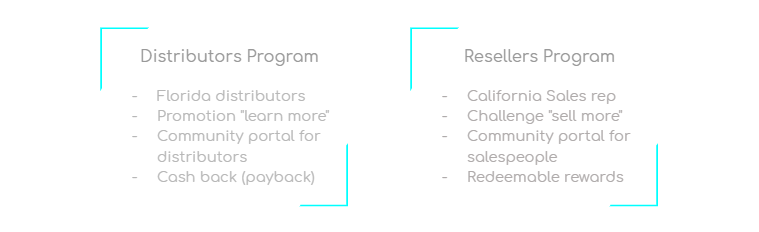
That’s awesome, isn’t it? Super organized!
Resources
Check out our articles where we have more in-depth information about the Fielo features that were mentioned here:
Updated over 1 year ago