
Rewards
Rewards are the prizes available to Members of a Program. You can offer any kind of product or service to incentivize your community: retail, travel, entertainment, experiences, etc. After earning Currencies (e.g. the standard Points) through incentivized behavior types, Members can exchange their currencies for Rewards.

Creating a Reward
Access the Rewards tab and, on the top right of the page, click New Reward.
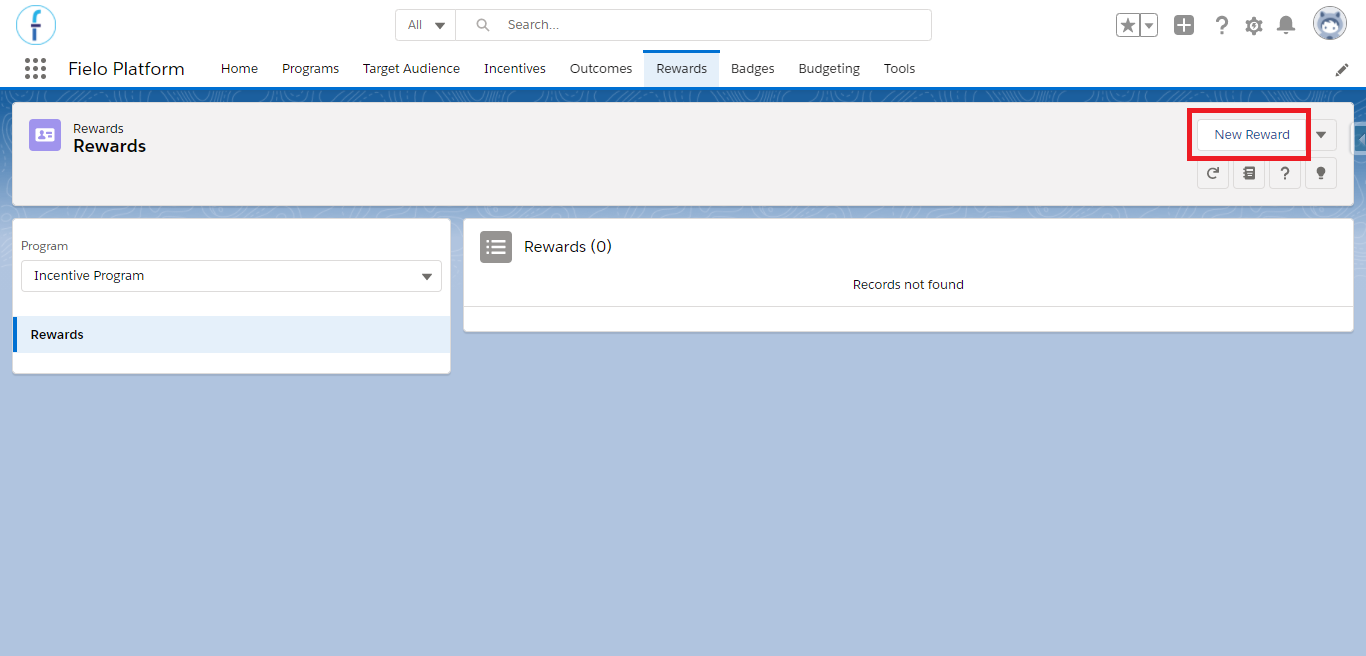
Create a New Reward
Basic Info
- Program: in the Program field, the name of the program you are currently working on will show up. Make sure it is the right one and, if not, close the form, change the program in the Program Selector and click on New Reward again.
- Reward Name: choose an attractive name for your reward. This name will be displayed to your members on your loyalty portal.
- Description: enter a detailed description of your reward. This description will be available to display to your members on your loyalty portal.
- Points: enter the number of Points that a member will need to redeem your reward.
- When this reward will expire?: choose the date on which your reward will no longer be valid to redeem. You can also leave this field blank, in which case it will not expire.
- How many days the voucher will be valid?: enter the number of days the unique code (a.k.a. voucher) generated by redemption of this reward will be valid. You can leave this field blank, in which case the code will not expire.
Custom CurrenciesIf you have any other currencies that don't generate payout in your Program (e.g. Miles), a field with its name will also be available when creating or editing a reward. Enter the amount that the member will need to have of this currency, or leave it blank in case only Points is required for redemption.
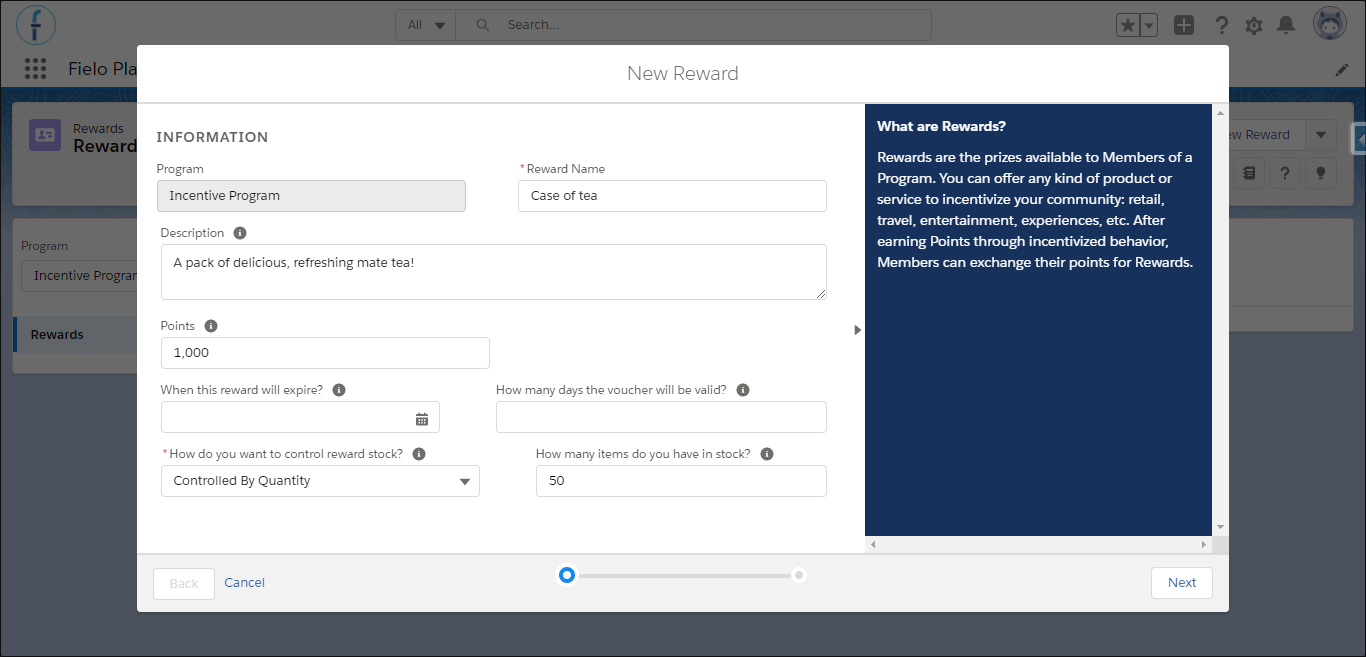
Reward information
Custom Currency Balance
Within the Reward page, you can check the amount needed to redeem the reward in the currency's field. However, by default, only Points is added to the layout.
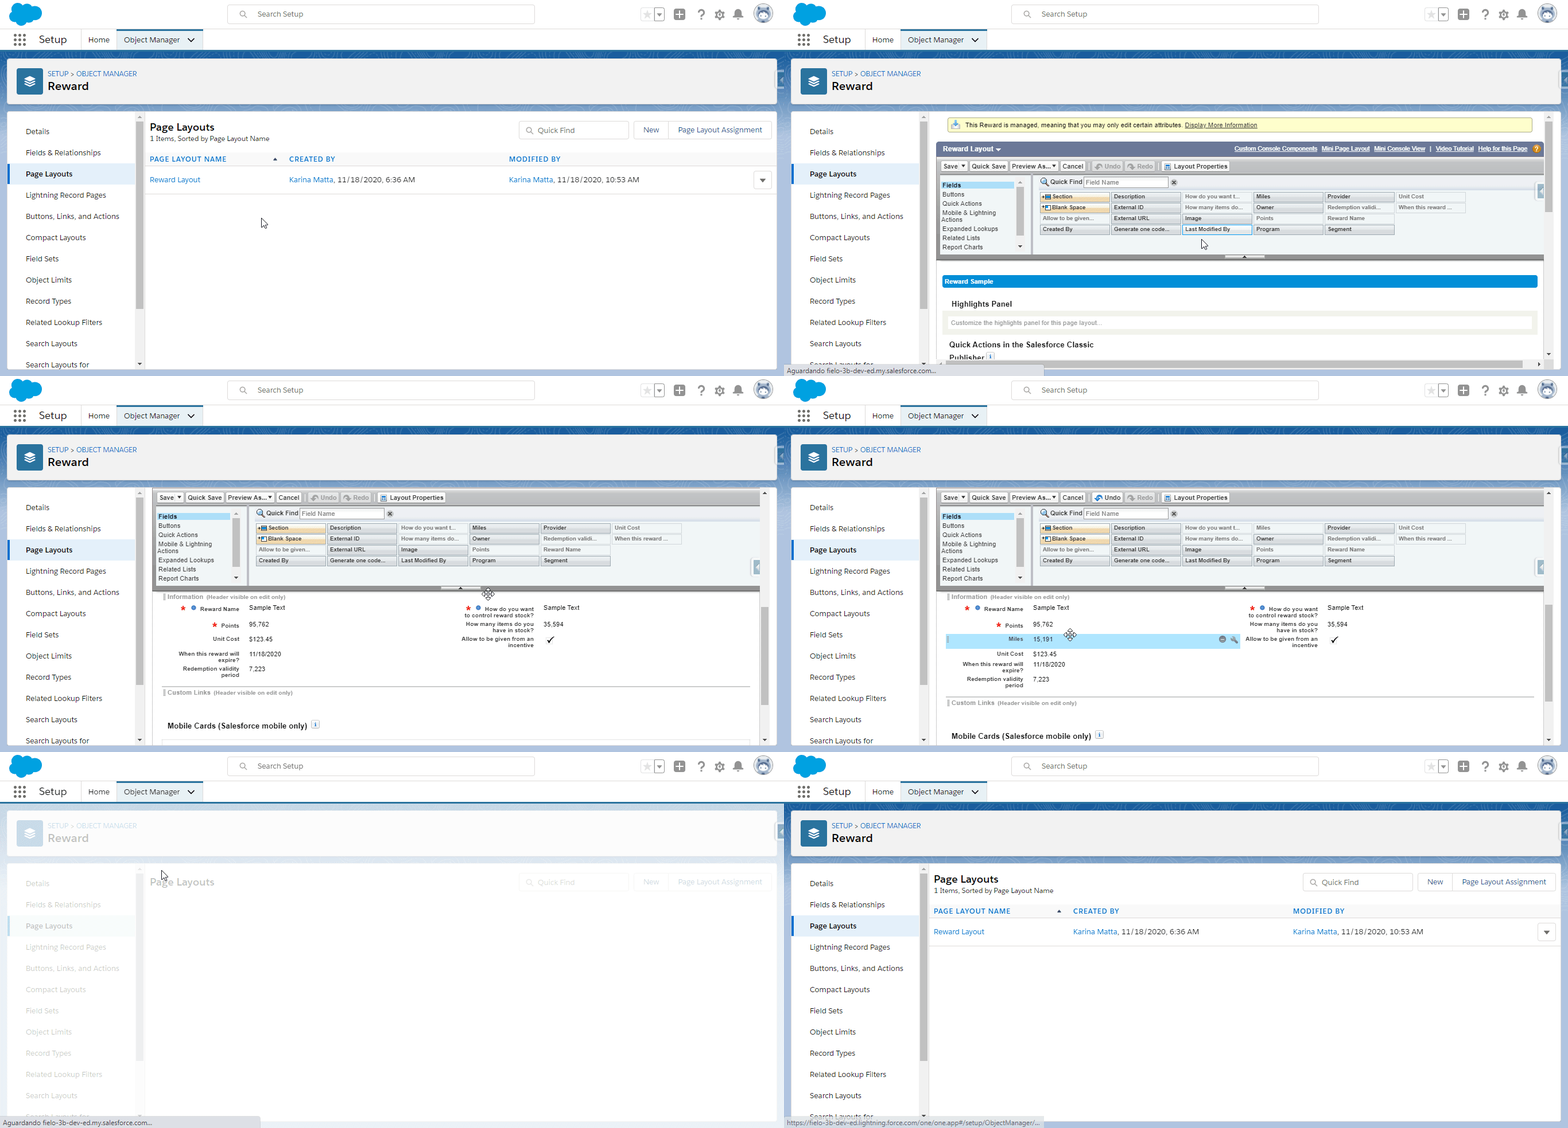
In order to add other currencies' fields to the layout, go to Salesforce Setup and access the Object Manager. Find the Reward object and, within, click on Page Layouts.
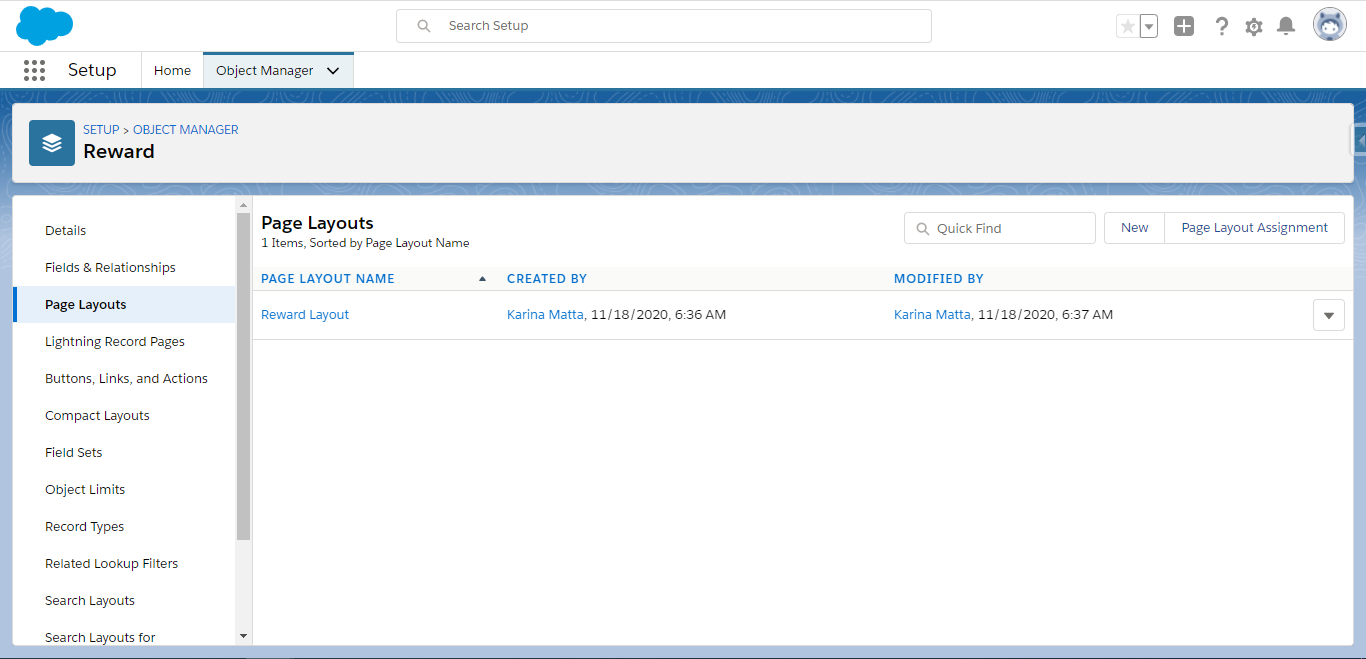
Once there, enter the Reward Layout, add the currency's field to the Reward Detail section and Save.
Extend Rewards "Details" FormYou can extend the Reward form in order to add more fields. See how to do that in our advanced settings page.
How do you want to control reward stock?
Decide how you want to manage the stock for this reward:
- Choose Unlimited to allow your reward to be redeemed an unlimited number of times (i.e. no stock control).
- Choose Controlled by Quantity to set a fixed available quantity of this reward.
- In the How many items do you have in stock? field, enter the quantity available for redemption.
- Choose Controlled by Item to limit redemption to a list of item codes, where each code represents an individual Reward Item available to be delivered to a member who has redeemed the reward. This option is often used for gift cards. See Loading Item Codes for details.
Rewards that are controlled by item cannot be reverted after a member has made a redemption.
Provider
Optionally, enter the Account name of the provider for this reward.
Segment
Optionally, you can target your reward to one or more Segments you've defined in your Program. To add a segment, select it on the list to the left and click . To remove one, select it on the lift to the right and click .
You can leave your reward open to all segments by leaving the list on the right empty.
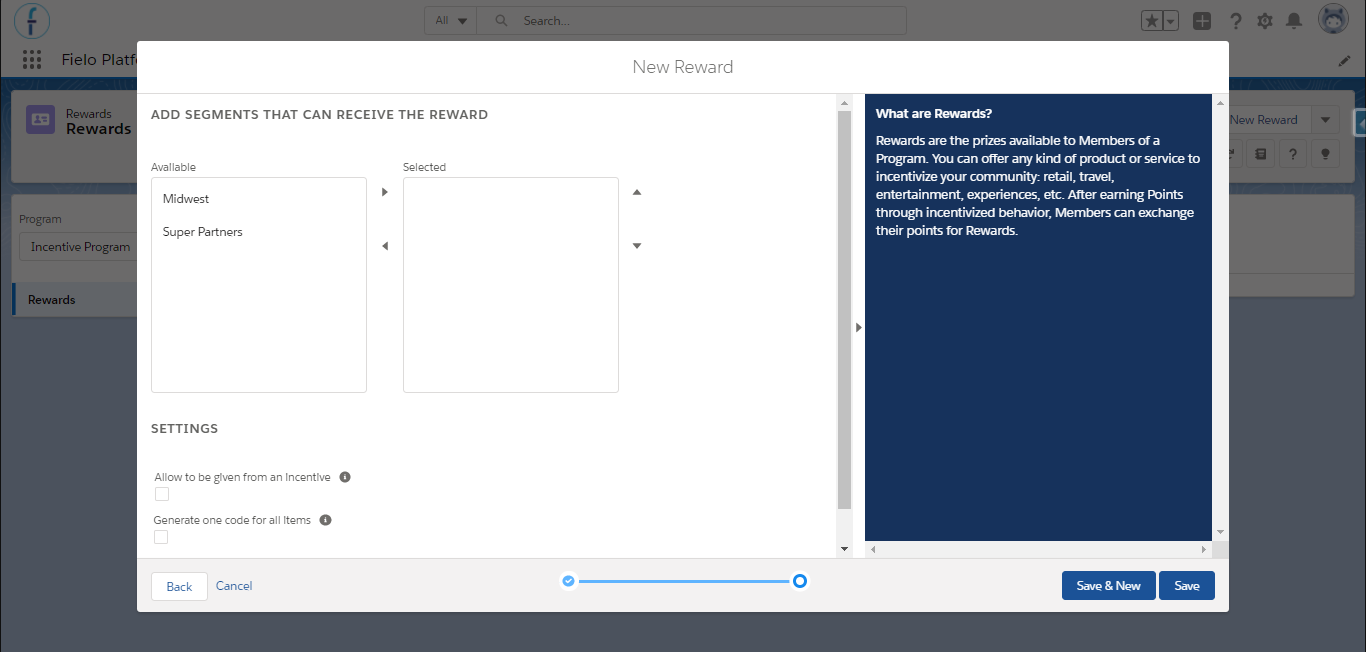
Segment Rewards
Allow to be given from an incentive (Instant Reward)
When , your reward will be available to be given to members instantly when they perform an incentivized behavior type, either in Rules or in Challenge & Mission Rewards.
Instant Rewards and SegmentationWe recommend NOT applying segmentation to Instant Rewards. If you do, be sure that all members who might win this reward as part of an incentive are in at least one of the segments. Otherwise, incentive processing will fail.
Generate one code for all items
When , the unique code generated during redemption will encompass all redemption items related to this reward. This will apply only when the stock type is Unlimited and Controlled by Quantity.
Show In Rewards Catalog
When , the reward will be visible only on the Rewards Catalog lightning component so that members can redeem it from your portal. If unchecked, it will be hidden.
Note that you can check both Show In Rewards Catalog and Allow to be given from an incentive options to allow it to be visible on the Catalog and to be an instant reward.
When you're ready to roll, click Save or Save & New to create another one!
Viewing and Editing the Provider FieldTo access the Provider field, it must be added to the Page Settings of the page(s) on which you want it to appear (e.g. Reward > New, Reward > Edit, Reward > View, etc.) See Page Settings for details.
Unit Cost
After saving the reward, you can enter its purchase cost in the Unit Cost. This information is relevant for you to be able to track how much you spent with the redemption of each reward, which is calculated by the Redemption Cost KPI in the Command Center.
Adding a Reward Photo
Now that you've created your reward, it's time to make it pop with a great photo! There are two ways you can include your photo: uploading it or specifying its external URL.
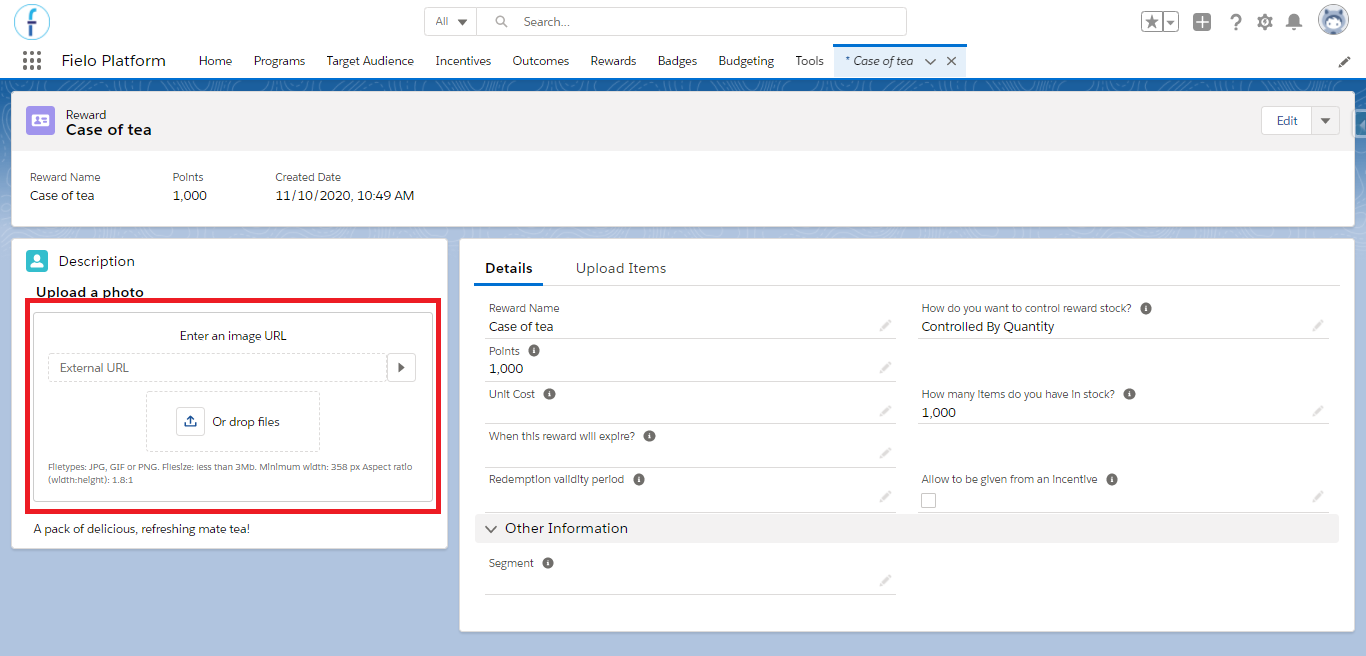
Uploading a Reward Photo
To upload your reward photo, click on the upload icon or drag and drop a file from your system to the dotted area. After the file loads, click on Done.
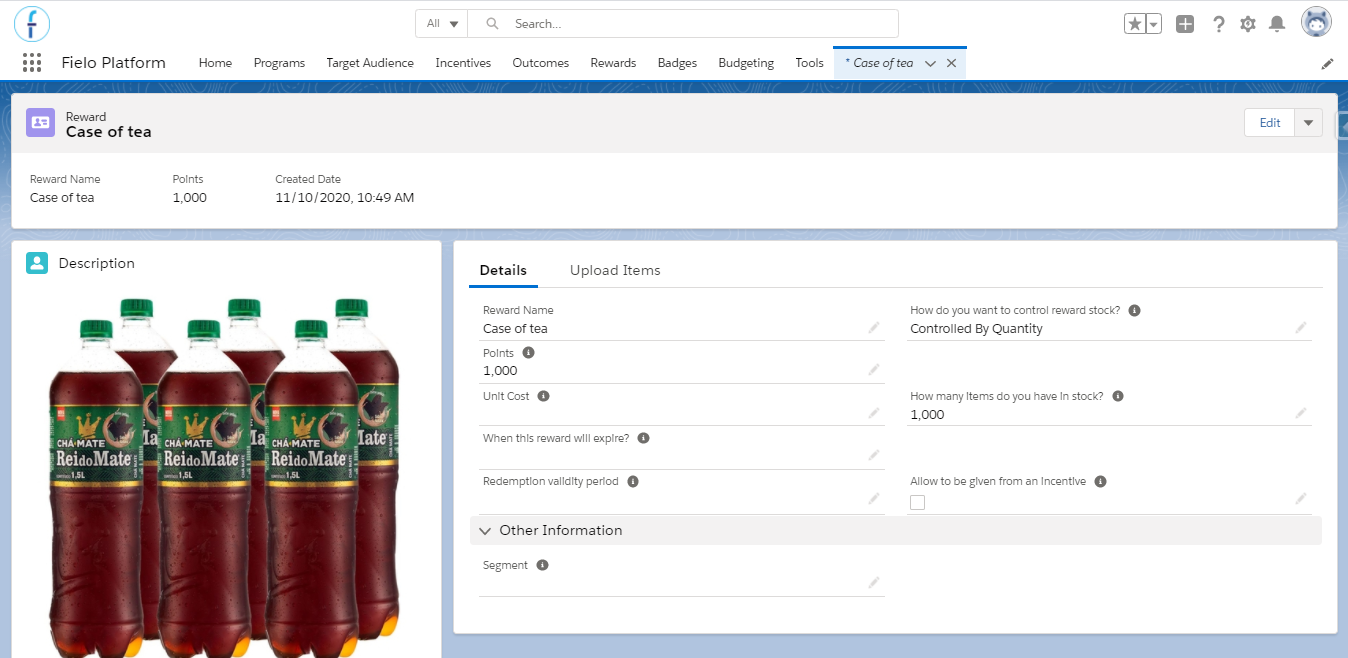
Entering an External URL
By default, Fielo avoids the usage of External URL in order to prevent browser hijacking. Deactivating the validation rules allows to use it under the responsibility of the client’s Salesforce Administrator.
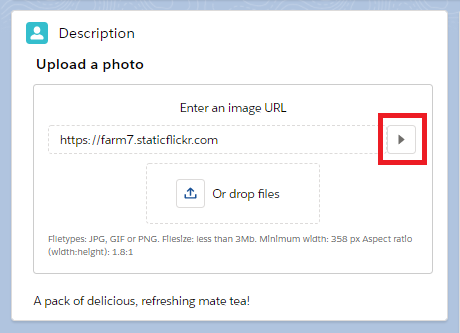
In order to be able to use an external URL for your reward's photo, you must first deactivate the DisallowExternalImage validation rule. For that, go to Object Manager in Setup and, within the Reward object, access the Validation Rules tab to deactivate the rule.
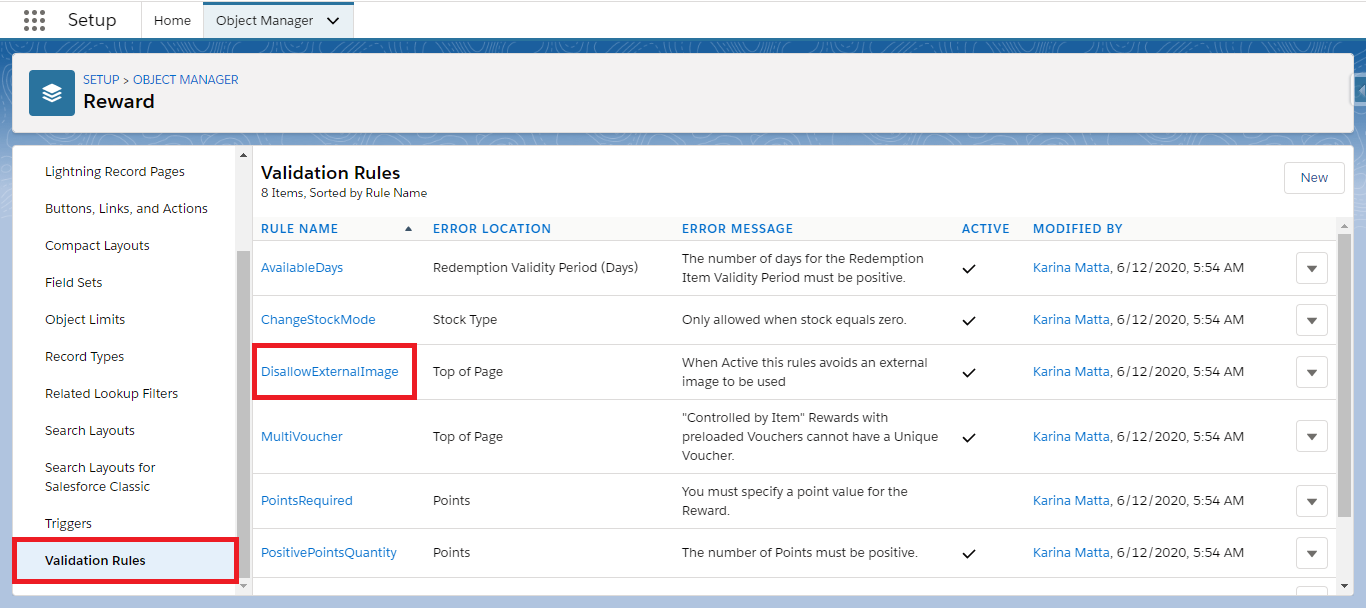
Next, you can go ahead and access the reward page. Enter the URL into the External URL field and click on the ▶️.
Replacing and Deleting a Reward Photo
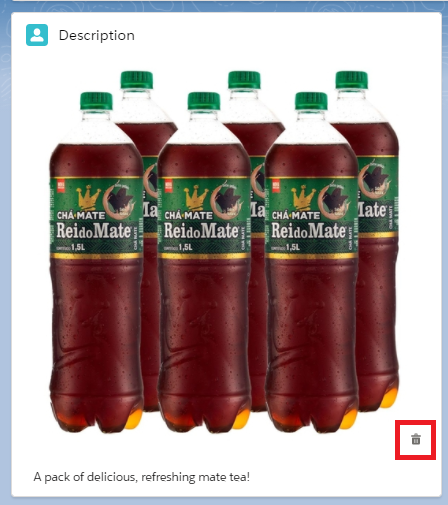
You can use a new photo for your reward by clicking on the trash icon. After that, upload the new one.
Loading Item Codes (For Rewards Controlled by Item)
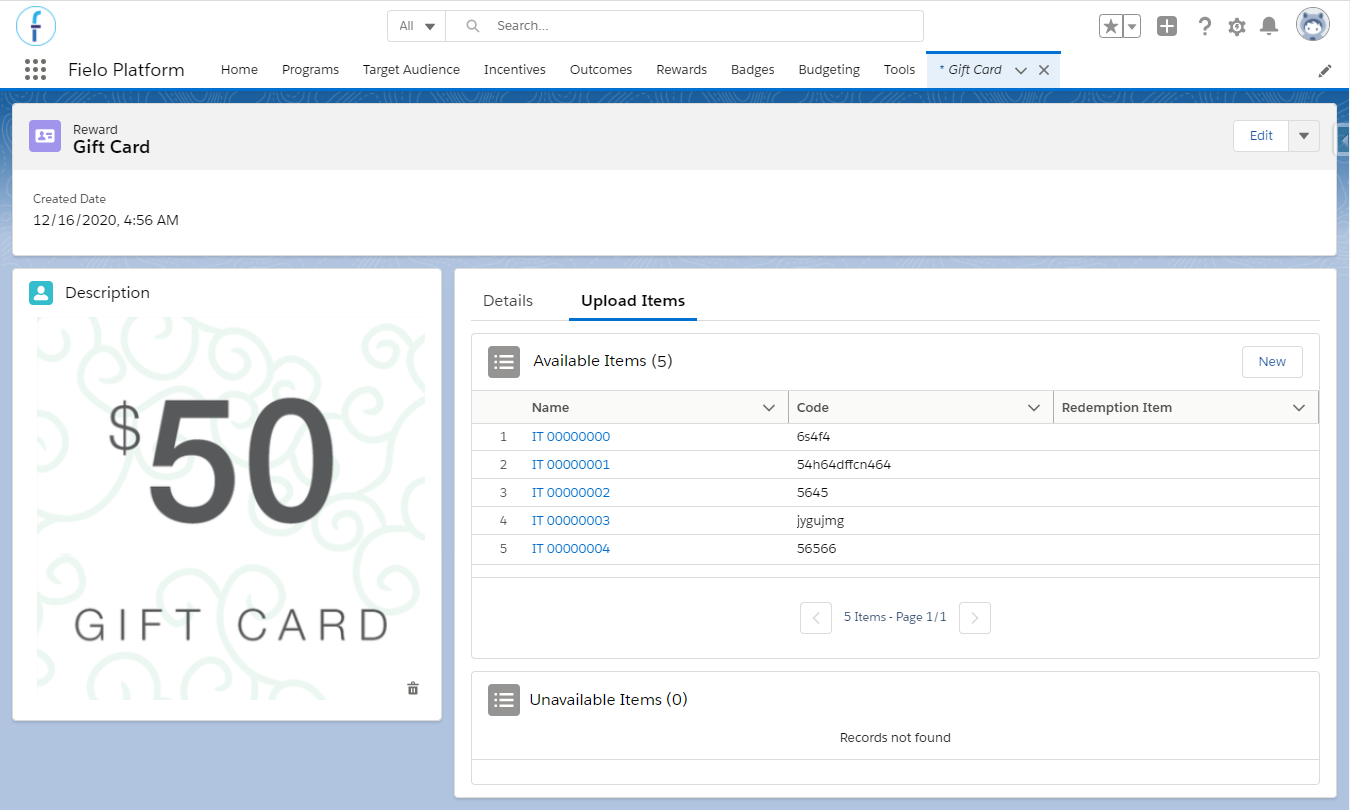
If the stock for your reward is Controlled by Item, you'll want to upload a list of alphanumeric codes, where each code represents an individual Reward Item to be delivered to a member that has redeemed the reward. Each Reward Item is unique and no longer available after being redeemed.
First, you'll need to create or generate a plain text file that contains your item codes, with each code separated by a line break (i.e. newline character). Here's an example:
6s4f4
54h64dffcn464
5645
jygujmg
56566
Note that your item codes can include any combination of letters and numbers and don't necessarily need to all be of the same length. Codes have a maximum length of 80 characters and are not case sensitive.
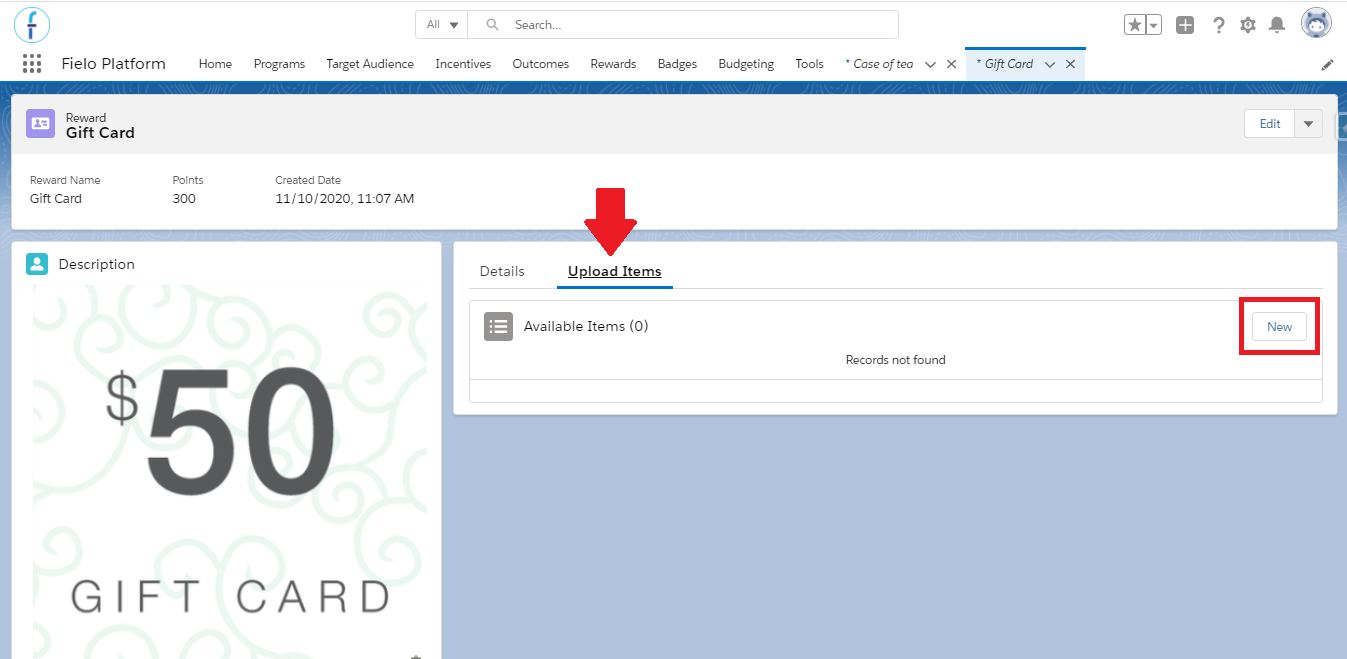
With your item code file ready, access the Upload Items tab on your reward's record page and click New.
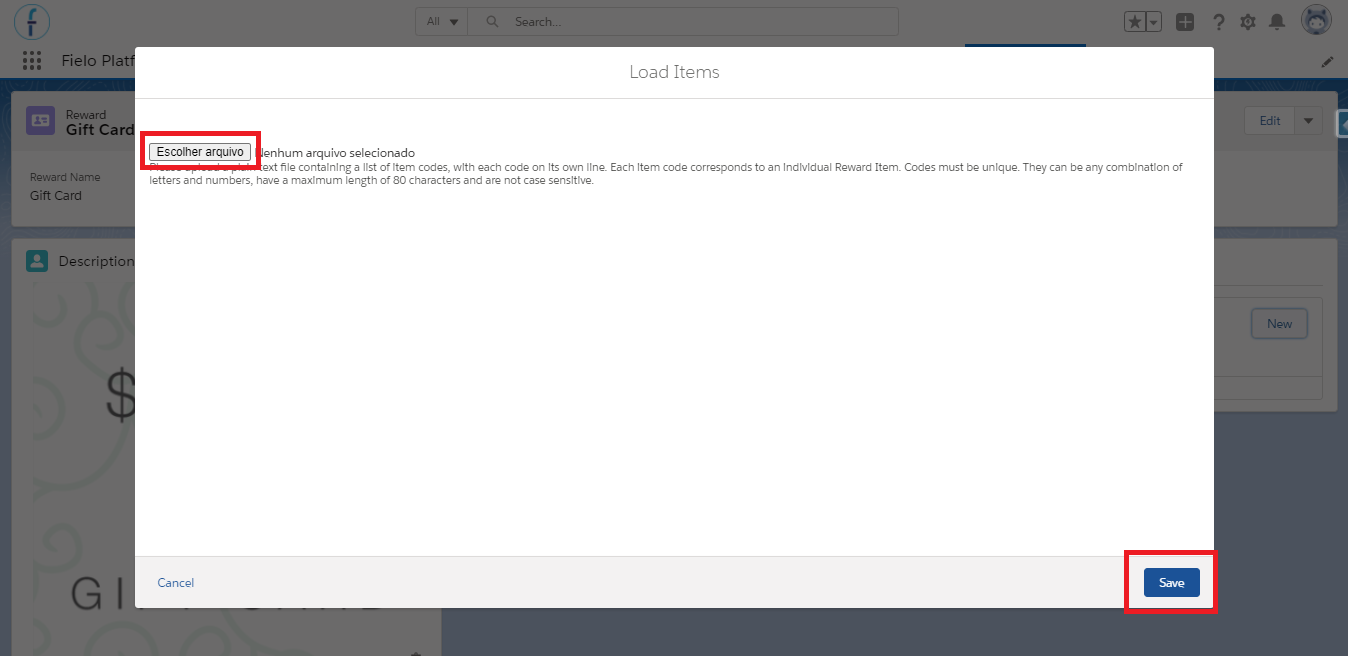
Select your item code file and click Save.
Success! Each item code in your file should appear as a reward item record in Available Items and, in Unavailable Items, you'll be able to see those items that were already redeemed.
Rewards Management Tools
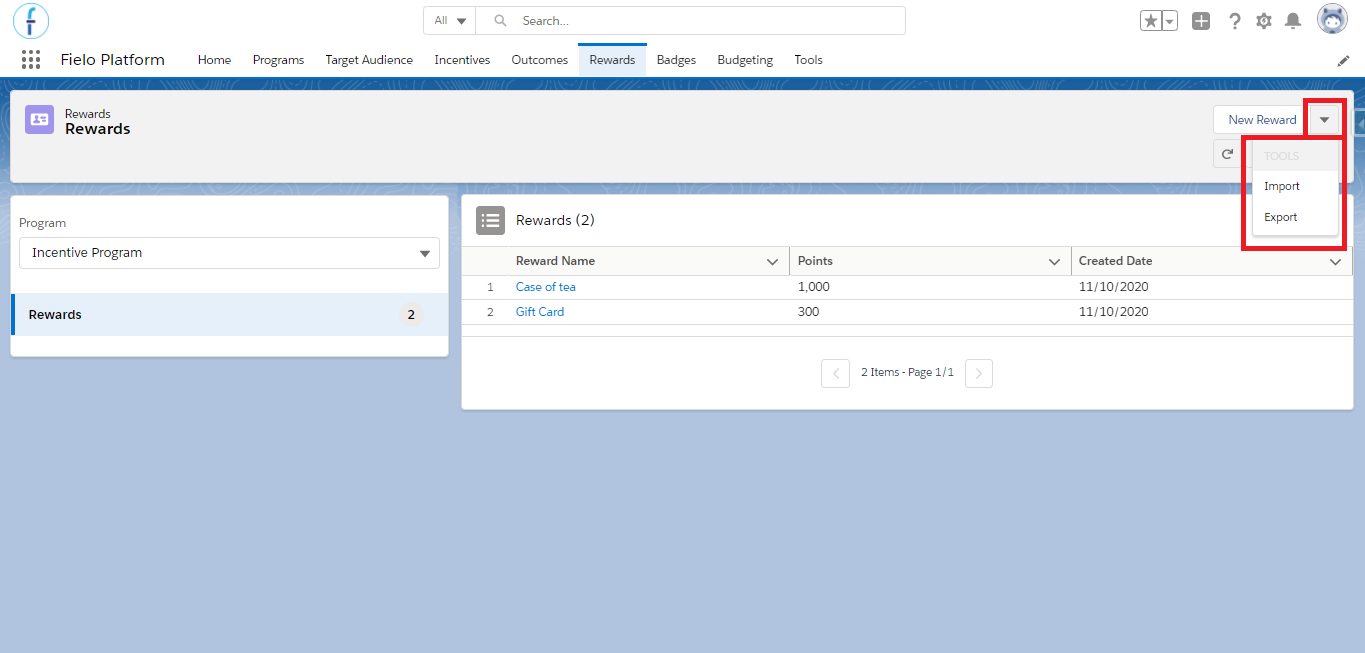
There are several Tools that let you manage Rewards. You can access them by navigating to the Rewards tab and clicking .
Rewards Management Tool Menu
Export
Select Export to export all rewards from the chosen program. When exporting, you'll obtain a file in JSON format containing your FieloPLT__Rewards__c records.
Images and Reward Items Not Included in ExportNote that uploaded images, external image URLs and Reward Items are not included in reward exports.
Import
Select Import to import rewards you or a colleague has previously exported.
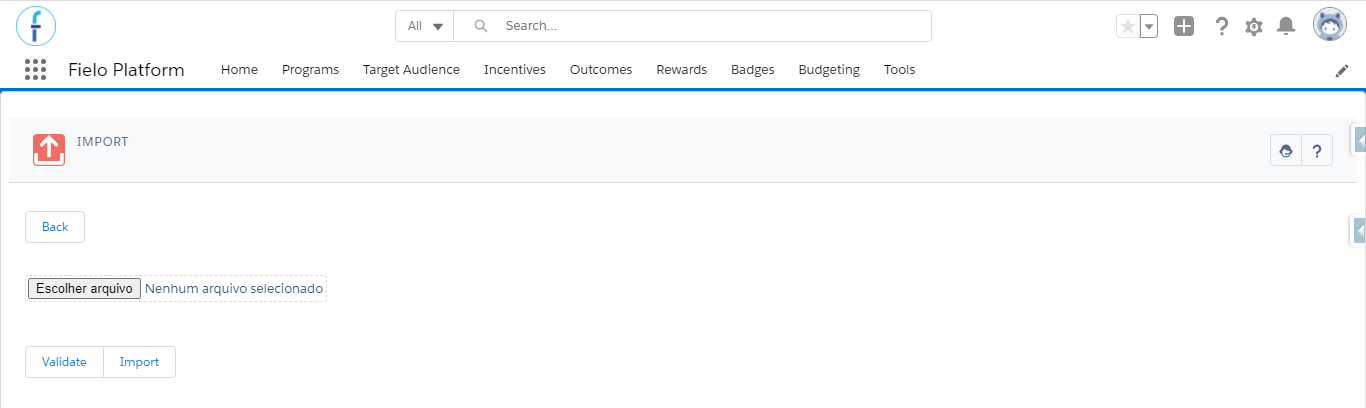
Simply upload a JSON file containing all the data for the rewards you wish to import. In most cases, this will be one that's been previously exported from another ORG, so you won't need to make any changes. We do, however, advise you to validate the JSON file before uploading.
Once you're ready, just hit Import.
If the Rewards you're importing were setup to Allow to be given from an incentive in Rules or Missions using your own custom Actions, you must first import those Actions into your Local Development Library.
Importing Rewards
Updated over 1 year ago