
Page Settings
Create and manage your Page Settings
Page Settings are only for Fielo pages that were built using Visualforce. They do not apply to pages built in Lightning.
Page Settings control the layout and structure of buttons, fields, and related lists on all Fielo interfaces. You can also use Page Settings to determine which fields are visible, read only and required.
Page Settings Management lets you extend and customize Fielo page layouts to show the information you need. You can tailor and adapt Fielo as you want!
If your installed FieloPLT package is earlier than v2.46, refer to this Page Settings guide to know how to manage them.
Page Settings Types
Page Settings are divided into different Types depending on where the layout is assigned to. In our examples, we'll use Members and Programs, though you can easily adapt our examples to the other Fielo interfaces as they follow similar structures.
Landing
A Landing page lists a group of records for a specific object. From a Landing page, you can make changes to the Columns, Buttons and Tools displayed. In this example, Member Landing includes four Columns - Name, Type, Points and Level; one Button - New; and two Tools options from the dropdown menu - Page Settings Management and Badges.
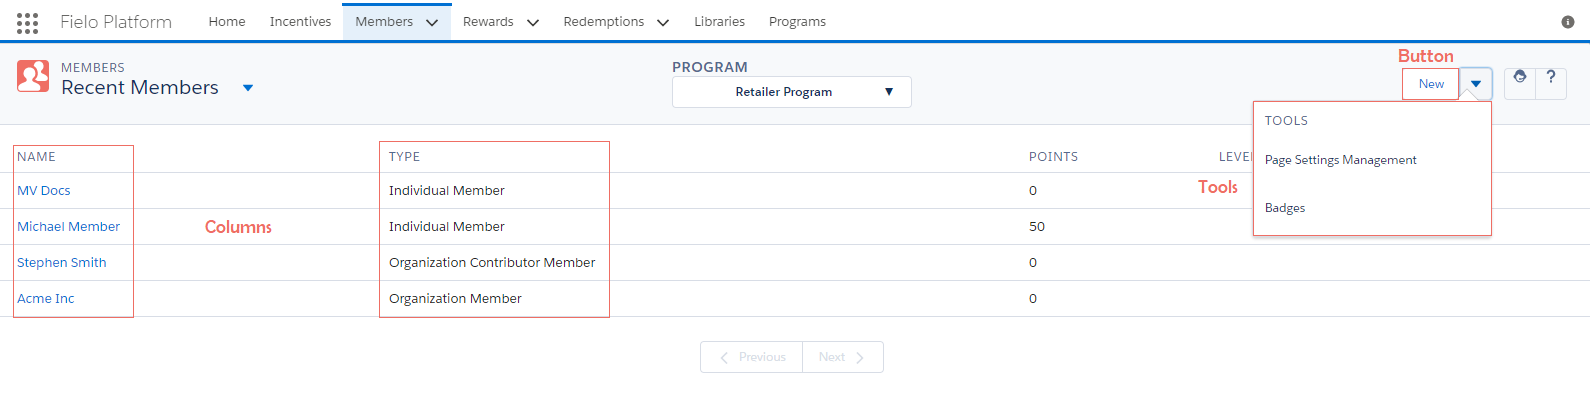
Member Landing Page
New
A New page is a form which provides the controls for creating a new record - for example, the information needed to create a new Member. From New, you can modify the Sections and all of the Rows (Fields) displayed therein. For example, when creating a new Member, there's one Section - Information, and five Rows (Fields) - Program, Name, E-mail, Account and Type. You can see how the Rows Name, E-mail, Account and Type are organized in two columns within the same Section.
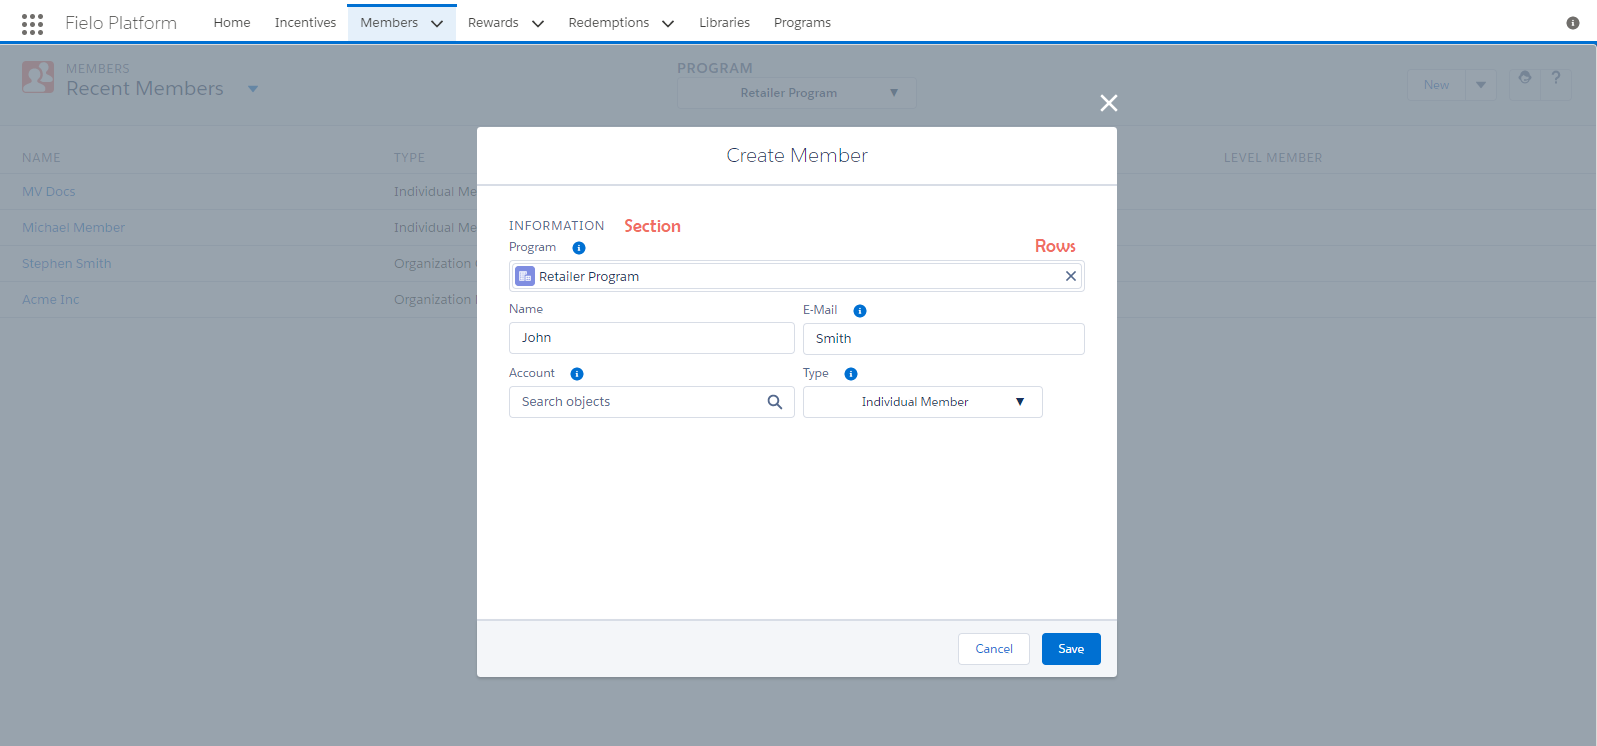
Create a New Member
View
A View page shows information about a particular record. You can decide on its Visibility and display Highlighted fields, Buttons and Tools. In the example below, when clicking on Michael Member, we can see that his Status, Points, Level and Type are Highlighted; there are two Buttons - Edit and Block; and two Tools options from the dropdown menu - Delete and Page Settings Management.
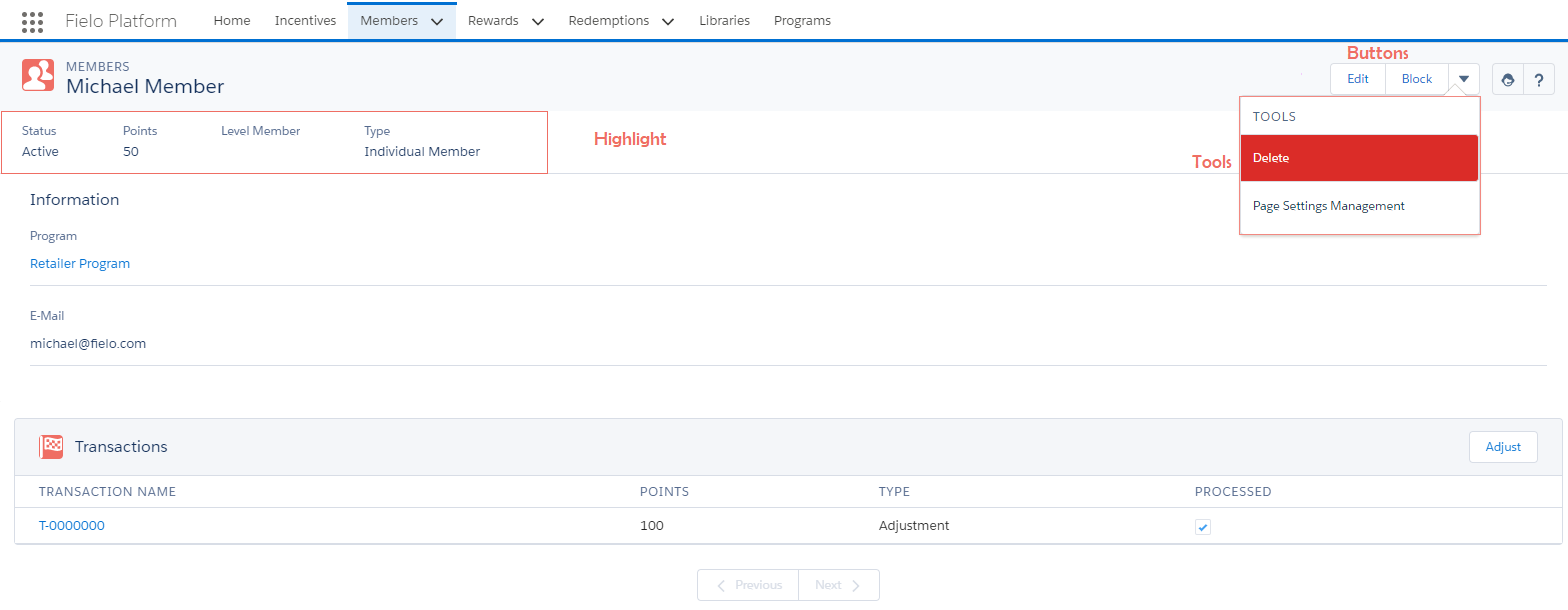
Member View page
Detail
The Detail area expands the available information shown in a specific record, e.g. the Program and E-mail of a specific Member. You can decide on its Visibility, create multiple Sections displaying fields in different Rows and Columns. The following example shows one Section - Information - and two Rows - Program and Email - for Michael Member.
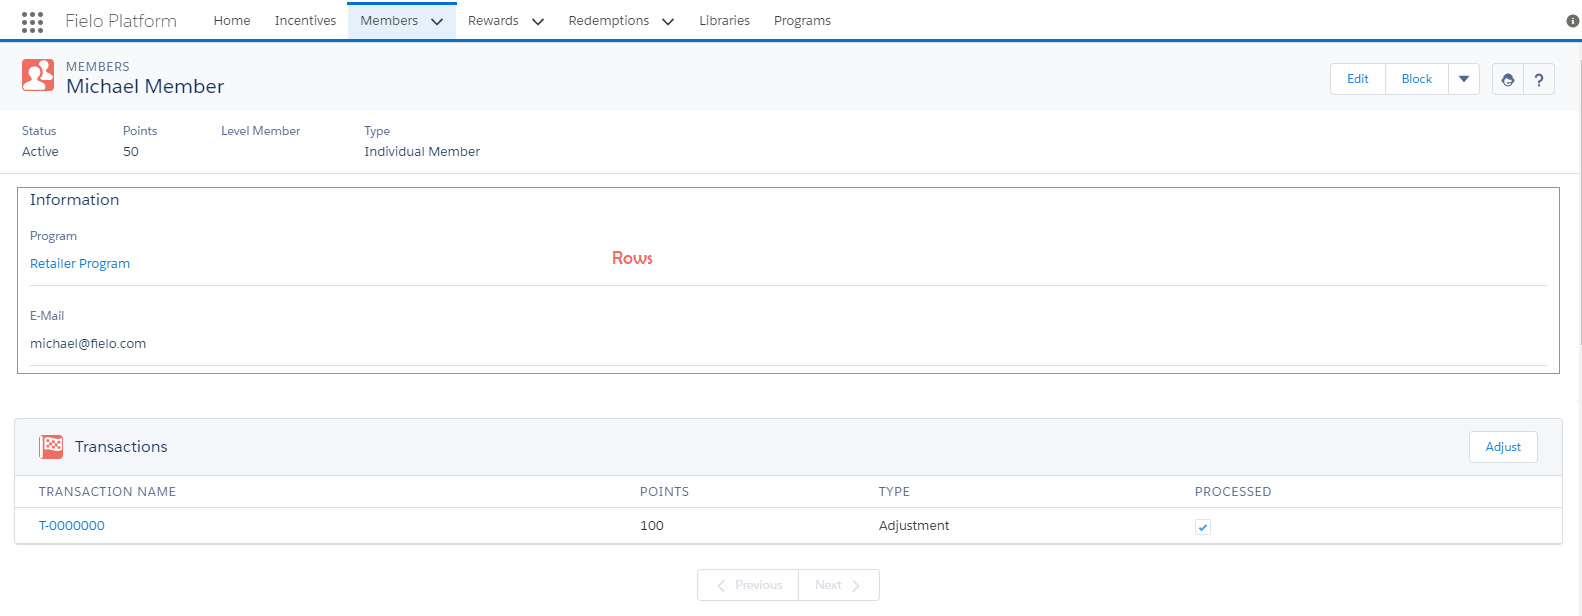
Member Detail section
Related
A Related list provides the controls for adding or managing related lists within a specific record. You can decide on its Visibility and create multiple Columns, Buttons, Tools and Actions. The examples below show two Columns - Order and Active; a Button - New; a Tool - New Manual, and an Action - Delete.
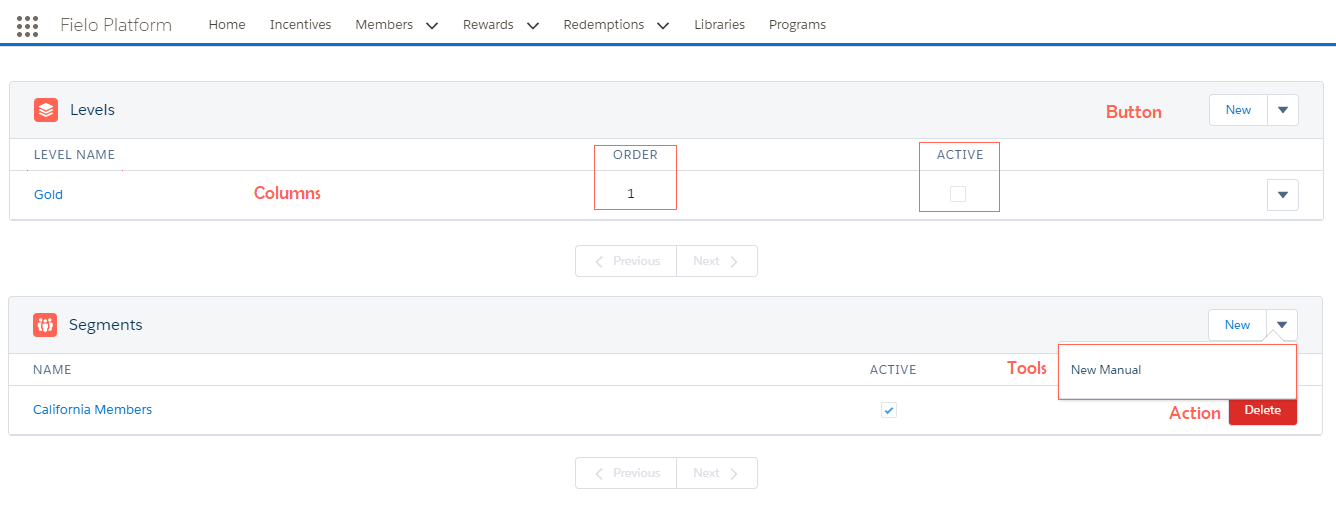
Levels and Segments Related Lists in Program
Edit
An Edit page is a form which provides the controls for modifying (editing) fields of an existing record. You can decide on its Visibility, change the Sections and choose which Rows (Fields) to be displayed in each. For example, when editing a previously created Program, you find four Sections: Information, Member Settings, Transaction Settings and Rewards and Redemption Settings. Each of those Sections include Rows (Fields) such as Program Name, Request Member Authorization, Online Processing, etc. Some of them, like Request Member Authorization and Request User, are displayed in two columns within the same Section.
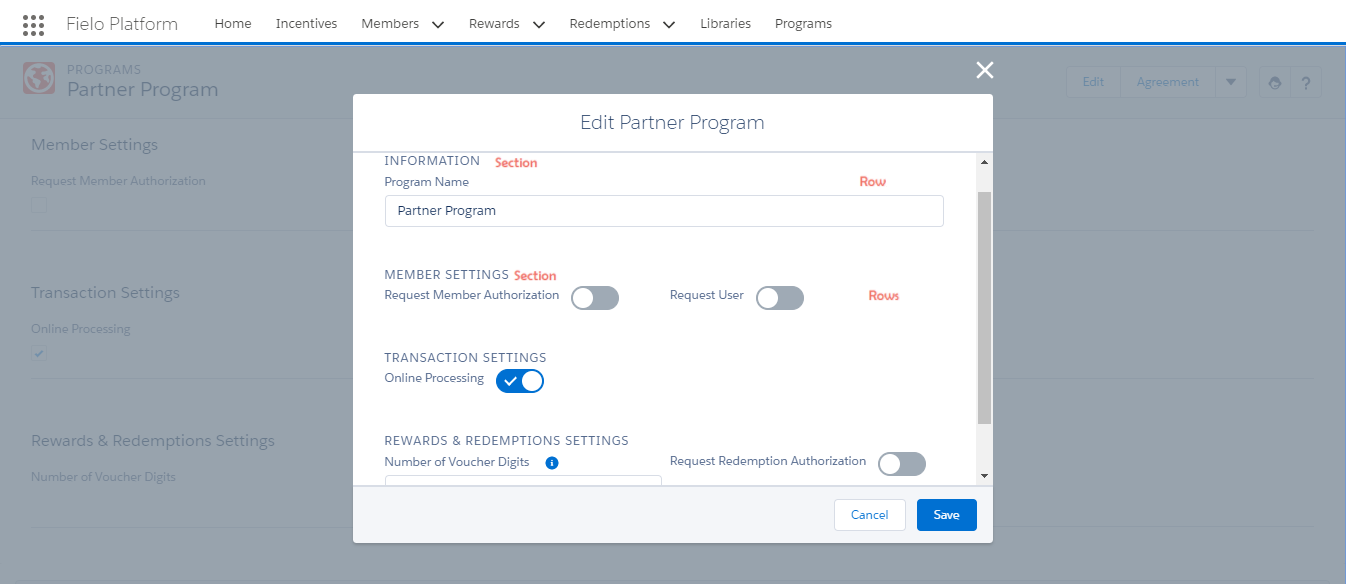
Editing a Partner Program
Page Settings and Libraries
All Page Settings must belong to a Library. Page Settings which control the layout and structure of Fielo pages - such as Programs, Incentives, Members, Rewards,etc.- belong to FieloPLT Library.
These Page Settings become active as soon as FieloPLT Library is enabled.
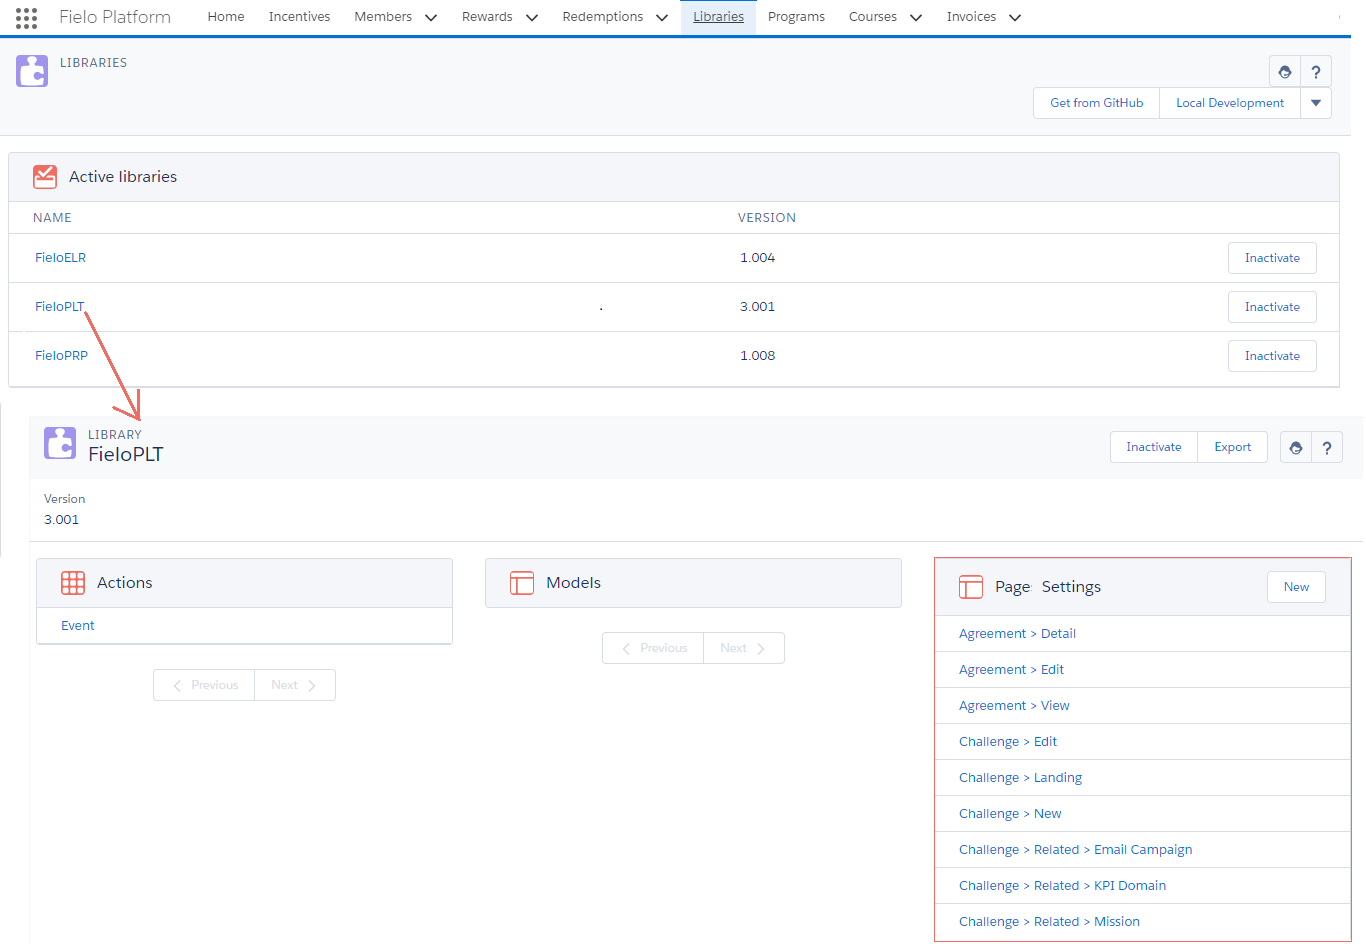
When using any Incentive & Loyalty Apps, such as E-learning and Proof of Purchase, they will also include their own Library - FieloELR and FieloPRP, respectively - which carry their own Page Settings that control their specific page layouts. For example, FieloELR includes all the Page Settings applicable to Courses, Modules and Questions, while FieloPRP includes all the Page Settings applicable to Invoices and Products.
Editing Page Settings
Note that the Page Settings included by default in the different Libraries can neither be edited nor deleted. You can only disable them by clicking Inactivate or assign them to a specific Program, Profile/Permissions or Record Types. For detailed instructions on how to go managing Program Assignment, refer to Program Assigment.
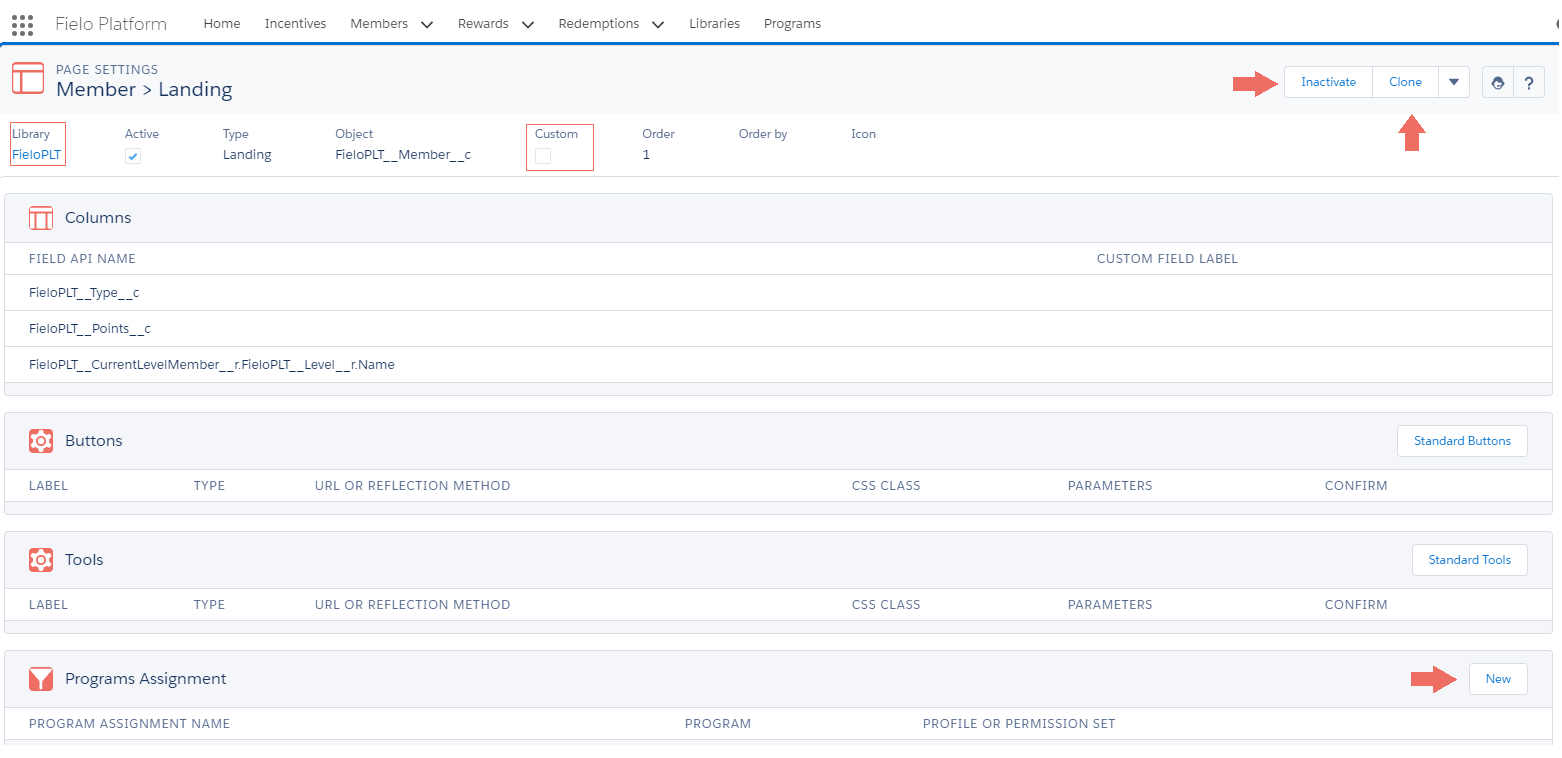
Default Member Landing
You can, however, Clone a Page Setting in order to use it as a starting point to set up your own.
Cloning Page Settings
TipWe highly suggest that you use default Page Settings to kick start your own custom Page Settings. This ensures that all of the basic functionality of your pages are maintained.
From the Page Setting you'd like to clone, simply start by clicking Inactivate.
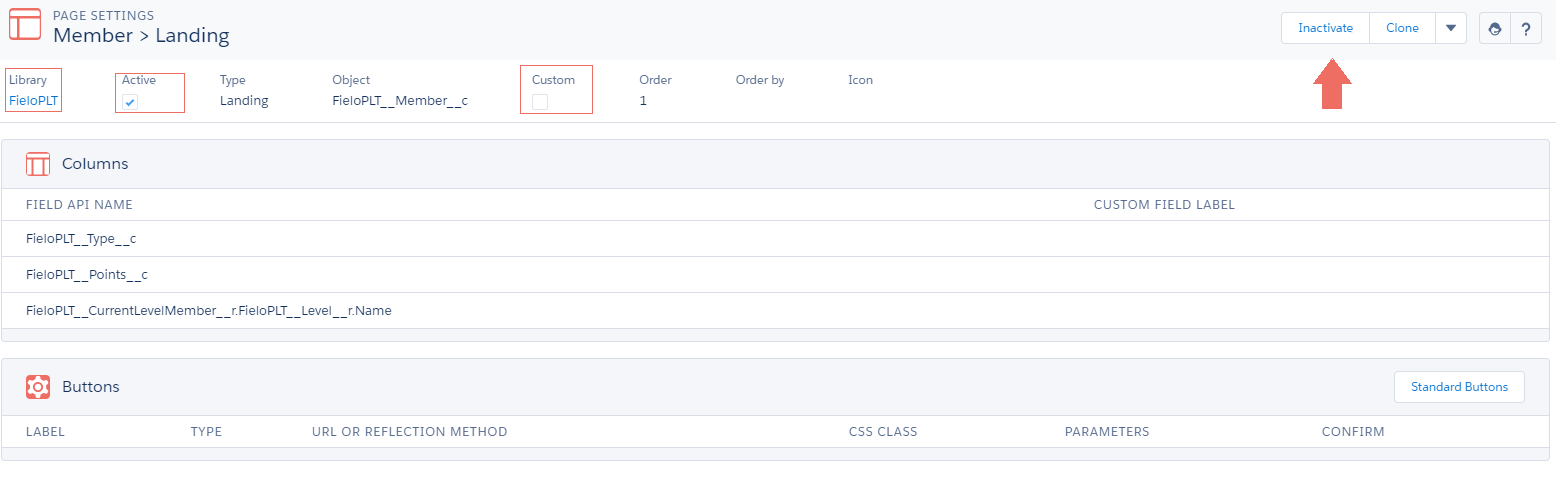
Cloning Member Landing
Once activation is confirmed, the Inactivate button will be replaced by an Activate button.
Now, hit Clone and the whole Page Setting structure will be duplicated. You'll get a new Page Setting, of the same Type - e.g. Landing - and stored in the same Library - e.g. FieloPLT.
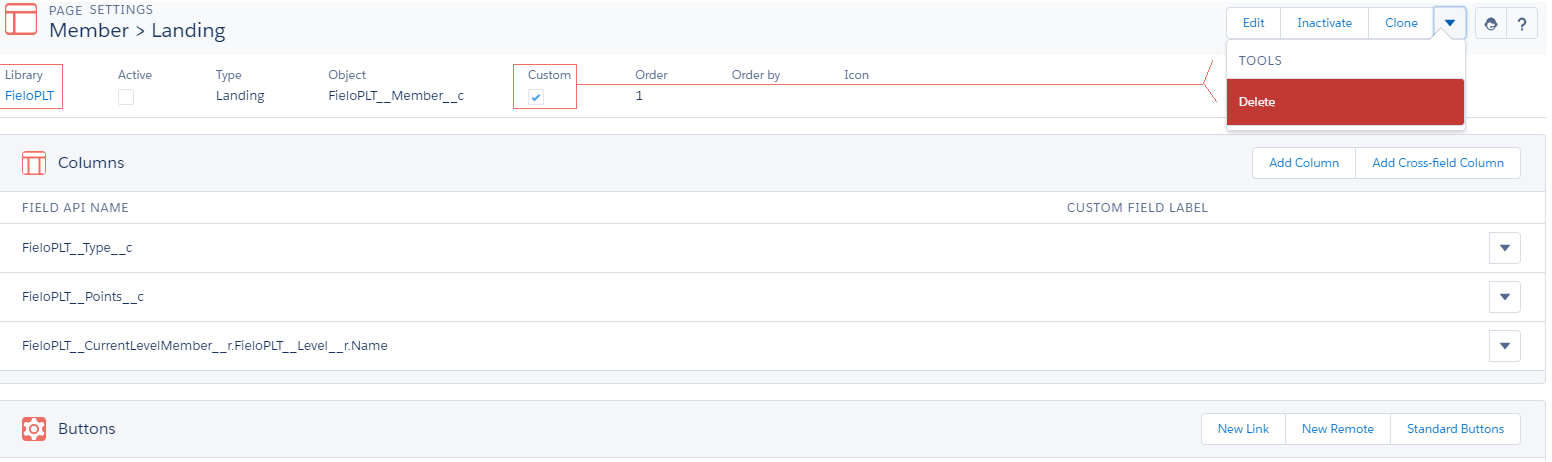
Cloned Member Landing
You'll see that the new Page Setting is in Custom and you can edit, delete and modify its structure.
Choosing a Library
You can choose to save your own custom Page Settings in the default Libraries - FieloPLT, FieloELR, etc. - or in Local Development (FieloLocal) Library, depending on how you want organize your Libraries. You can identify a custom Page Setting that you've created by its Custom.
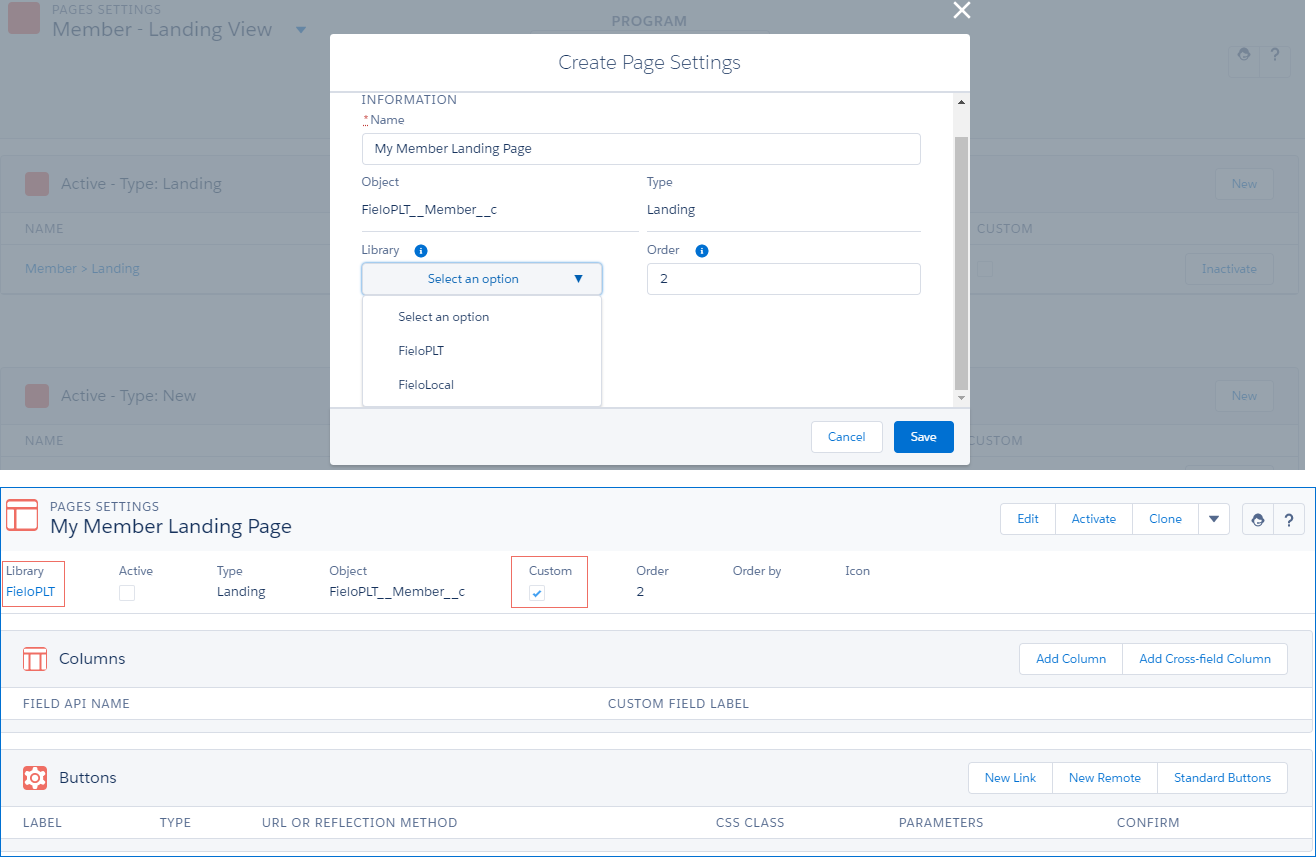
Choose a Library for your custom Page Setting
Page Settings Management
Up to now, you've seen that there are several types of Page Settings, each corresponding to a different page layout: Landing, New, View, Detail, Related and Edit. Also, you've learned that each of them belongs to a Library, either default Libraries such as FieloPLT, FieloELR, FieloPRP or your own Local Development (Fielo Local) Library. Now, it's time to start managing them.
Page Settings Management lets you work directly with the Page Settings assigned to a specific object. For example, you can access and manage all the applicable Page Settings for Members from the Members tab.
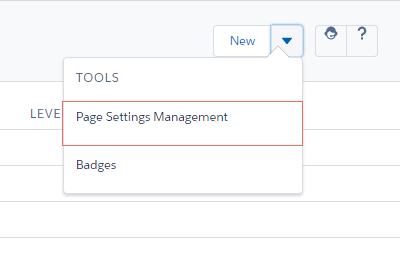
Page Settings Management in Members
Getting started
Once you've accessed Page Settings Management, you'll notice an array of different information. The most important thing for you to know is that all the existing Page Settings are grouped into two categories, based on the following:
Status
Page Settings can be either Active or Inactive. All the Active Page Settings are displayed before all the Inactive ones.
Type
All Page Setting Types are grouped together based on their Type. For example, if you're placed in Landing View, you'll see Landing Page Settings first and then all New; if you're in placed in Record View, you'll see all View Page Settings first followed by Detail, Related and Edit Page Settings.
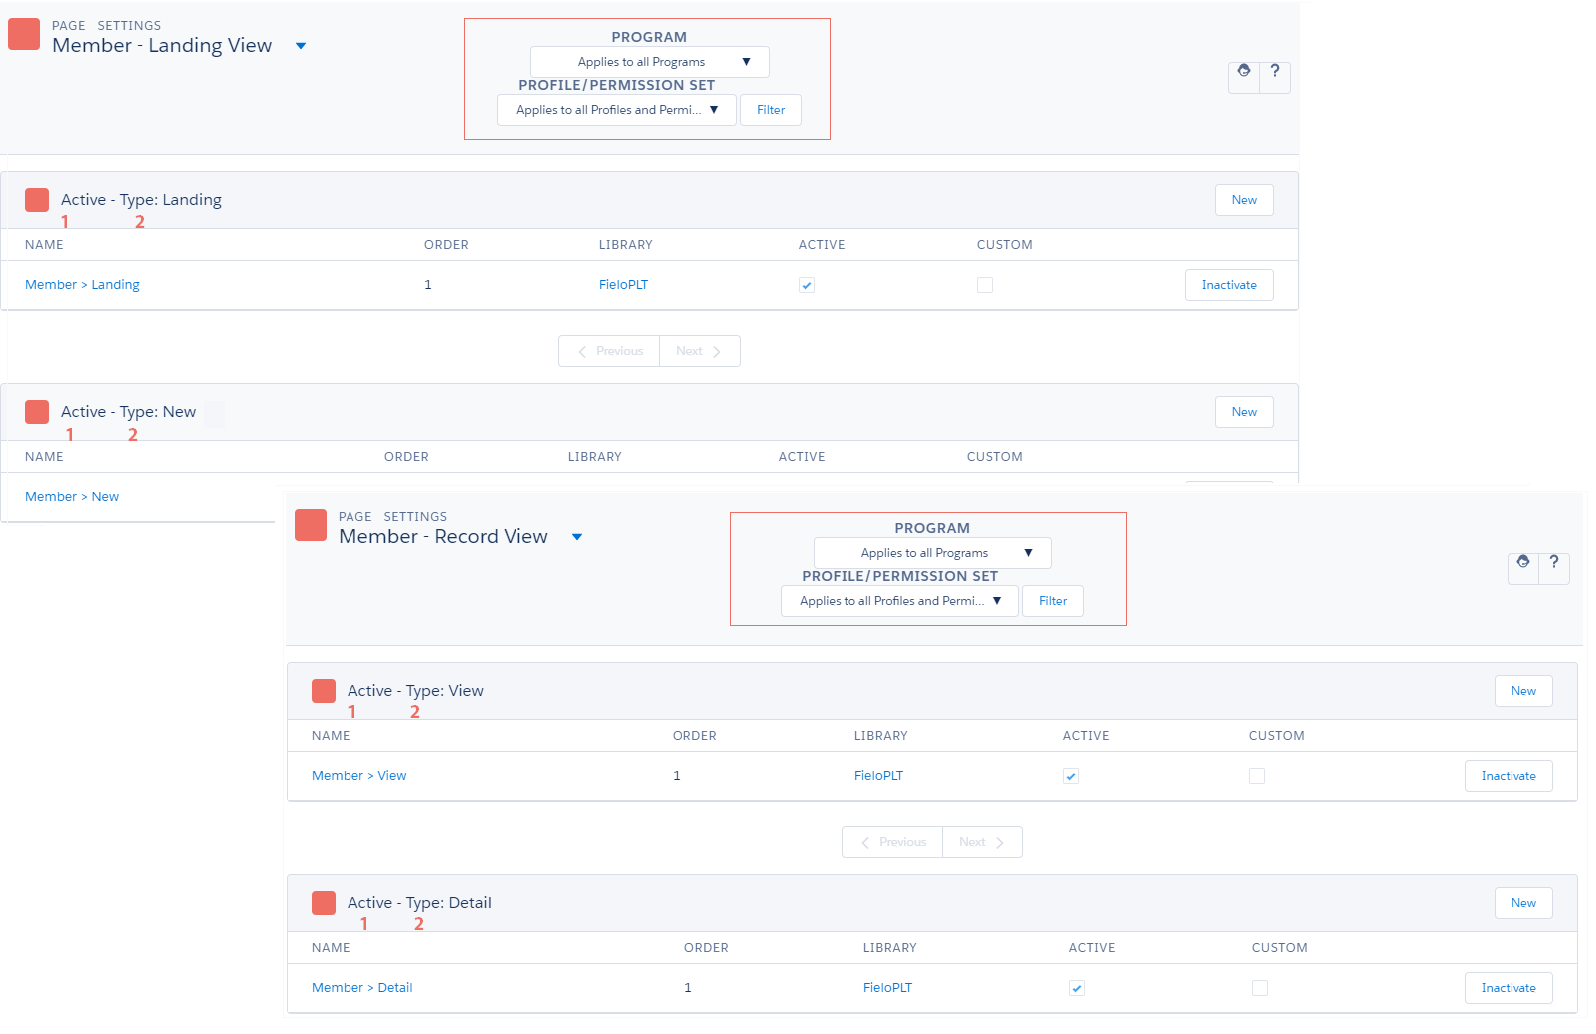
Page Settings: Status, Type and Filtering
Also, you'll see that you can filter all Page Settings by Program, Profile/Permissions or Record Types, if applicable.
Program Assignment
Every time you're creating or modifying any Page Setting, either your own custom Page Setting or any of the default ones that come within the different Libraries, you can choose which Program or Profile/Permissions you want them to be available for.
To do so, click New and choose the Program and/or Profile/Permission Set you'd like:
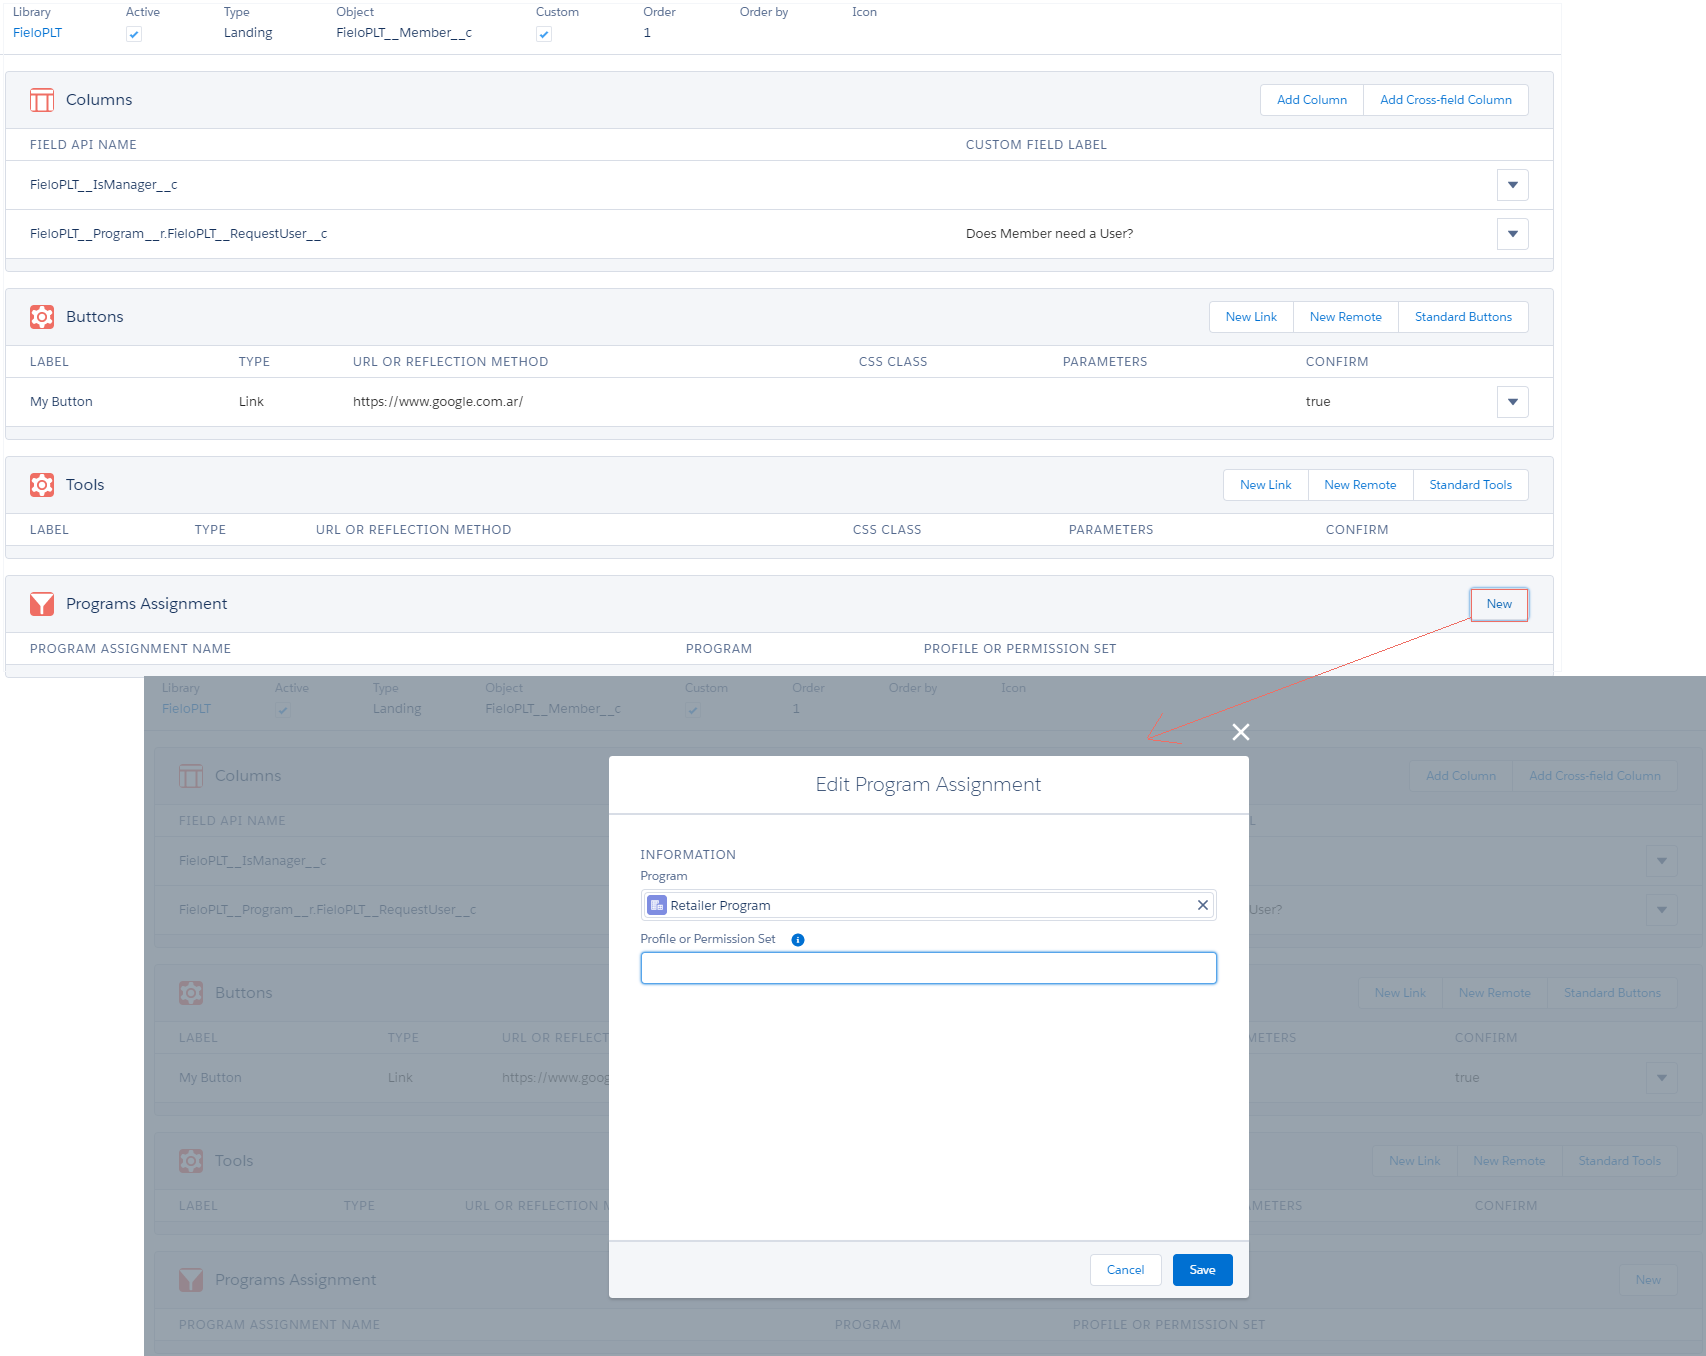
Program Assignment
In our example, we've created a new Landing page only for Members who are part of our Retailer Program. For Members of our other Programs, we've decided to use the Landing page that comes with FieloPLT Library.
Record TypesIf you have any objects that include record types, you can also assign different page settings to each available record type.
Moving along Page Settings
In order to move fast along all existing Page Settings, you can use the picklist on the top left corner. When clicking , you'll be able to browse and choose among the different Objects which include at least a Page Setting either in the Landing Viewor Record View category.
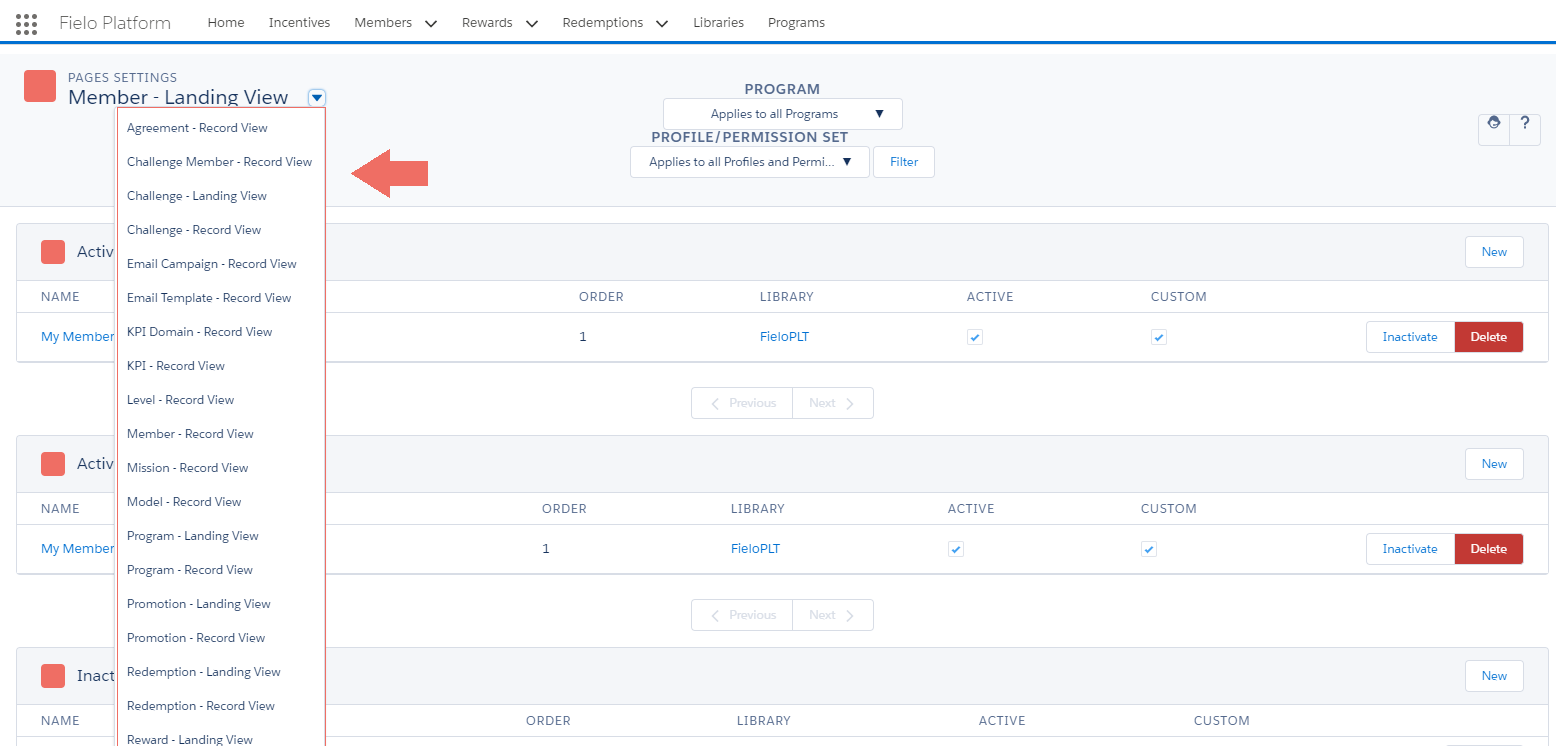
Page Setting list
Landing and Record View
Page Settings Types are classified in two broad categories, depending on where you're accessing the Page Settings Type you want to modify:
Landing View
Landing View includes both Landing and New Page Setting Types. These Page Setting Types can be accessed directly from any of the tabs.
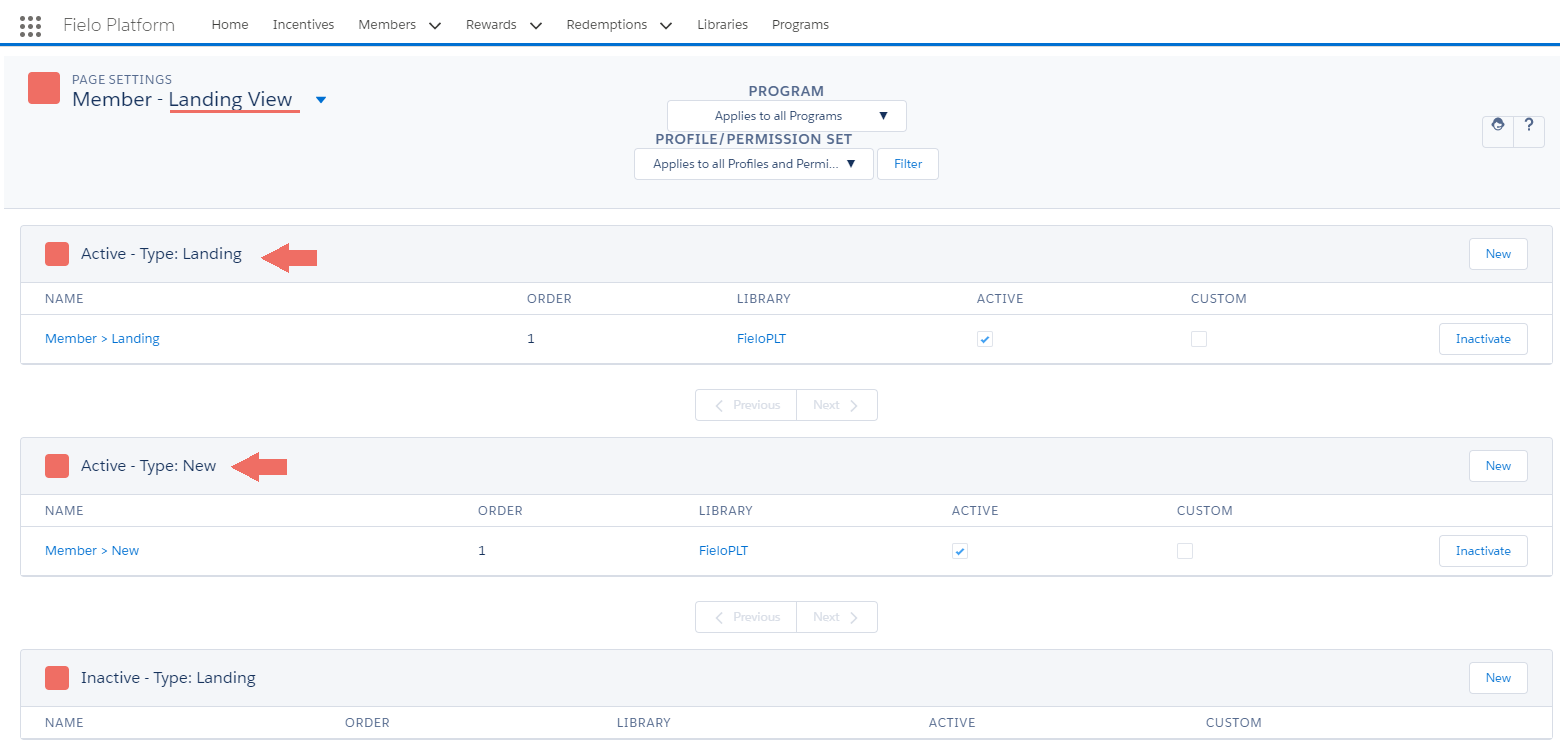
Landing View - Members
Landing
As described in Landing above, you can modify the following parts of your Landing pages:
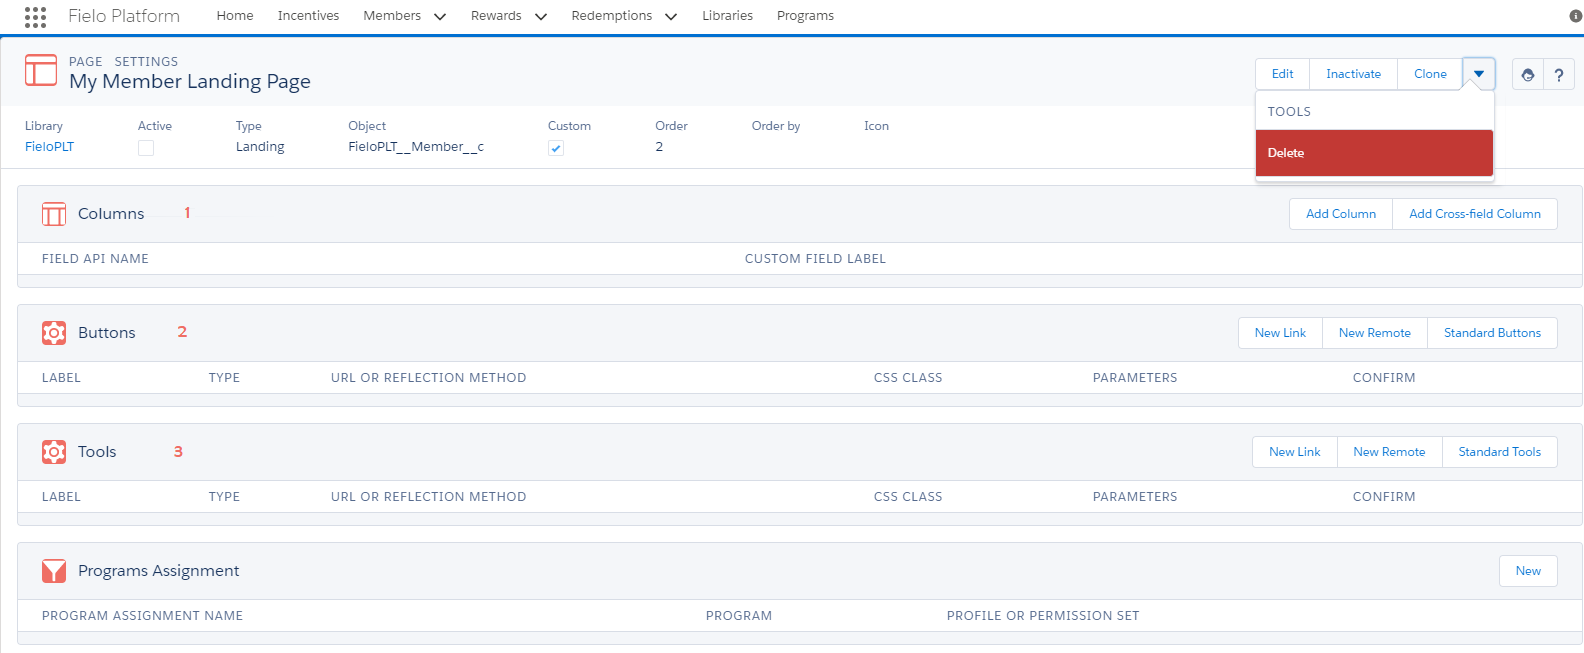
Member Landing Page
1. Columns
You can add two different kinds of Columns:
- Add Column: this option lets you add a new Column based on Fields of the Object. In this example, we're displaying if Members are Managers (A).
- Add Cross-field Column: here you can choose to display a Field that belongs to a different Object from the one you're modifying. E.g. User is a Program Field whereas the Object we're modifying is Member (B). The way of referencing a cross-field is by including the Object API Name followed by the Field API Name
ObjectAPIName__r.FieldAPIName__c
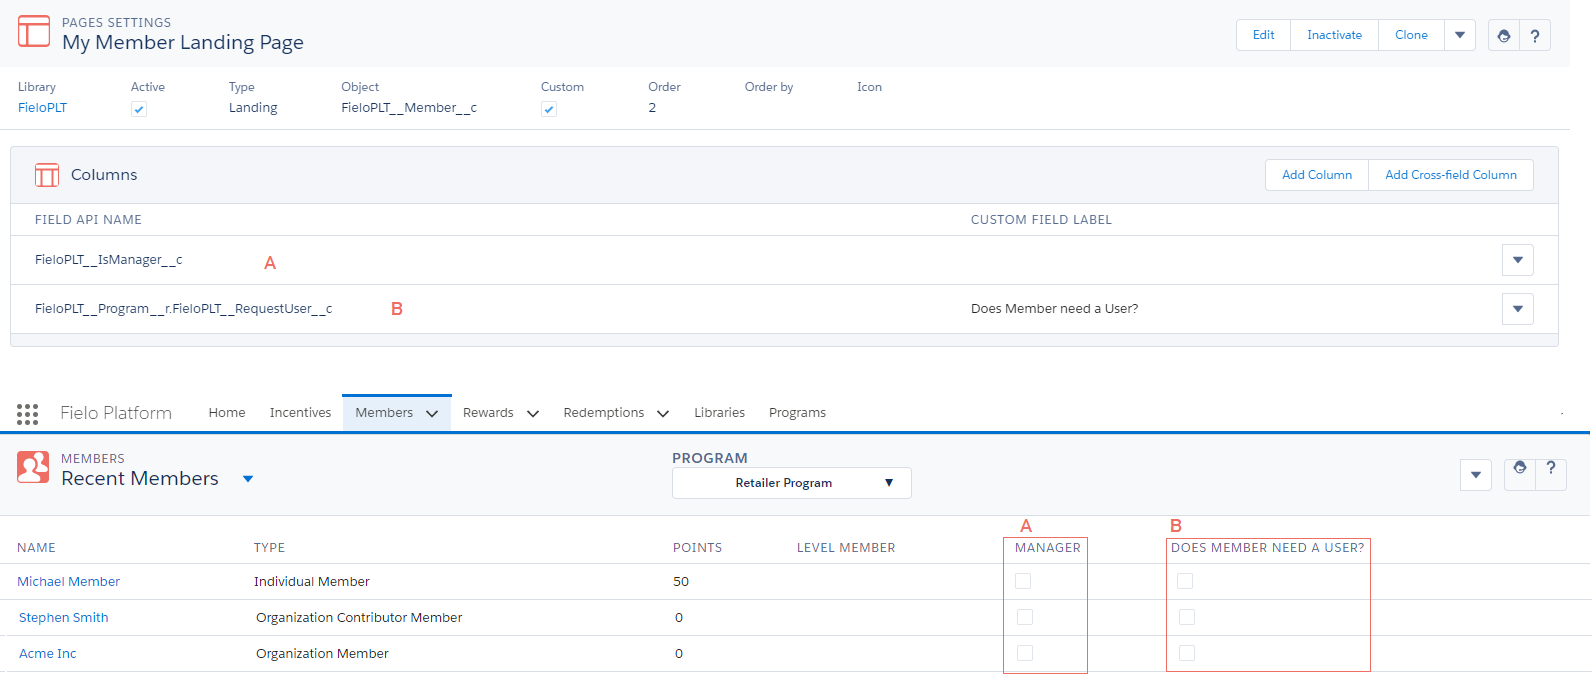
Columns on Member Landing
For Columns you can also set a Custom Field Label, which overwrites the default Field Label to display in that particular Column.
2 & 3. Buttons and Tools
There are three types of Buttons and Tools you can choose from:
- New Link: this lets you include a Button or Tool which redirects to a specific URL. If you Confirm, a confirmation message will pop up every time the Button or Tool is hit. Note that you need to add `http://´ before the URL name.
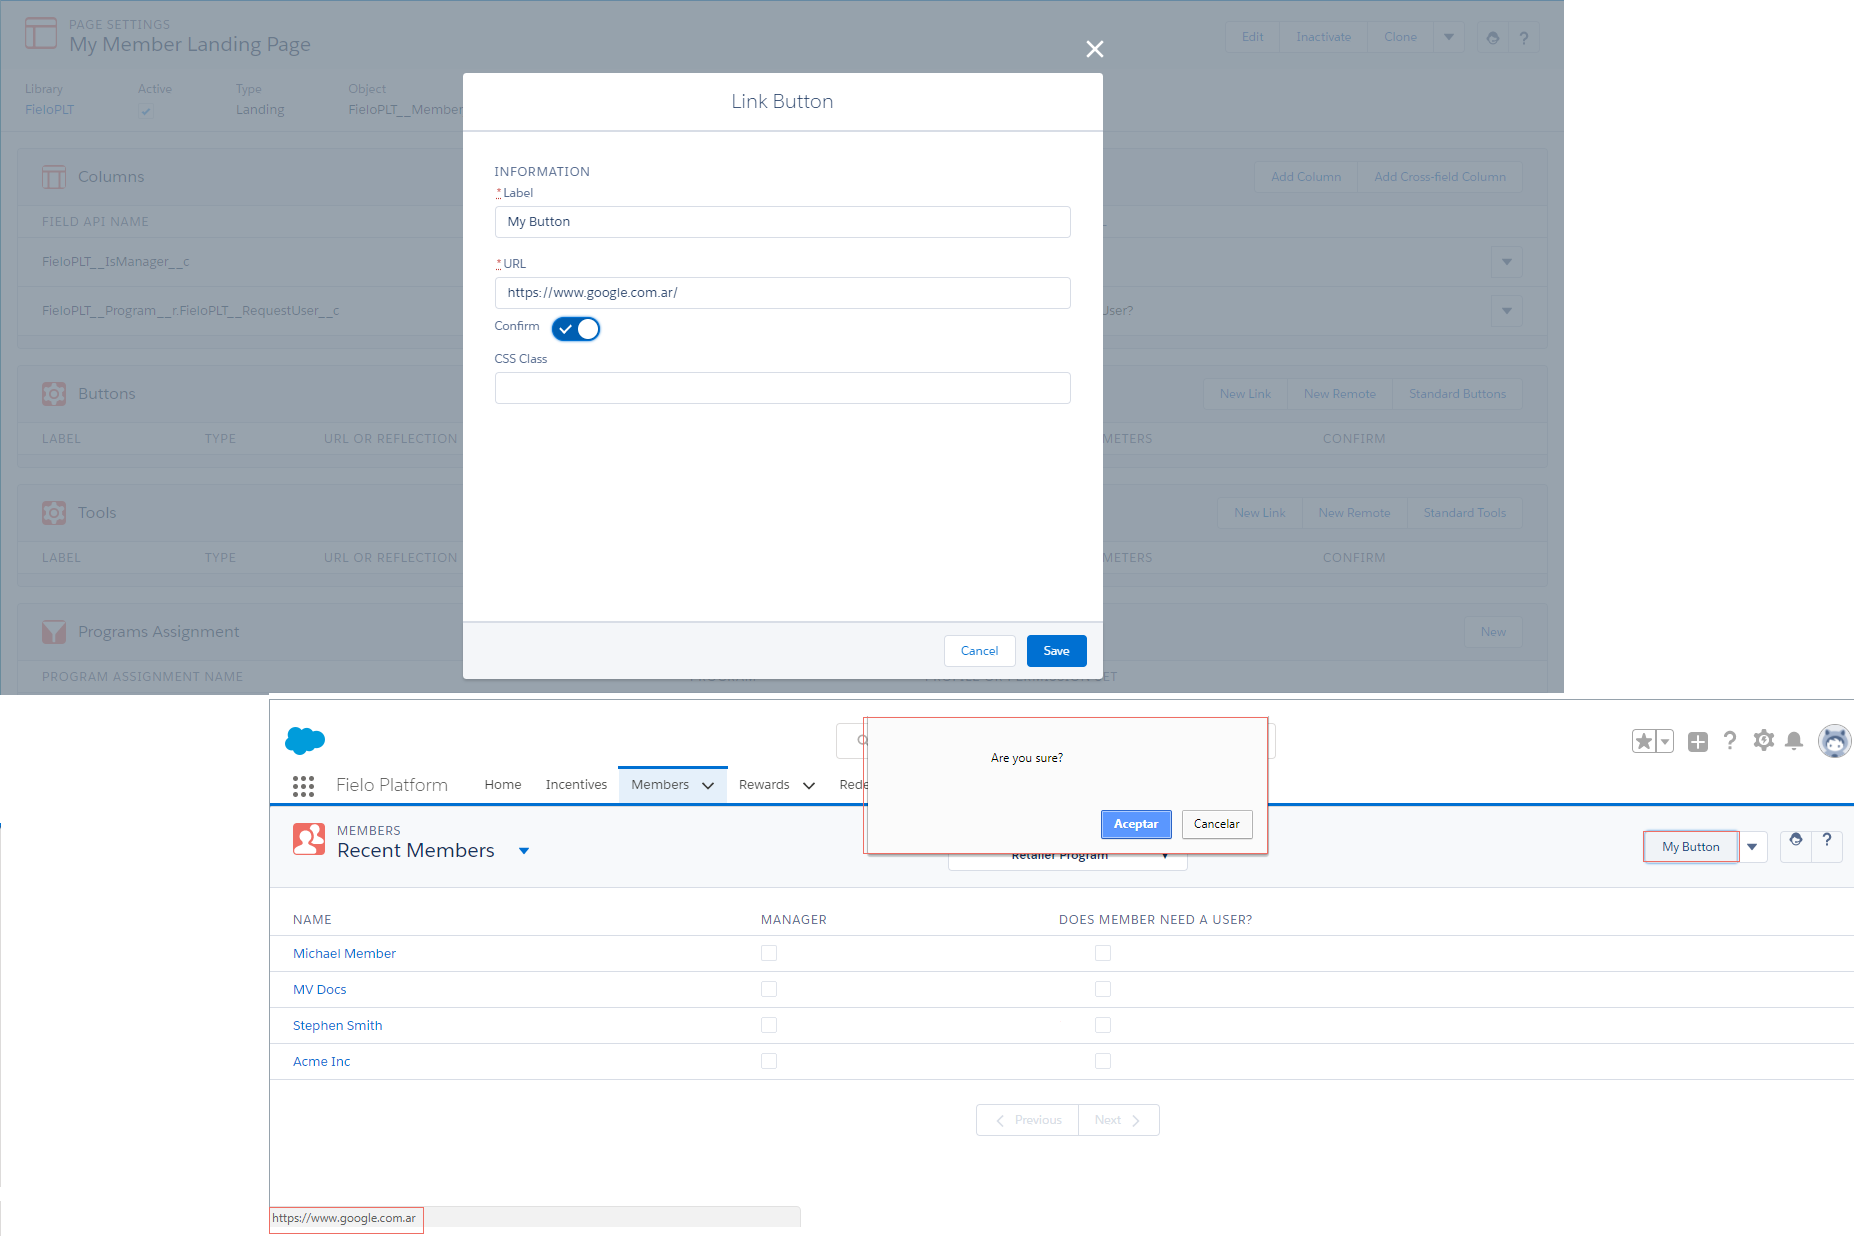
New Link Button for Members
-
New Remote: this lets you include a Button or Tool which redirects to a reflection method. At a high level, with the Remote you are able to create a custom button that will trigger a program (e.g. an extension of a Fielo Apex Class) created previously. If you Confirm, a confirmation message will pop up every time the Button or Tool is hit.
-
Standard Buttons | Standard Tools: they allow you add Buttons or Tools that let you execute common, standard actions such as New, Edit, Clone, etc. Note that you can access and modify these actions from both the Standard Buttons and Standard Tools.
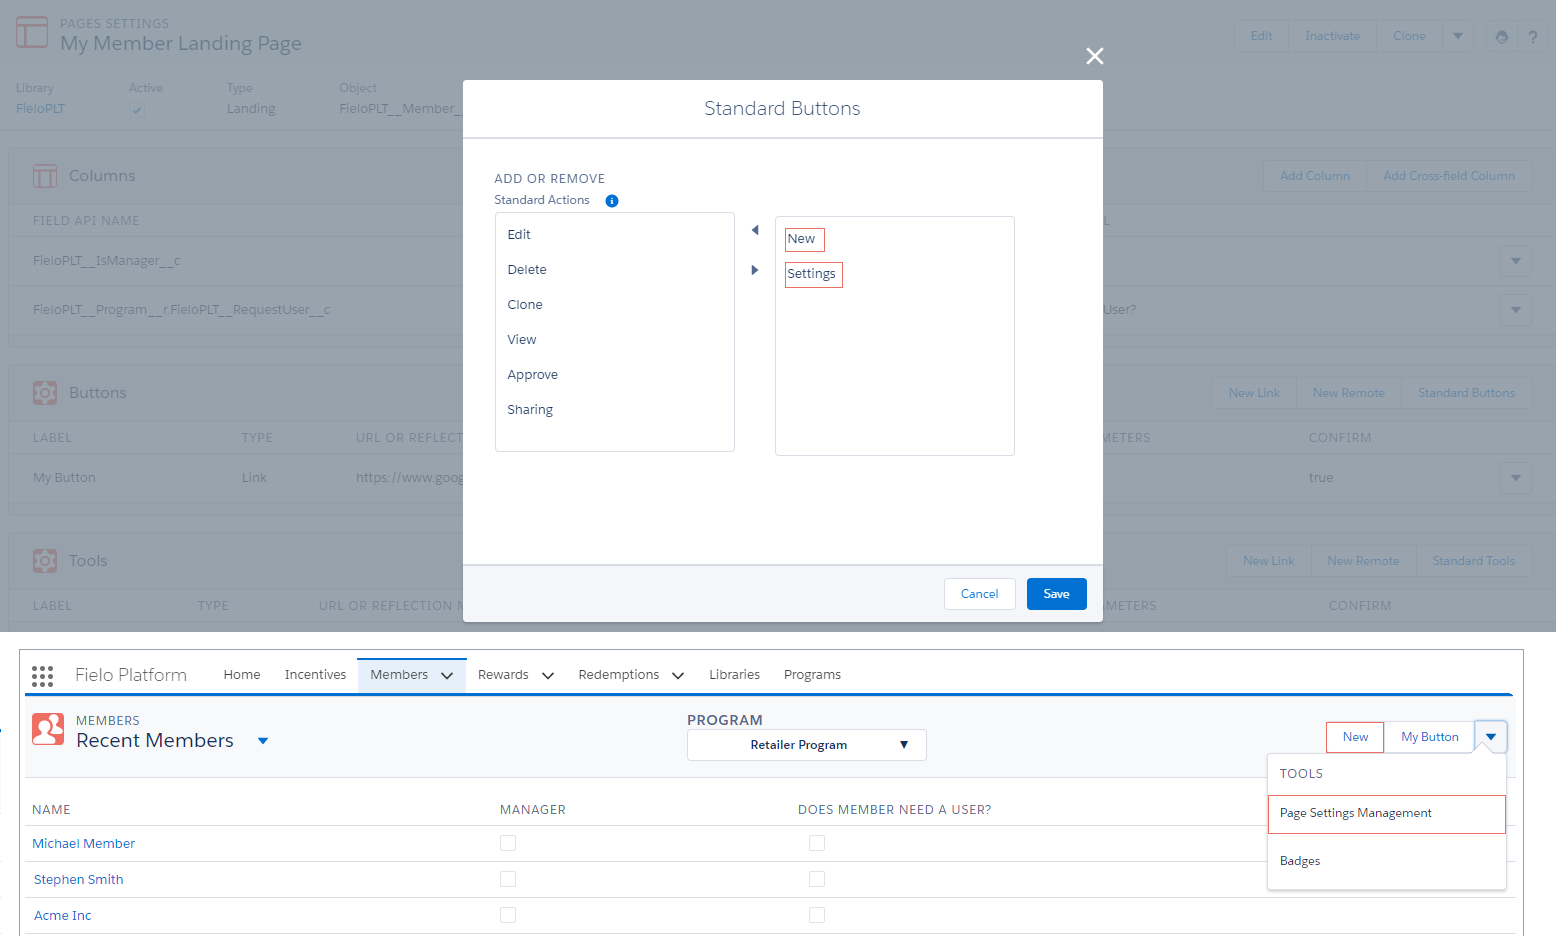
Standard Buttons and Tools
For Landing page, only New can be displayed as a Standard Button and Settings as a Standard Tool. Any of the other available actions (e.g. Edit, Clone, etc.) are not applied to Landing Page Setting Type.
New
As described in New above, you can modify the following parts of your New pages:
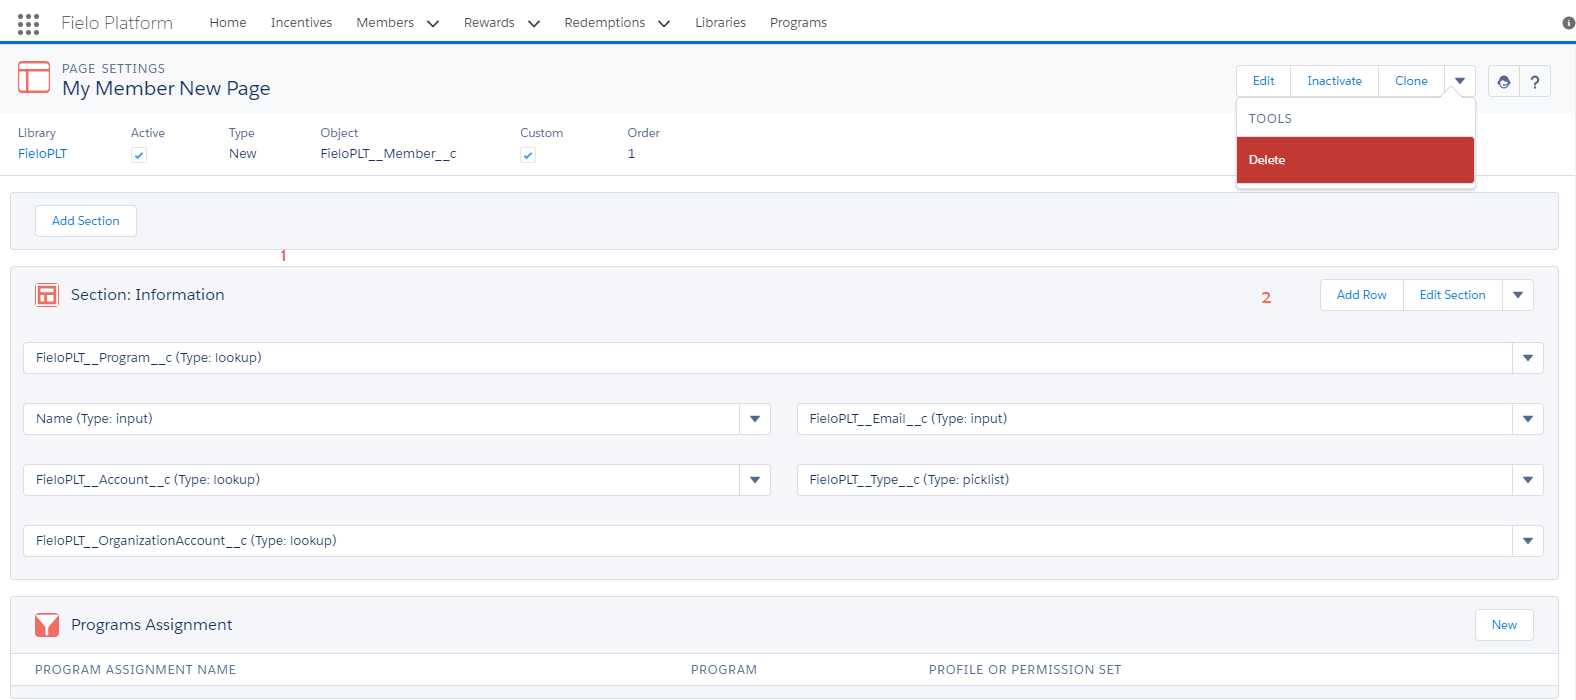
Member New Page
1. Sections
Sections display a group of Rows (Fields) under a common category.
- Add Section: it lets you create a brand new Section where you can include several Rows, organized in different ways.
- Edit Section: you can modify Section names to display to make sure they're clear and catchy enough.
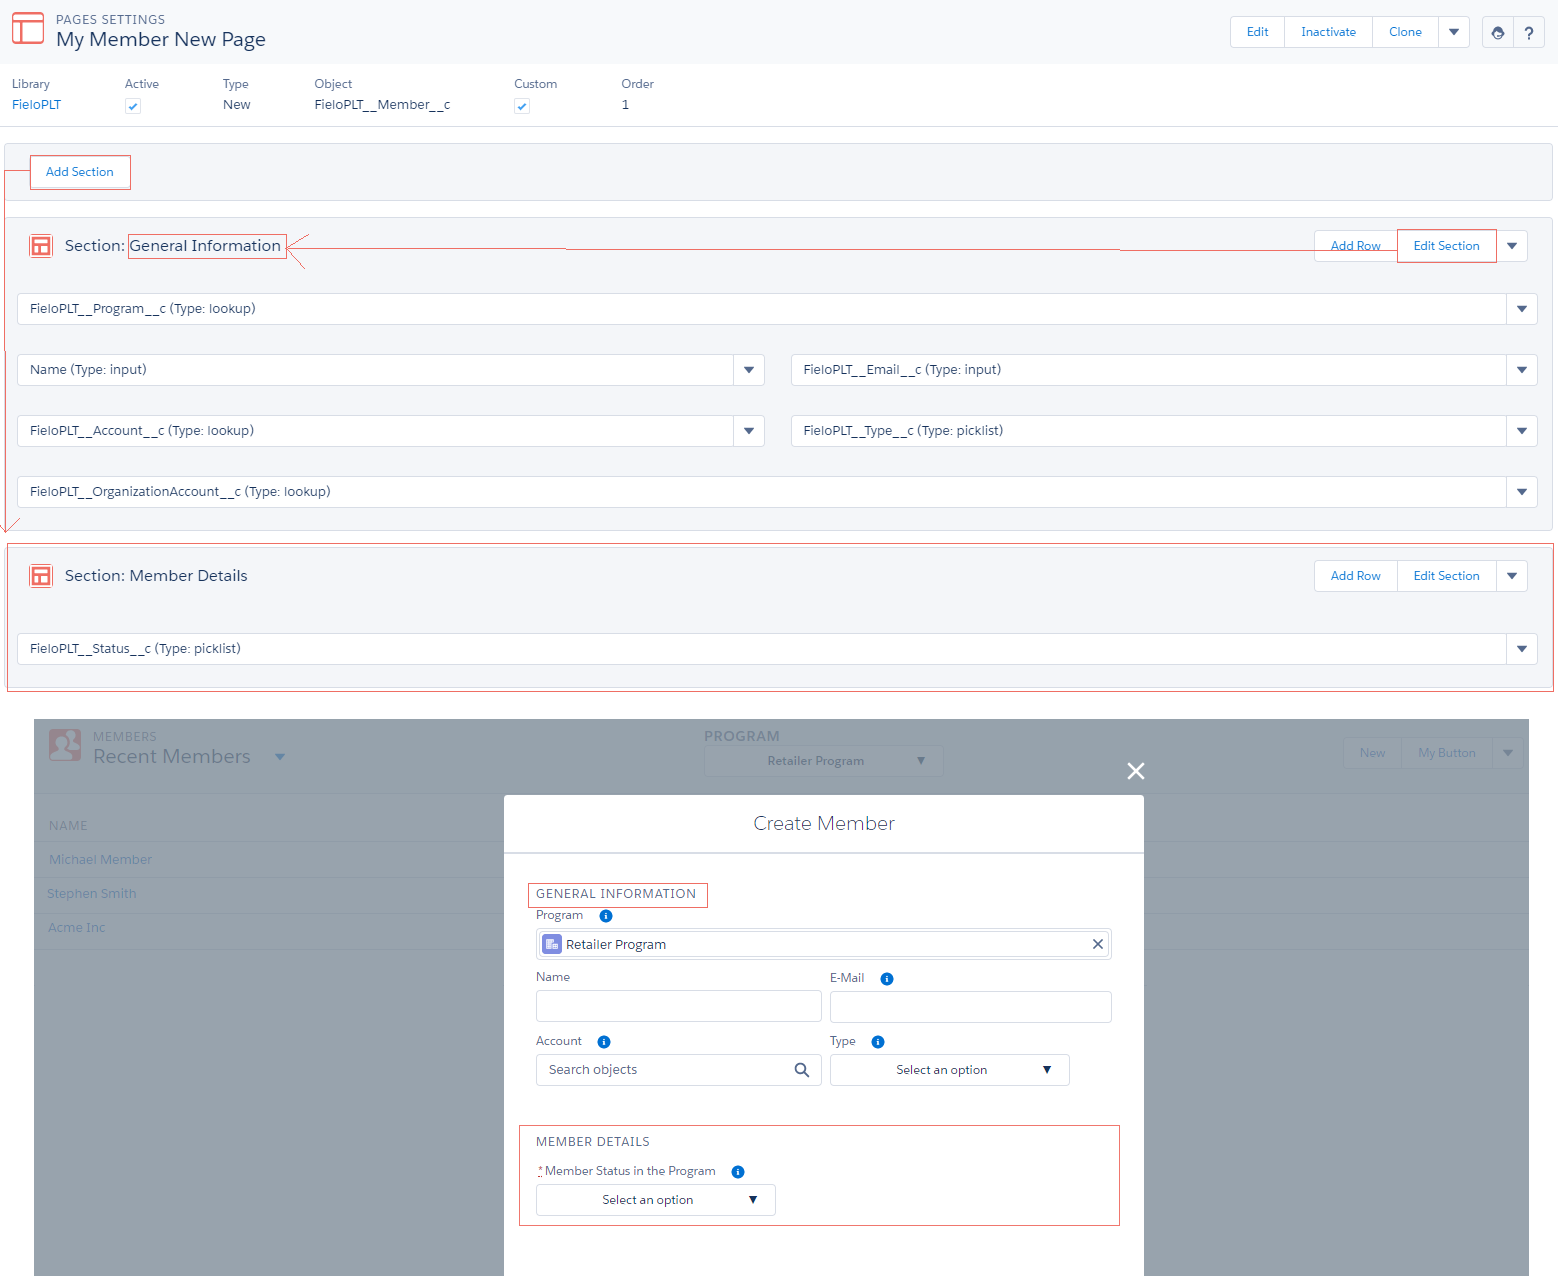
Adding a Section
2. Rows
Rows are where Fields of the Object are displayed. Rows are always grouped in a Section. You can add two types of Rows:
- Add Rows: here is where add different Fields which can be displayed as Rows, either under a Section or independently in the New page.
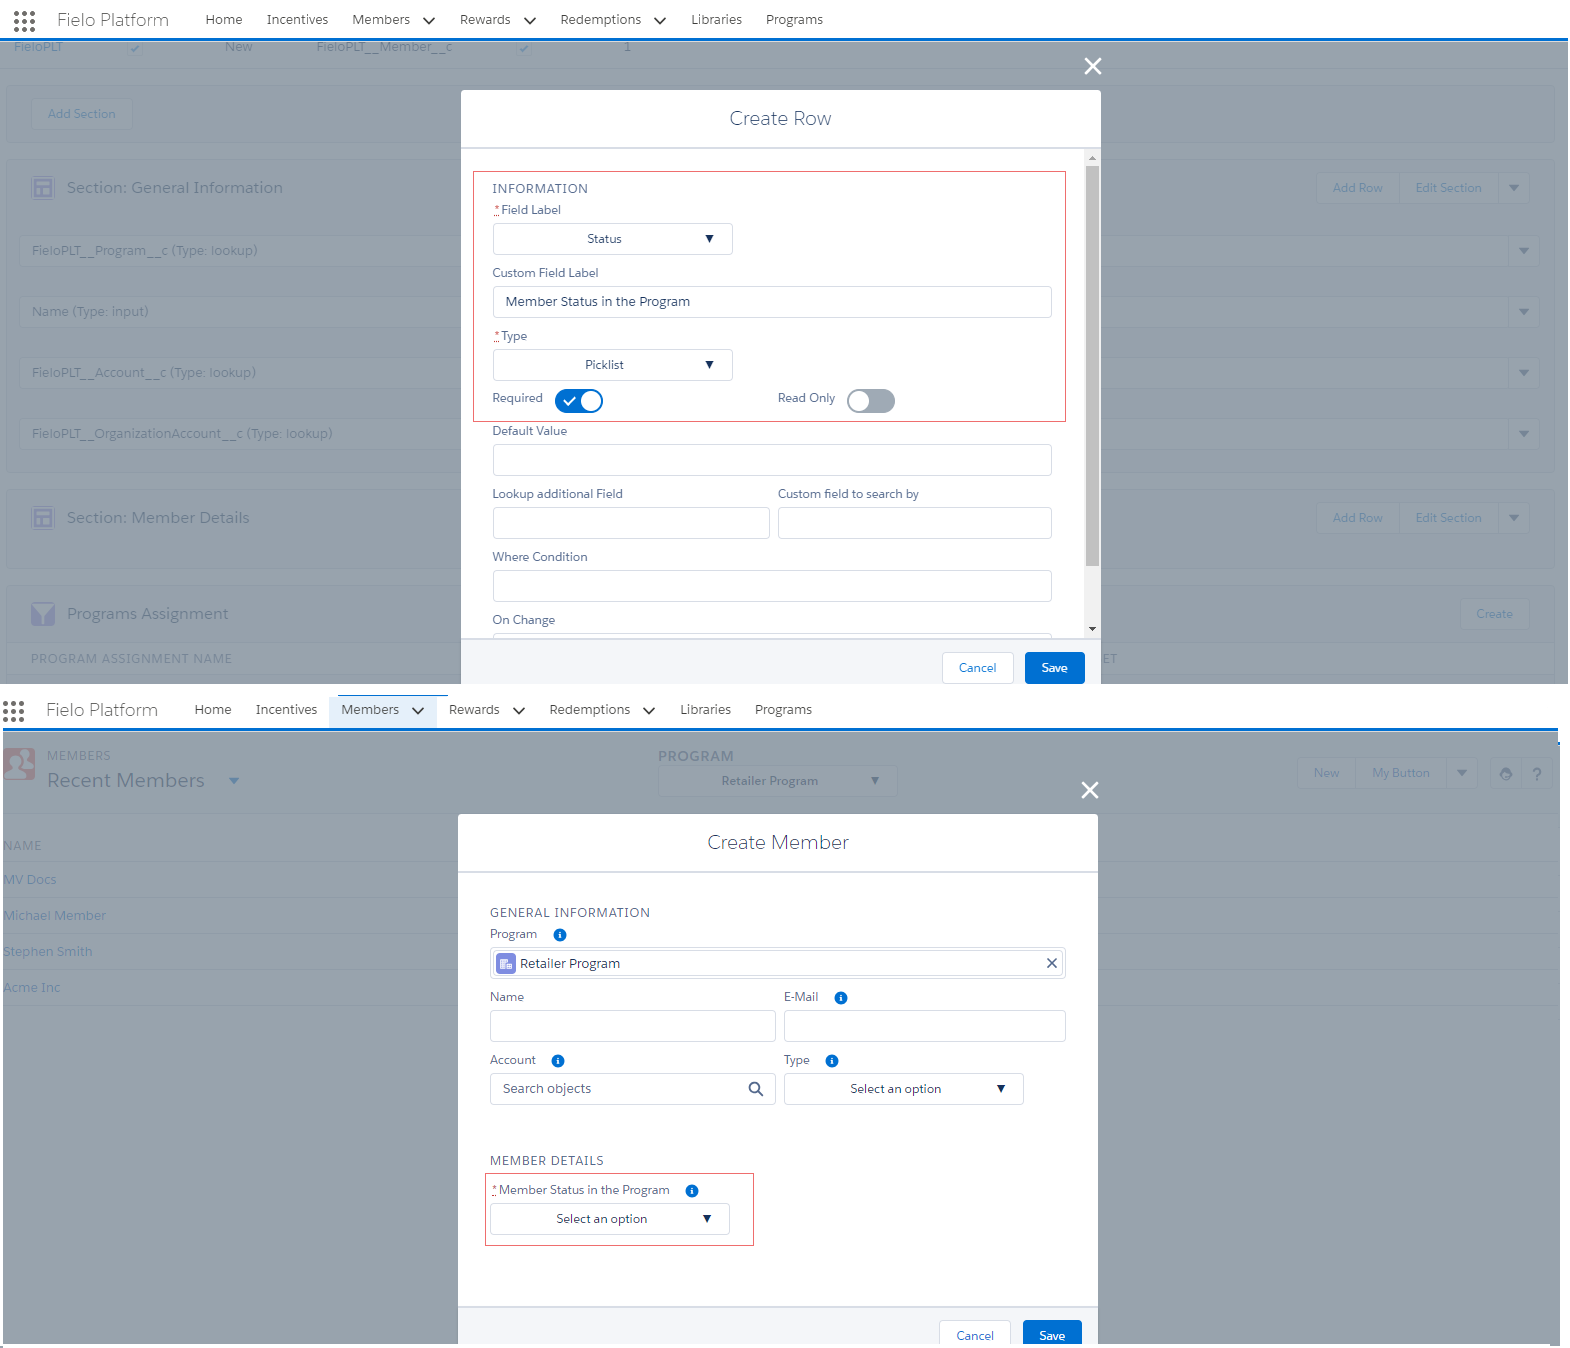
Adding a Row
When adding a new Row, you can configure any of the following basic settings:
- Field Label Name: here you can choose any available field of the object the Page represents. For example, as we're modifying the New page for Members, all Field Labels come from the Member object.
- Custom Field Label: here you can enter a custom name for the Fiel Label Name you're chosen before. This Custom Field Label will be the one displayed on the New page. In our example, we're overwriting Status - default Field Label Name - to Member Status in the Program.
- Required | Read Only: if you'll like the Row to be either a Required field or a Read-only field. You can choose to make it both Required and Read-only, either Required or Read-only, or none of them.
- Type: this lets you determine how the type of Row will be visually displayed. You can go for any of these options:
- Hidden: Row won't be visible when using the New page. This is useful when using a Default Value to pre-populate the Row in the New page but
- Input: Row will be shown as an open text box where you'll be able to add plain text.
- Checkbox: Row will be a field you can / , and will include a
- Picklist: Row will be a menu that expands giving you different choices (values) from a list you have defined.
- Multi-select: Row will let you select one or more values at a time.
- Radio Button Group: Row will be shown in a group of two or more and you can only select one radio button at a time.
- Lookup: Row will be a () be an autocompleted combo box that will search against a database object.
- Rich Text: Row will be a text area with added capabilities for use by various publishers.
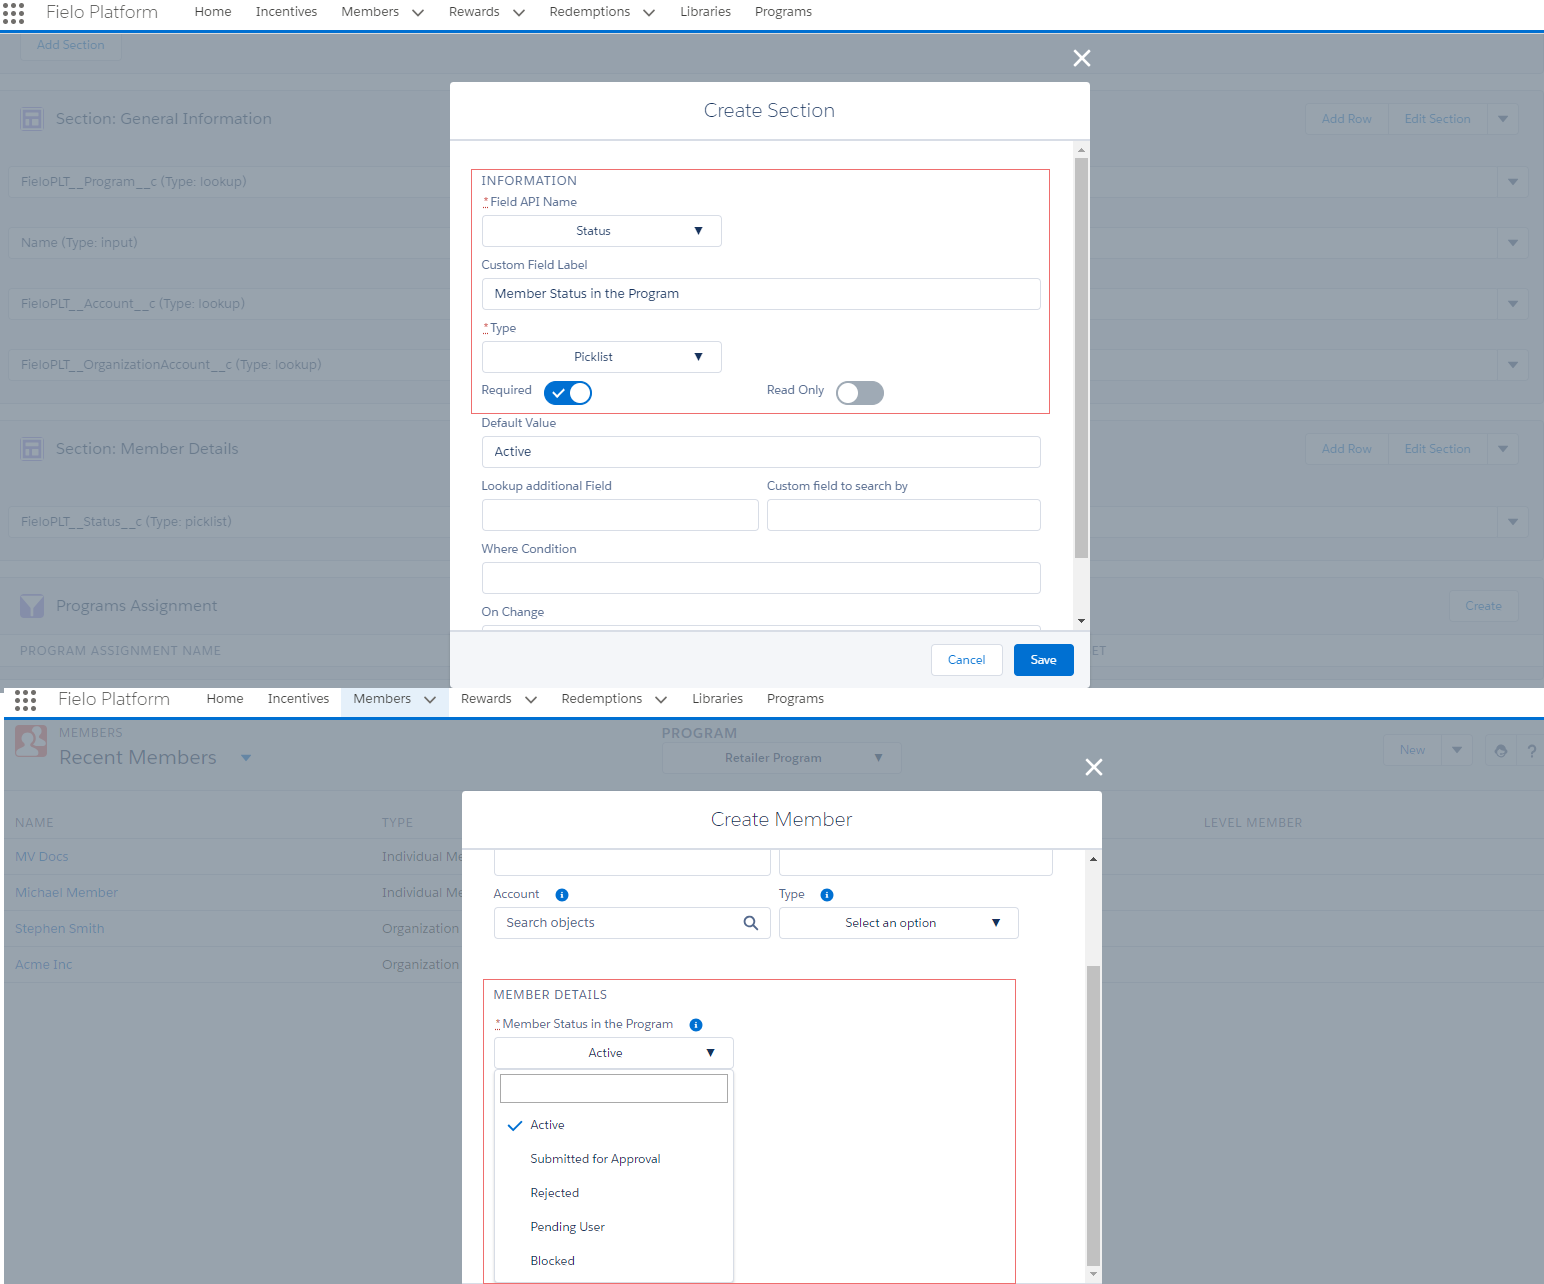
Adding a Row - Basic Settings
For fields whose Type is Lookup (), you can set any of the following specific details, such as:
- Additional Field: This lets you show an extra field to identify different records when searching against a database object. For example, when looking up for Member's Account, you want to distinguish them by SIC Code apart from their Account Name. Note that you need to enter the extra field API Name - i.e.
Sic.
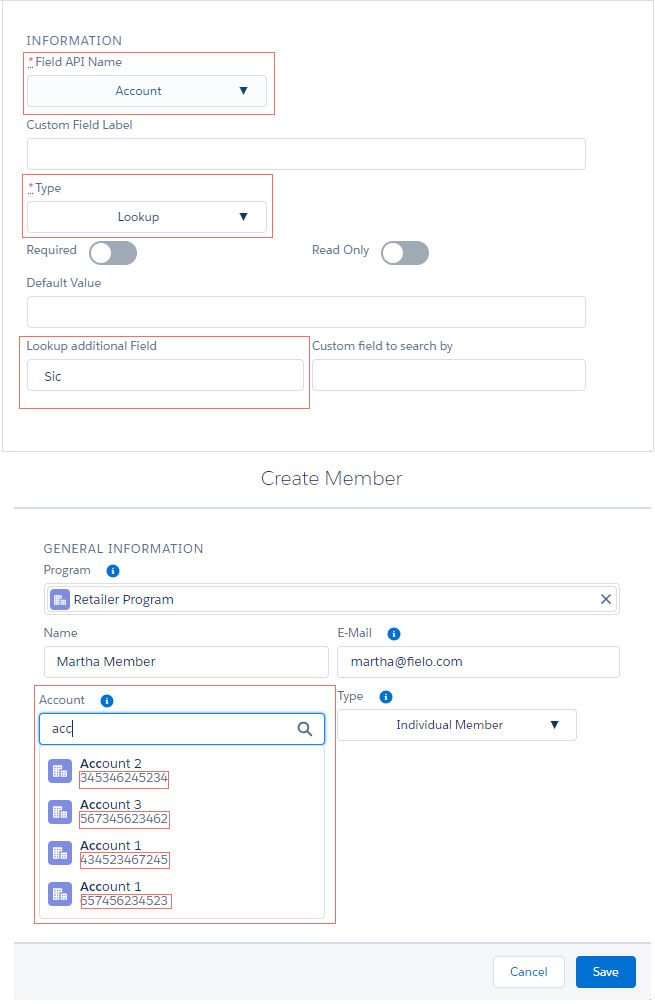
Adding a Row - Additional Field
- Custom Field: This lets you search by a different field. For example, when looking up for Member's Account, you may want to search them directly by SIC Code instead of their Account Name. Note that you need to enter the extra field API Name - i.e.
Sic.
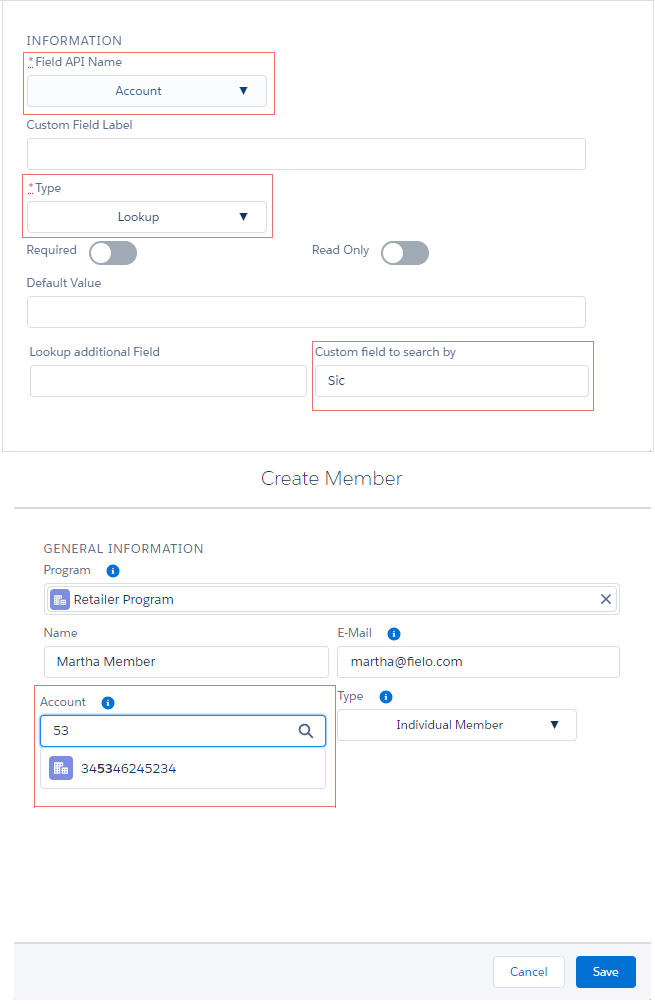
Adding a Row - Custom Field
- Add Row Column: note that once you've added a Row, you can then add a Column just by clicking . A Column includes the same information as a Row, but the only difference is that it's vertically placed next to a previously created Row you've chosen.
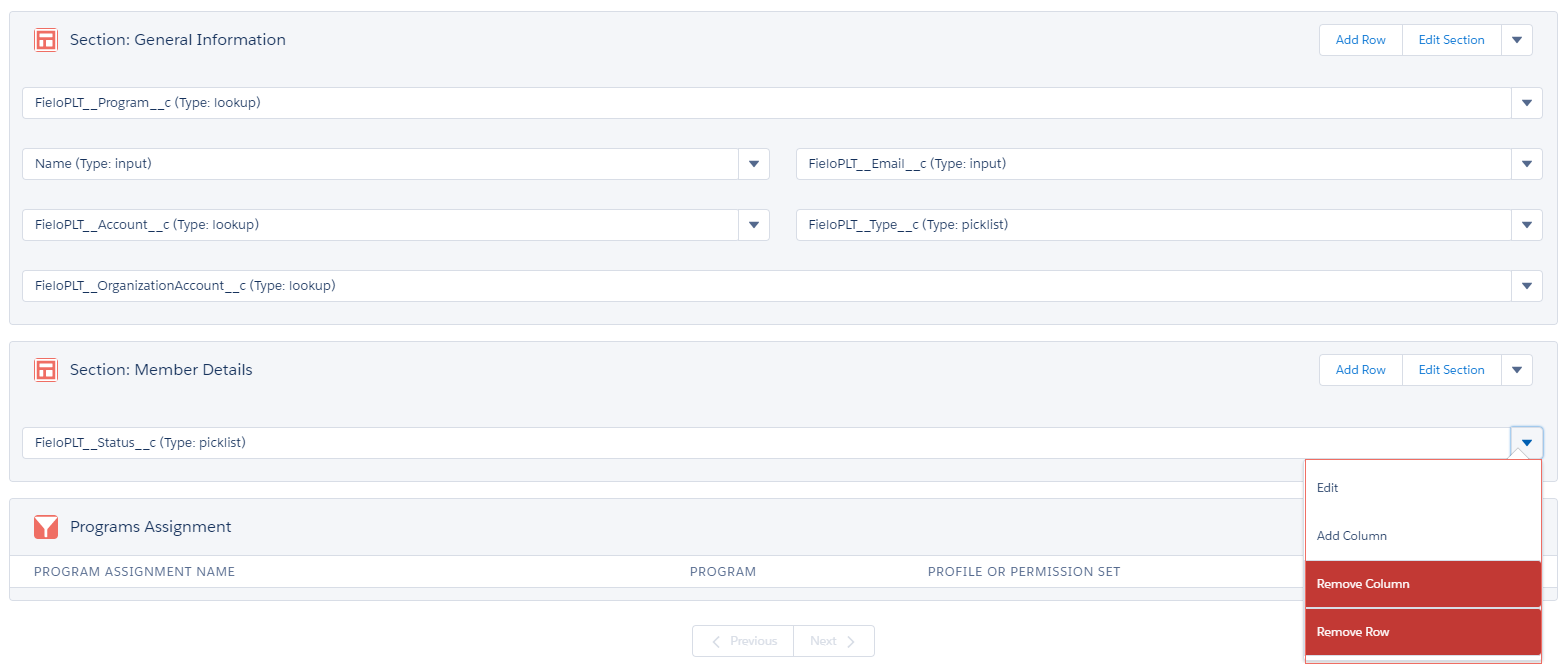
Add Row Column
Record View
Record View includes View, Detail, Related and Edit Page Setting Types. These Page Setting Types can be accessed directly from any specific record.
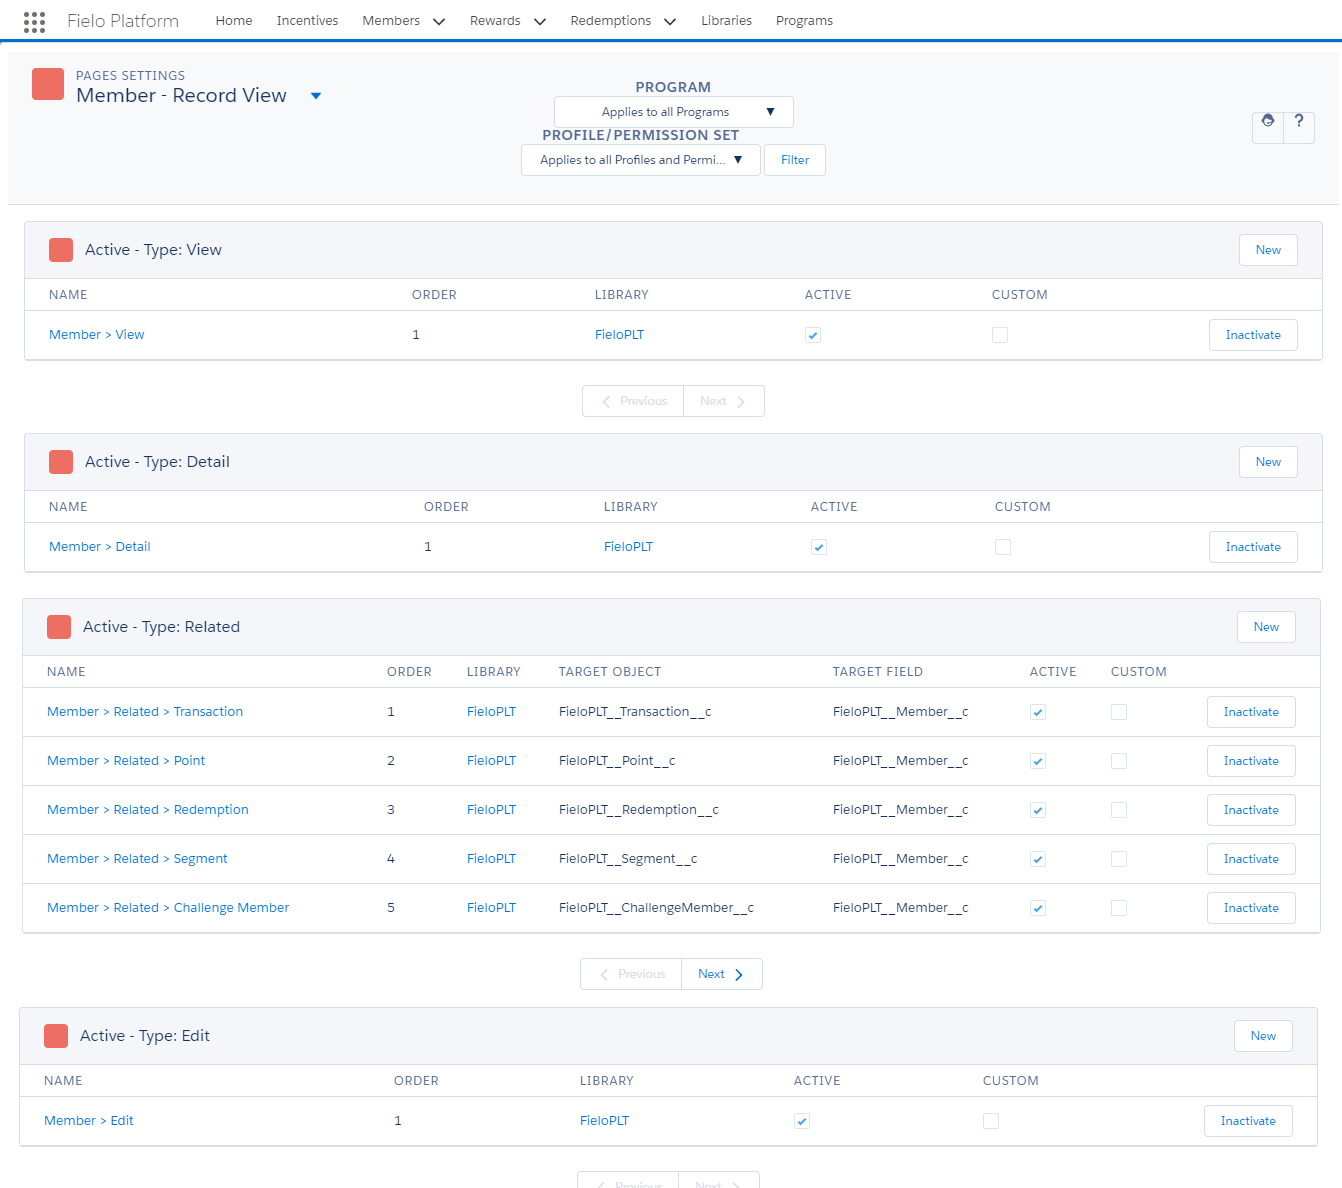
Member Record View
View
As described in View above, you can modify the following parts of your View pages:
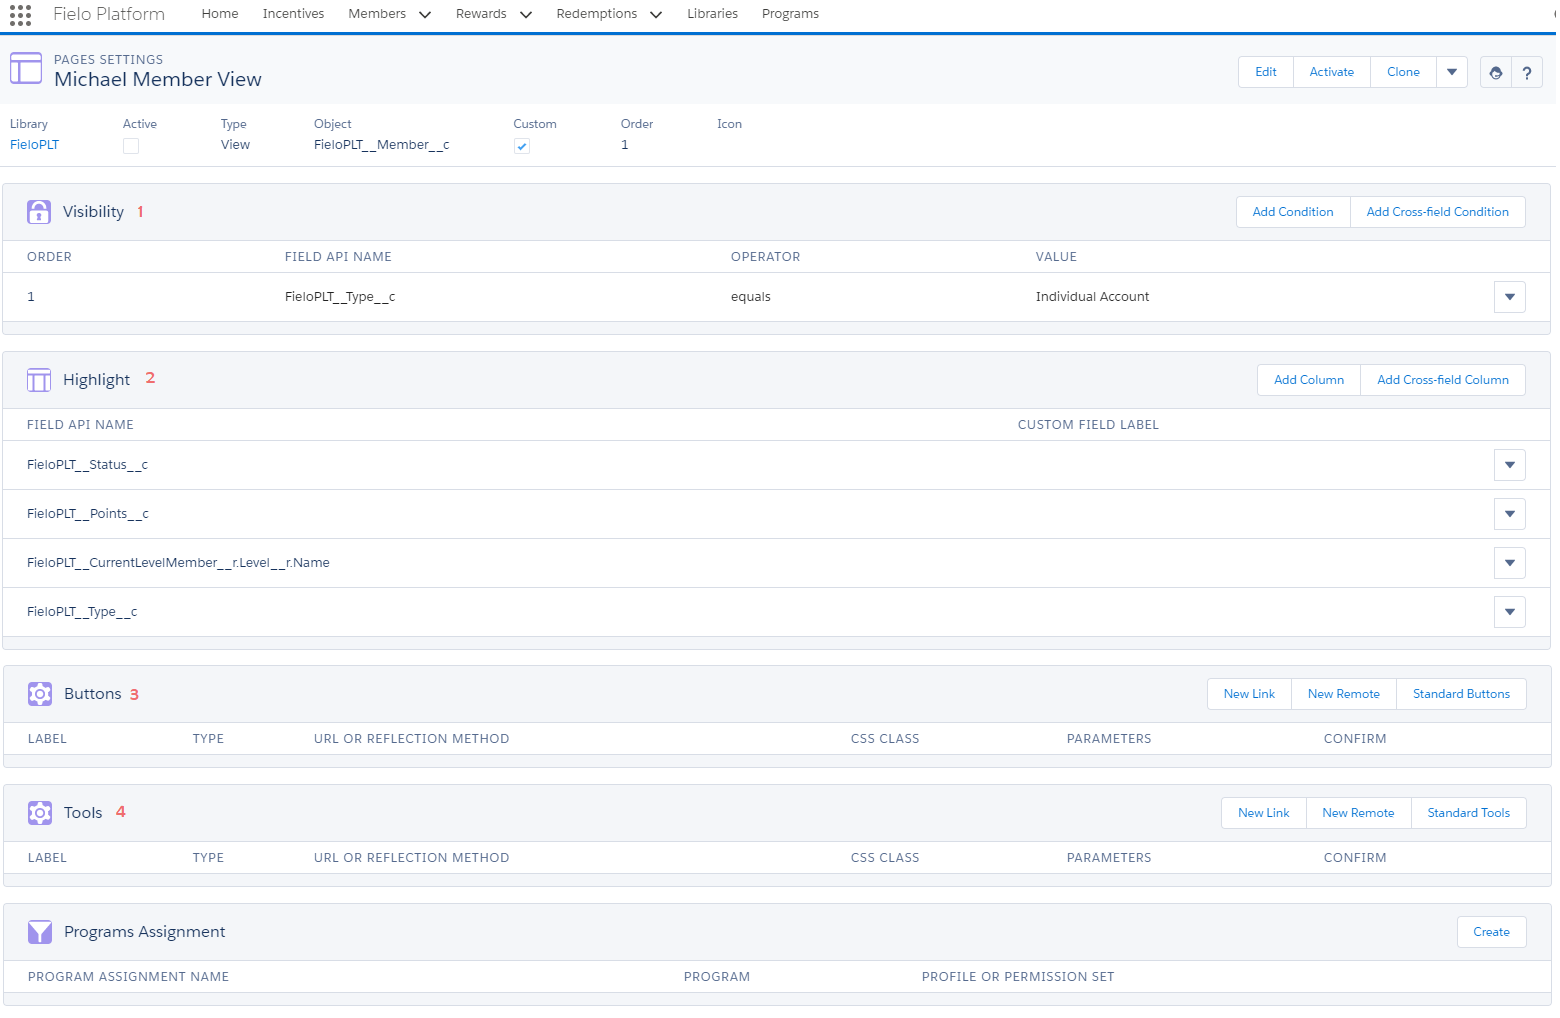
Member View
1. Visibility
You can set a condition to decide when a Page Setting is displayed.
2. Highlight
Highlight lets you include some fields you want to point out and bring the attention to. You can add two different kinds of Columns:
- Add Column.
- Add Cross-field Column.
It works the same way as when adding Columns to Landing pages.
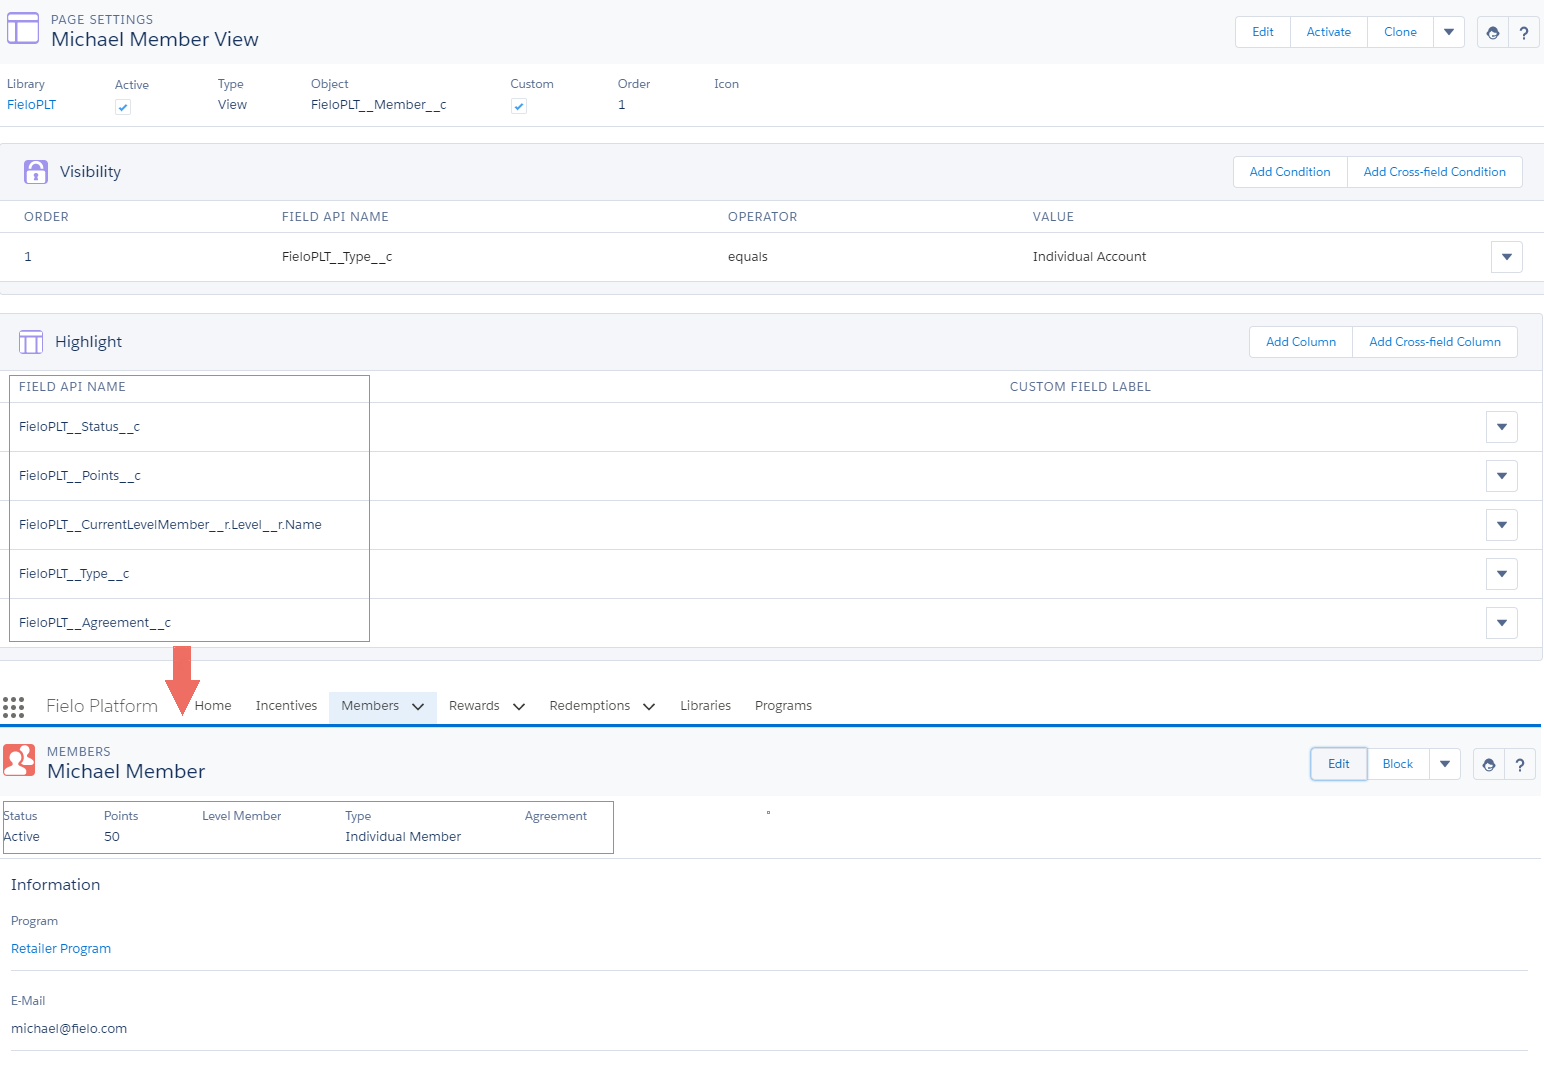
Member Highlight
3 & 4. Buttons and Tools
You can add any of the three types of Buttons and Tools available:
- New Link.
- New Remote.
- Standard Buttons | Standard Tools.
It works the same way as when adding Buttons and Tools to Landing pages.
For View page, only Edit and Clone can be displayed as a Standard Button and Delete, View, Settings, and Sharing as a Standard Tools. New is not applied to View Page Setting Type.
Detail
As described in Detail above, you can modify the following parts of your Detail pages:
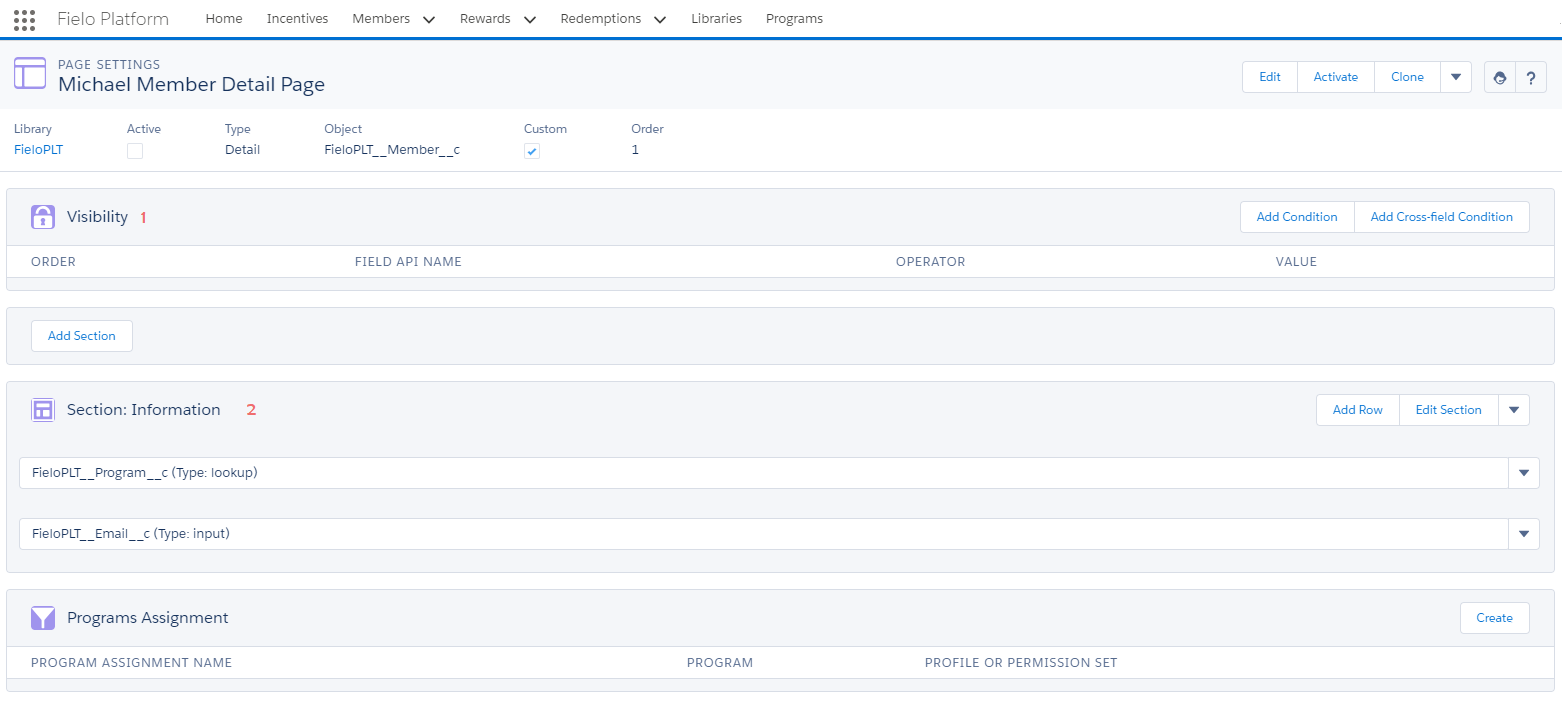
Member Detail
1. Visibility
You can set a condition to decide when a Page Setting is displayed.
2. Sections
Sections display a group of Rows (Fields) under a common category.
- Add Section.
- Edit Section.
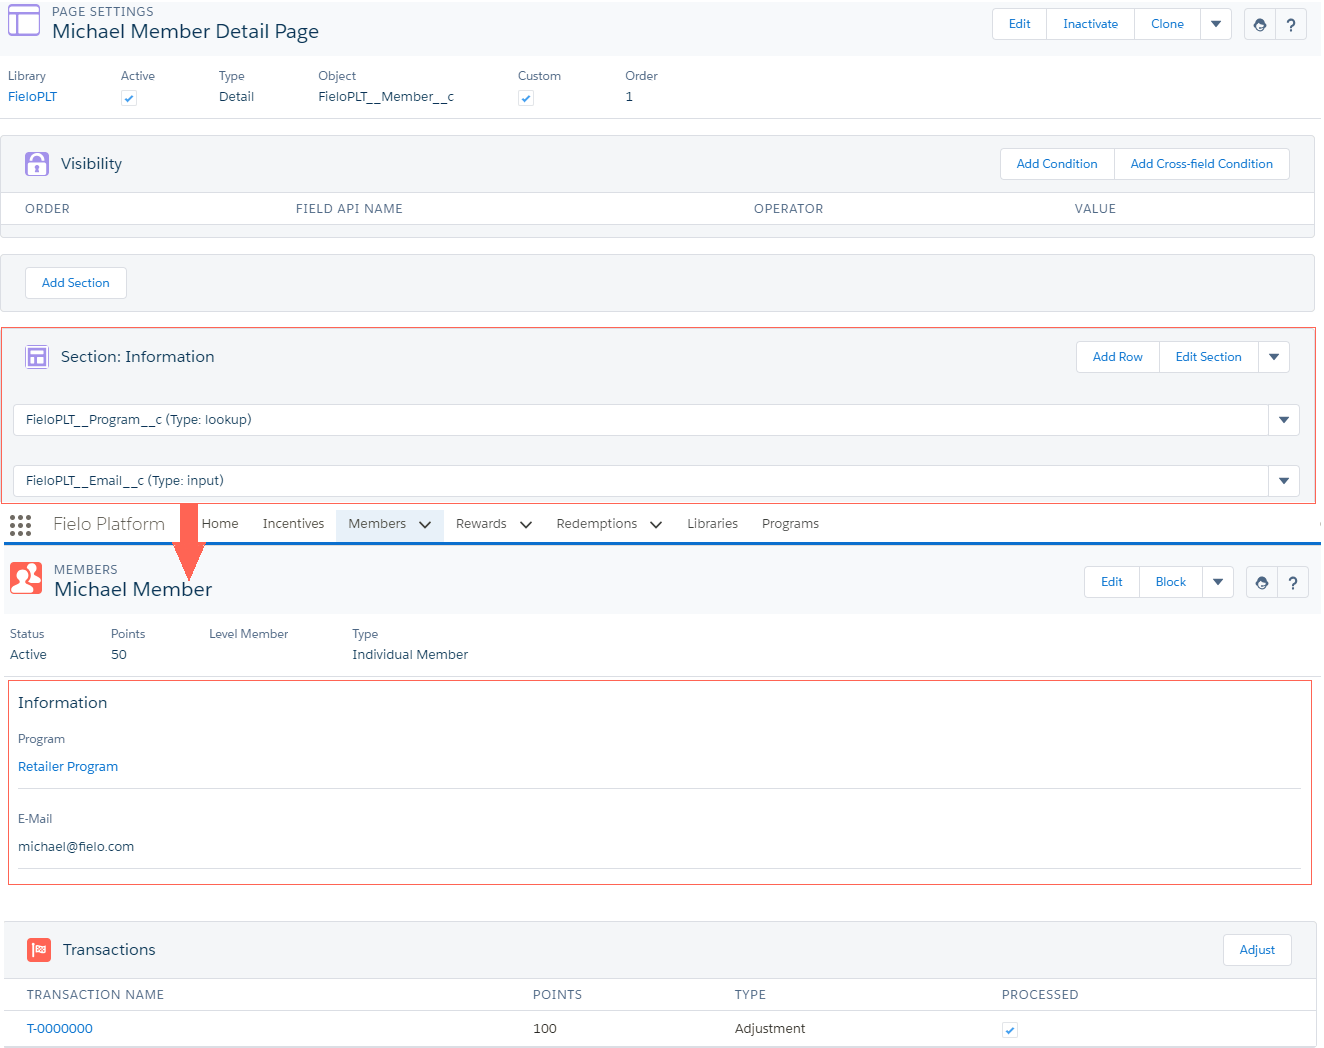
Member Details
It works the same way as when adding Sections to New pages.
Related
As described in Related above, you can modify the following parts of your Related pages:
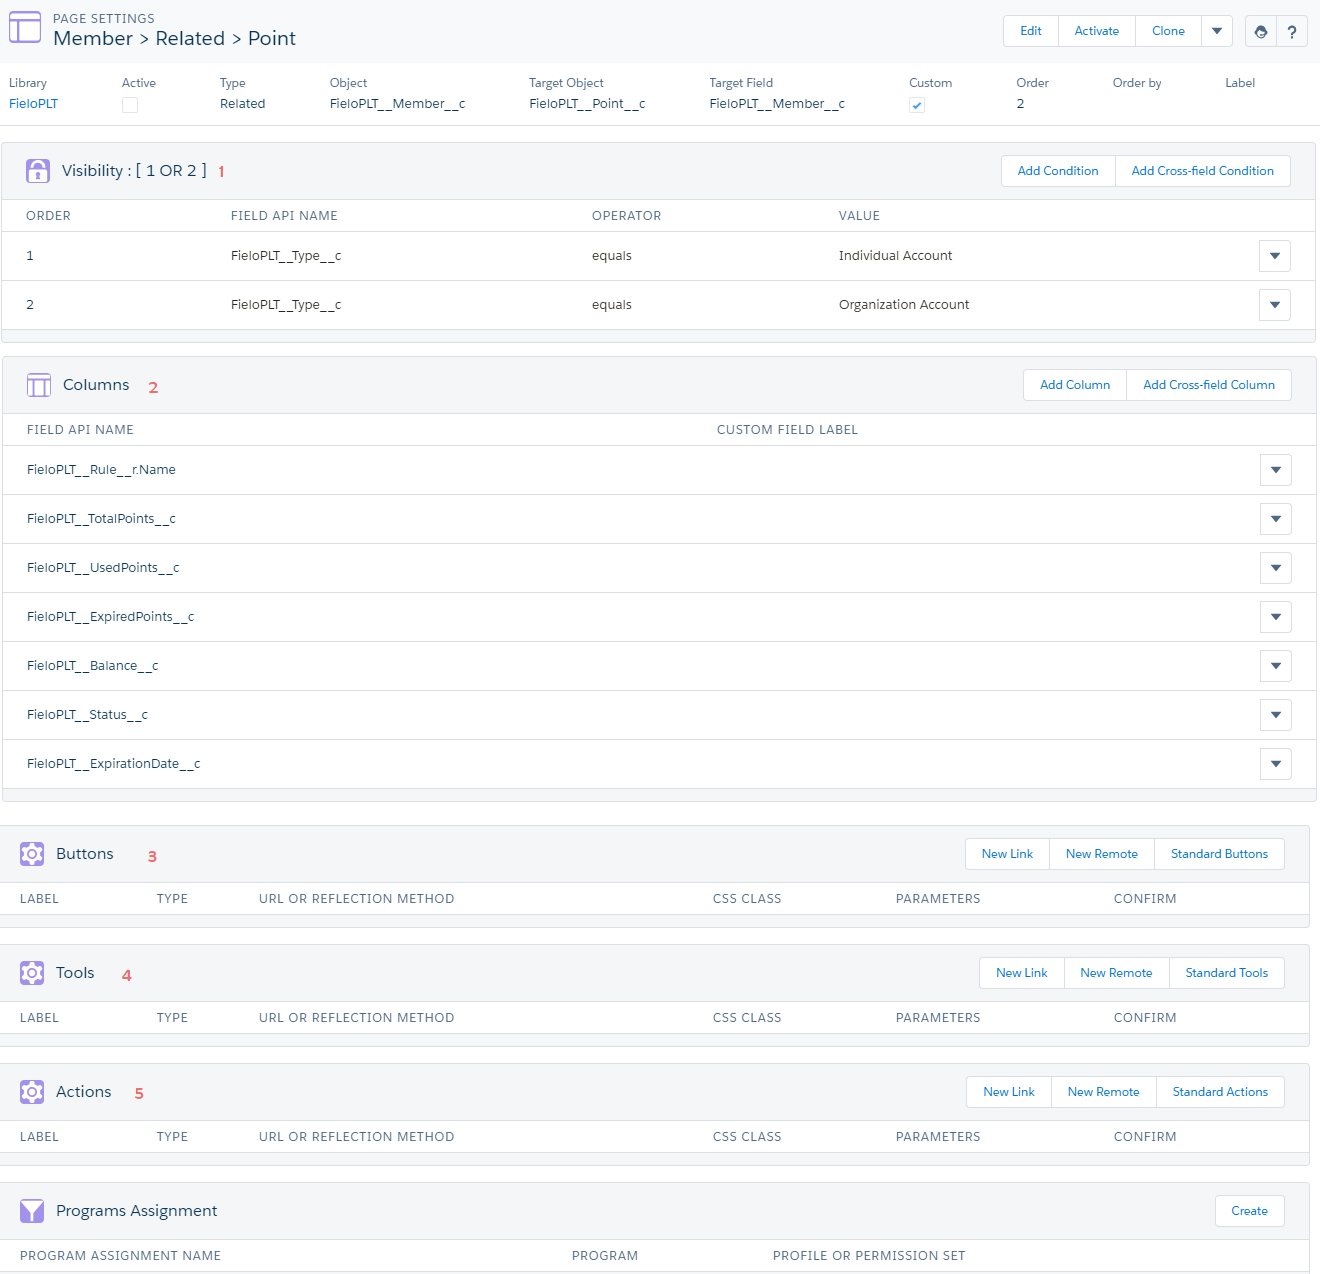
'Points' Related List in Members
1. Visibility
You can set a condition to decide when a Page Setting is displayed.
2. Columns
You can add two different kinds of Columns:
- Add Column.
- Add Cross-field Column.
It works the same way as when adding Columns to Landing pages.
3. & 4. Buttons and Tools
There are three types of Buttons and Tools you can choose from:
- New Link.
- New Remote.
- Standard Buttons | Standard Tools.
It works the same way as when adding Buttons and Tools to Landing pages.
5. Actions
Actions lets you create or update records from a Related list in a quick and easy way directly from the record.
There are three types of Actions you can choose from:
- New Link.
- New Remote.
- Standard Actions.
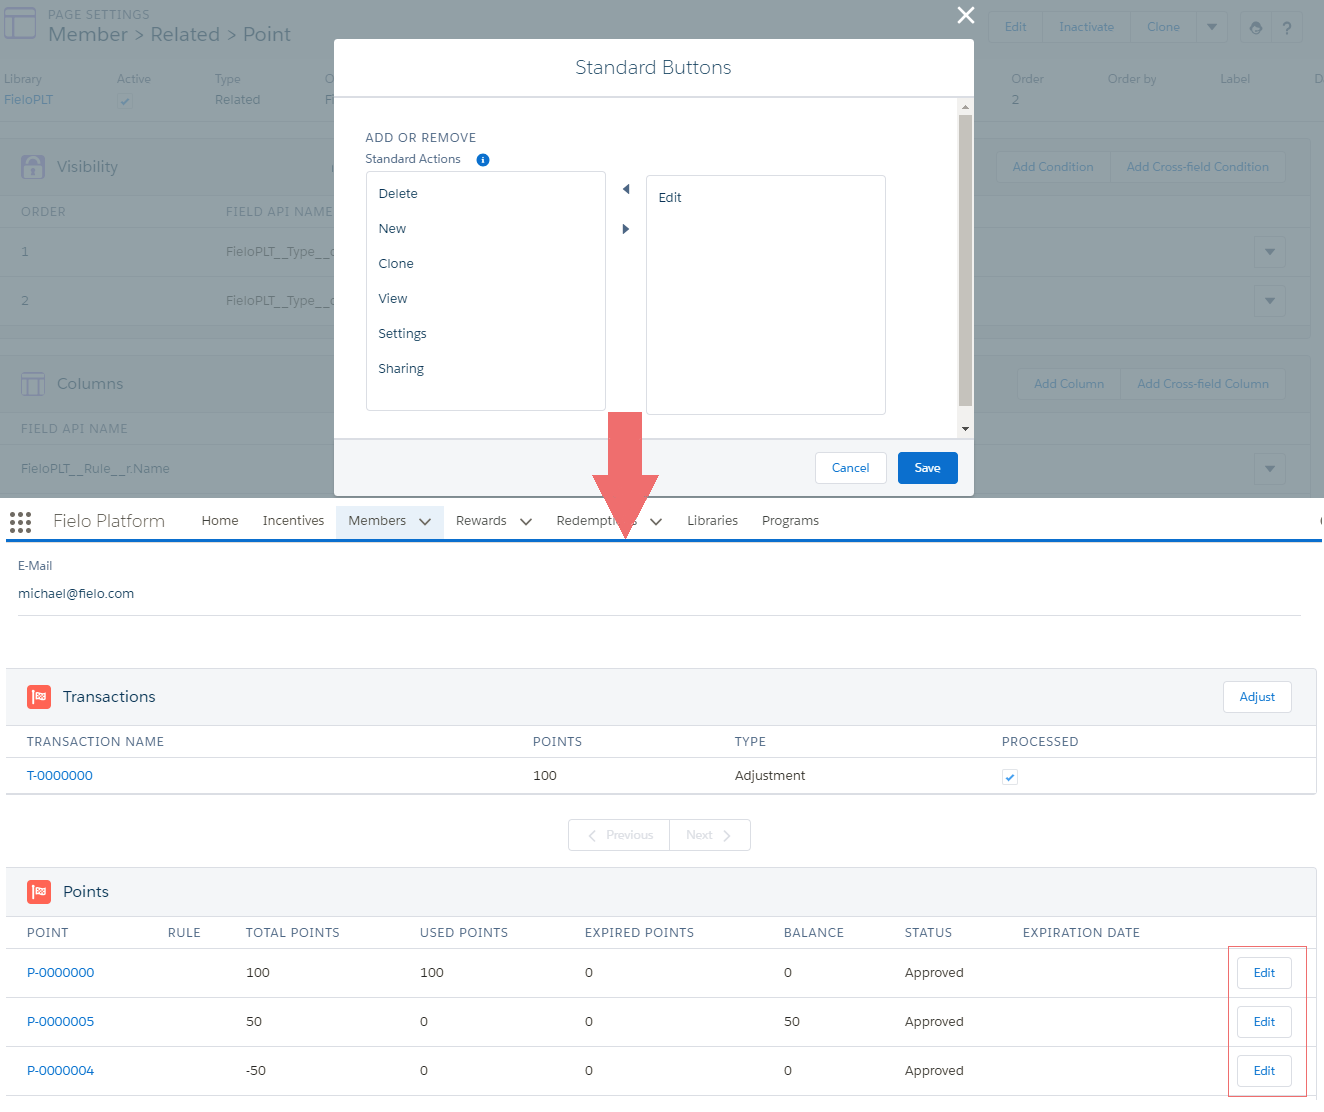
Edit on 'Points' Related List
Ordering Items on Your Related ListYou can order the data shown on your custom related list page setting. In the Order by field, use the following format:
NameOfField ASC, NameOfField DESC, ...where ASC means from least to greatest and DESC means from greatest to least.
Adding a Data Filter to Your Related ListYou filter the data shown on your custom related list page setting. In the Data Filter field, use the following format:
{"//API Name of Target Object":"{!record.Id}","//First field to filter by":"Value", "//Second field to filter by":"Value",...}The first key-value pair ensures that only records of the related list that have a lookup to your current record are shown (as is standard behavior when not using a data filter at all). The rest are the filters you want to use to limit what records are shown on the related list.
For example, if you have a custom version of the Member > Related > Point page setting, you can use the following data filter to show only Point records related to a custom Currency called "Mile":
{"FieloPLT__Member__c":"{!record.Id}","FieloPLT__PointType__r.Name":"Mile"}
Edit
As described in Edit above, you can modify the following parts of your Edit pages:
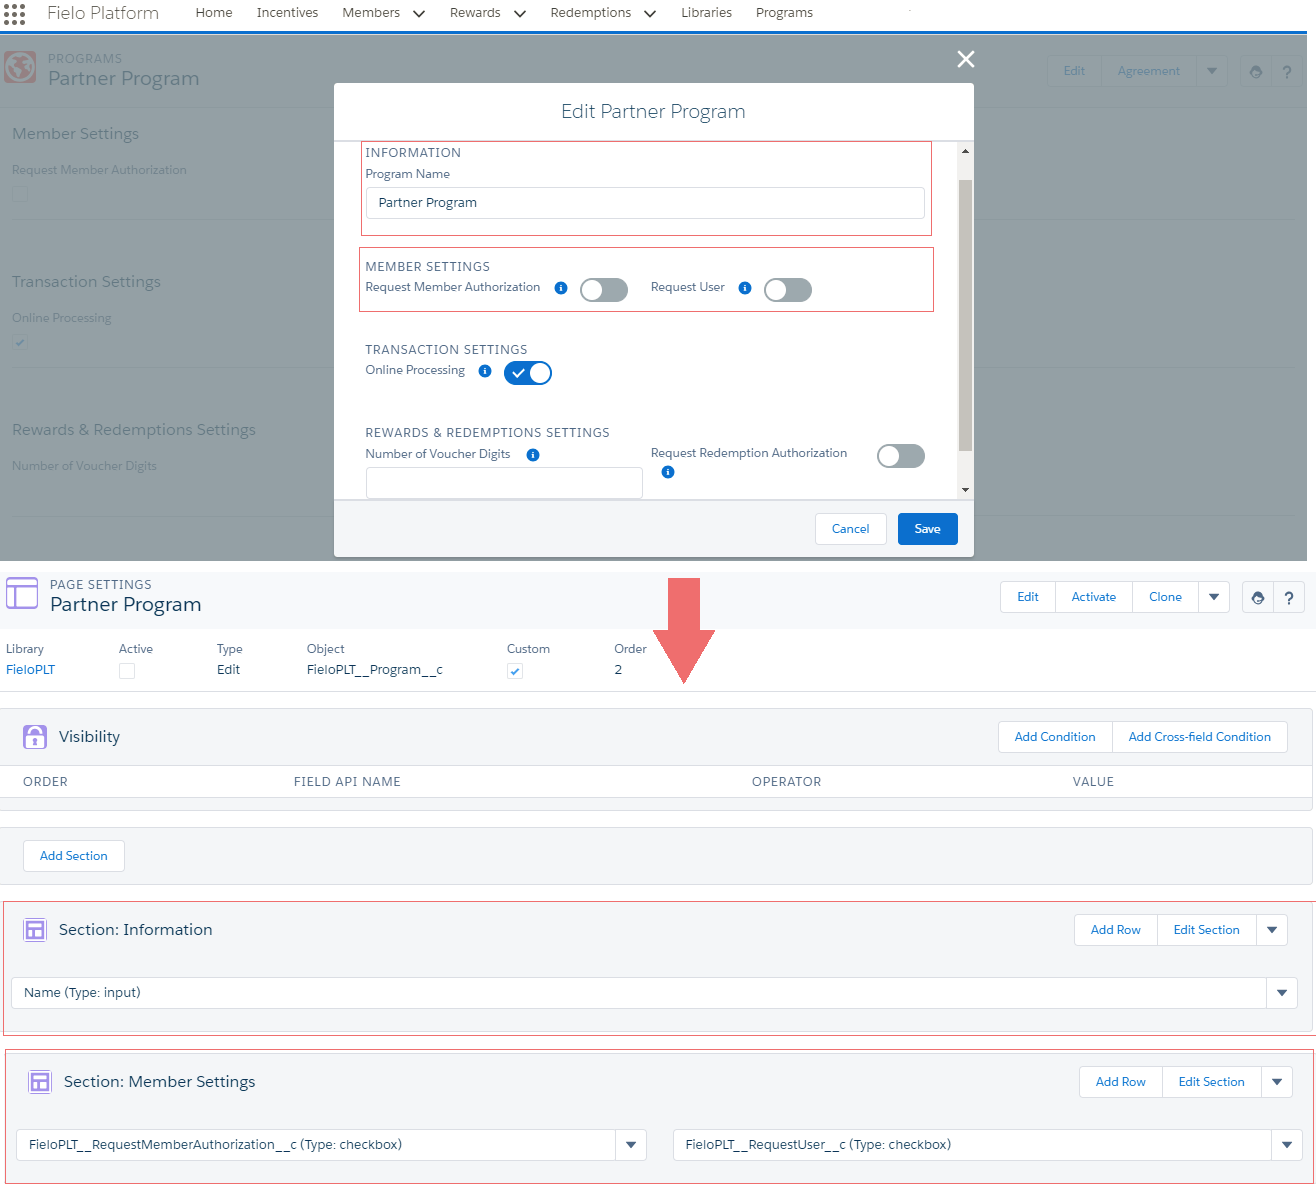
Program Editing
1. Visibility
You can set a condition to decide when a Page Setting is displayed.
2. Sections
Sections display a group of Rows (Fields) under a common category.
- Add Section.
- Edit Section.
It works the same way as when adding Sections to New pages.
Updated over 1 year ago