
Global Reward Solutions
An expanded Rewards universe for your loyalty portal
Global Reward Solutions (GRS) utilizes a diverse array of partners and automatic customization to ensure that your rewards catalog is highly relevant and enticing to your program members.
Contact FieloIf you wish to use GRS in your Program, contact your Fielo Consultant first. They will proceed with the GRS implementation in your ORG; you don't need to follow the process described in this page.
GRS Information
Implementation is carried out jointly with GRS. Before starting, you'll need to get in touch with your GRS account manager and obtain the following information:
- Gallery domain
- Admin username
- Admin password
- API key
You can also ask your account manager about the GRS Storefront Implementation Guide, which you'll need to follow afterwards to complete your implementation.
Enable State and Country/Territory Picklists
In order to ensure that Rewards are highly relevant to your Members, GRS requires your Salesforce ORG to use State and Country/Territory Picklists. This way, GRS can offer your
Members the best rewards available in their area. Let's get going.
In Setup, start to enter "State and Country/Territory Picklists" in the Quick Find box and select it.
Carefully read and follow Salesforce's instructions on enabling this feature. It will involve adapting state and country data already in your Org to picklist format. Once you've finished this process, go ahead and click Enable.
Find more details on how to Configure State and Country/Territory Picklists.
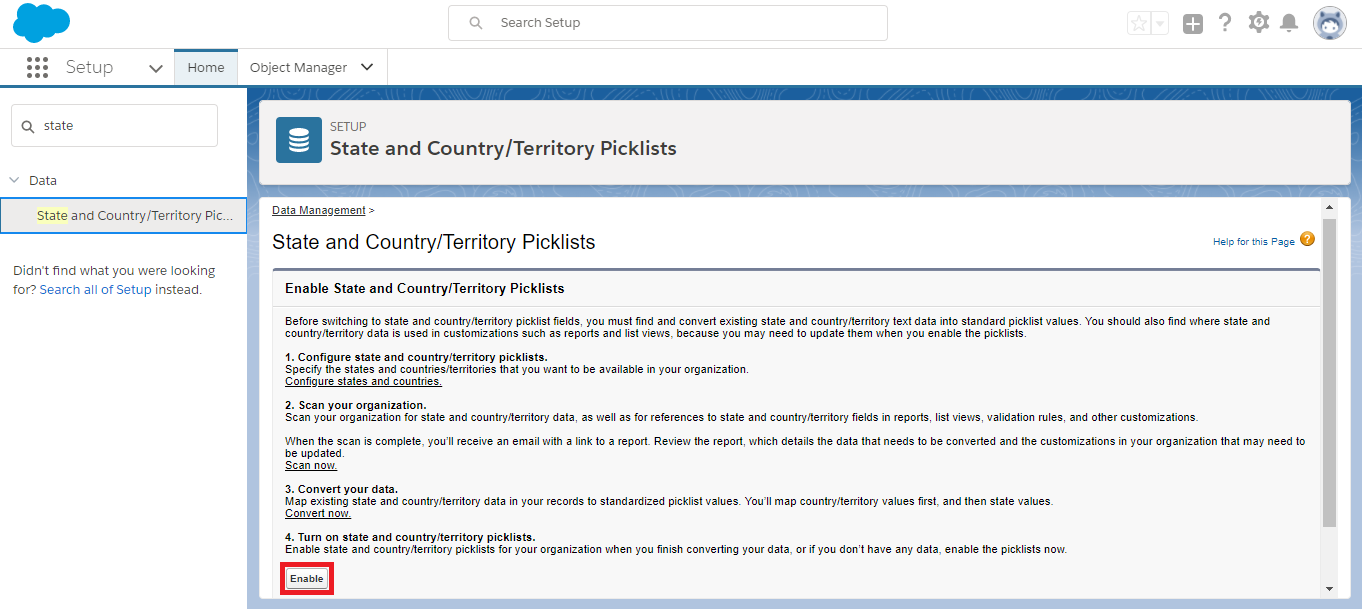
Enable State and Country/Territory Picklists
Create an Account for GRS
Integration with GRS requires an Account for internal use. In Salesforce Setup, go to the App Launcher and click Accounts. In Accounts, click New.
You can give this new account any name you'd like and you don't need to fill in any other fields. Take note of the name you've given it and click Save.
Install the Fielo-GRS Connector
After logging into your Salesforce Org, click here to access our repository with the installation link for the latest release of the Fielo-GRS Connector.
Or, click here to access the direct link.
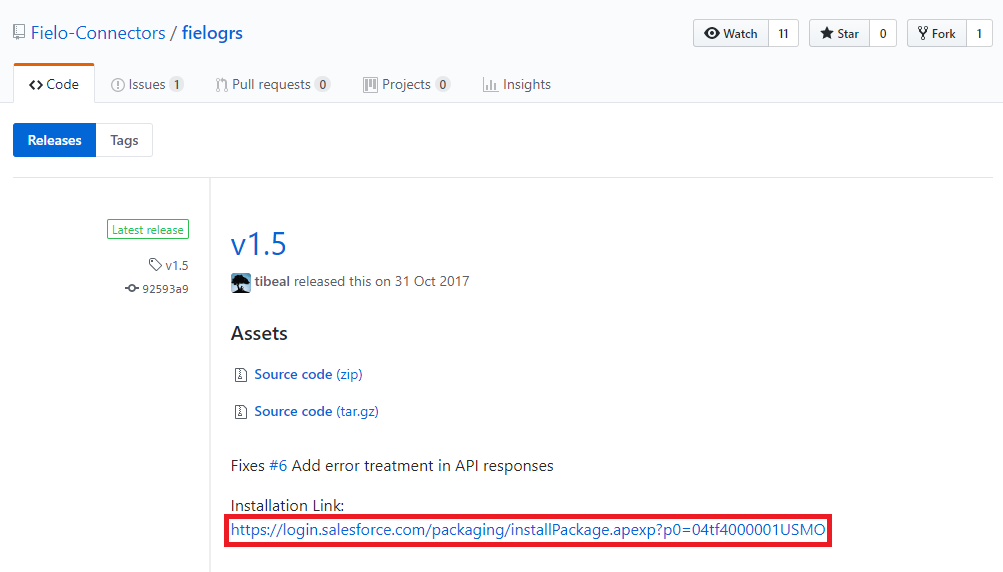
Fielo-GRS Connector Latest Release
Select Install for Admins only and click Install. When process is completed, the Org Administrator will be notified by email.
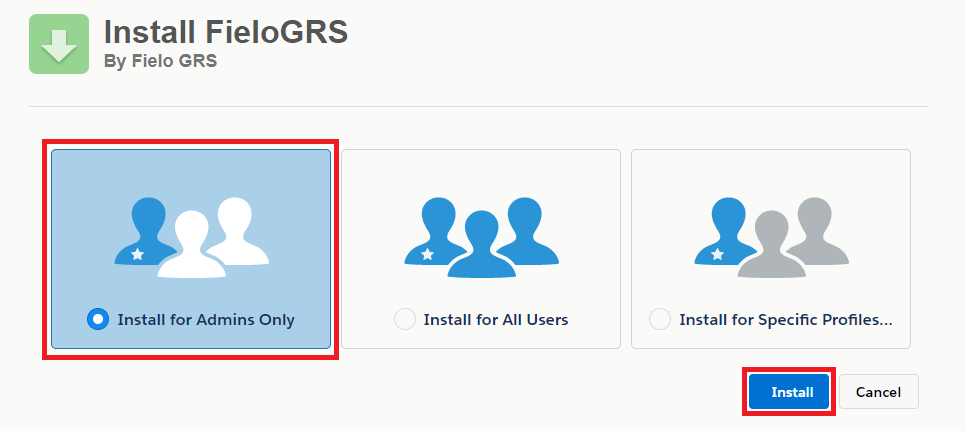
Fielo-GRS Connector Installation
Add GRS Fields to Program Settings
After installing the GRS connector into your Org, you'll need to add the related fields to the Program object so that you are able to complete the setup and input some necessary data.
For that, go to Salesforce Set up and access the Object Manager. Find the Program object and enter it.
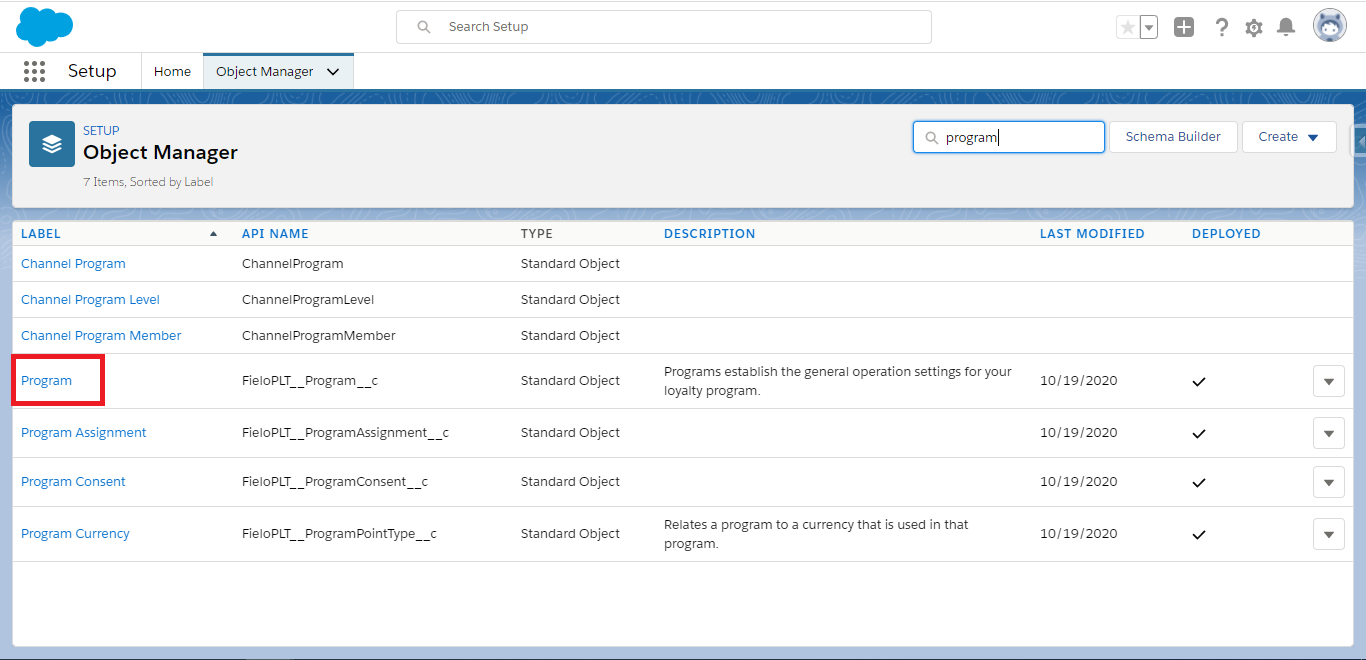
Click on 'Program' in order to access this object's page.
In the column to the left, access Field Sets and click on New. Give it a Label, enter the Field Set Name (which must be ExtendProgramSettingsForm) and describe where it is going to be used. Save.
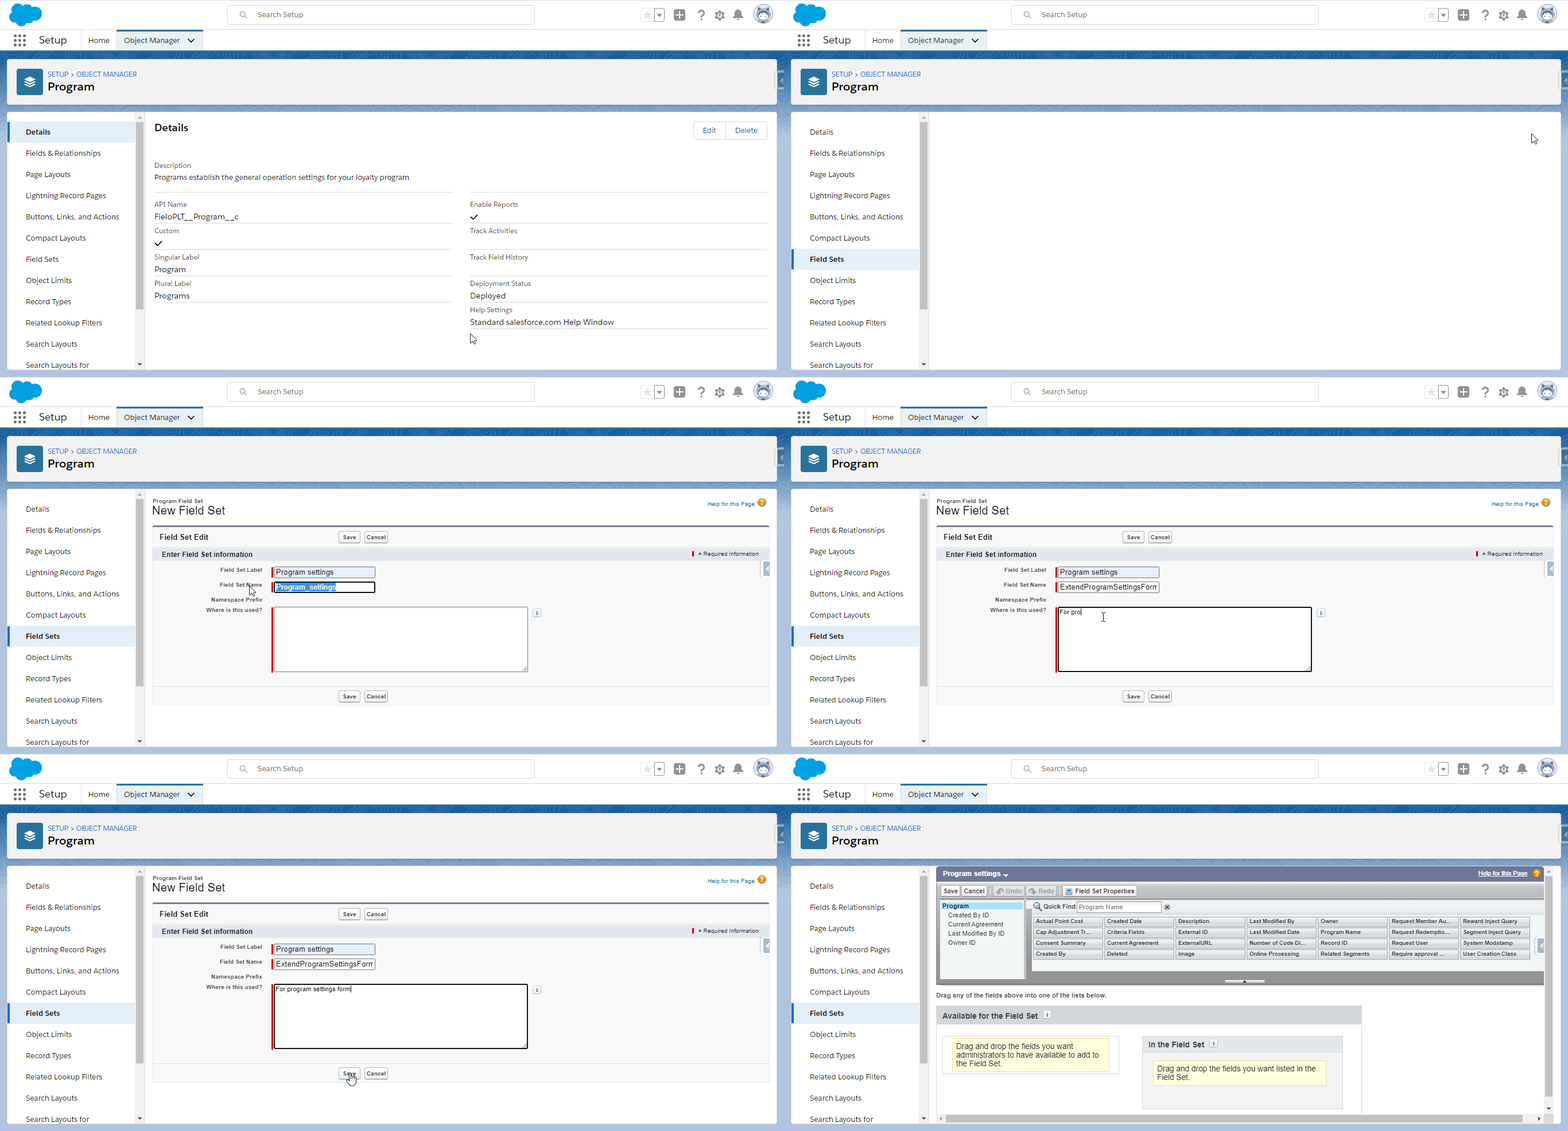
After the field set is created, you will be redirected to its configuration page. Look for the fields listed below in the list on the top and drag and drop them to the bottom section of the page.
- GRS Point Type
- GRS Account
- GRS Member Fieldset
Don't forget to Save afterward.
Activate the FieloGRS Library
Once you've successfully installed the Fielo-GRS Connector, you can activate the FieloGRS Library.
In the Tools menu, within Libraries, find the FieloGRS library and click Activate.
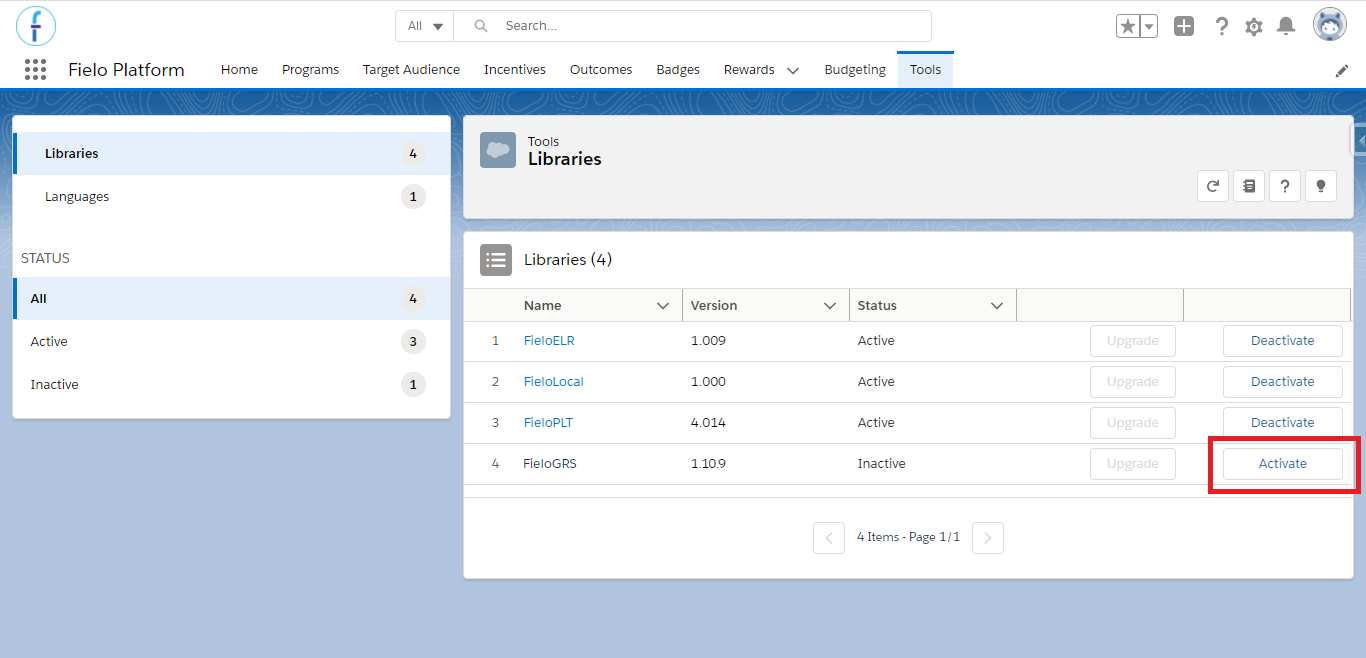
Activate FieloGRS Library
Fill In Custom Fields
with the FieloGRS Library activated, you're ready to fill in the custom Program fields provided for GRS integration. You will need to fill in these fields in each Program you plan on using GRS with.
If you have the Spring '21 Fielo release (or later) installed in your Org and are not able to find the fields mentioned below on your Program Settings page, you might need to add them. Take a look on how to extended the program settings form for more details on how to do that.
- Go to the Programs menu and select the Program in which you'd like to use GRS.
- On the Program page, go to the Settings tab and click on Edit.
- Set GRS Point Type to the Program Currency you'd like to use with GRS.
- Set GRS Account to the Account you created for GRS.
- Set GRS Member Fieldset to the following value:
[
  {"grsFieldName":"employeeId","sfFieldName":"Id"},
  {"grsFieldName":"firstName","sfFieldName":"FieloPLT__Contact__r.FirstName"},
  {"grsFieldName":"lastName","sfFieldName":"FieloPLT__Contact__r.LastName"},
  {"grsFieldName":"email","sfFieldName":"FieloPLT__Email__c"},
  {"grsFieldName":"address1","sfFieldName":"FieloPLT__Contact__r.MailingStreet"},
  {"grsFieldName":"city","sfFieldName":"FieloPLT__Contact__r.MailingCity"},
  {"grsFieldName":"postalCode","sfFieldName":"FieloPLT__Contact__r.MailingPostalCode"},
  {"grsFieldName":"provinceState","sfFieldName":"FieloPLT__Contact__r.MailingStateCode"},
  {"grsFieldName":"country","sfFieldName":"FieloPLT__Contact__r.MailingCountryCode"},
  {"grsFieldName":"telephone","sfFieldName":"FieloPLT__Contact__r.Phone"},
  {"grsFieldName":"language","sfFieldName":"FieloPLT__User__r.LanguageLocaleKey", "isLocale":true}
]- If using Levels with GRS, set GRS Metadata FieldSet to
[{"id":"enterIDhere", "name":"enterNameHere", "fieldName":"FieloPLT__CurrentLevelMember__r.FieloPLT__Level__r.Name"}], whereenterIDhereandenterNameHereare the ID and name of the metadata field you've created in GRS for leveling. For more information on configuring metadata, contact GRS. - When you're ready, click Save.
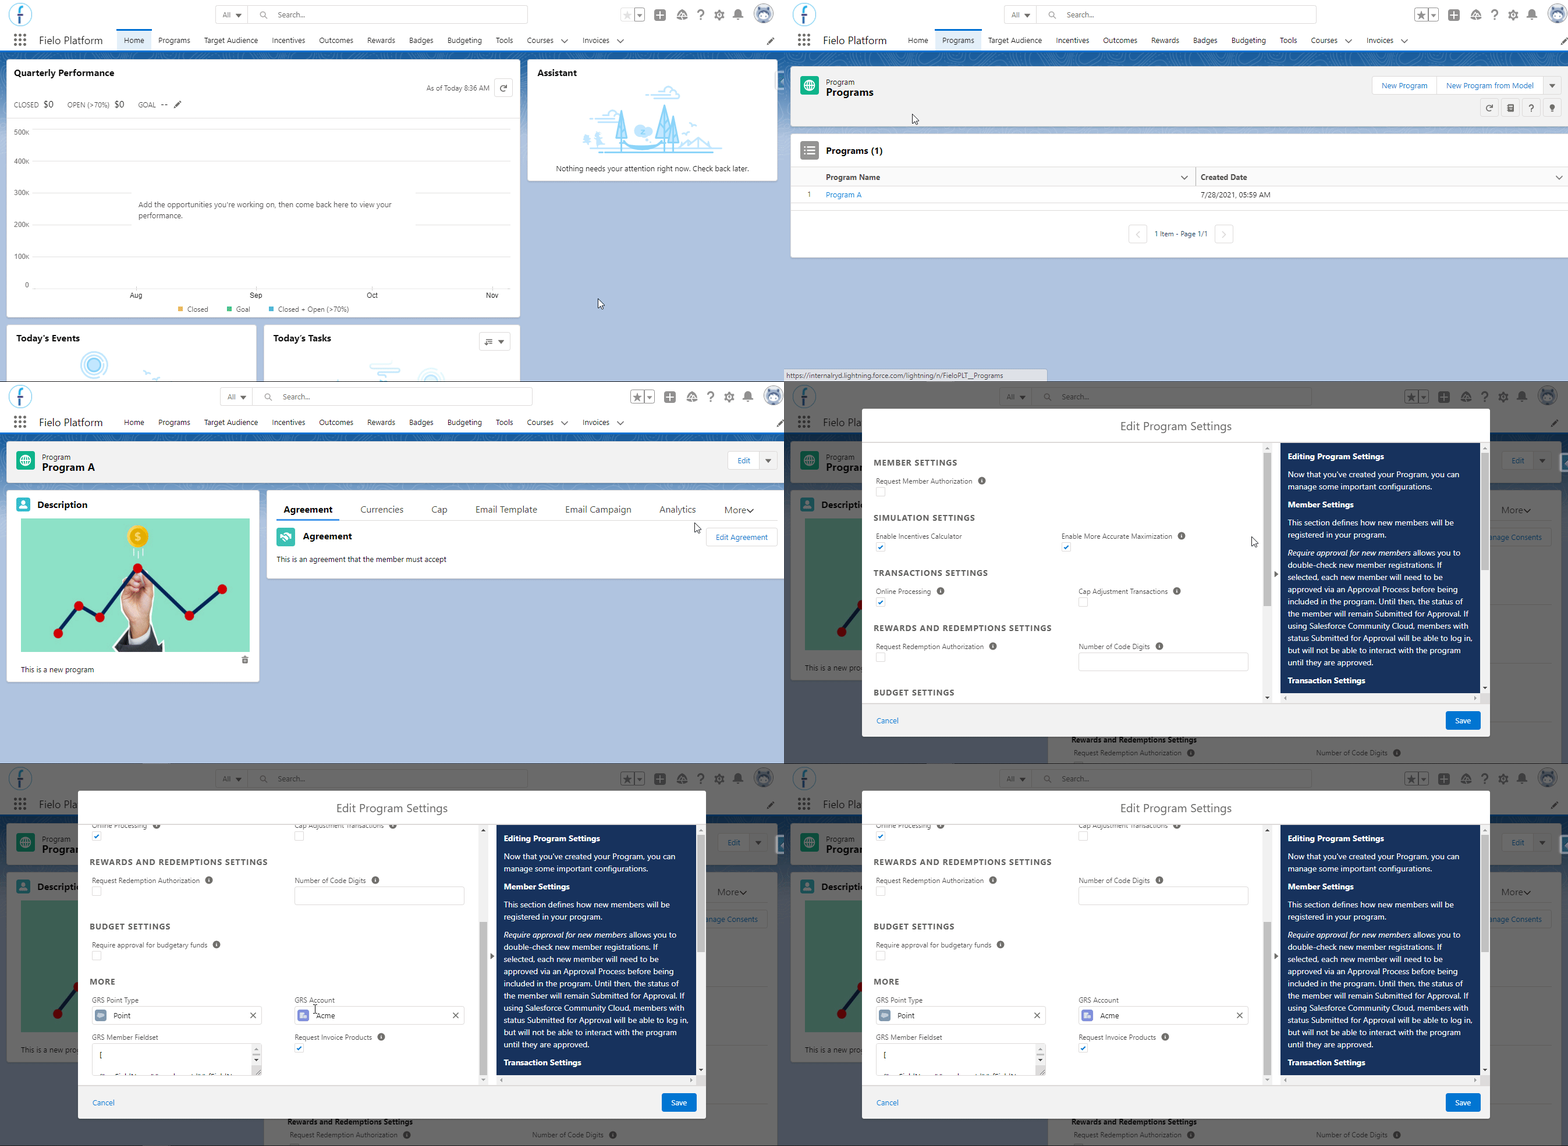
Edit Program
Edit Custom Settings
Next, head over to Setup in your Org and enter "Custom Settings" in the Quick Find box.
Edit GRS Allowed Fields
In Custom Settings, next to GRS Allowed Fields, click Manage.
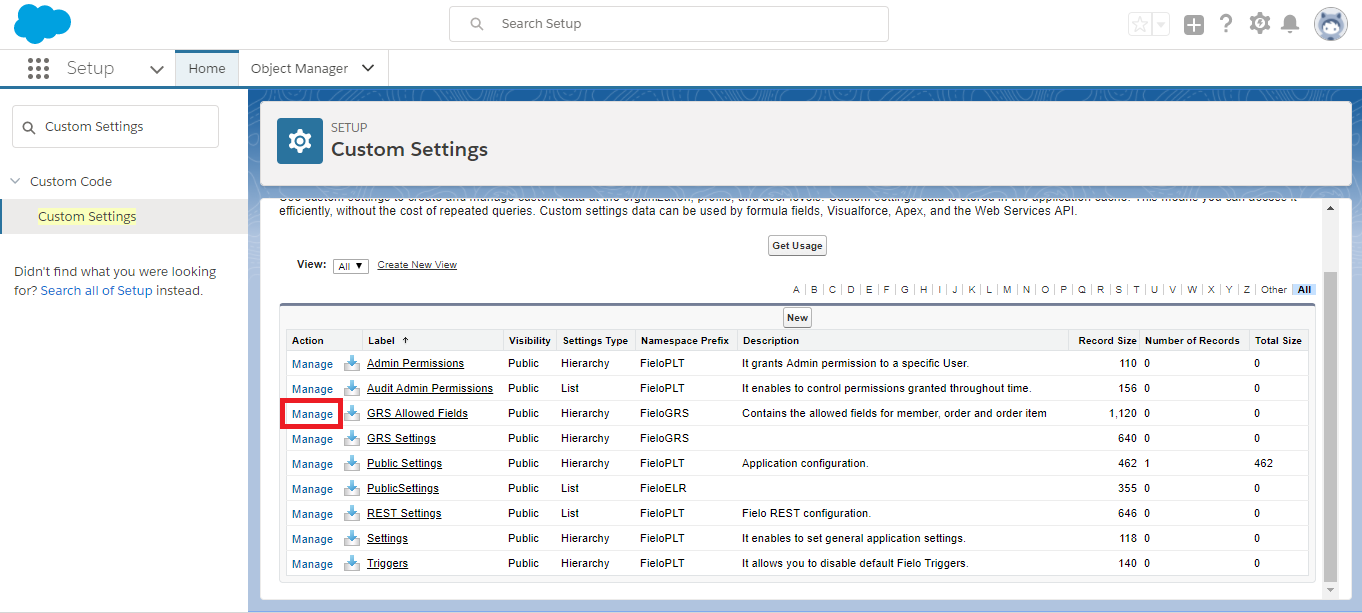
Custom Settings
On the GRS Allowed Fields page, above Default Organization Level Value, click New.
Then, fill in the following properties as indicated:
- GRS Member Allowed Fields:
firstName,lastName,email,address1,address2,country,city,provinceState,telephone,language,employeeId,postalCode,balance - GRS Order Allowed Fields 1:
businessAddress,totalPointCost,totalPointCostLessPointsPurchased,pin,pointsPurchased,pointsPurchasedCost,pointsPurchasedCurrency,shipAddress1 - GRS Order Allowed Fields 2:
shipAddress2,shipCity,shipCompany,shipCountry,shipEmail,shipName,shipPostal,shipProvinceStat,shipTelephone,discountCoupon - GRS Order Item Allowed Fields:
catalogCode,catalogName,description,lineItemId,name,orderedAt
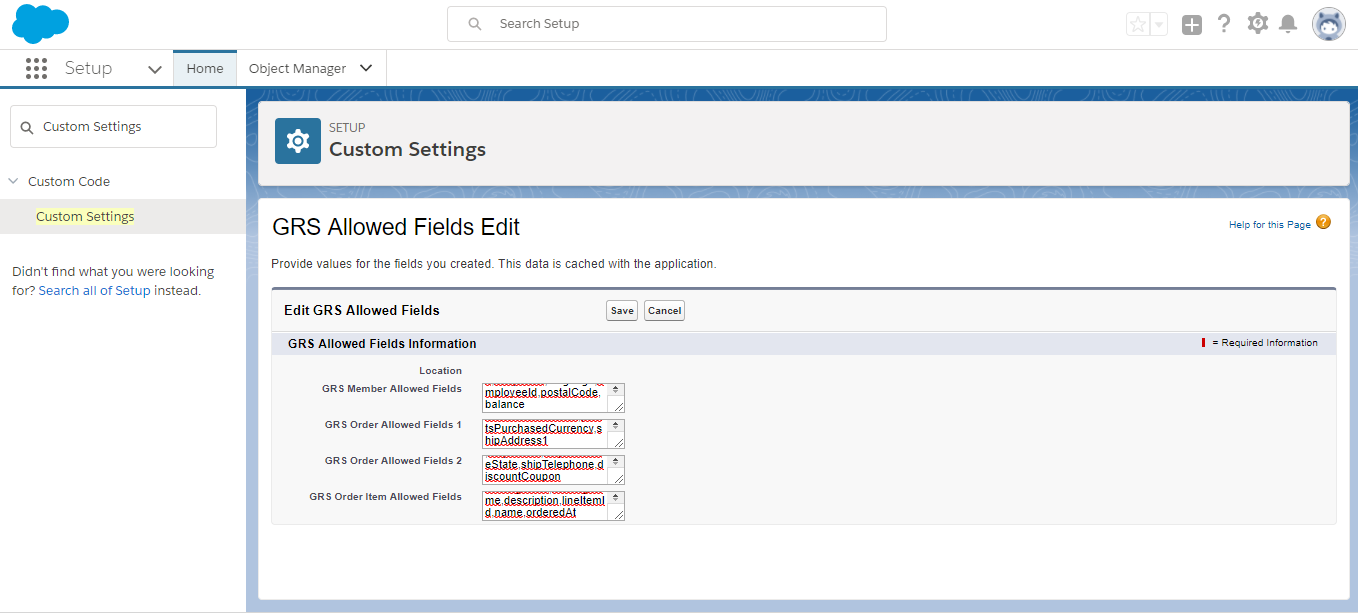
GRS Allowed Fields Edit
Click Save.
Edit GRS Settings
Now, go back to Custom Settings and, next to "GRS Settings", click Manage. Click New above Default Organization Level Value to access the GRS Settings Edit page and enter the following properties:
- Admin ID: (Provided by GRS).
- Api Key: (Provided by GRS).
- Domain: (Provided by GRS).
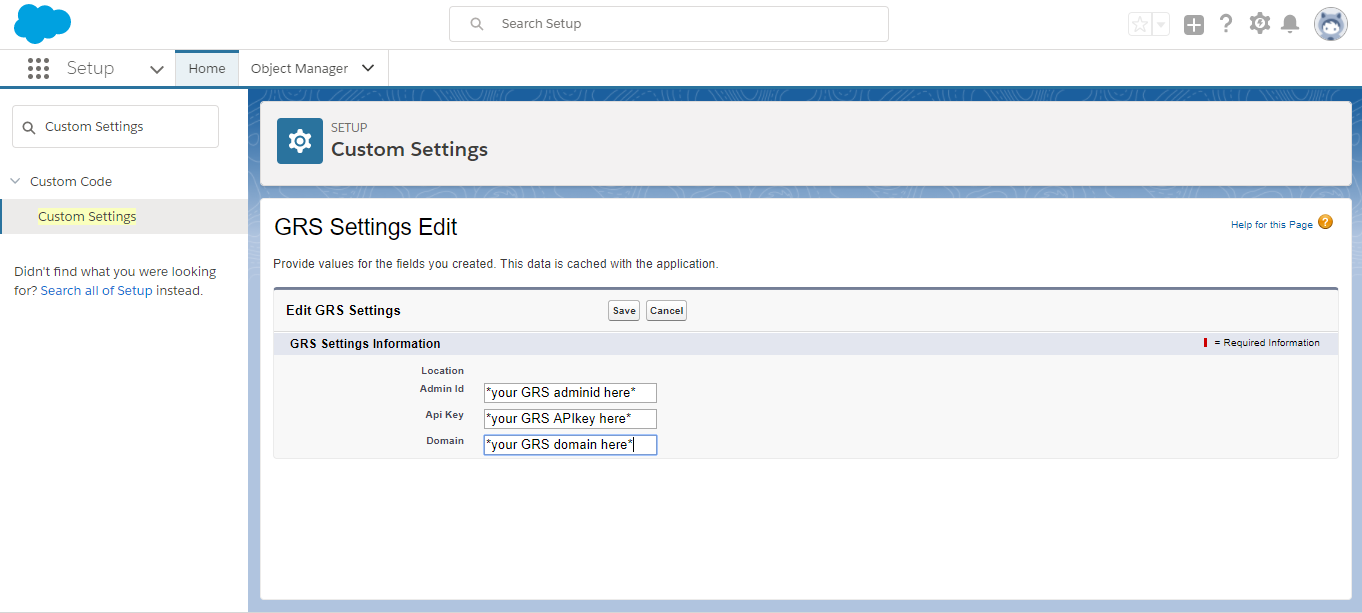
GRS Settings Edit
Click Save.
When you wish to have more than one GRS version - with different visual identity, point ratio, email communication, budgeting, etc. -, you would have to create more than one storefront: each one of them reflecting the different setups. This could be necessary when you have more than one program, for example, where GRS needs to be different depending on which user is accessing it.
In order to be able to do that, first you need to create a new Profile for every storefront that you want to have. After doing that, go back to Custom Settings and, next to "GRS Settings", click Manage.
Within the related list, click on New. As it was done before for the Default Organization Level Value, you will enter the Admin ID and the Api Key. However, you will need to enter two other data this time:
- In the Location field, select Profile and then click on 🔍, look for the profile that will be able to access the alternative storefront and select it.
- In the Domain field, you will enter the alternate storefront's domain. In theses cases, you will have a different domain for each storefront.
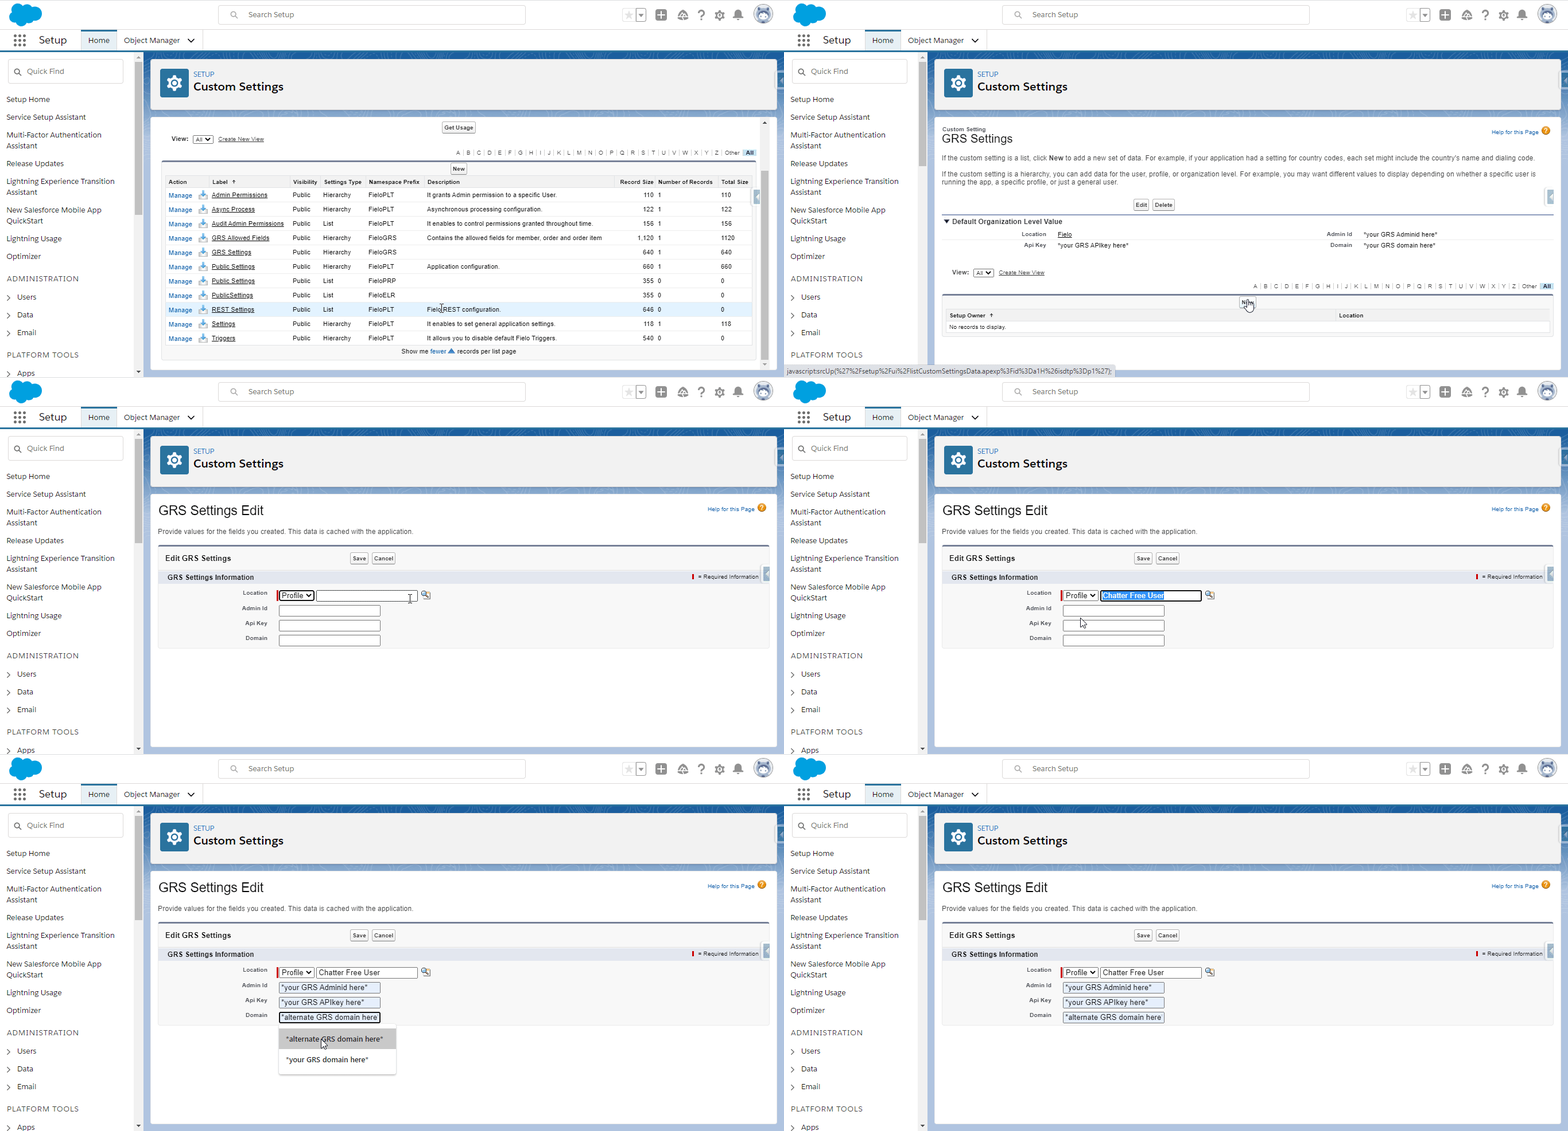
GRS Settings for alternative storefront
Click Save. Then, assign this profile you selected to all the users who you want to have access to the alternate storefront.
Profile Configuration
For the GRS Gallery component to display properly in your Member portal users, the Profile assigned to portal users must have access to certain data.
In Setup, enter Profiles in the Quick Find box and select it. Click on the Profile that you use for your Member portal users.
At the top of the Profile Detail page, click Edit. Then, on the Profile Edit page, under Administrative Permissions, make sure Apex REST Services and API Enabled are ticked .
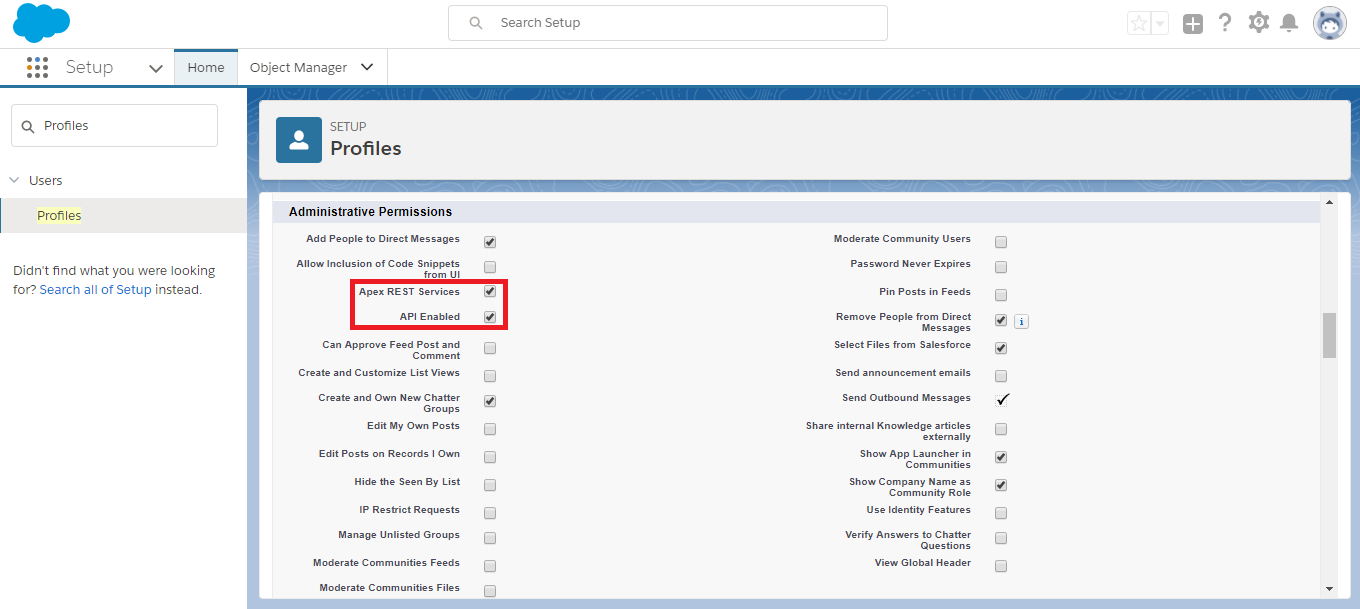
Profile Edit - API Enabled
Click Save.
Now, back on the Profile Detail page, scroll down to the section called Enabled Apex Class Access and, in this section, click Edit.
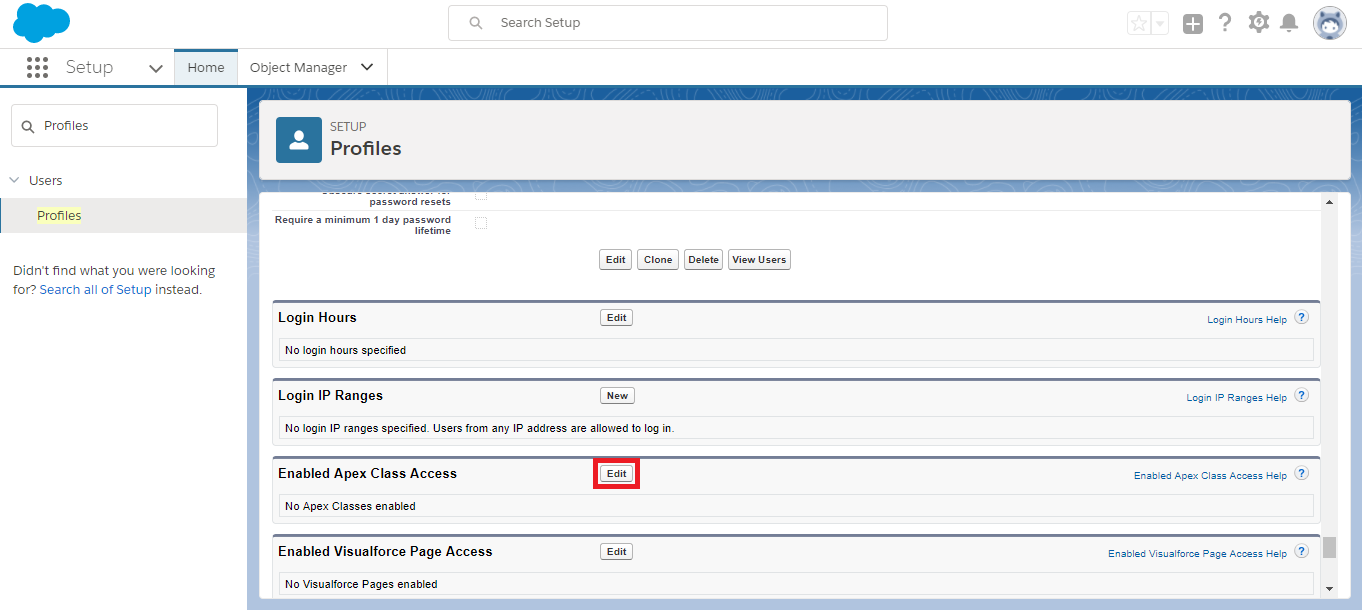
Profile Details - Enabled Apex Class Access
In the Available Apex Classes list, select all classes that begin with FieloGRS and click Add . They should now appear in the Enabled Apex Classes list. Click Save.
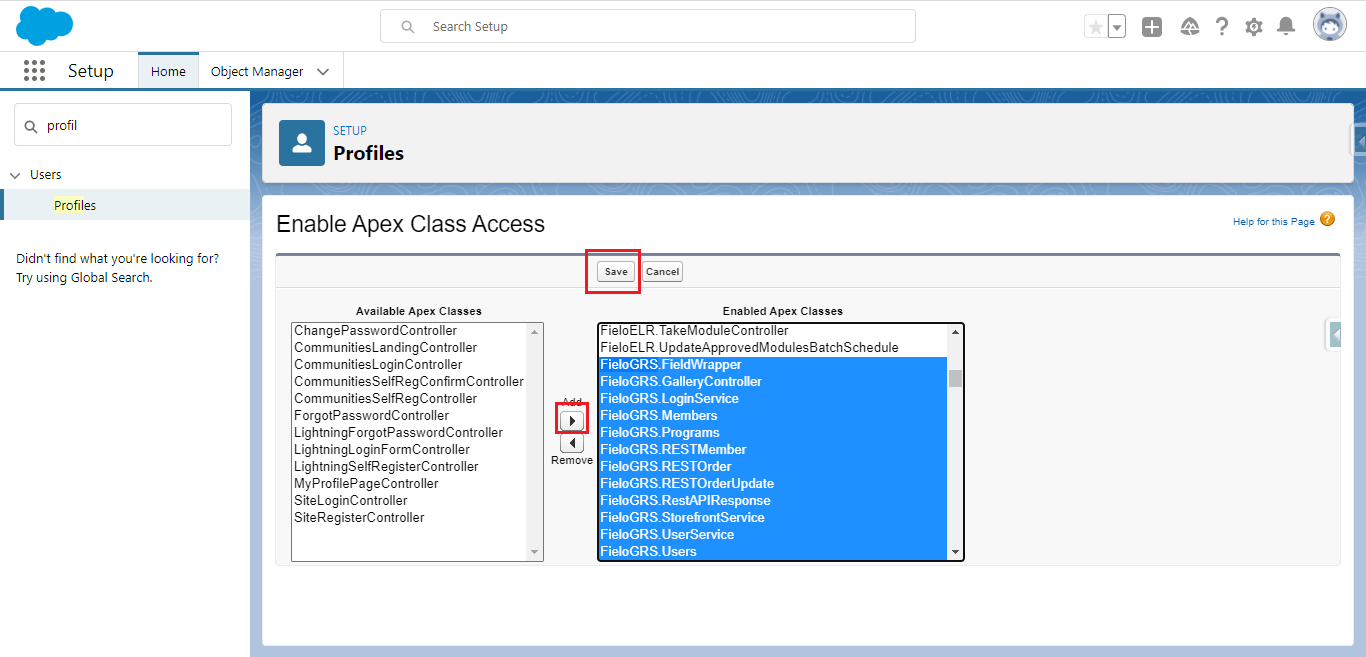
Add FieloGRS Classes to Enabled Apex Class Access
Integration User Configuration
When using the GRS, it is necessary to have an integration user in Salesforce, who will be responsible for connecting GRS with Fielo in order to exchange data between the two services - more specifically, sending information from us to them. This user can also be defined as the one that will be used by external systems to call Salesforce APIs, such as the ones that Fielo offers.
So, other than creating a new user in your ORG to assume that role, it will need certain permissions for the integration to work properly.
For that, you'll have to create the permission set. Go to Salesforce Setup, quick find and access permission sets. From there, click on New, give it a label of your choice and Save.
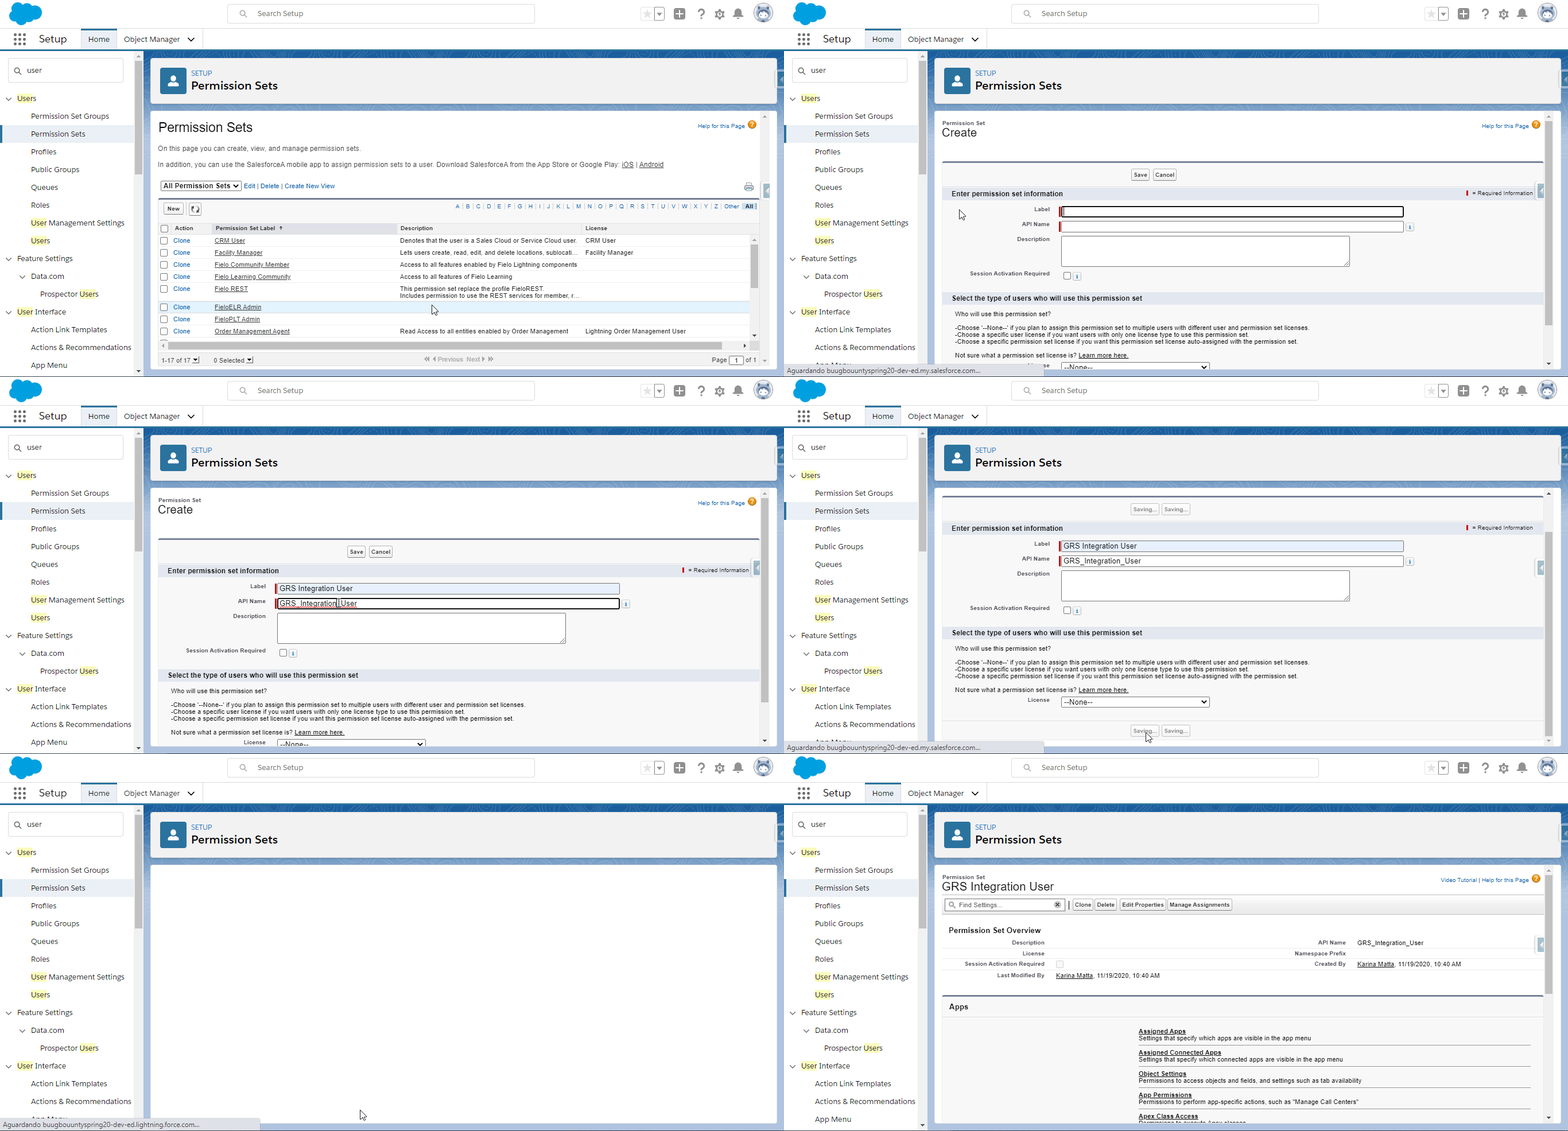
Click on New in order to create a new permission set
After it is created, access the System Permissions section, click on Edit and check the API Enabled field. Save.
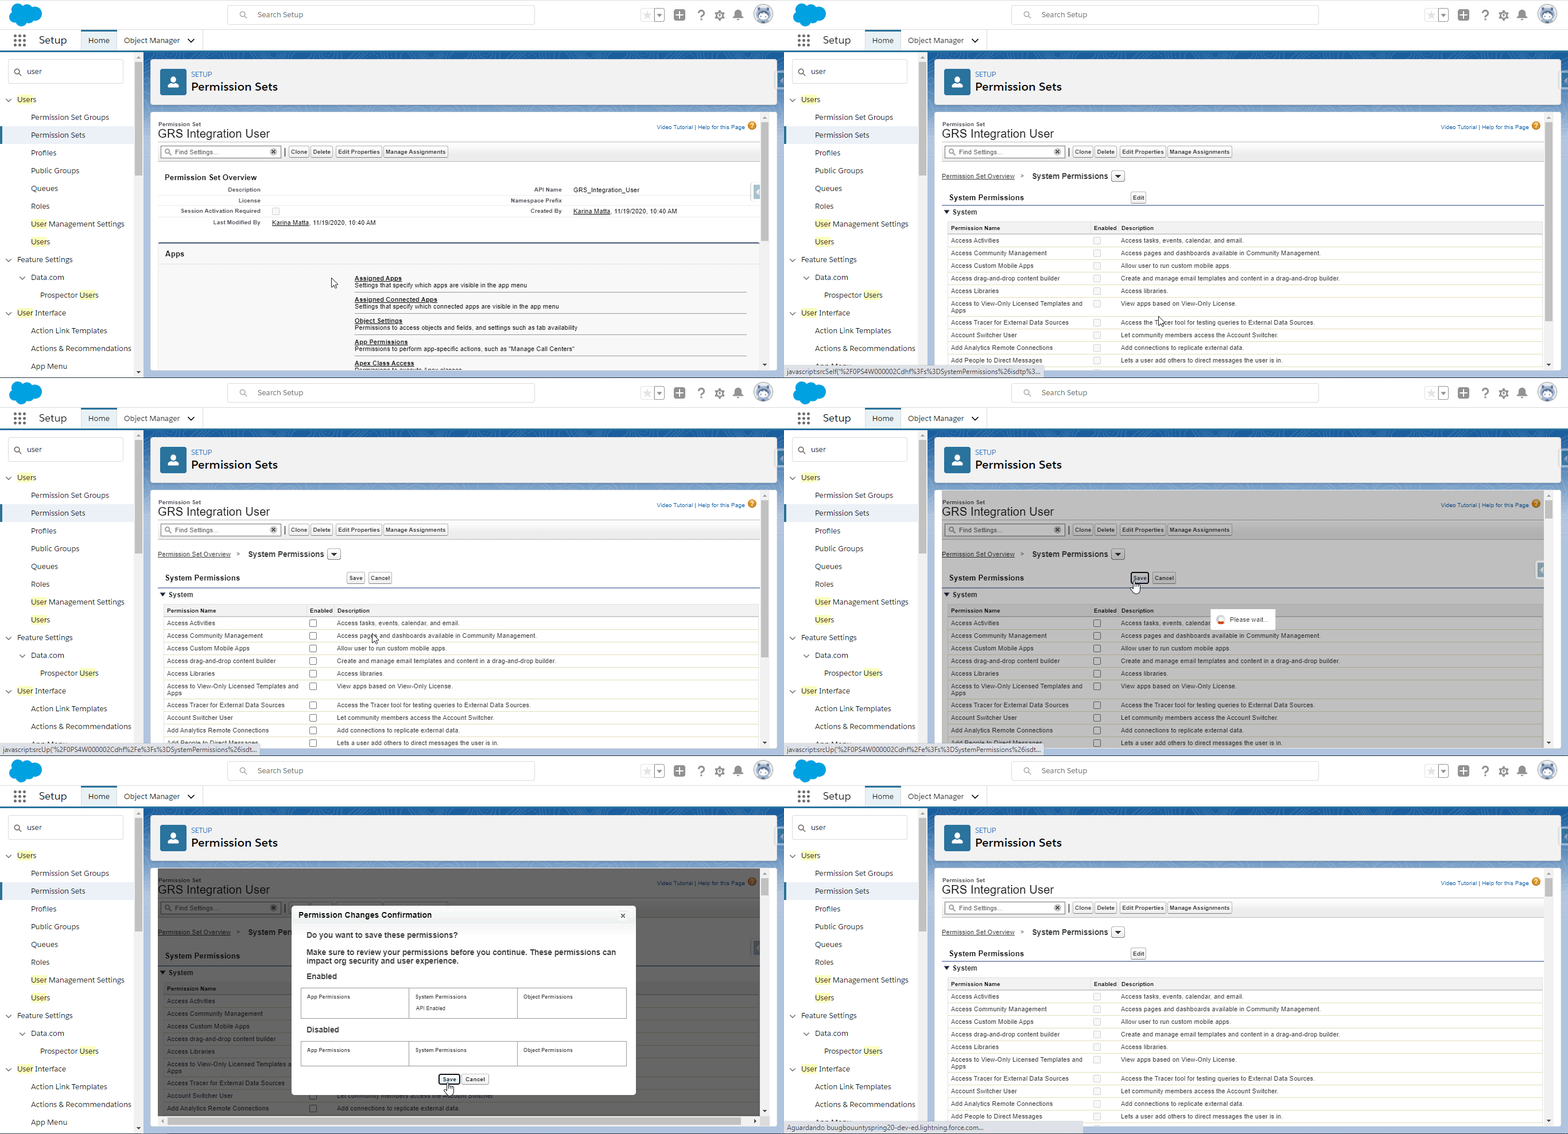
Add system permissions to the set
Next, back on the Permission Set Overview page, scroll down to the section called Apex Class Access, access it and click on Edit. From the Available Apex Classes list, select the following classes and send them to the Enabled Apex Classes list.
- FieloGRS.RESTMember
- FieloGRS.RESTOrder
- FieloGRS.RESTOrderUpdate
Don't forget to Save after.
Object permissionWe suggest you to give to the integration user create, read, update, delete permissions for the objects and read, edit permissions to the fields that the integration updates.
Objects and their respective fields in parenthesis:
- Redemption Items (GRS Order Id)
- Programs (GRS Point Type, GRS Order Fieldset, GRS Order Item Fieldset, GRS Account, GRS Member Fieldset, GRS Metadata FieldSet)
- Provider Orders (GRS Order Number)
- Users (Member Id)
Fields from Custom Setting:
- GRS Settings custom setting (Admin Id, Api Key, Domain)
- GRS Allowed Fields custom setting (GRS Member Allowed Fields, GRS Order Allowed Fields 1, GRS Order Allowed Fields 2, GRS Order Item Allowed Fields)
Only after your new permission set is ready, access the Integration User's page and, from the Permission Set Assignments section, click on Edit Assignments. Choose the permission set that you created from the Available Permission Sets list, and add it to the Enabled Permission Sets list. Save.
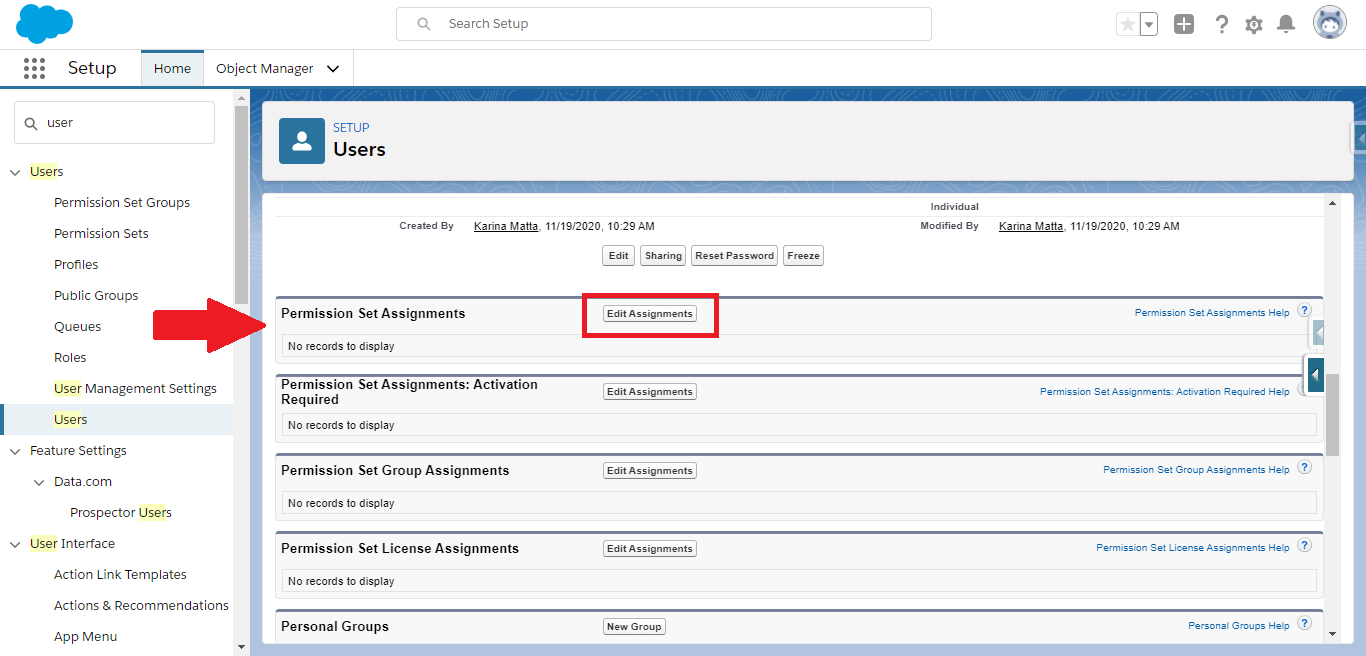
Edit a User to assign the newly created Permission Set to it
Finally, you will need to contact GRS and send them the Integration User's credentials, which include their:
- Domain
- Username
- Password
- Security Token
For you to be able to call any API (Member Balance, Create Order, Update Order), it is necessary to log in - authenticate - with the Integration User. So, creating it and giving it the related permissions is mandatory.Moreover, be sure that this user is solely employed for integration purposes, so as to avoid it being blocked for some reason, which would impact negatively in your integration.
Audit Permission
Before moving forward, your Salesforce Administrator User needs a special permission.
In Setup, enter "Visualforce Pages" in the Quick Find box and select it. Click A to see all pages beginning with A, then select Audit Permission.
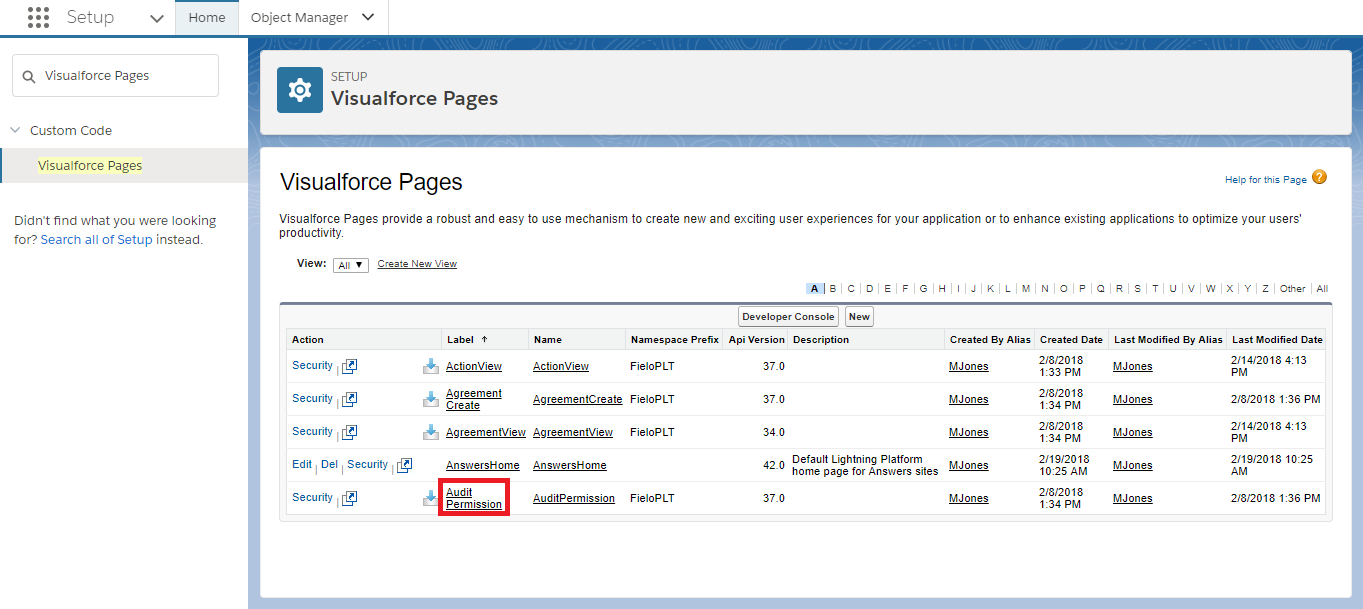
Audit Permission Visualforce Page
Click Preview.
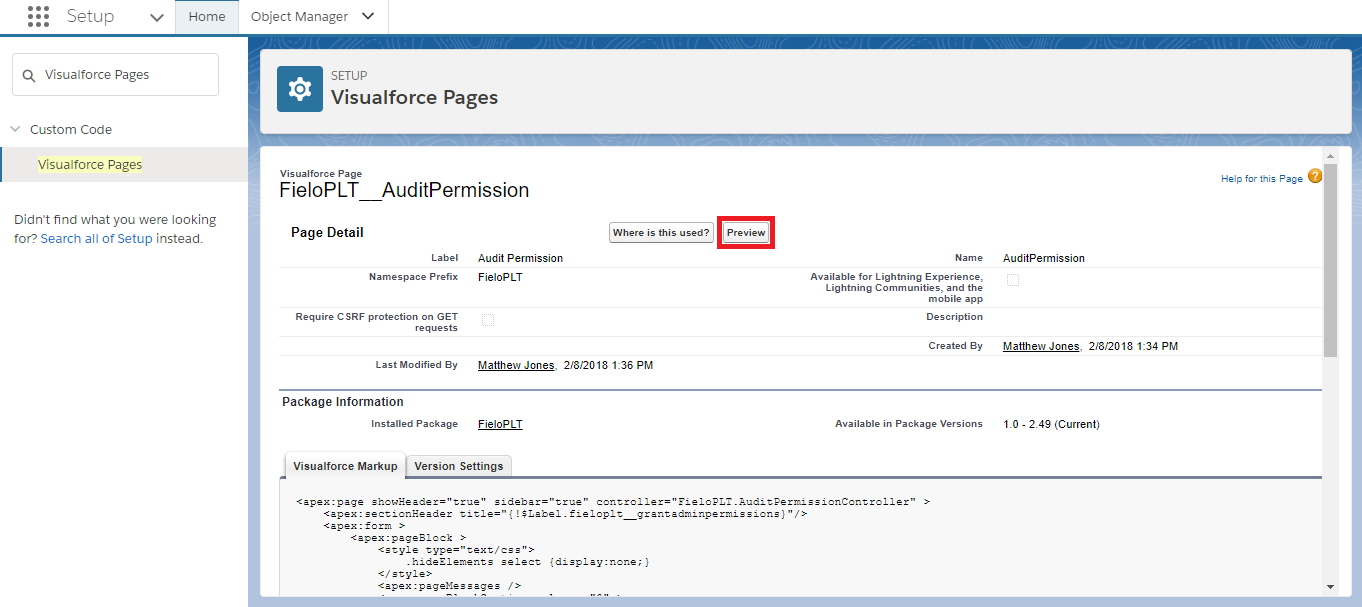
Audit Permission - Preview
In User, using Lookup, enter the name of your own System Administrator User. Then, click inside the To field and choose a date for the permission to end. This can be tomorrow or any other date in the future. Finally, click Save.

Grant Admin permissions
Member Setup
In order for GRS to function, certain Salesforce fields will need to be properly completed for each and every Member who might use GRS Gallery. Let's see how.
Be sure to carry out these steps for all Members who will participate in GRS Rewards.
Go to the Members tab and select the Member that will participate in GRS Rewards. On the Member page, confirm that E-mail contains a valid e-mail address.
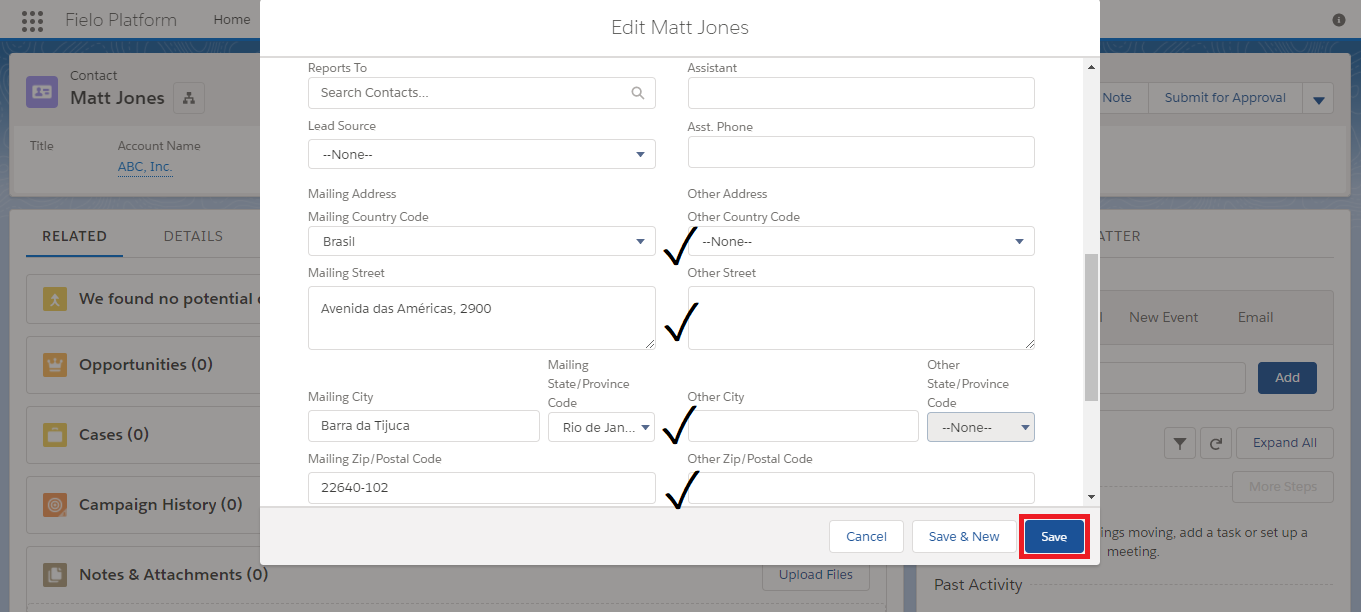
Next, click on the Contact record for the Member. On the Contact page, click 🔽 and then Edit. Make sure the following fields are properly filled in:
- First Name
- Last Name
- Phone
- Mailing Country
- Mailing Street
- Mailing City
- Mailing State/Province
- Mailing Zip/Postal Code
Click Save and return to the Member page.
User Setup
Go to Salesforce's Object Manager and access the User object. Enter the User Page Layouts tab and Edit the User Layout.
Check if the Member Id field is already in the Additional Information section. If not, drag & drop the field to that section and Save.
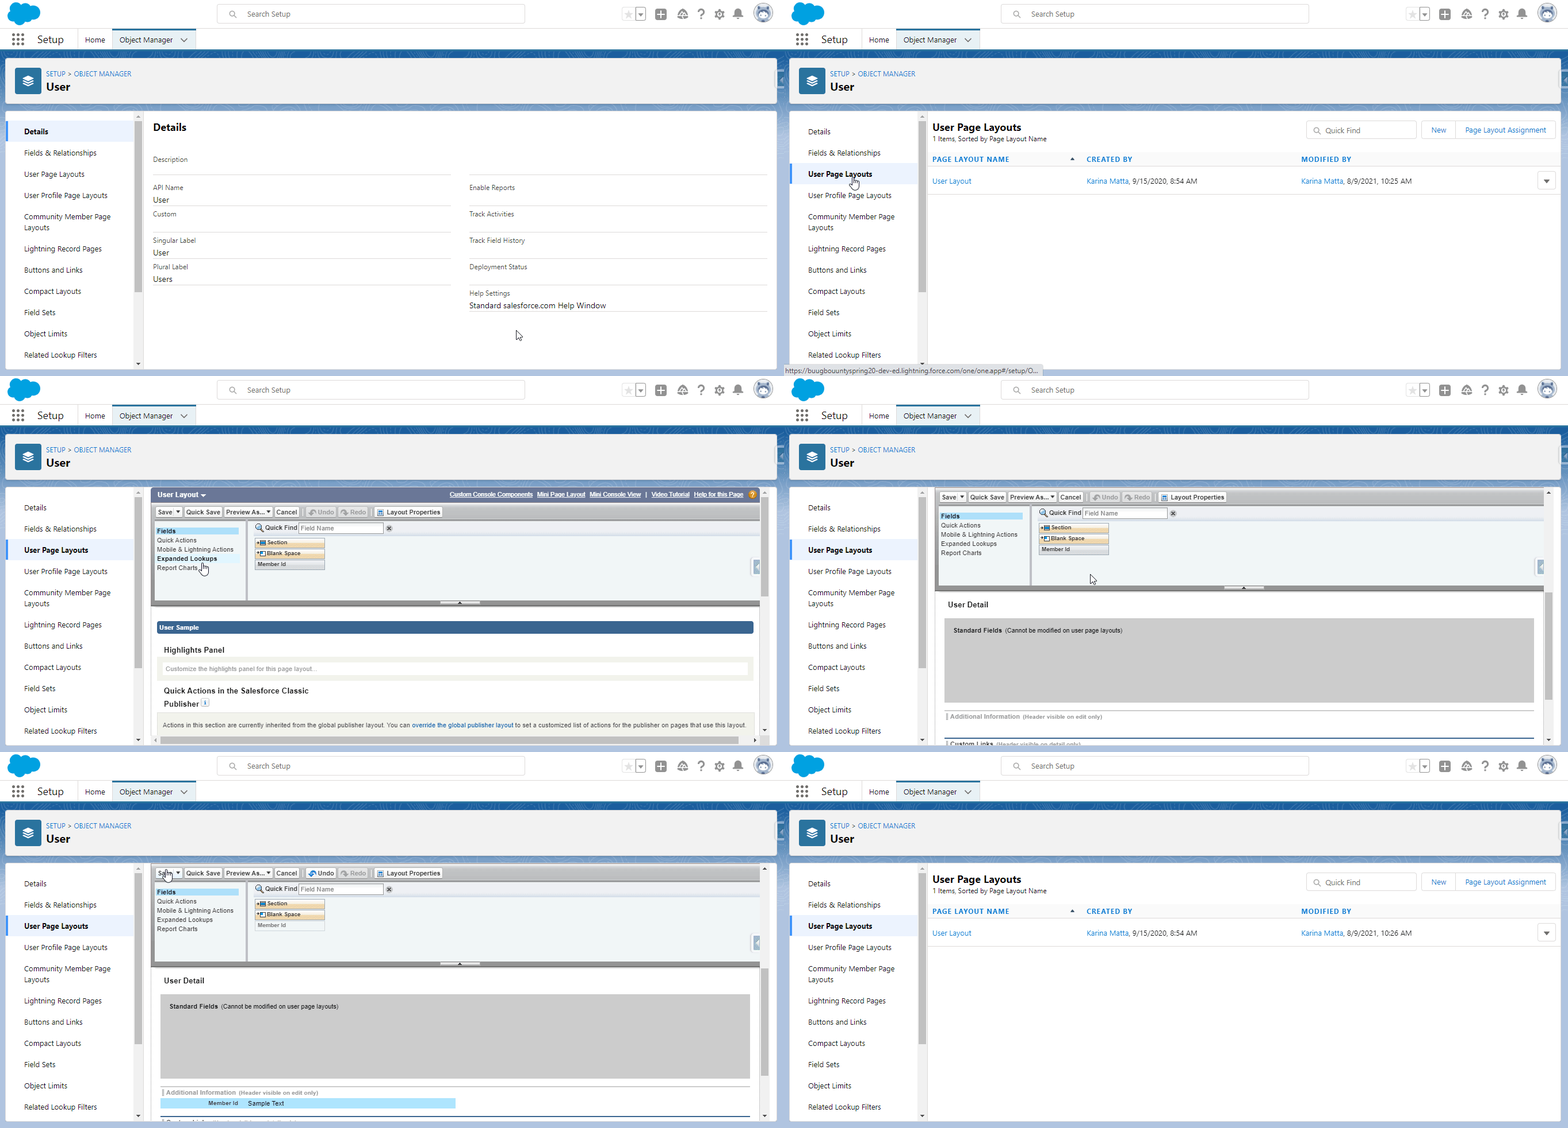
Adding the Member Id field to the User object layout
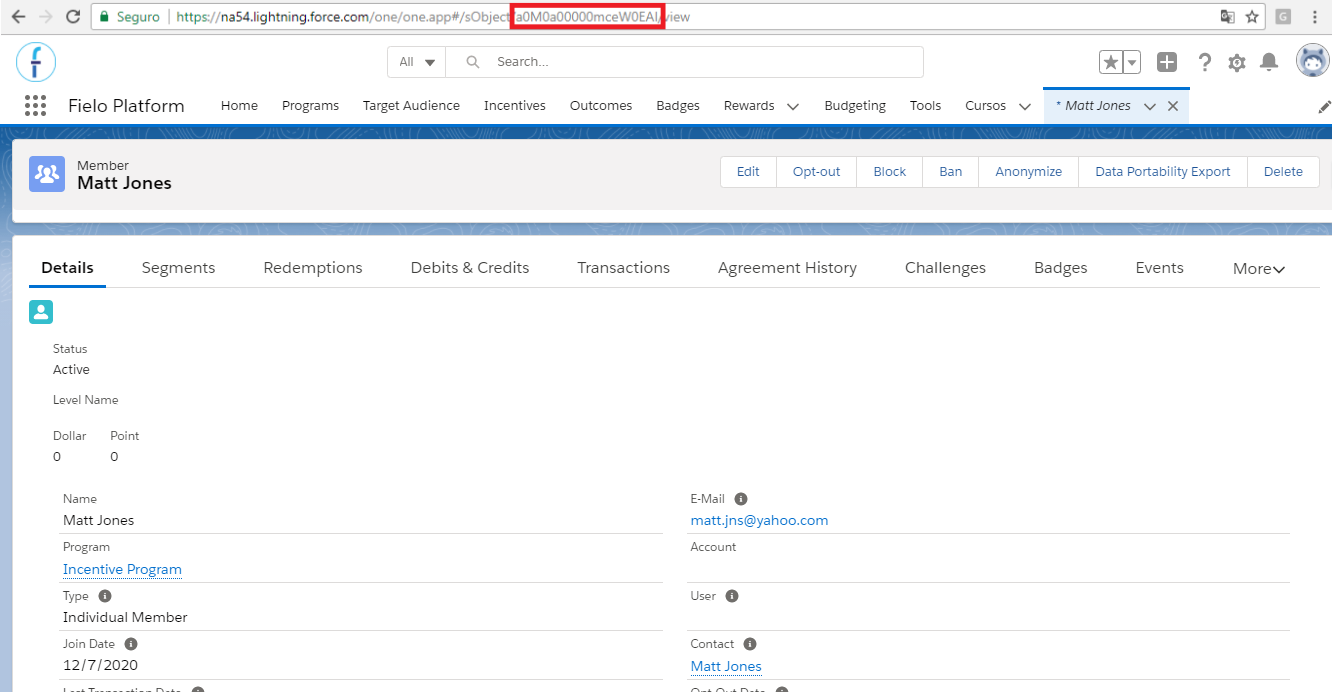
On the Member detail page, copy the Member ID. This 18-character alphanumeric ID can be found in the URL of the Member page in between sObject/ and /view.
Next, click on the User record for the Member. On the User page, click User Detail and then Edit. In the Member Id field, paste the Member ID that you copied. Confirm that Language is set to the Member's preferred language and click Save.
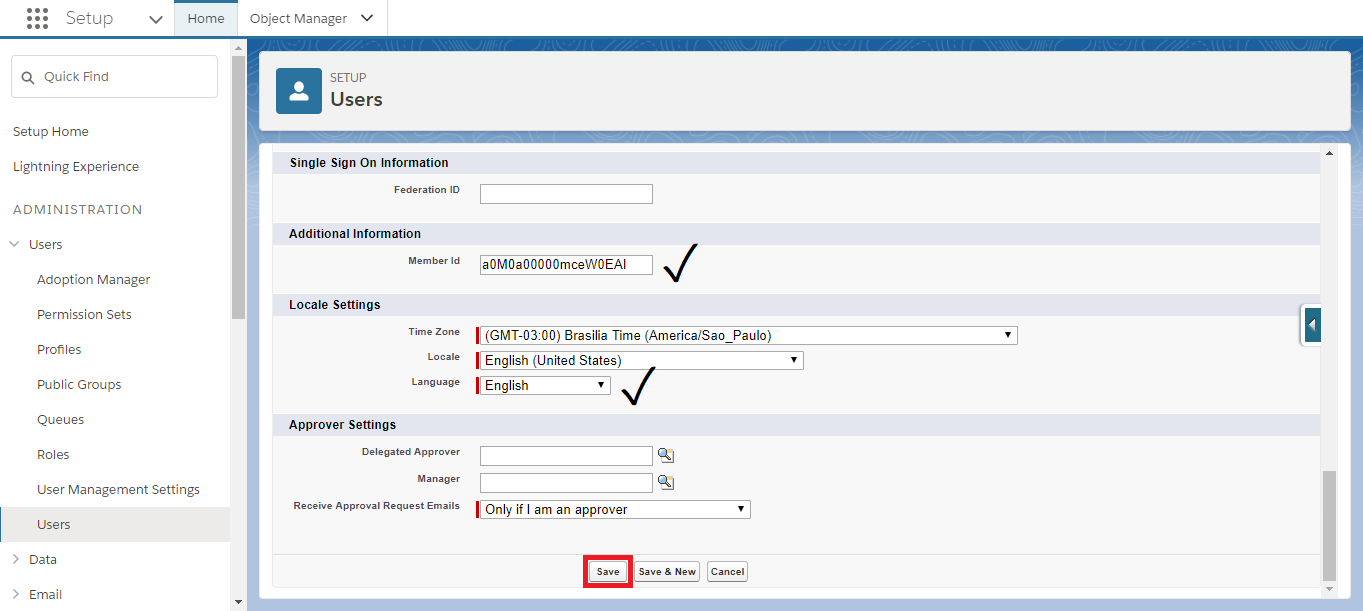
The Member ID can only be associated with the User when the User is being created. It is possible to create a Flow to associate the Member ID to the User automatically, instead of needing to do it manually.
Next Steps
Fielo is now ready for the GRS integration. Next, you'll need to complete some additional steps required by GRS:
- Create a Connected App.
- Retrieve the customer key and consumer secret from the Connected App and insert them into their respective fields within your GRS account.
- Create the certificate (App Manager > (find the connected app created) > Manage)
- Download the SAML file (organization metadata) and import it to your GRS account.
Contact your GRS account manager for details on completing those implementation steps.
Connected AppsIn case you have more than one storefront for GRS, you will need to create a connected app for each one. They will be related to each storefront's domain.
Updated over 1 year ago
What's next
Once you've completed the configuration required by GRS, check out the FieloGRS component, which integrates your GRS Storefront with core Fielo features.