
Registration
A complete solution for the first step of your Member journey
Registration is a form that lets a new user register in a Salesforce Experience Cloud Site and become a Member of a Program. Registration includes terms and conditions acceptance and communication opt-ins.
Salesforce Experience CloudPreviously known as Community Cloud, as of Salesforce Spring '21 release, Community is now referred to as Experience Cloud and/or Site.
Who It's For
Registration is for loyalty admins who want to enable external visitors to simultaneously register as a new User in a Salesforce Site-based loyalty portal and become a Member of a Program.
How It Works
Upon successful submission, a new Community User is created and linked with a new Individual Member. The new Member's login credentials is managed by Salesforce via this User. New Members also receive a welcome e-mail, which you can customize to include your own company branding and Program-specific details.
You can choose between one-step and two-step registration. In one-step registration, the registering Member creates a password directly on the form. In two-step registration, password creation occurs during the email verification process.
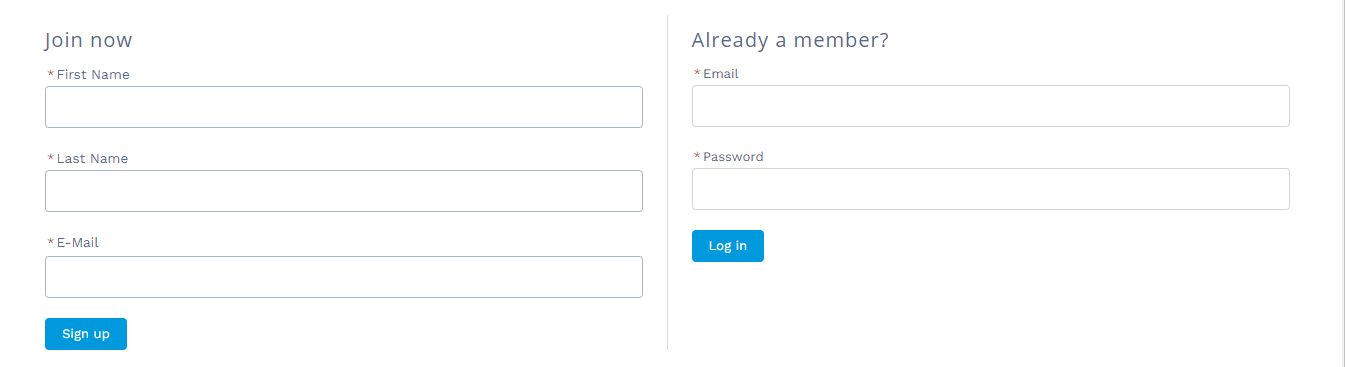
Two-Step Registration with Login
You can include additional Member fields to request any further information you may need from new Members. If your program uses consents, members will automatically be asked to opt in to program communication.
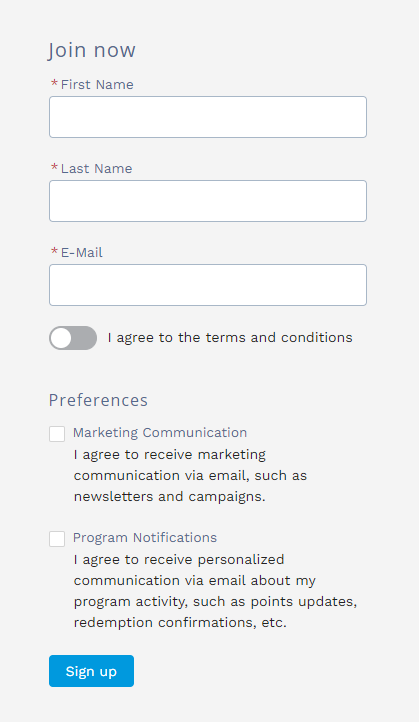
Two-Step Registration with Consents
Members who are already registered can use the standard Salesforce login functionality or, if enabled, the login form right on the component.
Set up Your Registration Page
To get started, let's first create a page for your Registration component.
Fielo Lightning Bolt TemplatesIf you're using a Fielo Lightning Bolt template, the Registration component will already be included on the Register page. Go to the Register page and skip ahead to the next section.
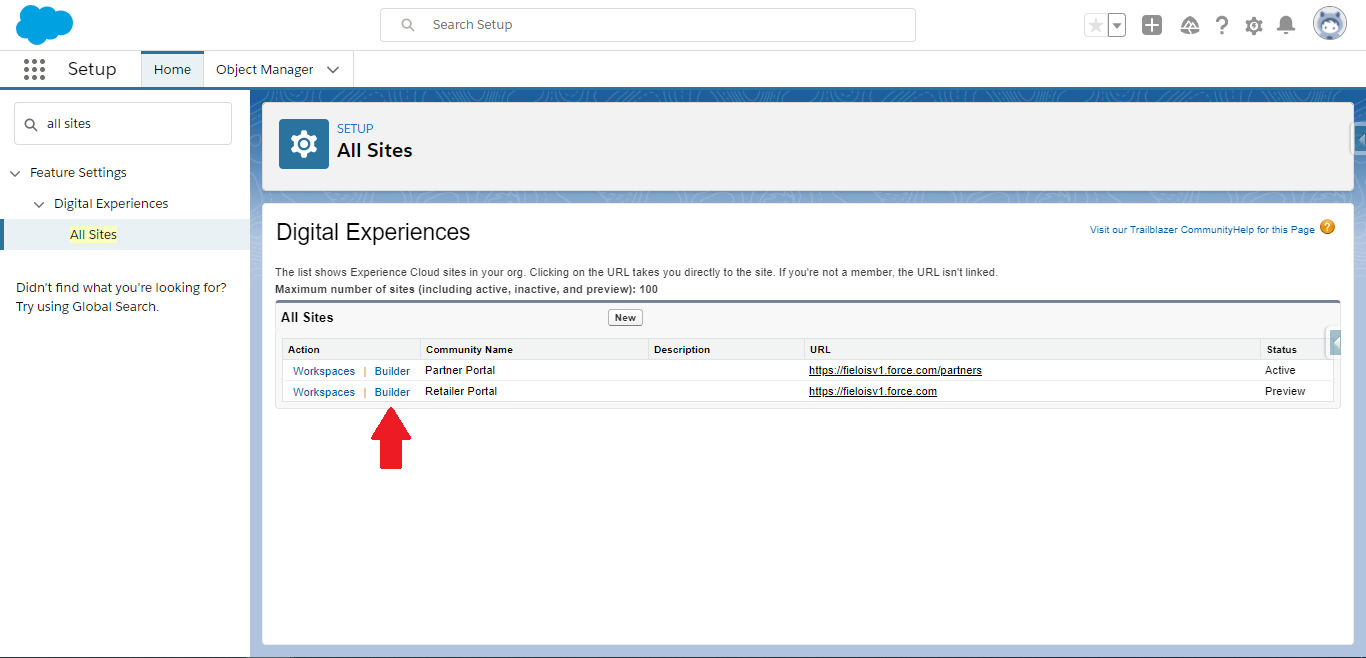
In Salesforce Setup, search for and select All Sites. Enter to the Builder for your Site.
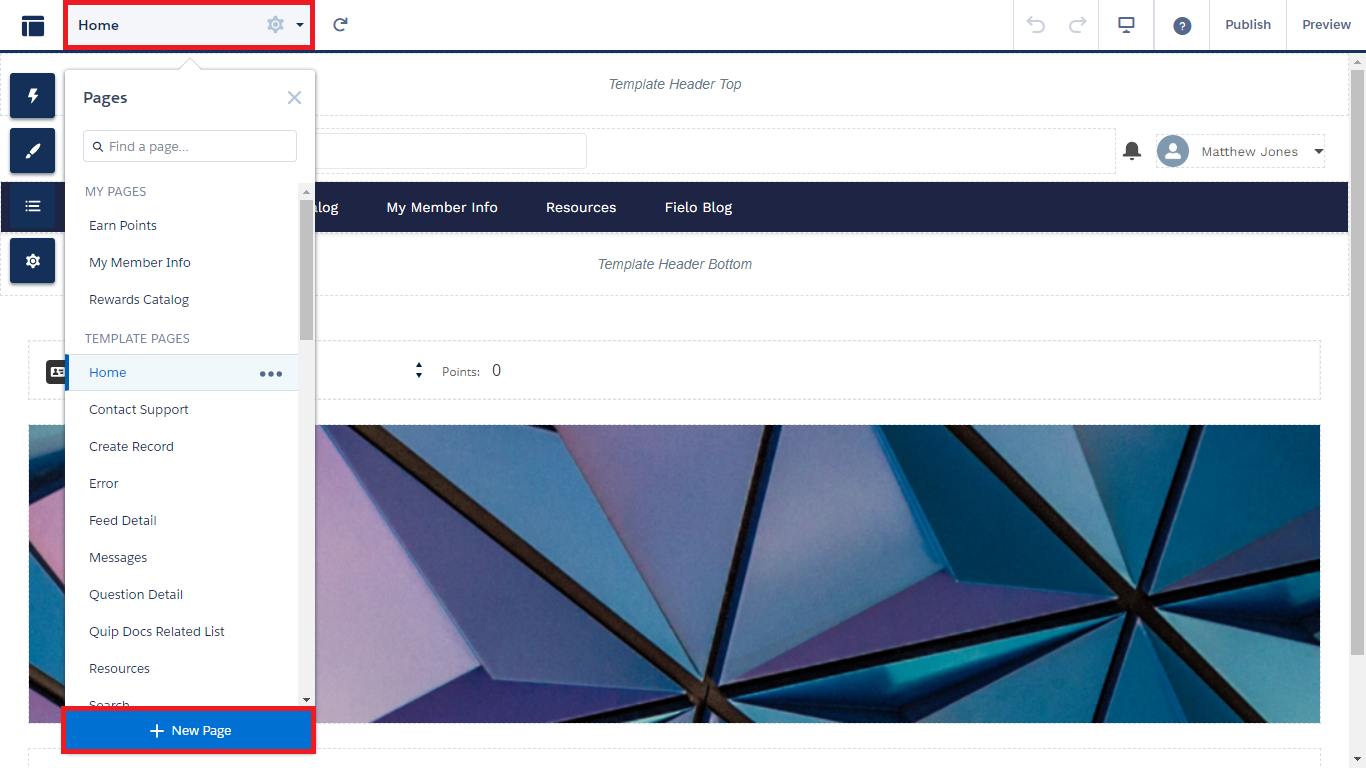
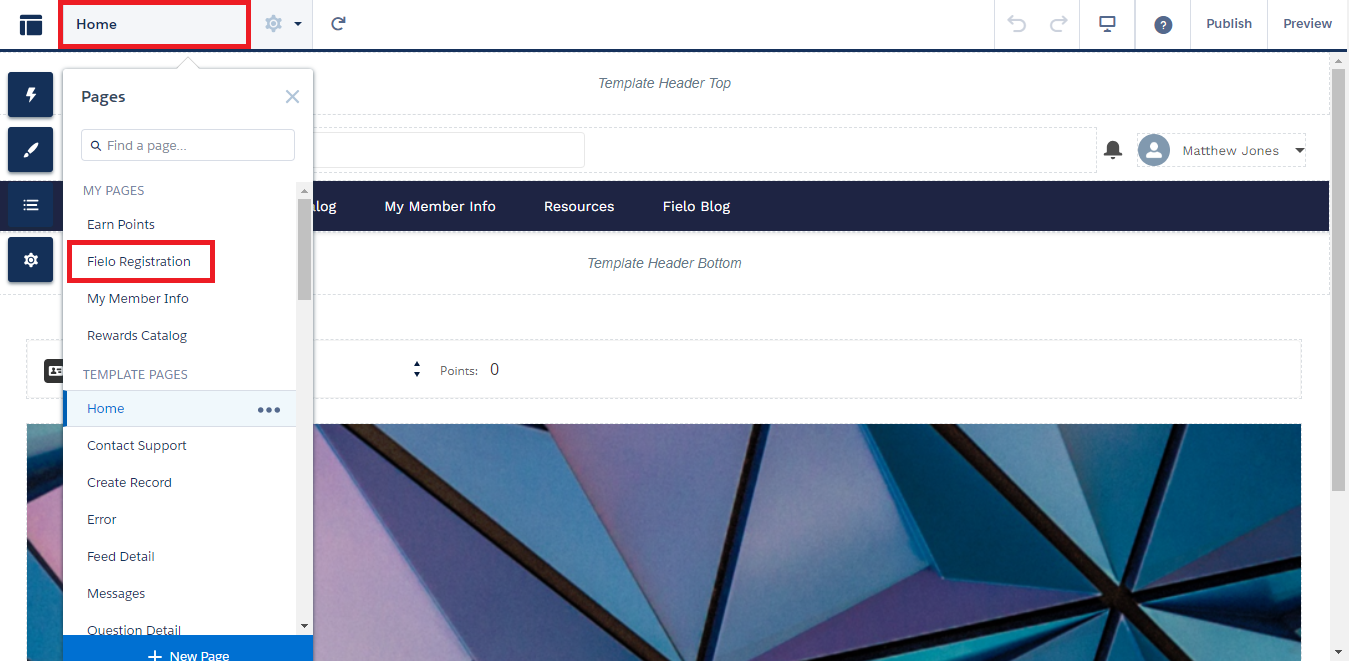
In Builder, click on Home to open the page menu and select New Page.
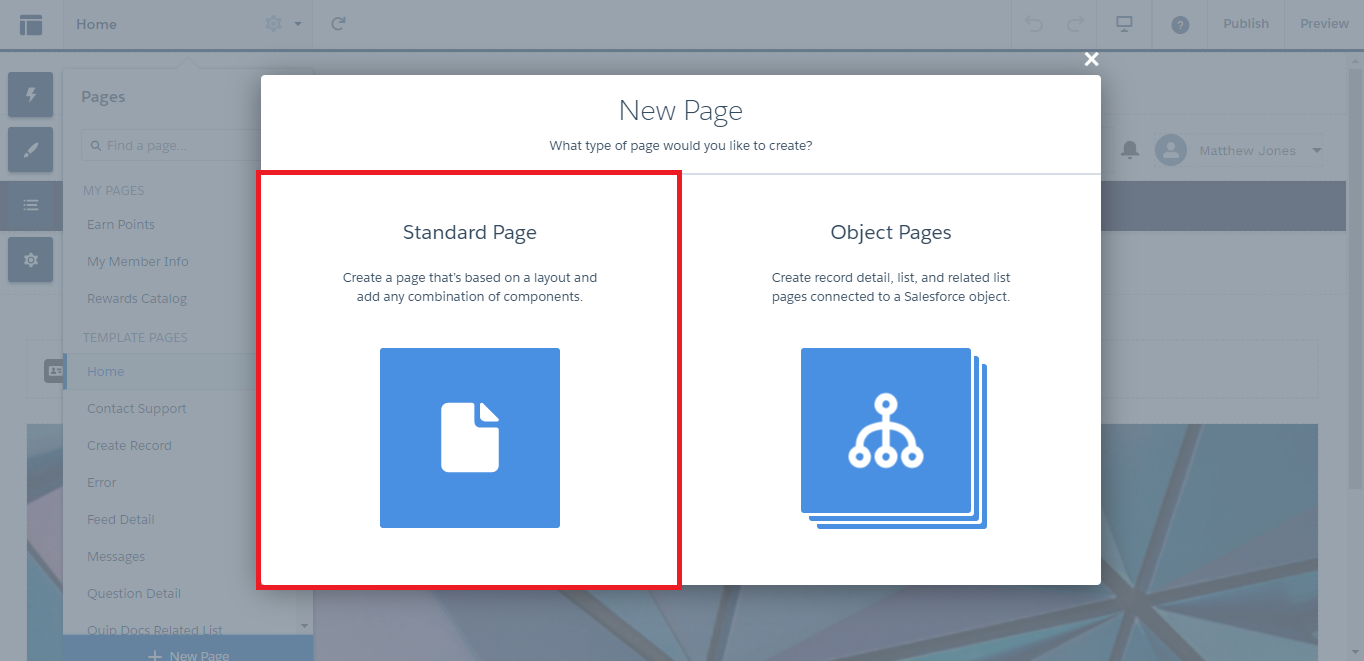
Choose Standard Page.
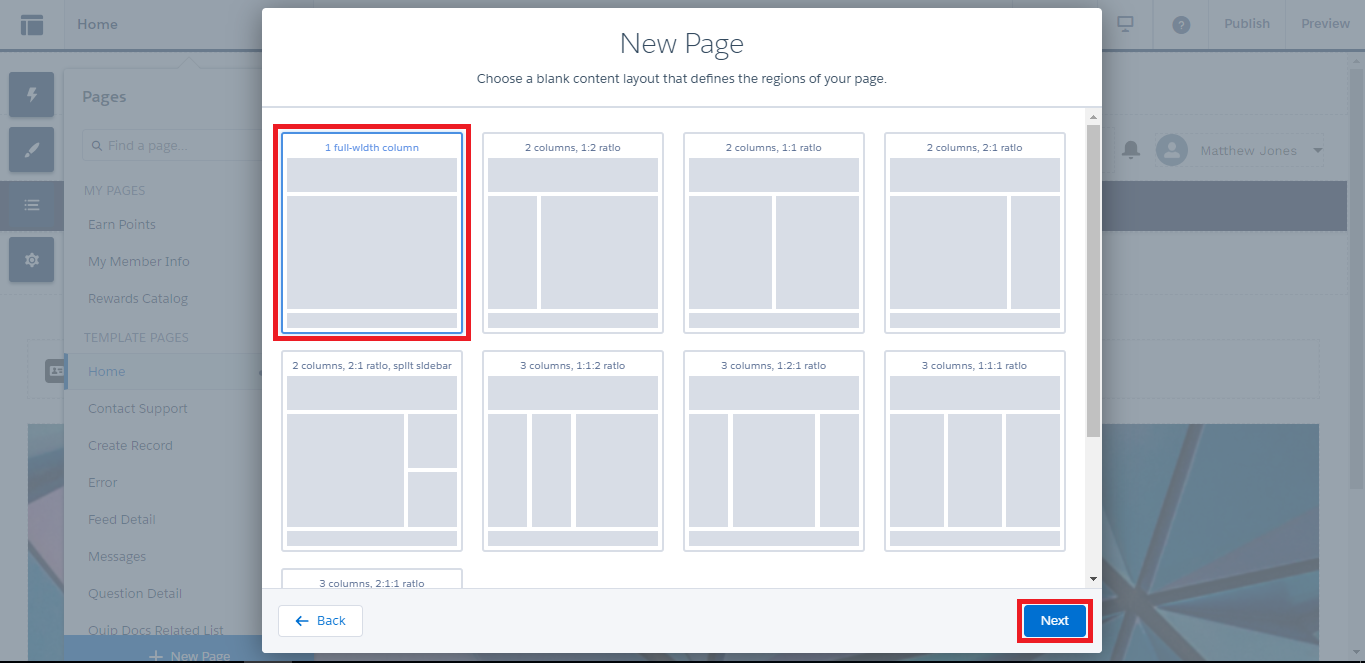
Choose 1 full-width column and click Next.
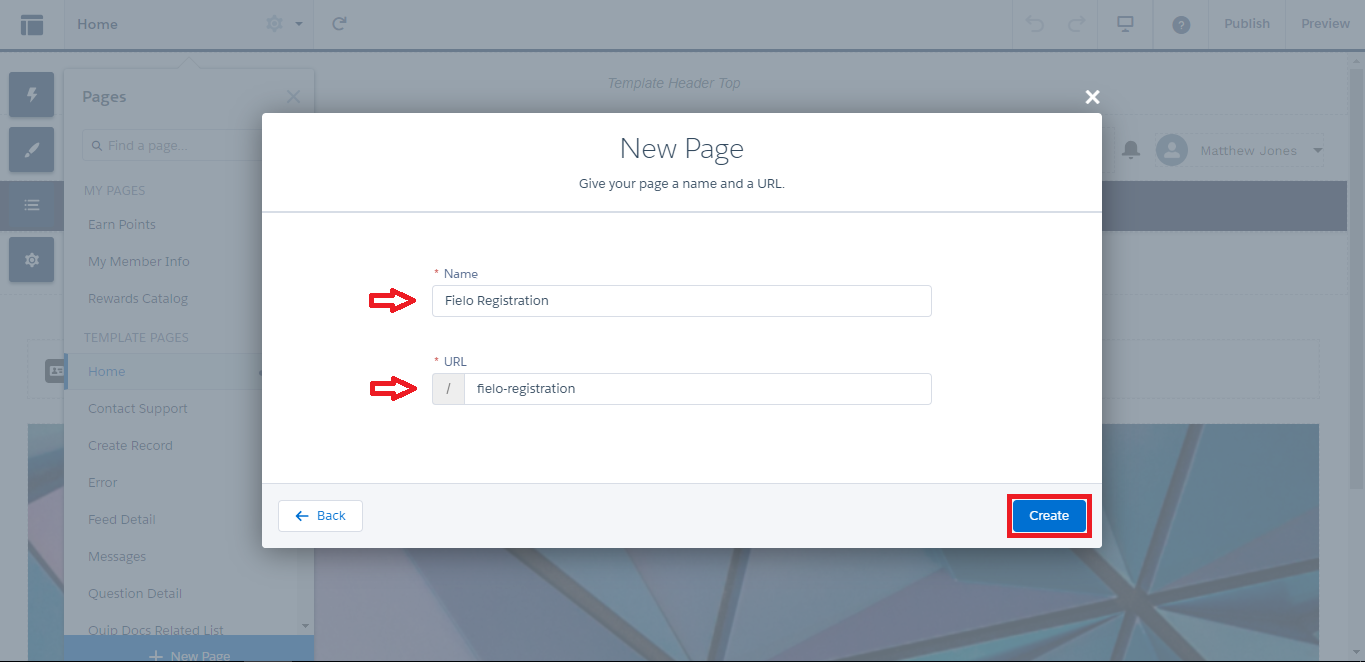
Enter a name and URL for the Fielo Registration page and click Create.
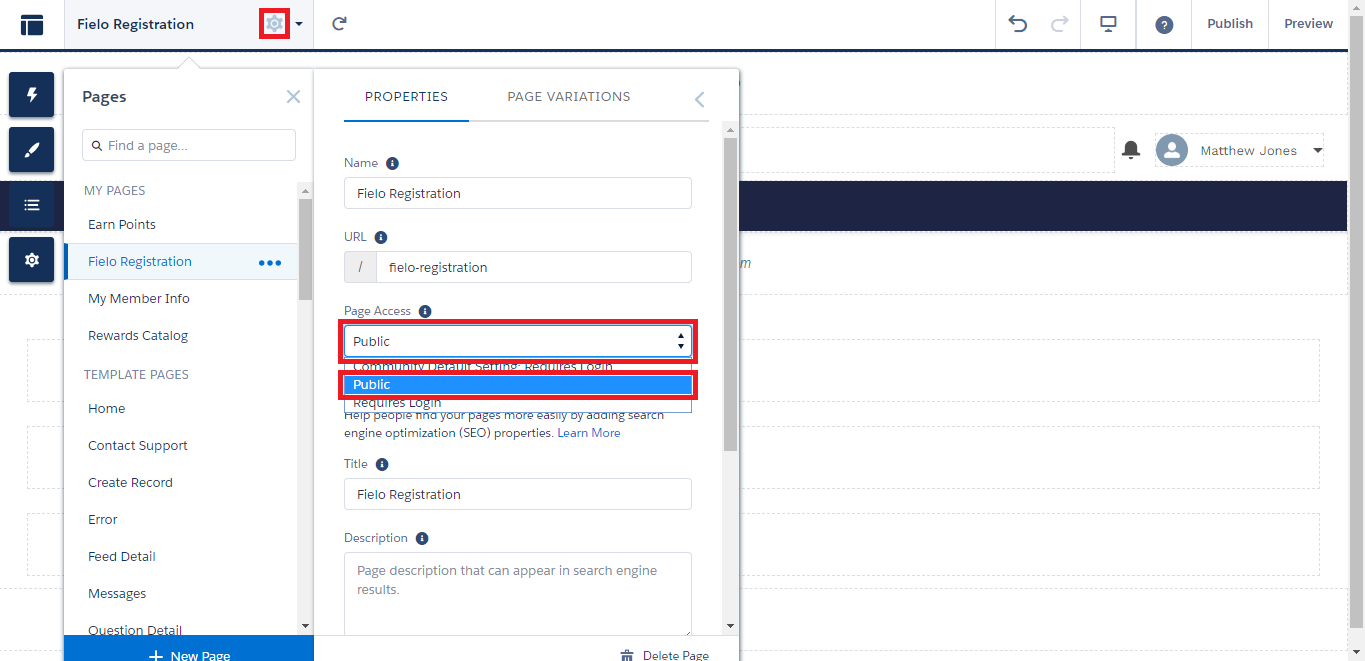
With your new page created, click the next to the name of your page and set Page Access to Public.
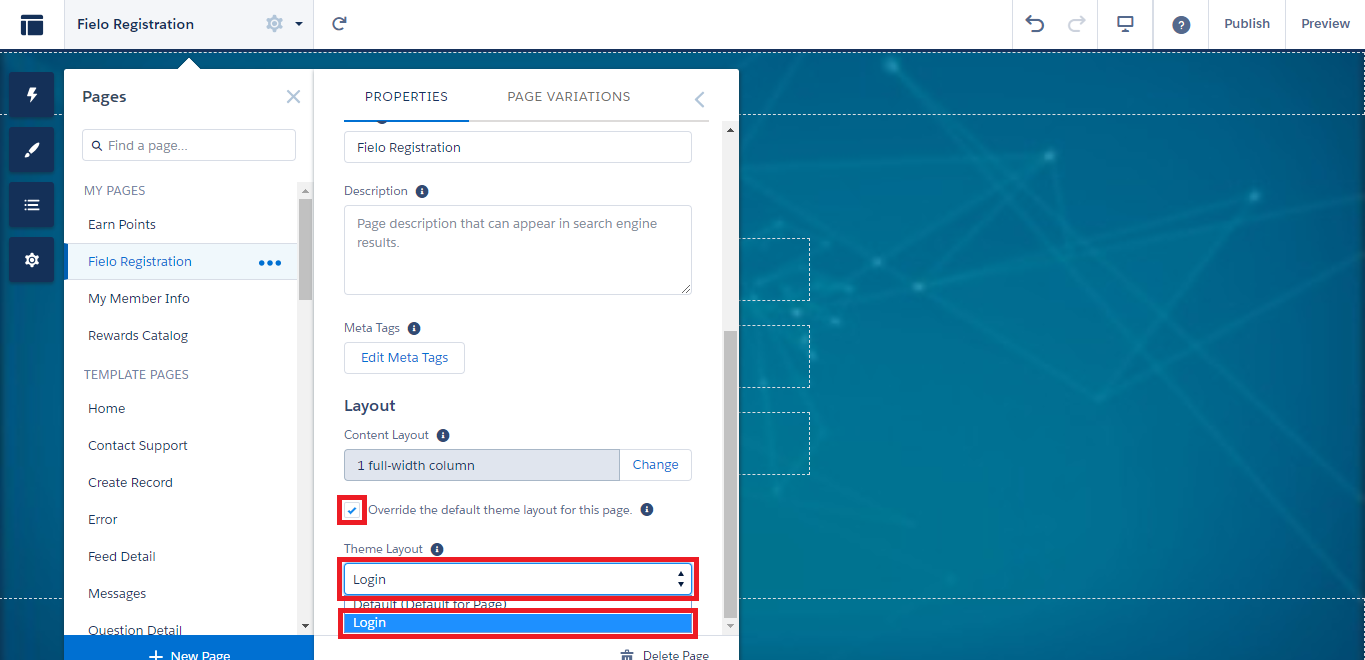
Optionally, you can also opt to Override the default theme layout for this page and choose the Theme Layout called Login. This way, default Salesforce components not relevant to Registration (such as User Profile Menu, Navigation Menu, and Global Search Box) will not be shown.
You can also clear the background image for a clean slate.
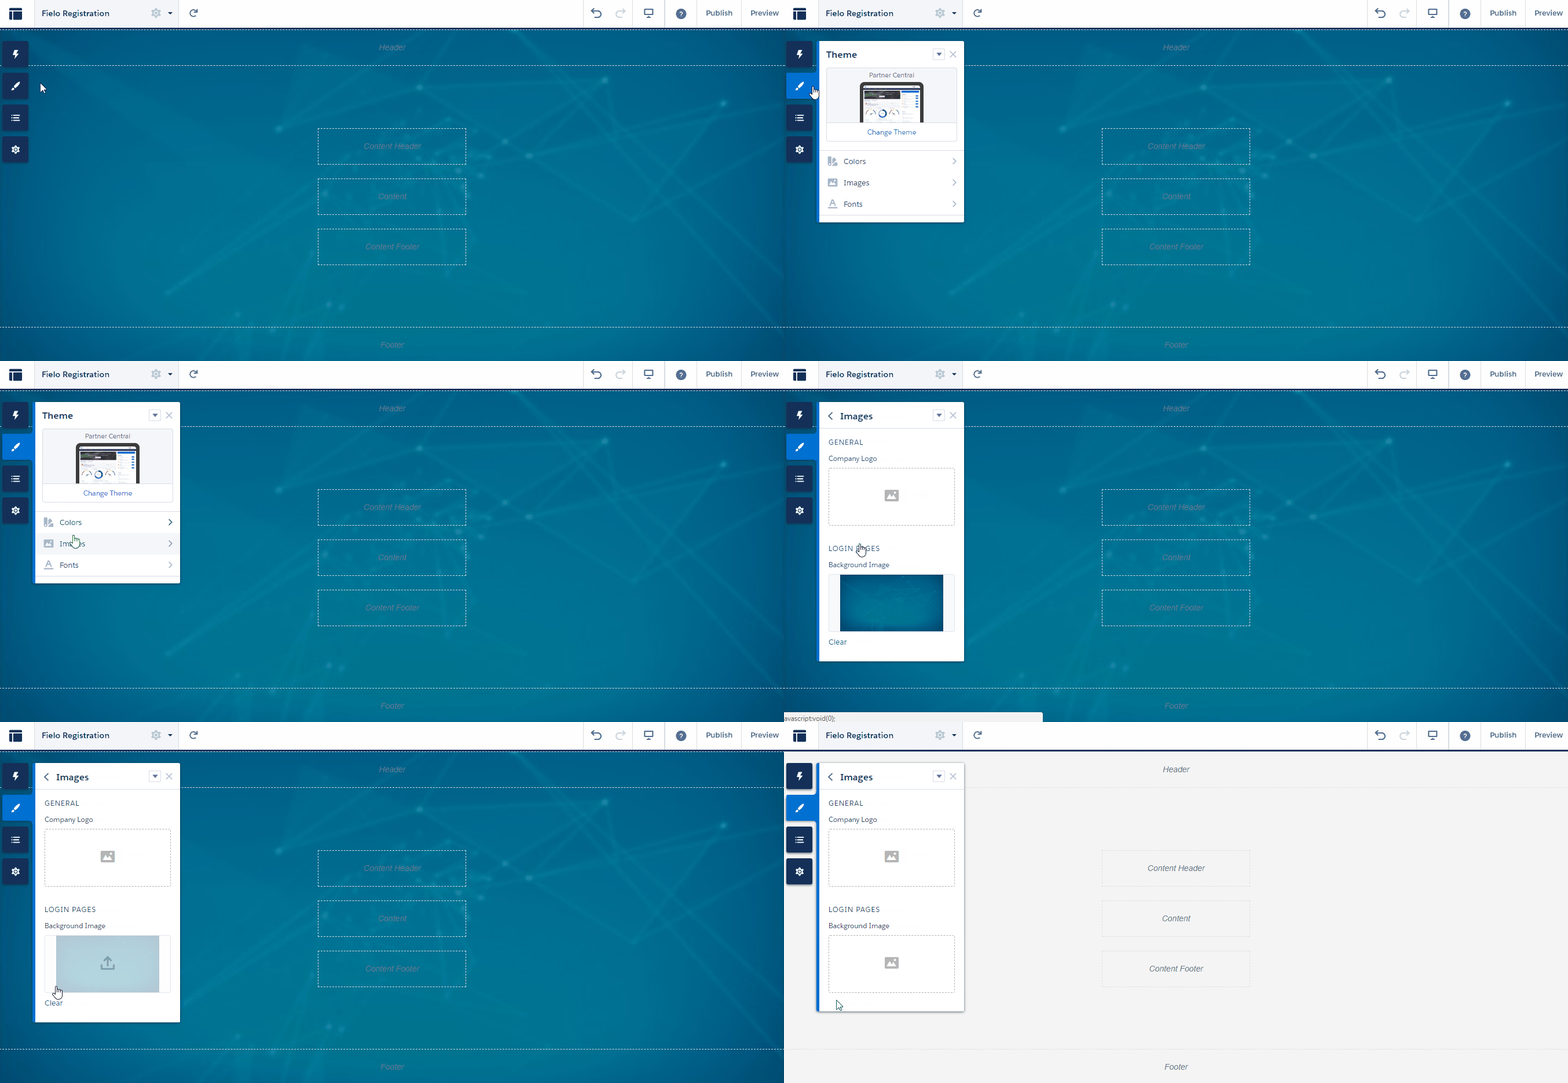
Customizing your ThemesYou can alter the background image, color palette, etc. of all the theme layouts in your Site by selecting . See Salesforce's Theme Your Experience Cloud Site doc for more details.
Give Fielo Permissions to Guest User Profile
For visitors to register in your Experience Cloud Site and join your Fielo program, you'll need to give some basic Fielo object and field permissions to your Site's Guest User Profile.
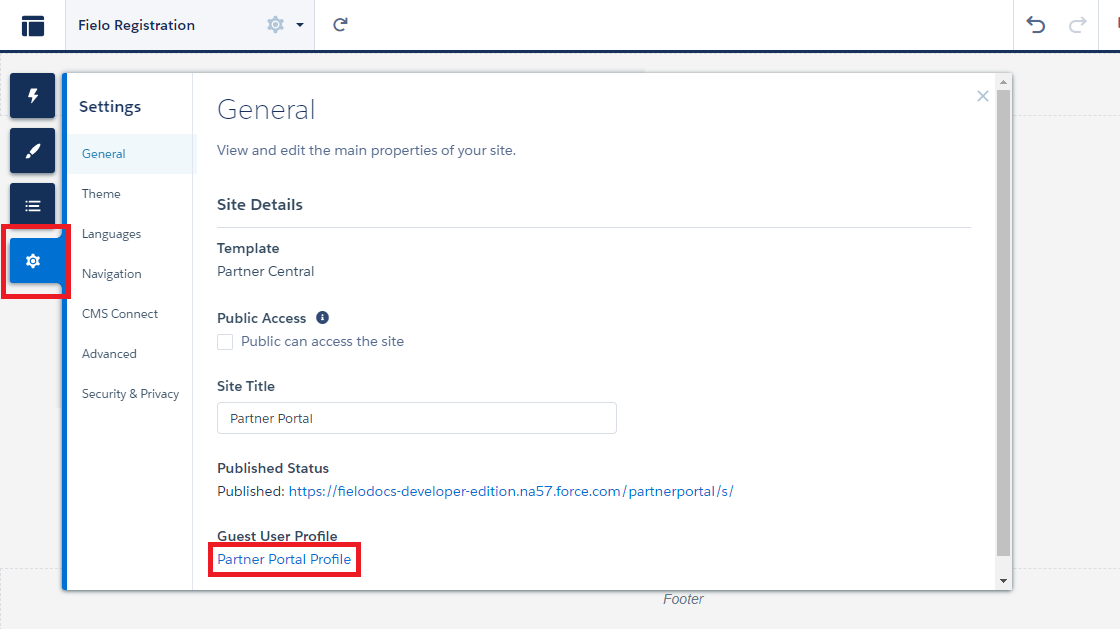
From Experience Builder, select on the left and click on the link under Guest User Profile.
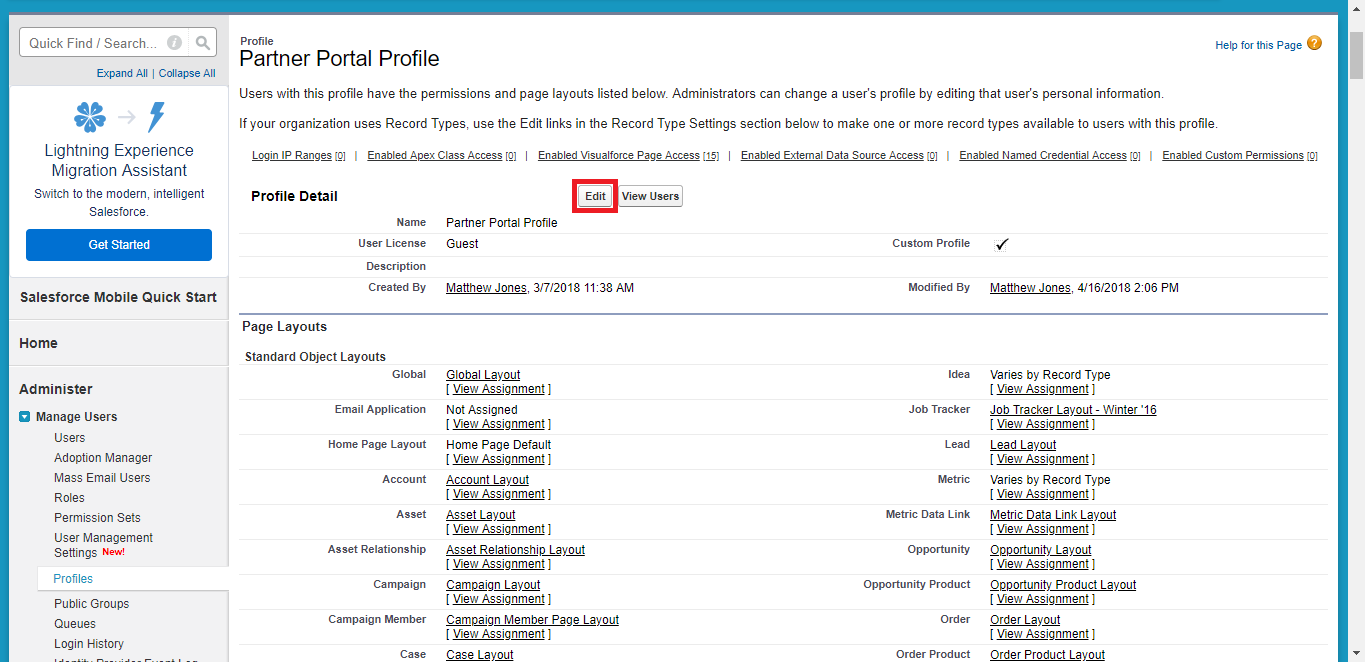
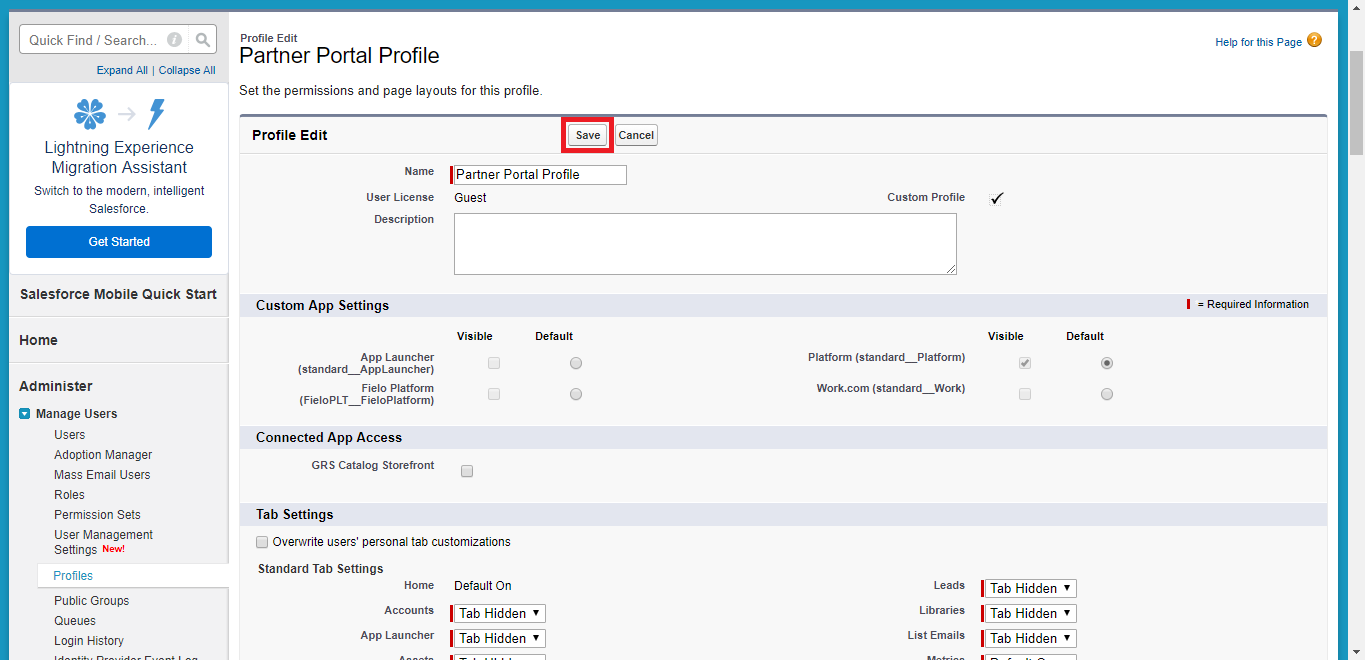
On the Profile page for your Site's Guest User Profile click Edit.
Under Custom Object Permissions and Standard Object Permissions, check the check boxes related to the permission from each of the objects below in order to enable the respective permission.
| Object | Read | Create |
|---|---|---|
| Account | X | |
| Agreement | X | |
| Challenge | X | |
| Challenge Member | X | X |
| Consent | X | X |
| Event | X | X |
| Language | X | |
| Levels | X | |
| Level Members | X | X |
| Member | X | X |
| Member Consent | X | X |
| Member Segment | X | X |
| Program | X | |
| Program Consent | X | |
| Promotion | X | X |
| Segment | X |
Click Save.
Back on the Guest Profile page, scroll down to Custom Field-Level Security and, next to the following objects, click on View. Click Edit and make sure to check the specified accesses in the table to ALL of the fields.
Don't forget to Save before leaving.
| Objects | Read | Edit |
|---|---|---|
| Agreement | X | |
| Challenges | X | X |
| Challenge Members | X | X |
| Consent | X | |
| Event | X | X |
| Language | X | |
| Level | X | |
| Level Member | X | X |
| Members | X | X |
| Member Consent | X | |
| Member Segment | X | X |
| Program | X | |
| Program Consent | X | |
| Promotions | X | X |
| Segment | X |
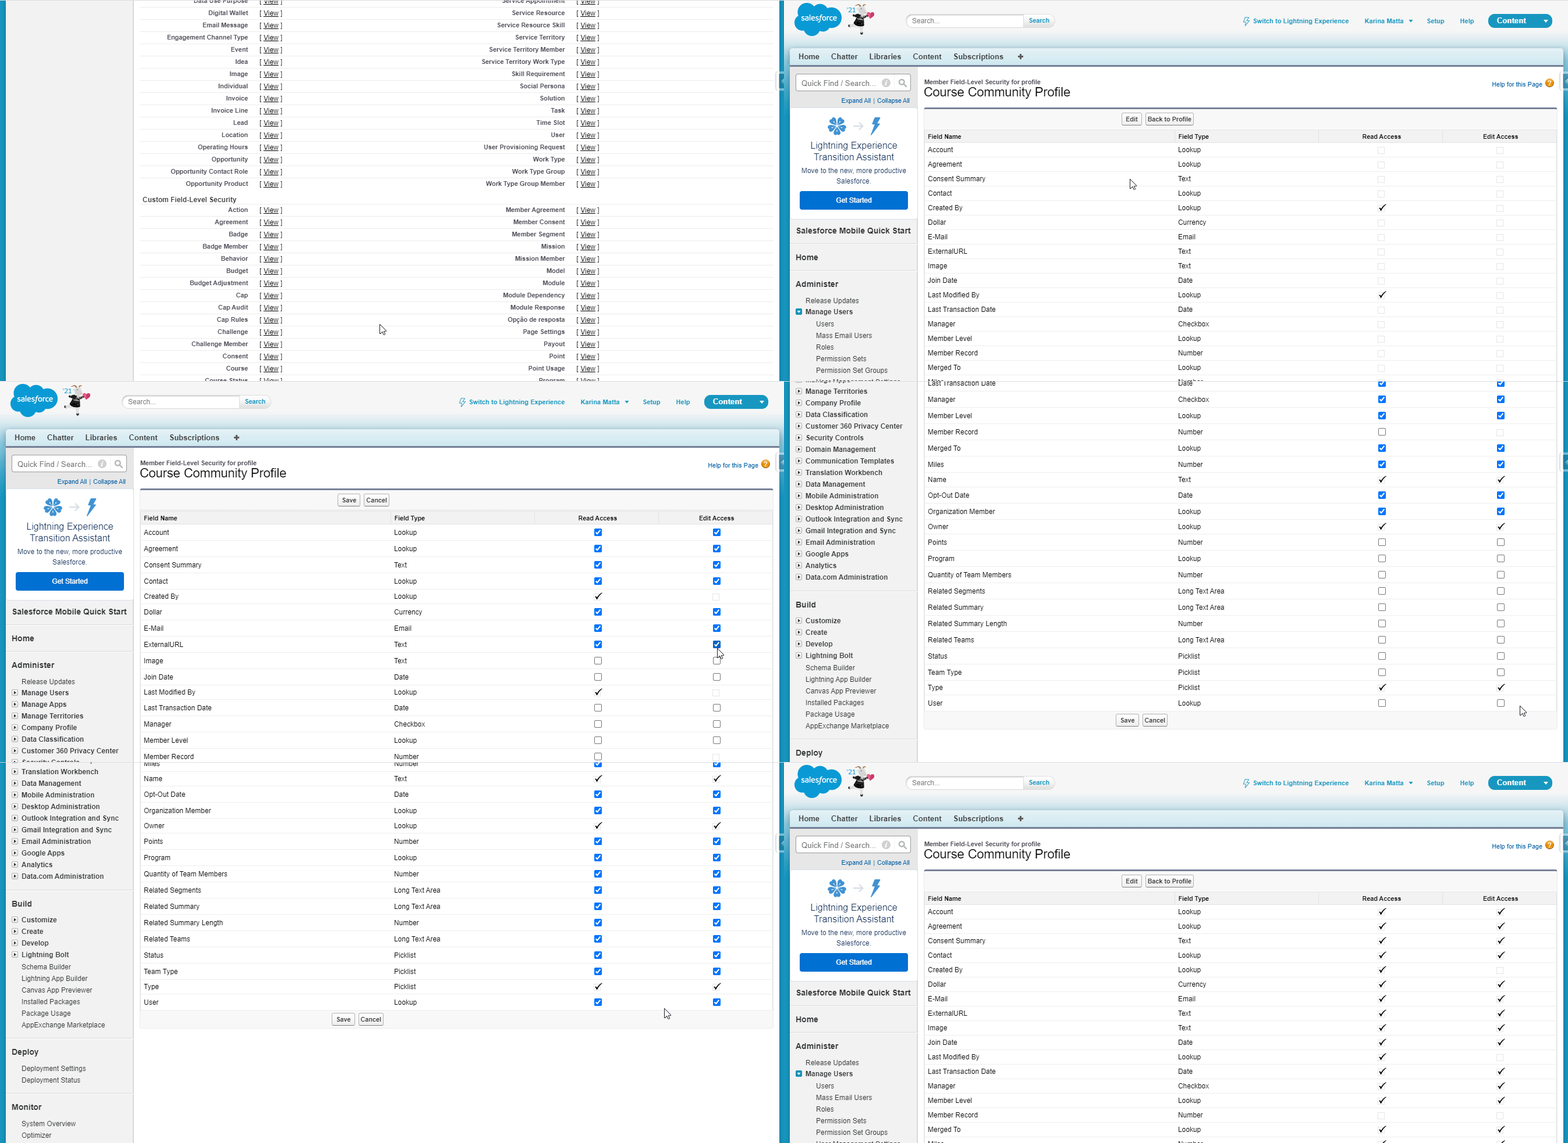
Field-level security
After giving Read access to all the fields, it is also necessary to enable guest profile access to some Apex Classes. Within the Guest Profile page, find the Enabled Apex Class Access list and click on Edit. Once there, select the following classes from the left column and add them to the right column:
- FieloPLT.CommunityRegistrationController
- FieloPLT.ManageConsentsController
- FieloPLT.MemberSelectorController
- FieloPLT.ProgramAgreementController
- FieloPLT.RegistrationController
Don't forget to Save after adding them.
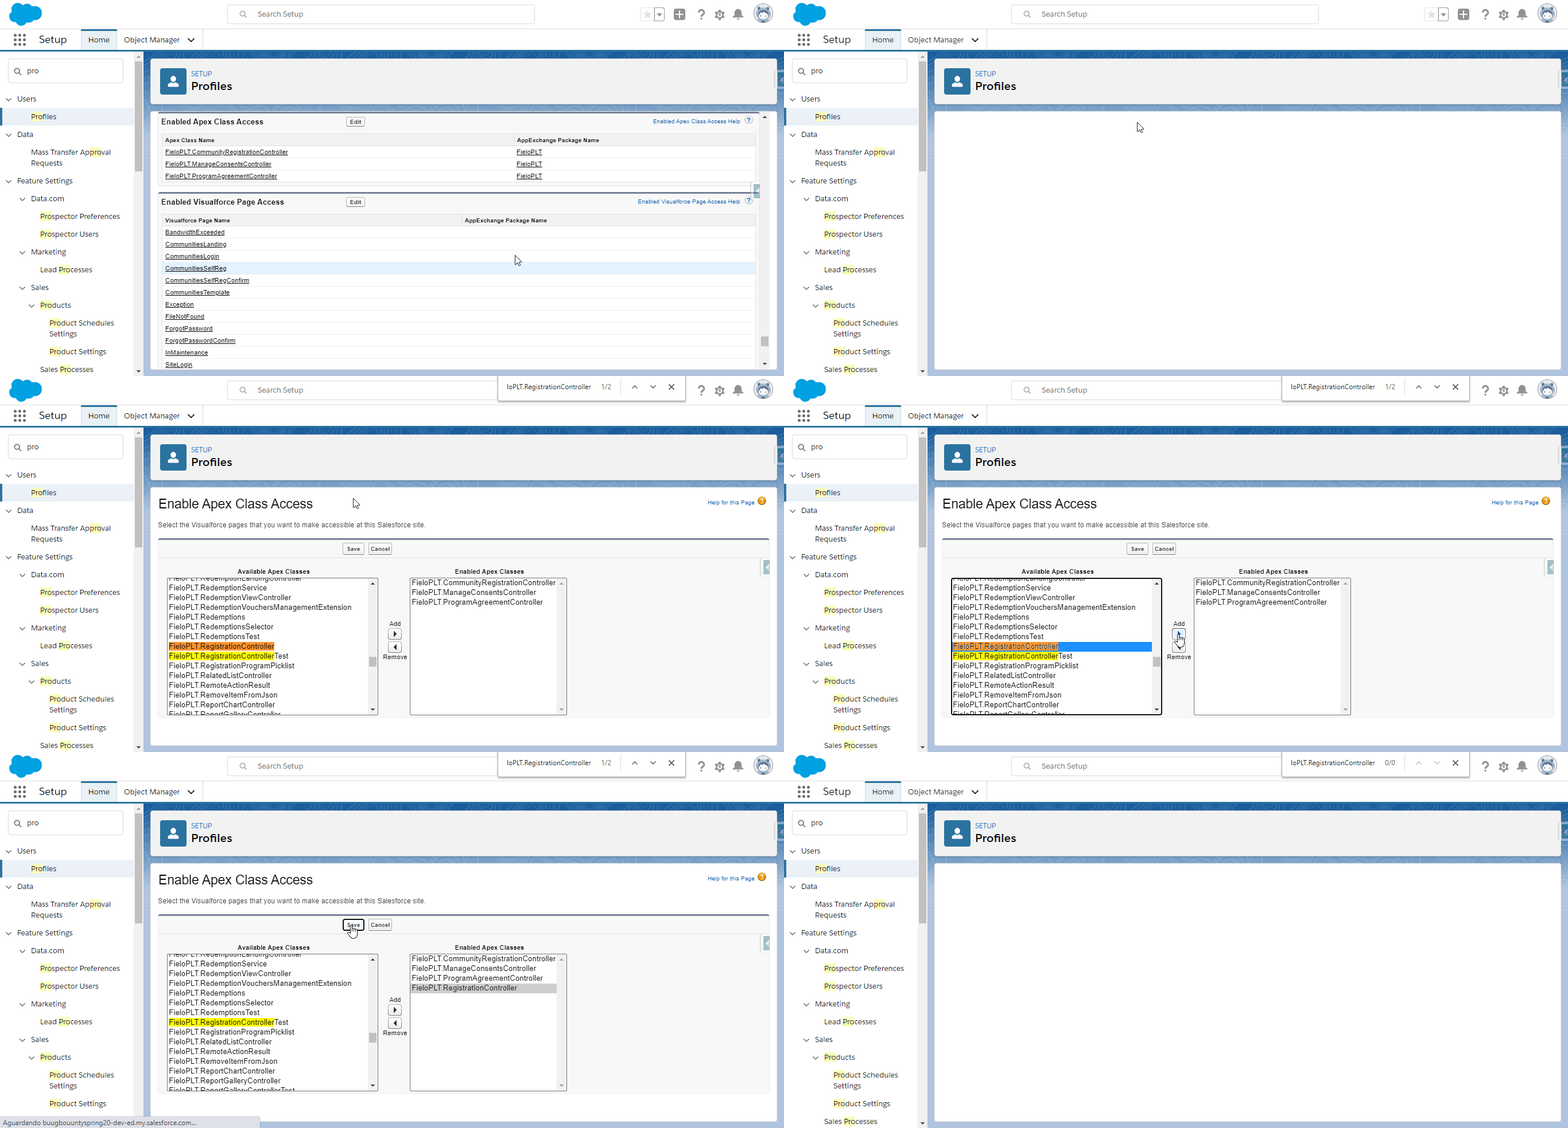
Enabling access to the FieloPLT.RegistrationController class
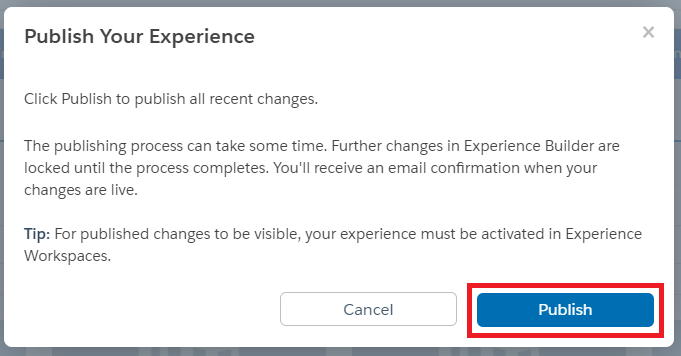
Back in Builder, publish your page by clicking Publish.

Go ahead and confirm publication.
Get Your Experience Cloud Site Ready
In order for your new Registration page to work successfully, you must now make some configurations in your org and then in your Site Workspace.
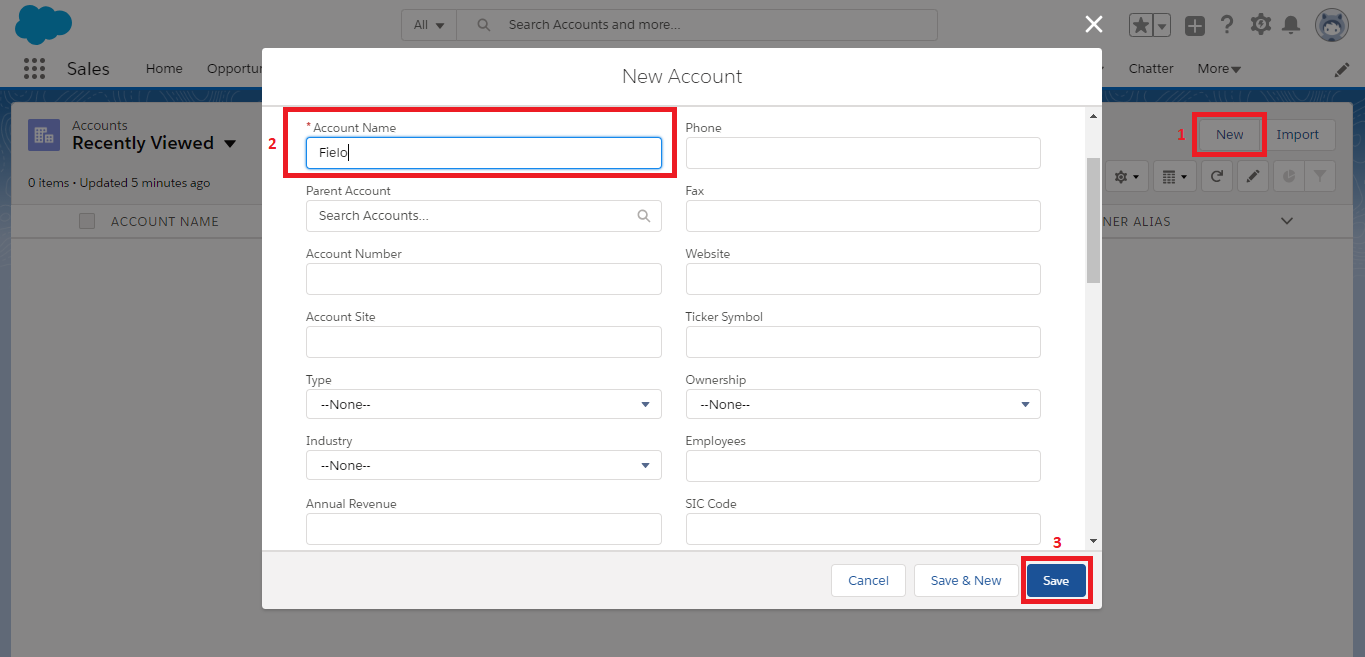
From your org, open the App Manager and, under All Items, click Accounts. Click New and enter a name. This account will be assigned to new Community users. When you're ready, click Save.
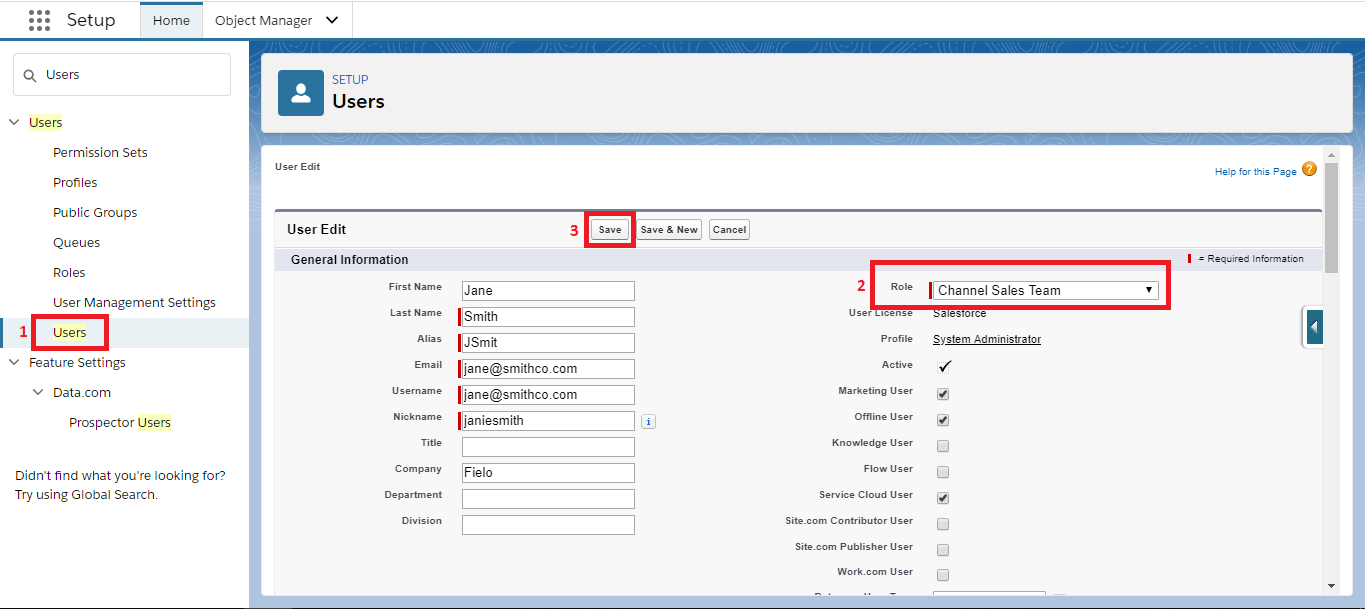
Next, click and enter Setup. Search for and select Users. In the row corresponding to your Salesforce user, click Edit. Give yourself a role and then click Save.
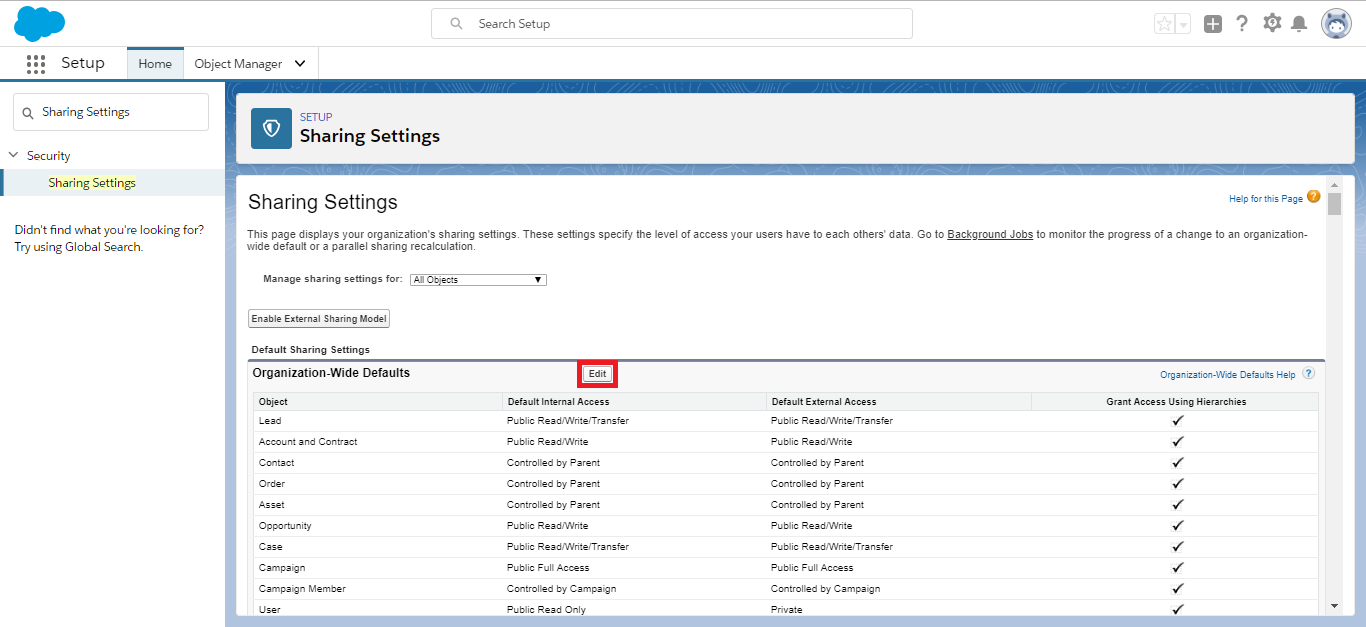
Also in Salesforce Setup, search for and select Sharing Settings. Click Edit.
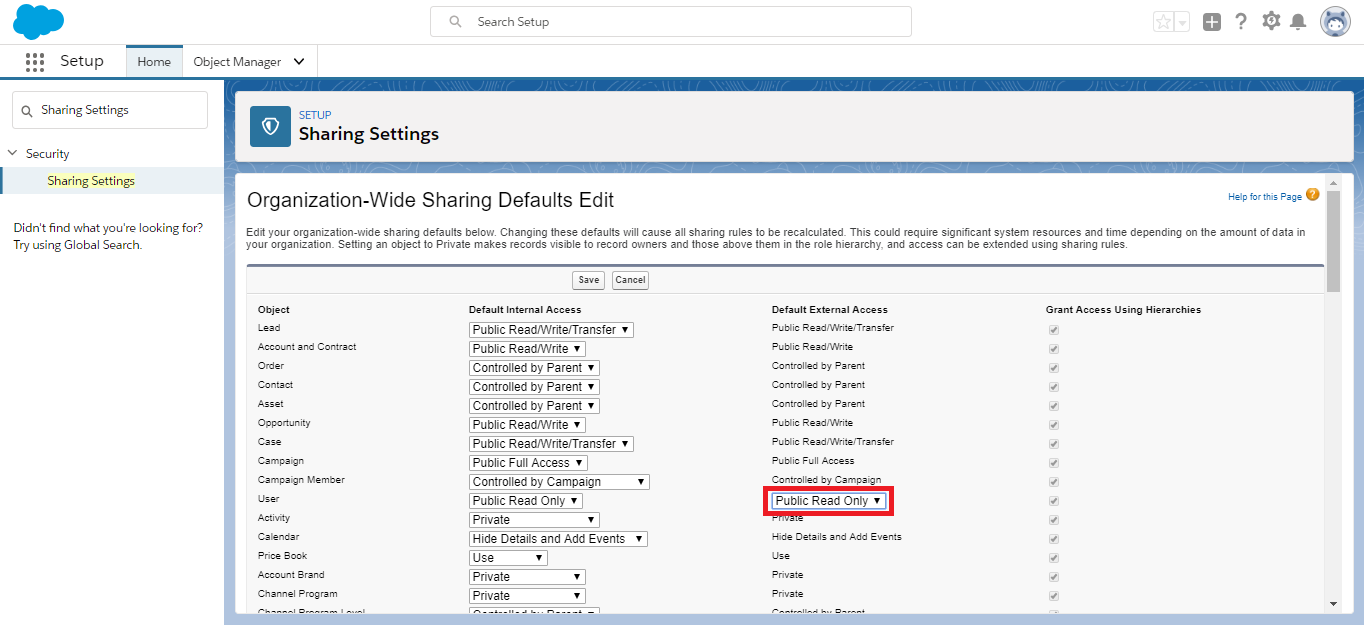
In the row corresponding to User, under Default External Access, choose Public Read Only. Then click Save.
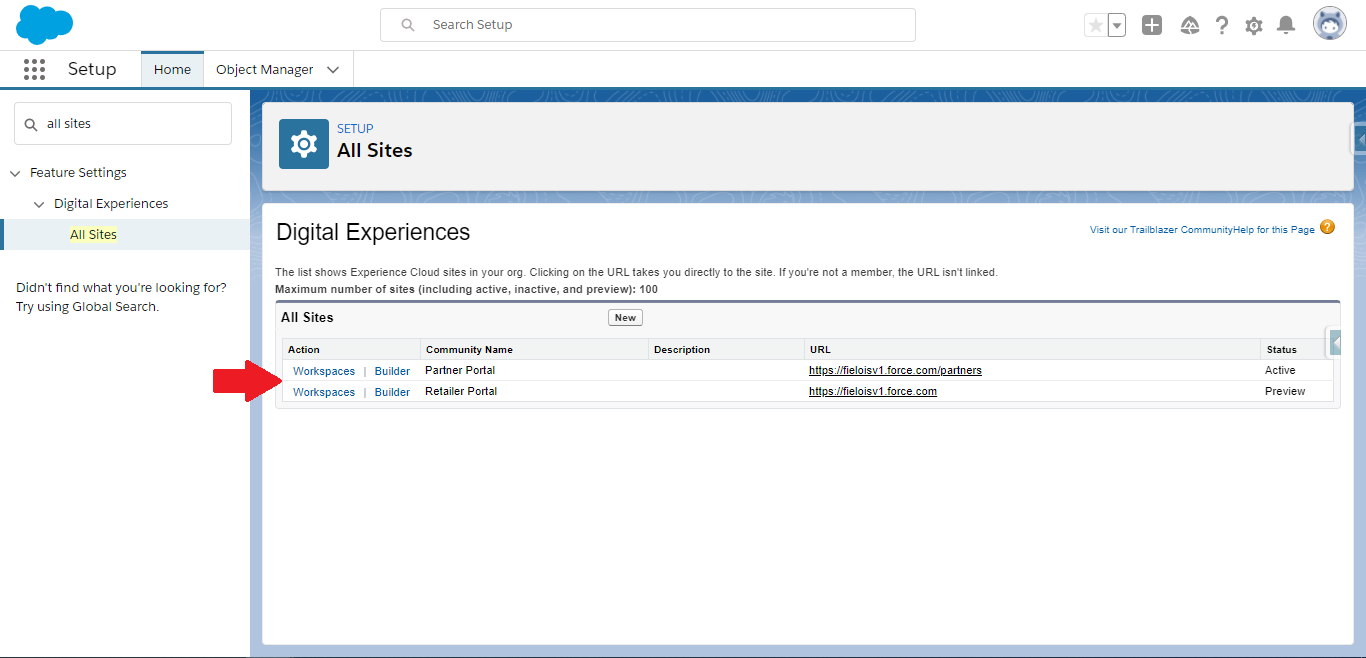
Back in Setup, quick find and select All Sites. Enter the Workspace for your Site.
In Workspaces, select Administration and then, on the left, select Emails.
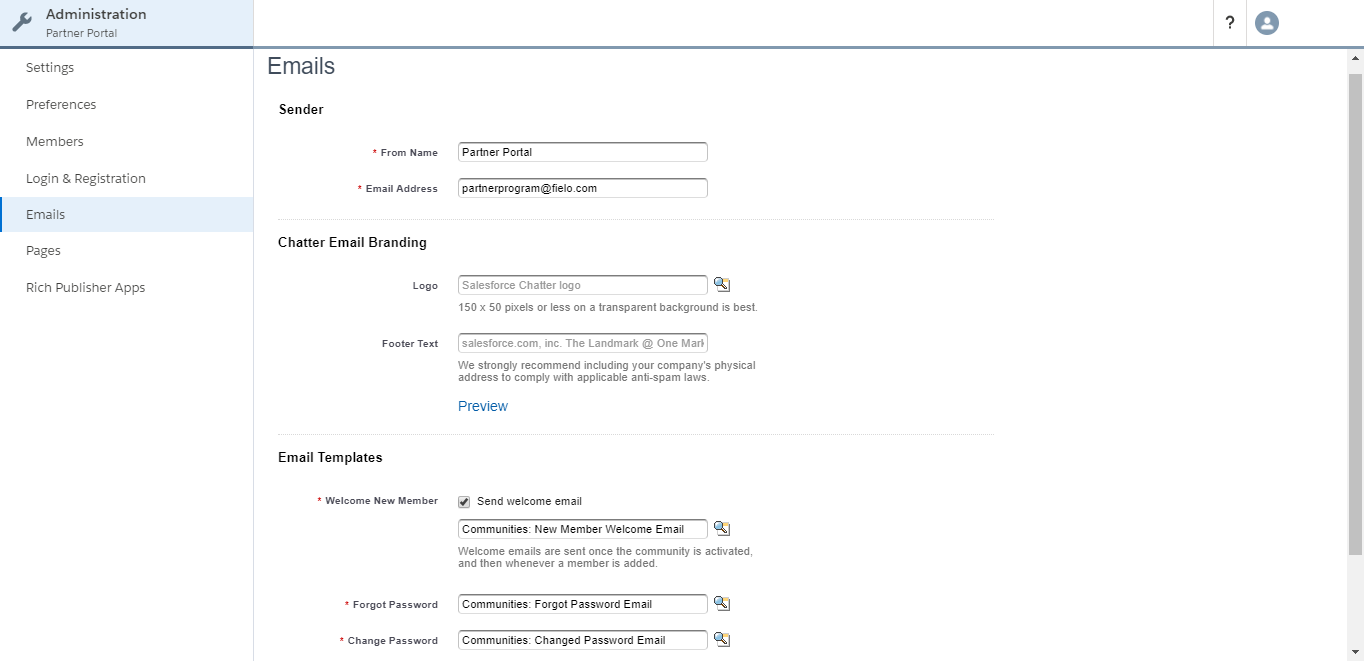
Under Sender, enter the From Name and E-mail Address that you want new Members to see when receiving Welcome, Forgot Password and Change Password e-mails. That this is valid for all community users, not only Fielo members.
Under Email Templates, you can also select your own templates for Welcome, Forgot Password and Change Password e-mails.
For more info on Salesforce E-mail Templates, see Salesforce's E-mail Templates guide.
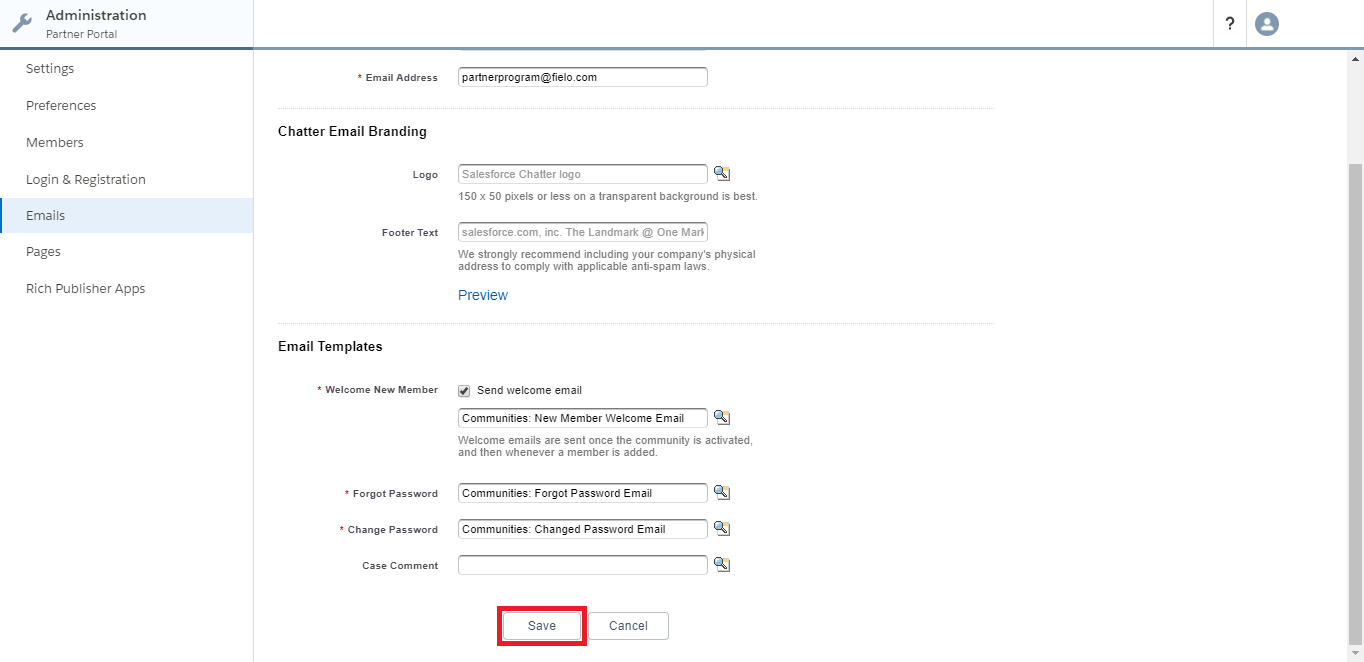
When you're ready, click Save.
Next, on the left, select Members. Then, under Select Profiles, next to Search, click and choose All.
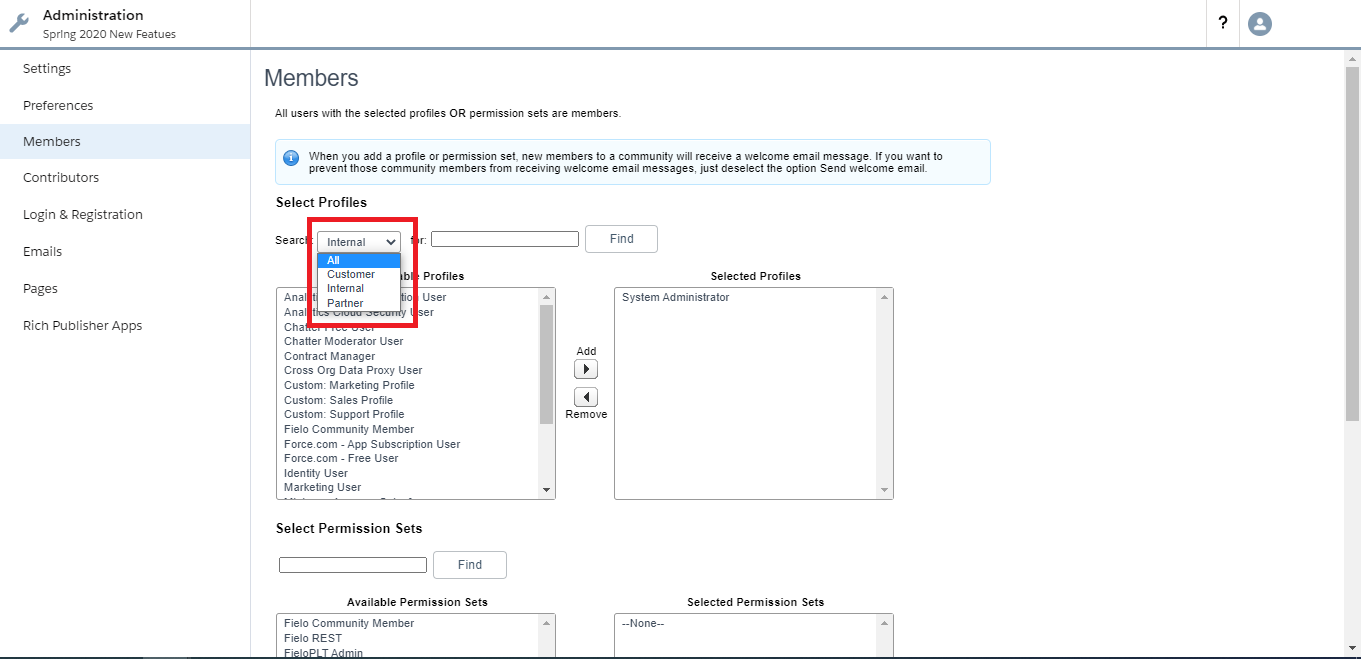
In the Available Profiles list, select the Profile you want to use for your Community users. Note that it has to have a community related user license, such as Portal or Partner.
This can be the Fielo Community profile included in the installation tool or your own custom profile that includes Fielo object and field permissons. Once you've made your selection, click Add . It should now appear in the Selected Profiles list.
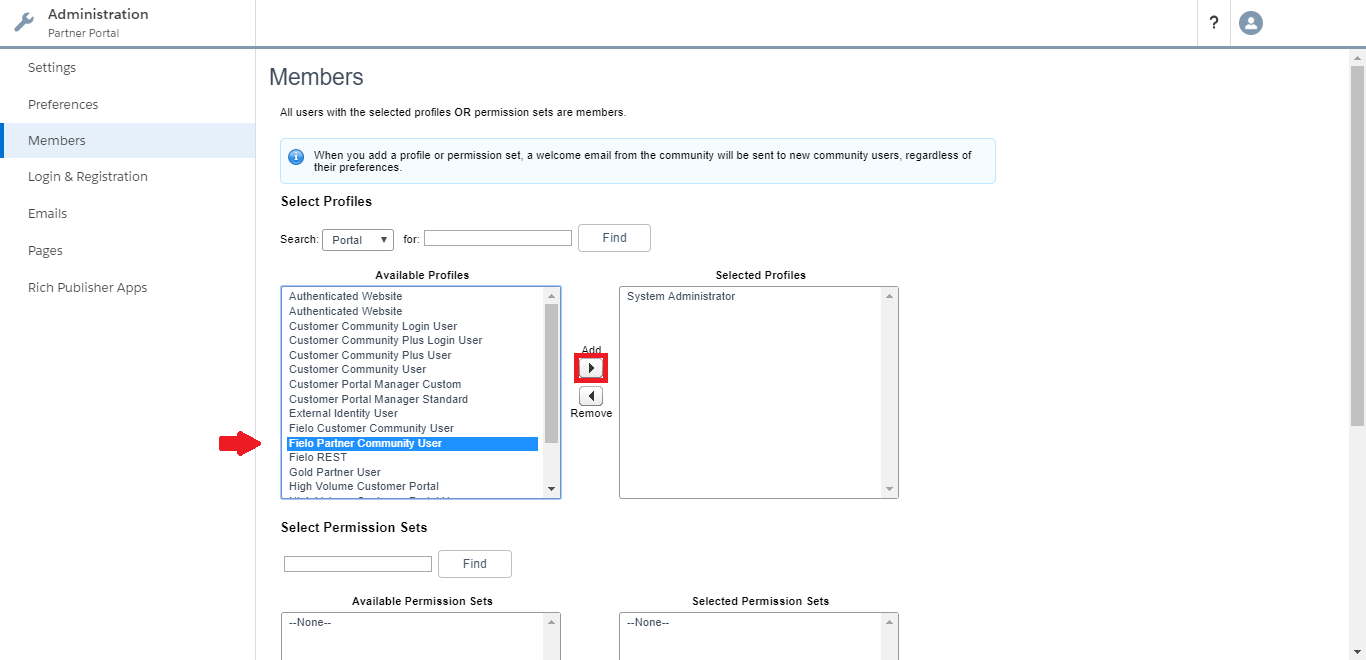
Click Save.
Finally, on the left, select Login & Registration. Under Registration, tick Allow external users to self-register. From the Page picklist, choose Experience Builder Page. Then, using 🔍, select the page you set up for Registration.
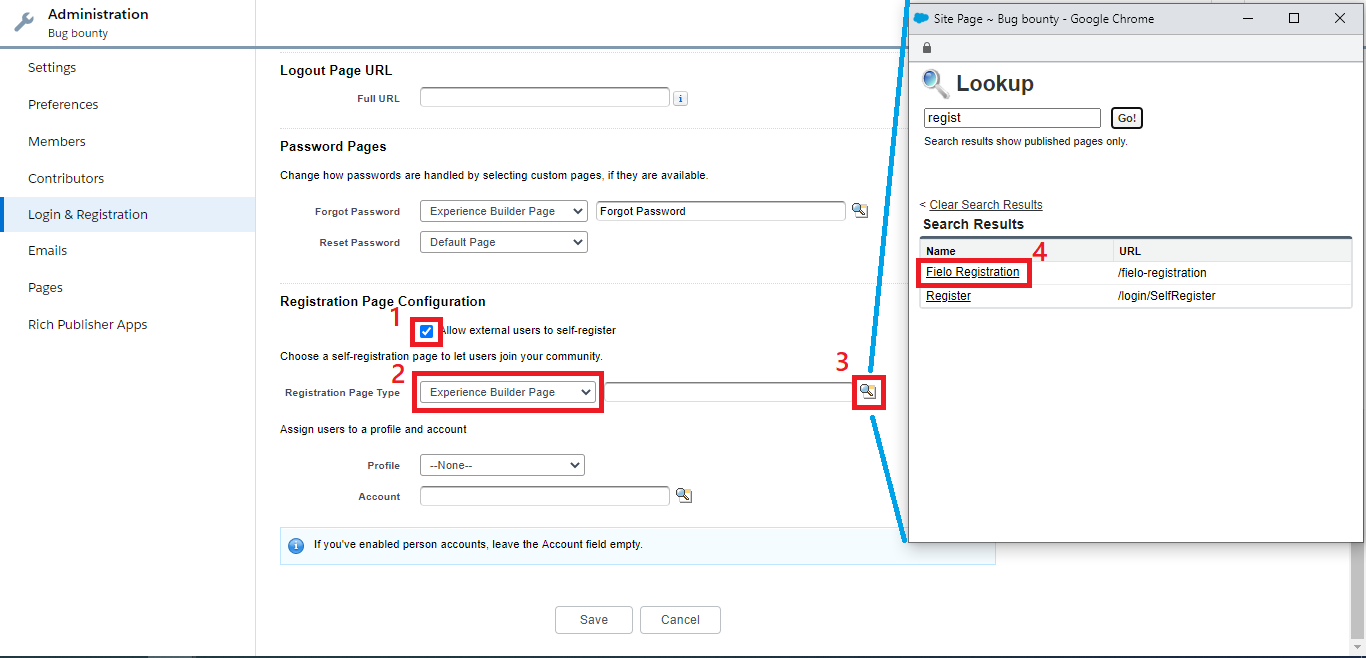
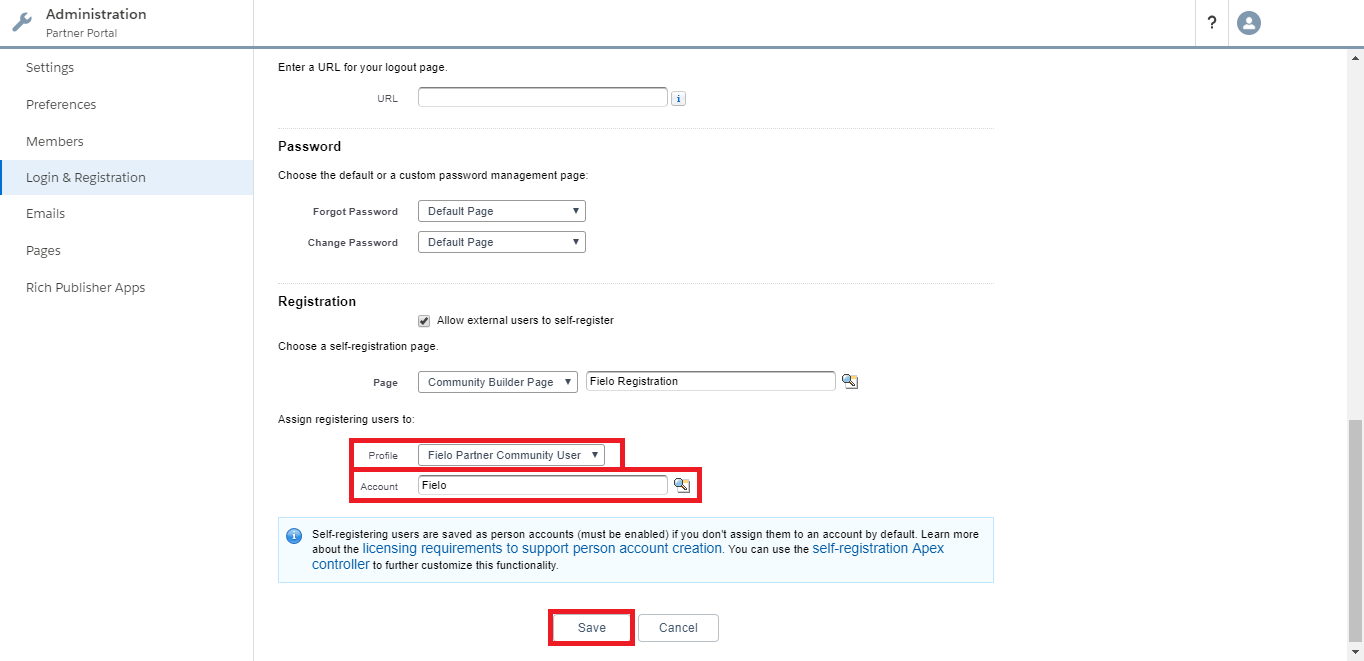
Next to Profile, choose the Profile you selected before for portal users in the Members settings.
Next to Account, using 🔍, select the Account you created for new Members to be assigned to. Click Save.
More Site Customization OptionsIn Login & Registration, you can add a logo, specify a login color scheme, assign a custom logout redirect page and more! For more details on these Salesforce Experience Cloud Site features, see their docs.
Add the Registration Component
Now, it's time to place the Fielo - Registration component on your registration page. Let's jump back into the Builder for your Experience Cloud Site from the All Sites page.
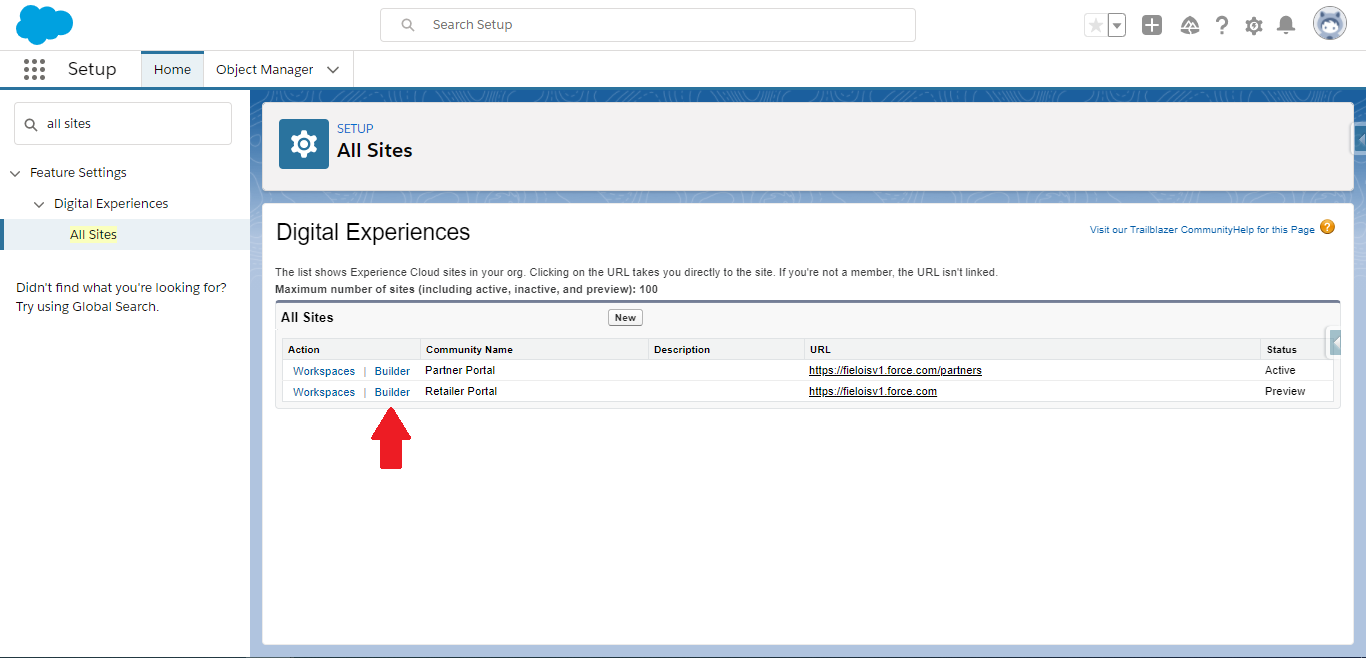
Navigate to your registration page.
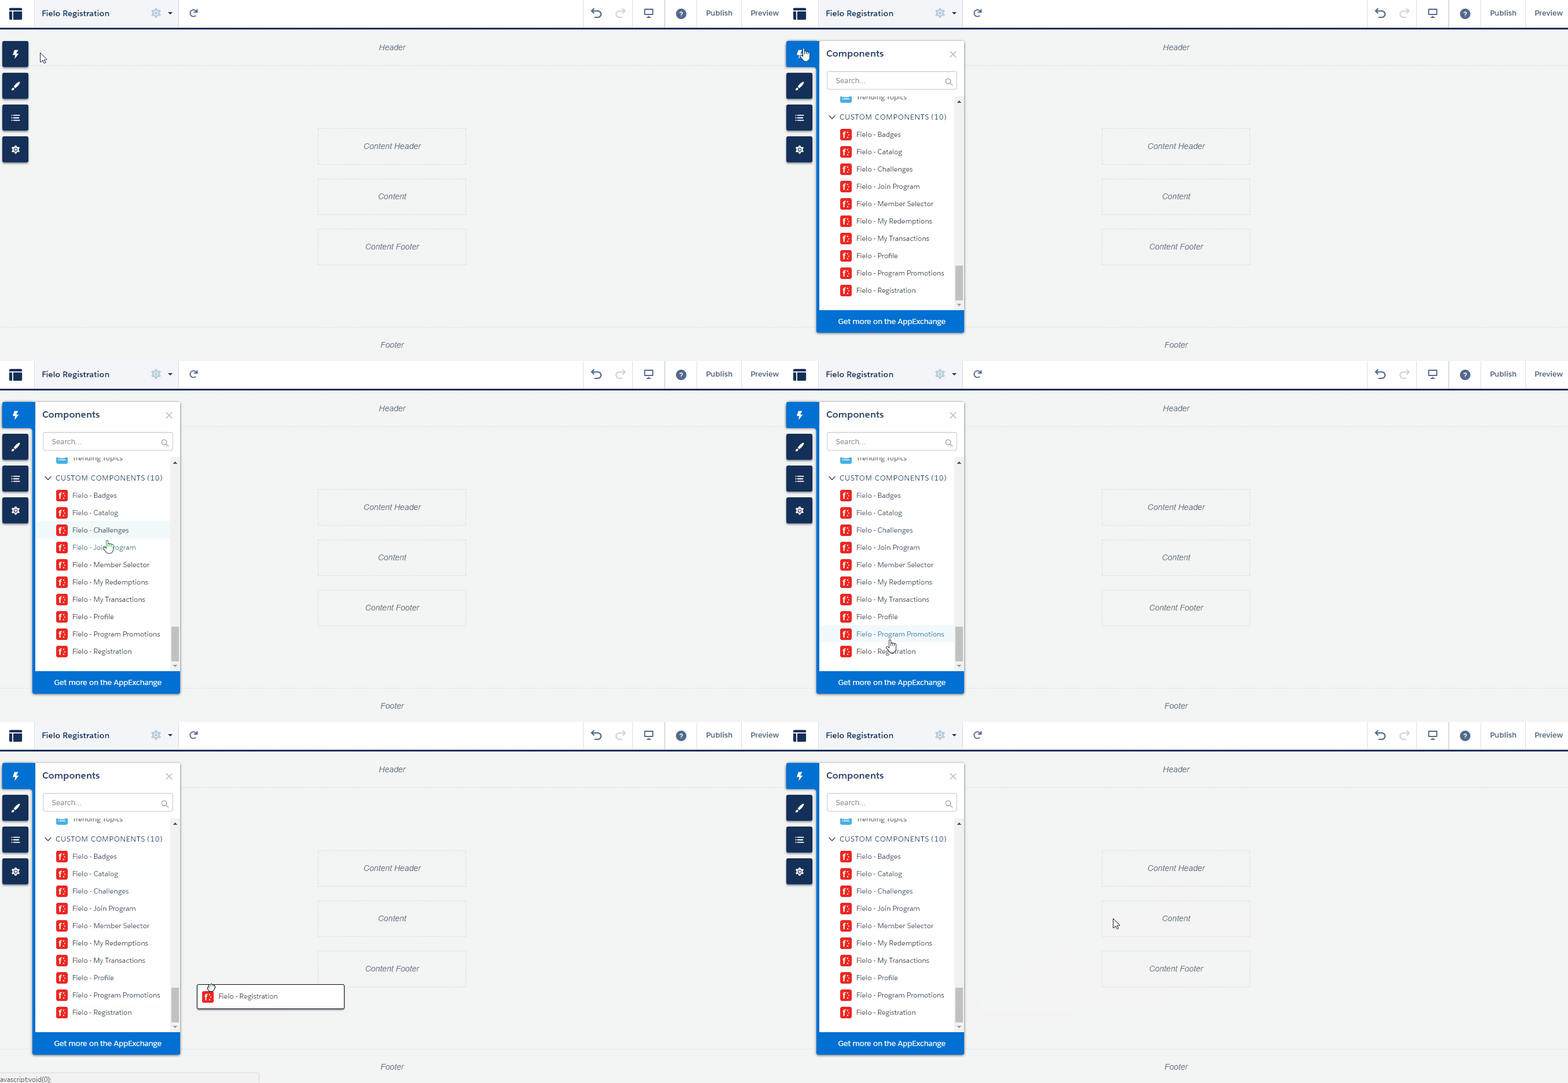
On your registration page, click and drag and drop Fielo - Registration onto your content area.
Welcome New MemberYou are able to check which email template is used for this message through the Administration , as mentioned in the get your site ready section.
Configure Registration
With the component on your page, you can now configure Registration to meet your loyalty portal's specific needs.
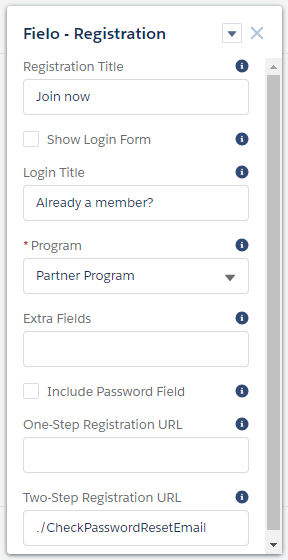
Configure Registration via the following properties:
- Registration Title: Enter a title to be displayed at the top of the form.
- Show Login Form: Check this box if you want to show a login form alongside the registration form. Remember that, if you're using a Salesforce template, users can also log in using the standard login page.
- Login Title: If you're using the login form, enter a title to be shown above it.
- Program: Choose the program that new members will join.
- [Optional] Extra Fields: Enter the API names of any additional member fields would like to include in the form, separated by commas.
- Include Password Field: Check this box if you would like new users to create a password on the form. Otherwise, the new user will create a password after verifying their e-mail address.
- One-Step Registration URL: If Include Password Field is checked , enter the URL new members will be directed to once they successfully register. When blank, the member will be directed to the site's Home page.
- Two-Step Registration URL: If Include Password Field is unchecked , enter the URL that new members will be directed to for password creation. By default, members will be directed to your site's Change Password page.
Updated over 1 year ago