
Campaigns and Action-Based Emails
In order to send messages through Fielo, you need to have already created Salesforce E-mail Templates as they feed through to Messaging. Essentially, you're just feeding the Templates through from Salesforce and Messaging - configuring some important parts as you do it. Don't forget to also set an Organization Wide Address.
There are two types of messages you can send:
- Transactional E-mails are the ones sent to individual recipients - i.e. direct one-on-one communication - based on that recipient’s action. In other words, recipients trigger an email to be automatically sent in their direction after completing an action or a specific event. Keep in mind, then, that those emails are only relevant to a particular recipient.
- Campaign E-mails are what is classically referred to as E-mail marketing. Using this feature, you can create a standard email campaign and send it to multiple recipients (a list of eligible members) all at once. Different from the Transactional, the Campaign E-mails are triggered to be sent by the recurrency you define them to be sent.
Both types of messages can be highly personalized, in their own ways. You'll understand how in this page.
Create Messaging Email Templates
Enable Page Settings - Email Template and Email CampaignBe sure the Email Template and Email Campaign related lists are active in your Program page.
From the Programs tab, access the program that you are configuring the campaign to and enter the Email Template tab.
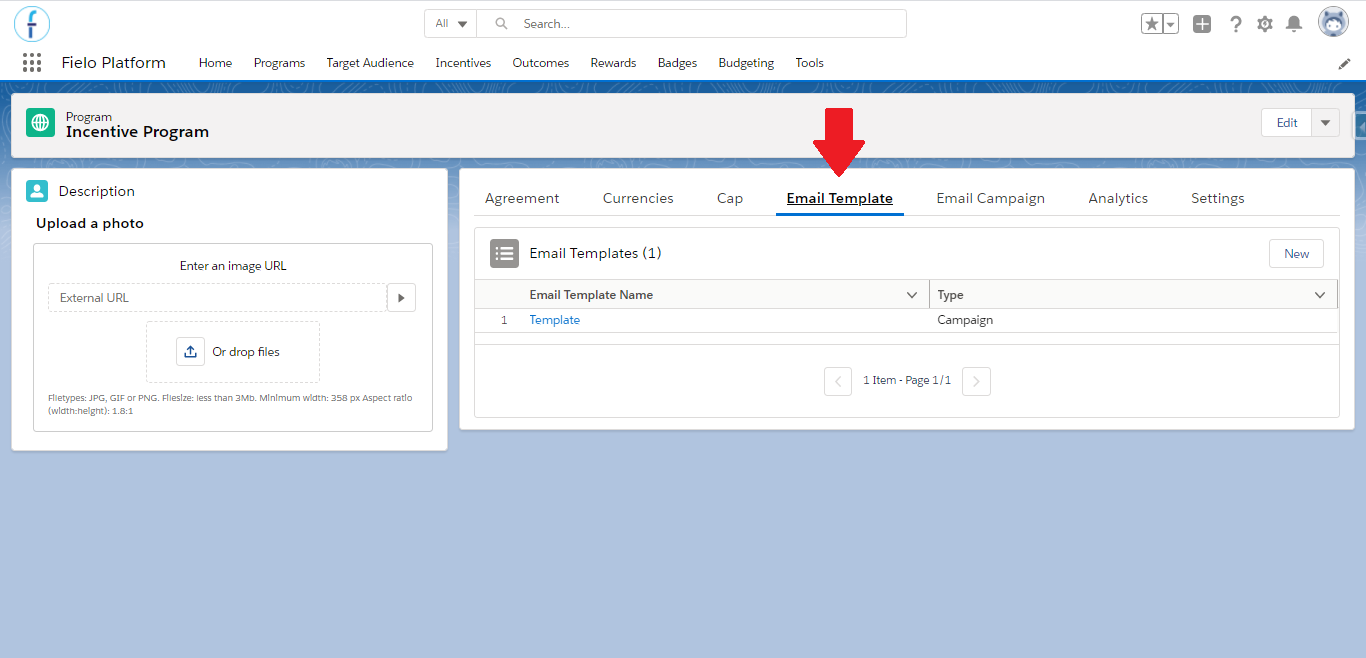
Programs: Email Templates
To create a new template, click New. Fill out the following information:
- Email Template Name: Give your template a name - this can be the same as the name you gave it in Salesforce.
- Program: This will automatically be filled out by the system based on the Program you are working from.
- Active: this if you want the template to be usable from now on.
- Data Class: This field is mostly used when creating a Campaign Email, whenever an Apex Class is necessary to configure the fields to be merged in the Salesforce Email Template. Here, you select the Apex Class that needs to be used.
As you may already know, Merge Fields is an extremely important feature that allows you to send bulk personalized emails, but, by using an Apex Class, you can essentially create fields to add in your Messages - what makes you capable of entering even more data than what is available by default on Salesforce.
With this freedom to add anything to your template, it is possible to easily define custom values such as how many points that member has received in the last 7 days. Take a look in this example:
global class Fielo_WeeklyEmail implements FieloPLT.EmailDataInterface{

    public Map<Id,Map<String,String>> getTransactionalData(Set<Id> emailAlertIds){
        return null;
    }

    public Map<Id,Map<String,String>> getCampaignData(Id campaignId, Set<Id> memberIds){

        Map<Id,FieloPLT__Member__c> membersMap = new Map<Id,FieloPLT__Member__c>([SELECT Id, Name, FieloPLT__OrganizationAccount__r.Name, FieloPLT__OrganizationAccount__r.FieloPLT__Points__c FROM FieloPLT__Member__c WHERE Id IN: memberIds]);
        Map<Id,Map<String,String>> valuesByMember = new Map<Id,Map<String,String>>();
        for(FieloPLT__Member__c member : membersMap.values()){
            Map<String,String> values = new Map<String,String>();
            values.put('name', member.Name);
            values.put('orgMember', member.FieloPLT__OrganizationAccount__r.Name);
            values.put('points', String.valueOf(member.FieloPLT__OrganizationAccount__r.FieloPLT__Points__c));
            values.put('pointsEarned', '0');
            valuesByMember.put(member.Id, values);
        }

        //points generated in the last 7 days
        for(AggregateResult ar : [SELECT SUM(FieloPLT__Points__c) points, FieloPLT__Member__c member FROM FieloPLT__Transaction__c WHERE FieloPLT__Member__c in : memberIds AND FieloPLT__Date__c = LAST_N_DAYS:7 AND (FieloPLT__Type__c = 'Adjustment' OR FieloPLT__Type__c = 'Loyalty Asset' OR FieloPLT__Type__c = 'Challenge Reward') AND FieloPLT__IsReverted__c = false GROUP BY FieloPLT__Member__c]){
            String sumPoints = String.valueOf(ar.get('points'));
            valuesByMember.get((Id)ar.get('member')).put('pointsEarned', sumPoints.subString(0, sumPoints.indexOf('.')));
        }

        return valuesByMember;
    }
}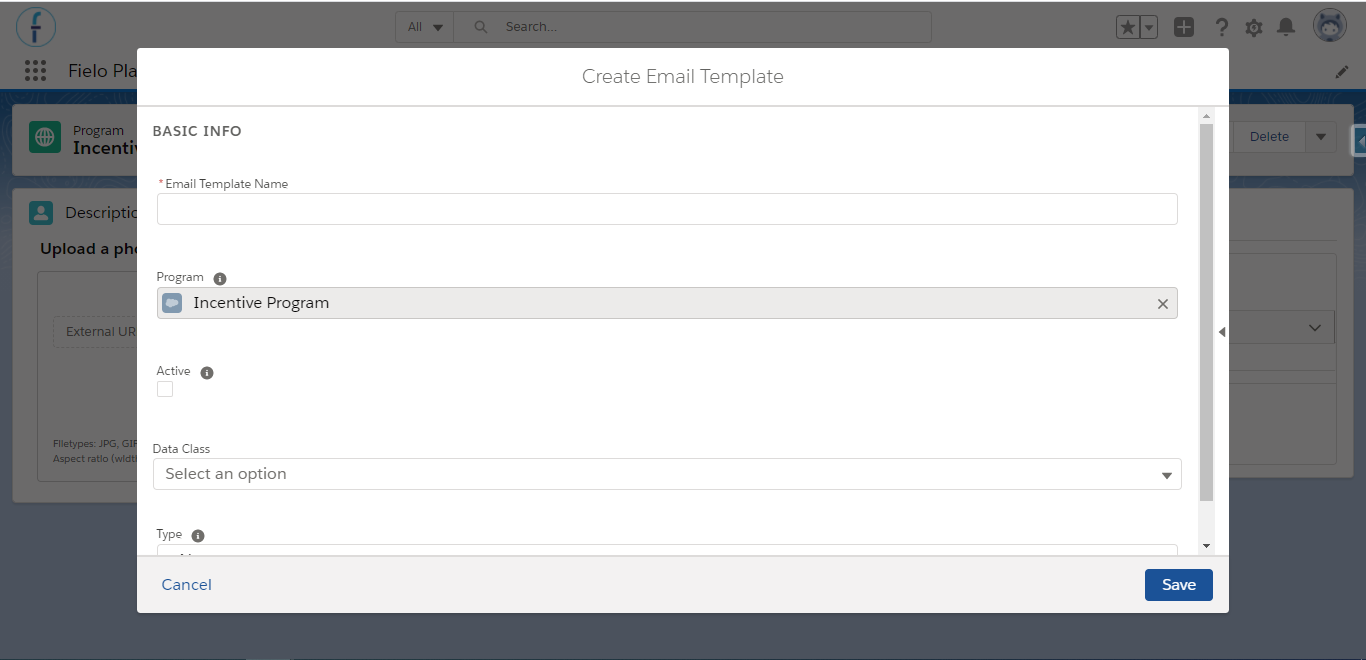
Email Template information
Now select which type of Email Message you would like to send out: Transactional Email or Campaign Email.
Transactional E-mail
If you want to send a Transactional Email, you need to connect it to a given Action, i.e. whenever a member completes the required steps of a given Action, they receive a message.
To better understand how this works, go to Actions.
They are made up of:
- An Object, which represents the behavior that you want to incentivize via e-mail.
- A Member, who is the recipient of the e-mail.
Actions can be accessed from the Tools tab. Some come pre-configured with each package and if you want to connect Messaging to one of these actions, simply edit the Behavior to which they are related to and check the Communication option. This will create a Lookup from Email Alert field that will allow you to use any Action related to that Behavior.
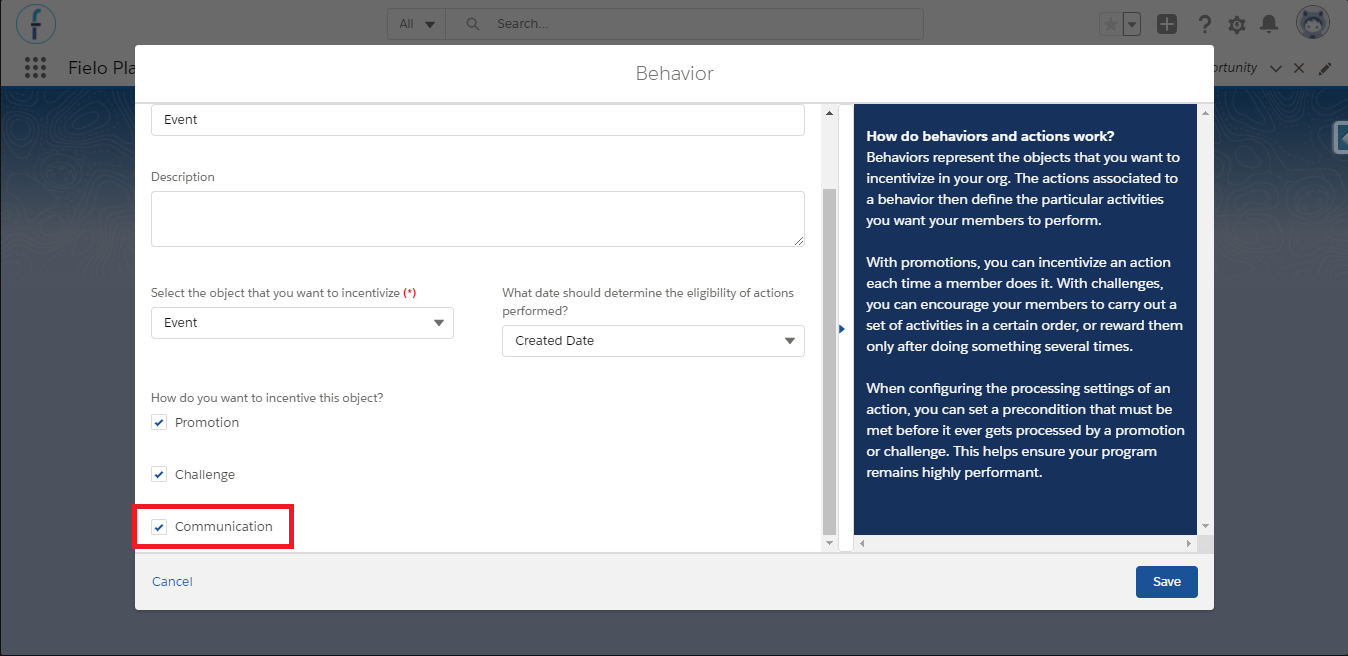
Lookup from email alert
In the above example, the Behavior is Event, and selecting the Communication option means an Email Alert will automatically be triggered when an event is completed.
You can also create a new Action, and configure it in the same way so that an email is immediately sent on completion of that Action.
Back to Messaging! Once you've selected Transactional E-mail, you have to fill out the following fields:
- Action: Here you choose which Action this Message is connected to. If you start typing in the box, your pre-configured Actions will come up, and you simply have to select the one you want. Note that if you used a merge field in your Salesforce Email Template, you need to choose an Action that incentivizes the object related to the merge fields (e.g. if you used the Redemption member's name, select an Action that incentivizes the Redemption object).
- Segment: If you want this Message to go out to a specific segment of your member base, select the one you want. Once selected, click to move it to the right-hand side.
- Template Unique Name: This is where you choose the Salesforce Email Template you want to use for this message. Simply select the one you want from the drop-down list.
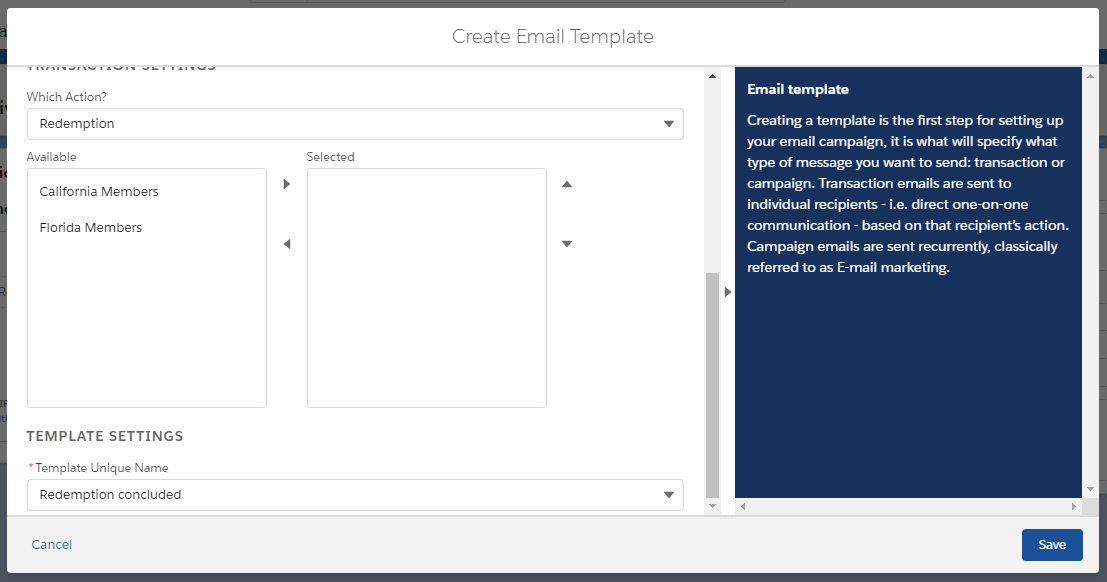
Transactional Email information
Campaign E-mail
If you select this option, at this stage you only have to select the Salesforce E-mail Template you want to use for this message. Simply select the one you want from the drop-down list.
Email Campaigns
Once you've created your Campaign Email Template, you need to actually set an Email Campaign in motion, since this type of Email Template will only be sent by the campaign - which is different from the Transaction email type. To do that, go back to Programs and enter the Email Campaigns tab. Select New.
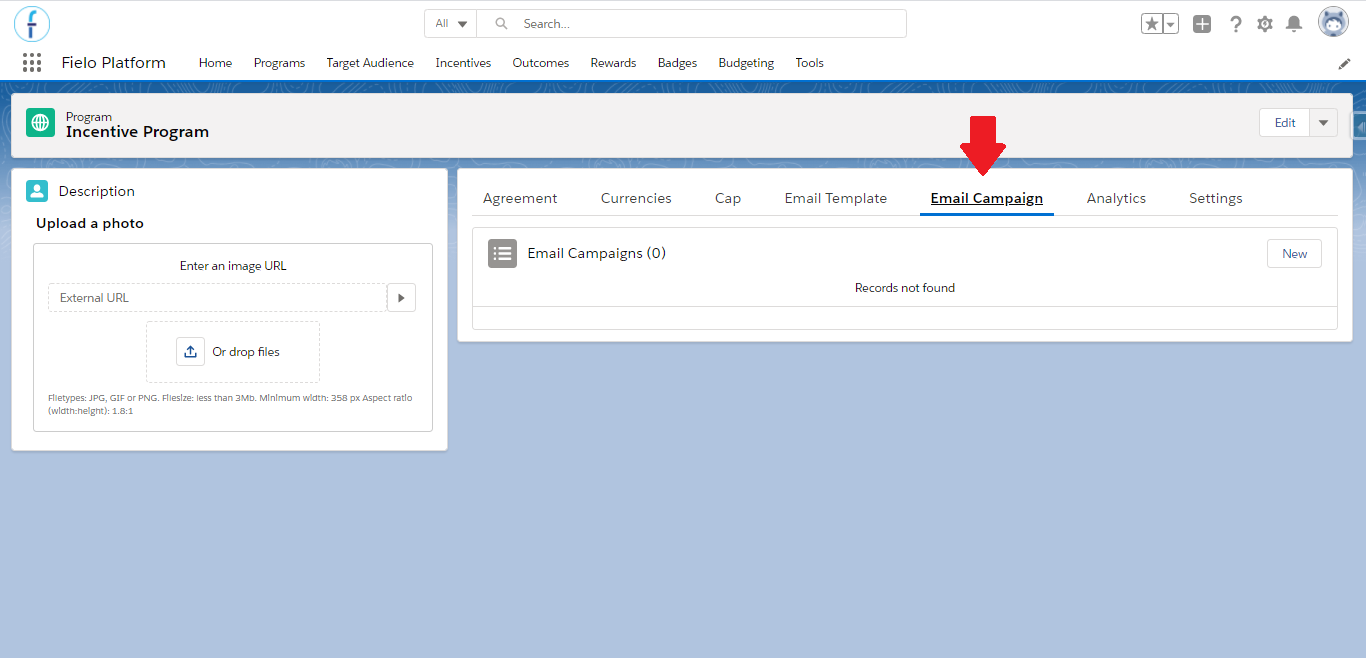
New Email Campaign
You then have to fill out the following fields:
- Program: This will automatically be filled out according to which Program you are currently working on.
- Email Campaign Name: Give your Campaign a name which refers clearly to what or who it is for. In the example below, we give the name Platinum Members because this is an email campaign aimed exclusively at Platinum Members.
- Date: Provide a date from which you'd like the Campaign to start. Note that if you choose a frequency for the Email Campaign, the date you set here will be taken into consideration for that. For example, if you enter 01/20 in the Date field and set the frequency to monthly, then the Message will be sent on the 20th day of every month.
If you leave the Date field blank, the Email will be sent the next time that the emailCampaigns scheduled job runs, which depends on how you have it configured. Check it out through Salesforce Setup in order to know more.
- Email Template: Now choose the template you made earlier, in Email Templates.
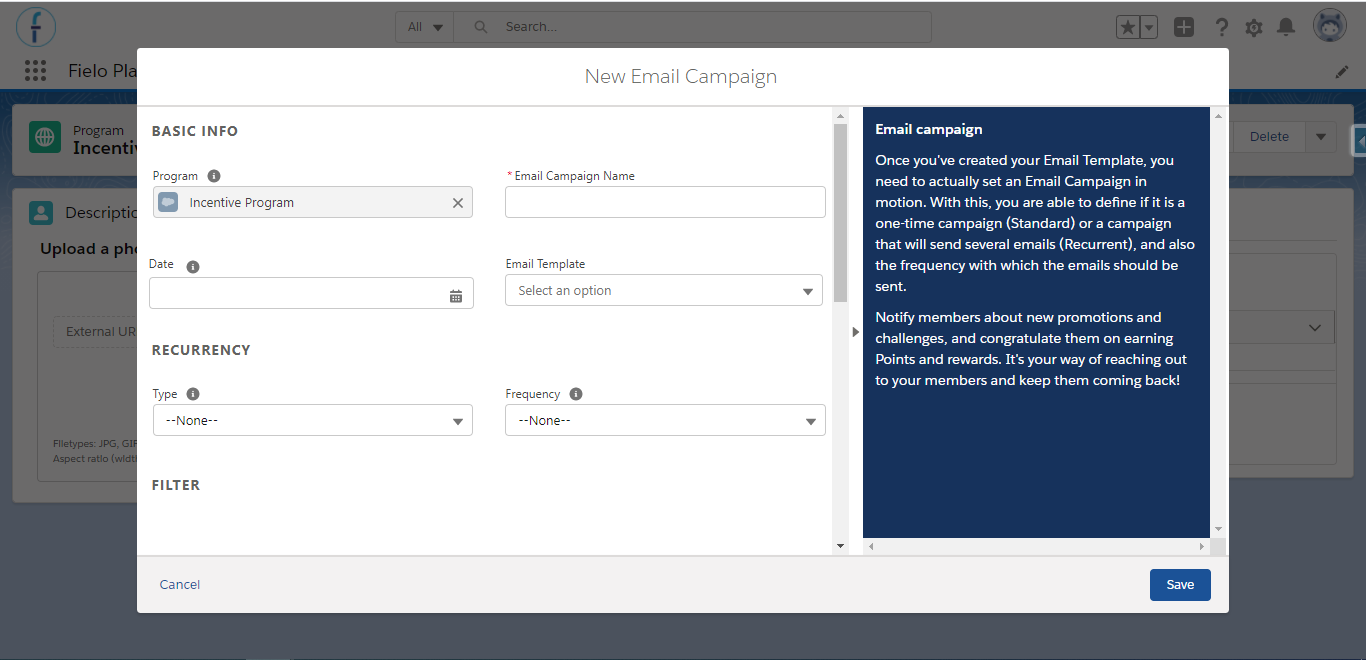
New Email Campaign information
Recurrency
This is where you will select your campaign's recurrency:
- Type: if it is a one-time campaign, select Standard. If it is a campaign that will send several emails, select Recurrent.
- Frequency: choose how often you want to send emails through this campaign - daily, weekly, monthly, every three months, every six months or yearly.
Other FrequenciesIn case your objective is to send the Email Campaign two times a week, for example, you can create two campaigns with different dates defined in the Date field.
Segment
This is the part where you select who you want your email campaign to go to.
With Segments, you have the option to choose a specific Member segment to receive these emails. Once selected, click to move it to the right-hand side.
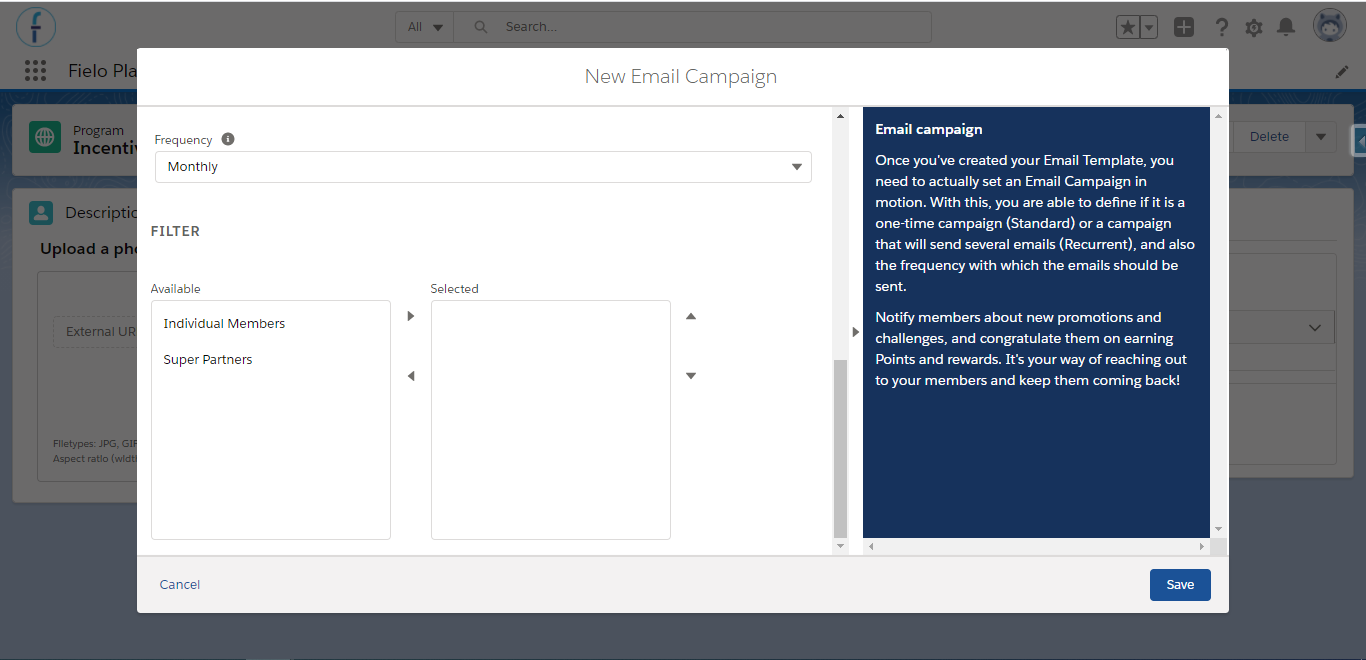
Custom Segmentation: Platinum Members
Campaign Status
After saving the Email Campaign, you are going to be redirected to its view page, where you are able to Deactivate or Edit whenever needed.
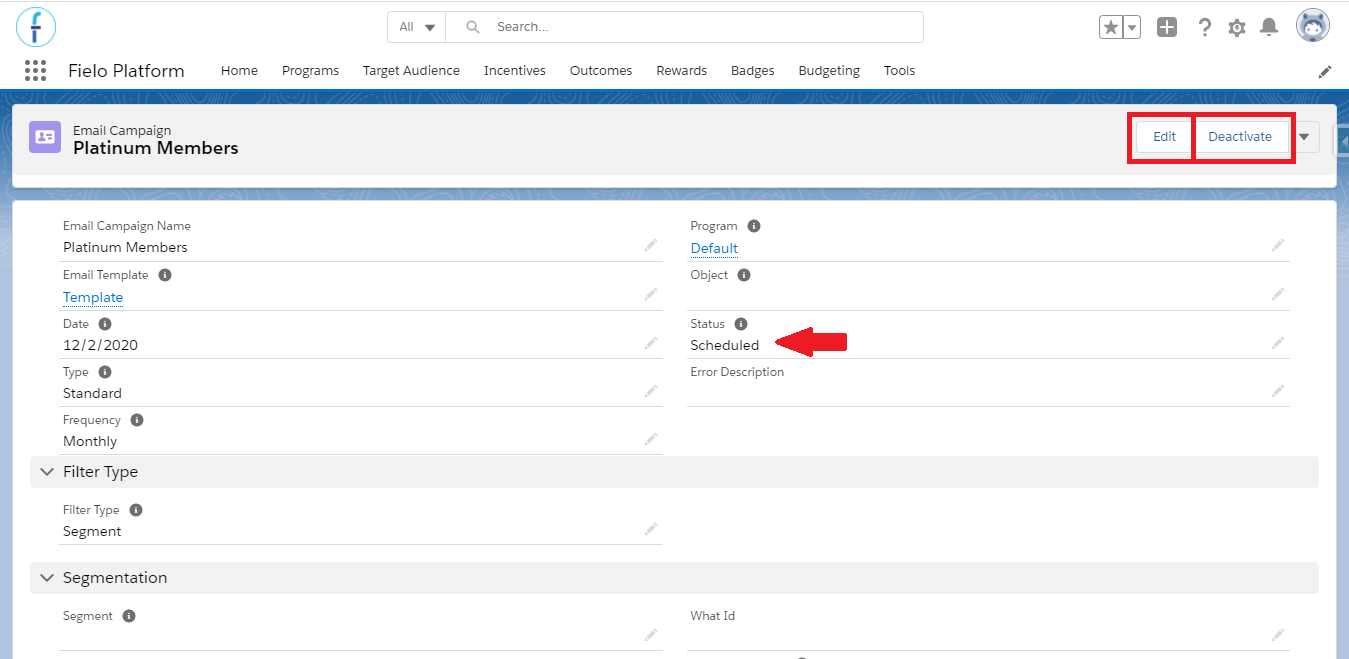
Email Campaign view page
It is also from this page, that you can keep track of the Campaign's status. They can be:
- Scheduled: all campaigns are created in this status. Recurrent campaigns will always be in scheduled status.
- In Progress: Standard campaigns will go to this status when the process to send the emails has started, but didn't finished yet. You may see this status in case there are a lot of emails being sent, causing the process to not finish quickly.
- Sent: Standard campaigns will go to this status after the emails are sent.
Deactivating CampaignsOnly scheduled campaigns can be deactivated. In case you activate it again later, the campaign will return to the scheduled status until the batch runs and the emails are sent.
Invalid Member email addressNote that if at least one of the Members who are supposed to receive the email from your campaign has an invalid email address, no email will be delivered - not even to the other Members who have a valid email address.
Whenever that happens, you will see the message “Email address is invalid” in the Error Description field.
Using Default Templates
Take advantage of the templates that come ready-made depending on the Fielo packages that you installed in your Org. There are 11 email templates with text-only samples that you can use to create Transactional and Campaign emails, which you can check by going to Classic Email Templates in Setup.
However, note that some of the templates are meant to be used only as one message type, and need to be setup with a specific Data Class (Campaign email) or an Action that incentivizes a specific object (Transactional email) . Otherwise, some of the merge fields configured within them will not be replaced by the expected information.
Here are some information that you will need for the templates to work properly:
- Fielo PLT templates
| Email Template Name | Message Type | Data Class | Incentivized Object |
|---|---|---|---|
| Instant reward | Transaction | Redemption Item | |
| Program invitation | Campaign & Transaction | Member | |
| Redemption concluded | Transaction | Redemption | |
| Status report | Campaign | EmailStatusReport | |
| Welcome email | Campaign & Transaction | Member |
- Fielo ELR templates
| Email Template Name | Message Type | Data Class | Incentivized Object |
|---|---|---|---|
| Course accomplished | Transaction | Course Status | |
| Course started | Transaction | Course Status | |
| Module Accomplished | Transaction | Module Response | |
| Module started | Transaction | Module Response |
- Fielo PRP templates
| Email Template Name | Message Type | Data Class | Incentivized Object |
|---|---|---|---|
| Proof of purchase approved | Transaction | Invoice | |
| Proof of purchase submitted | Transaction | Invoice |
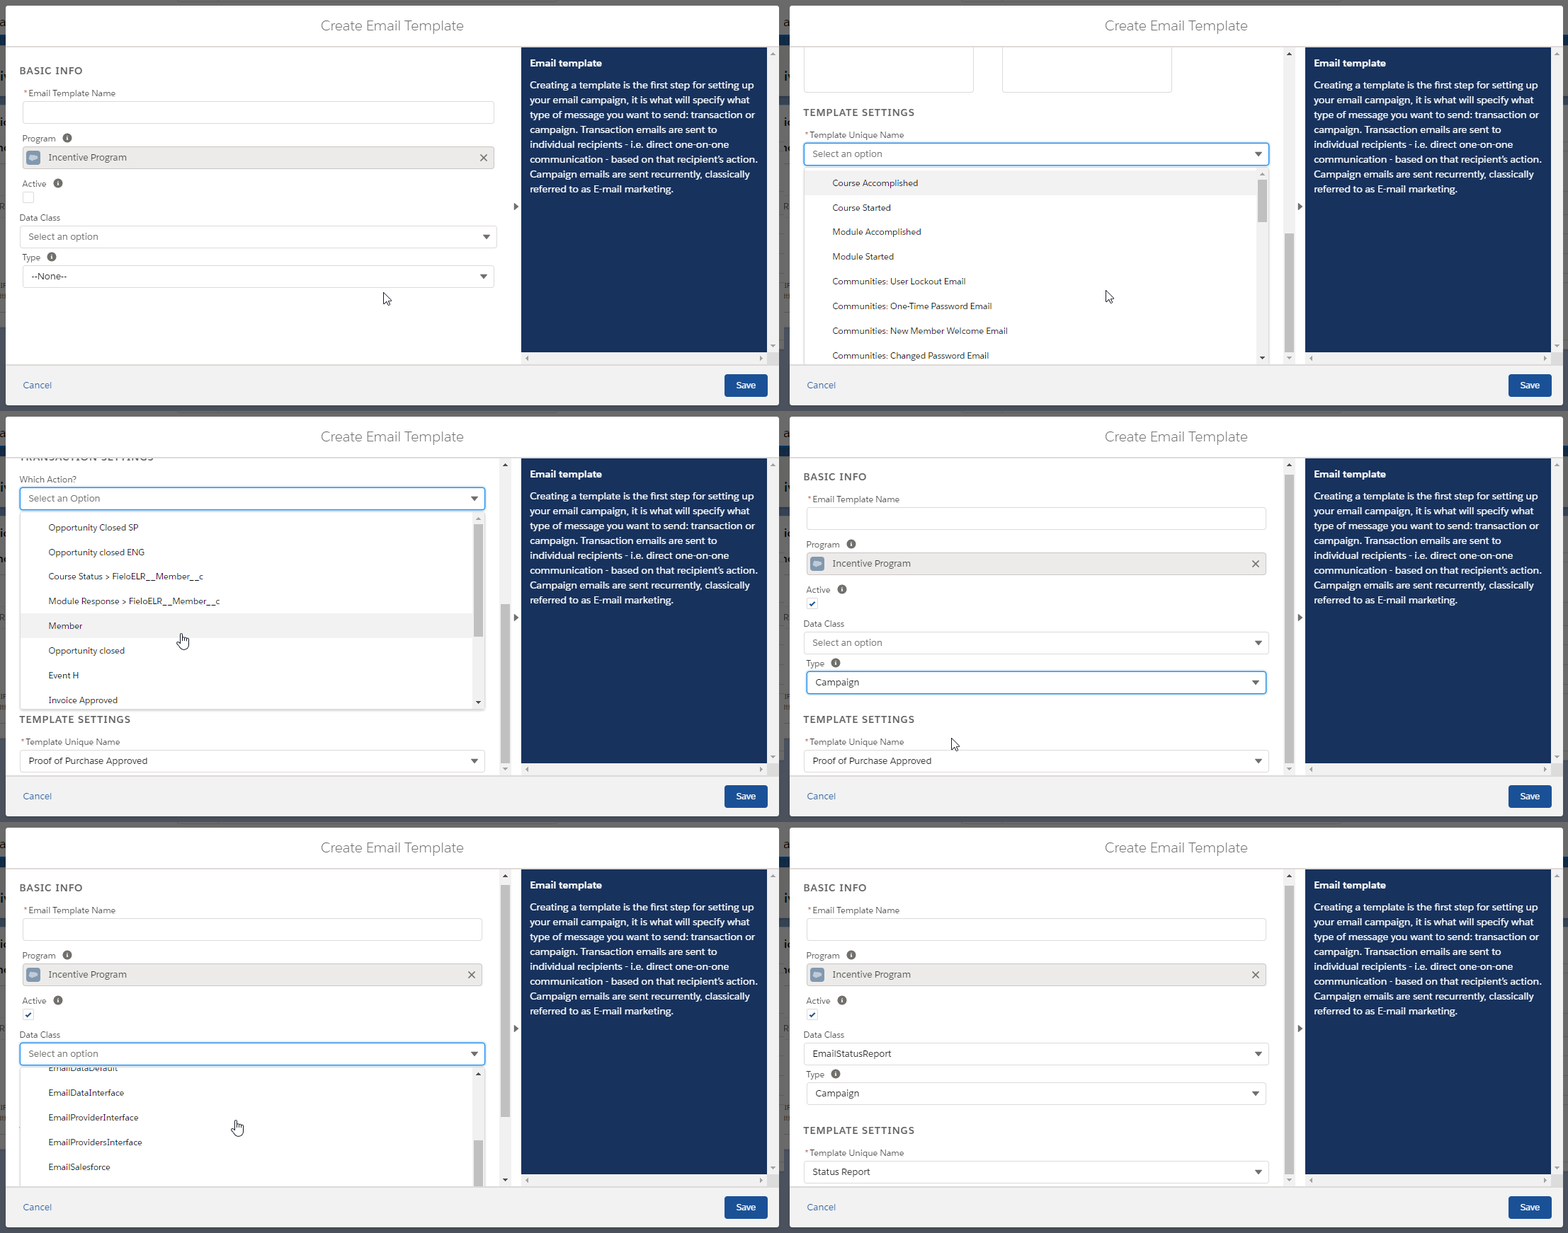
Creating an Email Template for "Proof of purchase approved" and, after, for "Status Report" default templates
Creating Email Campaigns around Incentives
Another way to create an Email Campaign, is to do it directly from Promotions and Challenges in the Incentives tab.
When you create an email campaign from a Promotion or Challenge, all the Segments applied to that the incentive will automatically be included in the Campaign, that is, only the members from those segments will receive the Campaign Email. If no segment was defined, all program members will be eligible.
To create an Email Campaign from an Incentive, go to the Incentives tab and select a Promotion or a Challenge.
From any of these screens, go to Email Campaign tab and click on New.
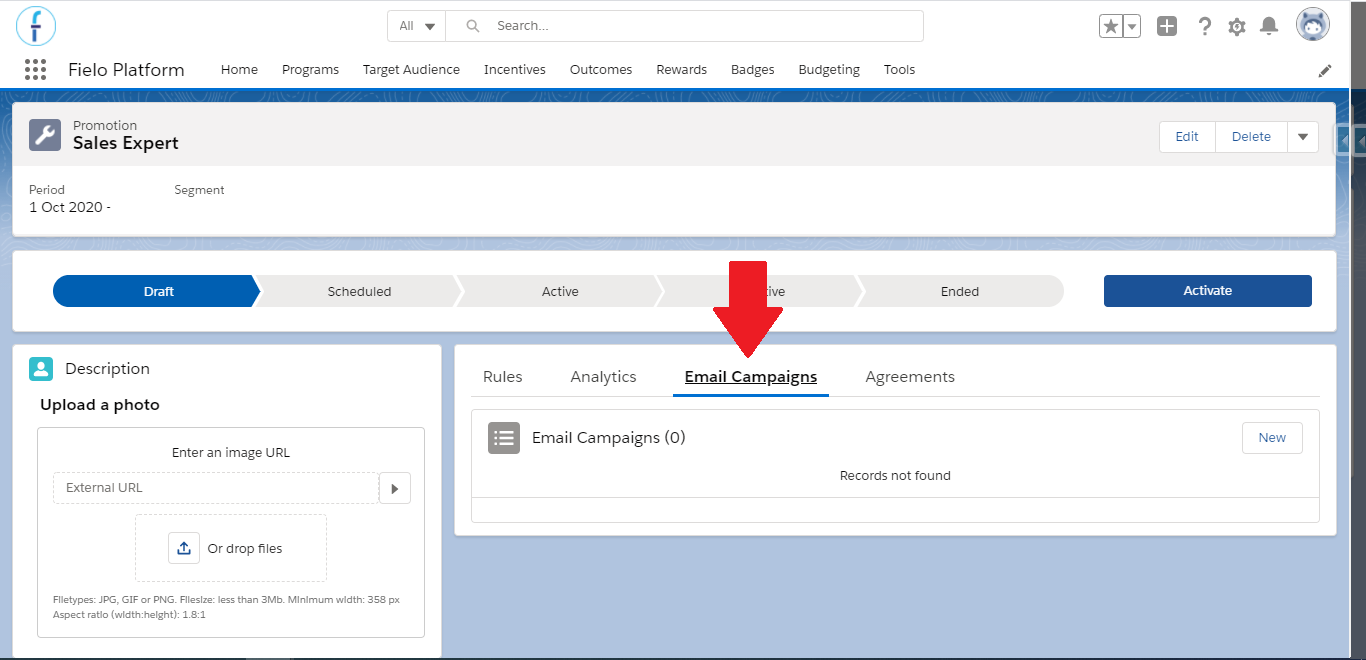
New Email Campaign from Challenge
Now, define the following fields:
- Program: This will automatically be filled out according to which Program you are currently working on.
- Promotion or Challenge: This will come already filled out with the incentive name that you are currently working on.
- Email Campaign Name: Choose a name for your campaign.
- Date: Select the date you want your email campaign to begin. When no date is chosen, it starts immediately once it's saved. If a future date is chosen, the Campaign will have its status set to Scheduled until the set date arrives.
- Email Template: Select the Email Template that is related to the email campaign being created. Only email templates that are configured as Campaigns will be available for selection.
- Recurrency: This is where you will select your campaign's recurrency.
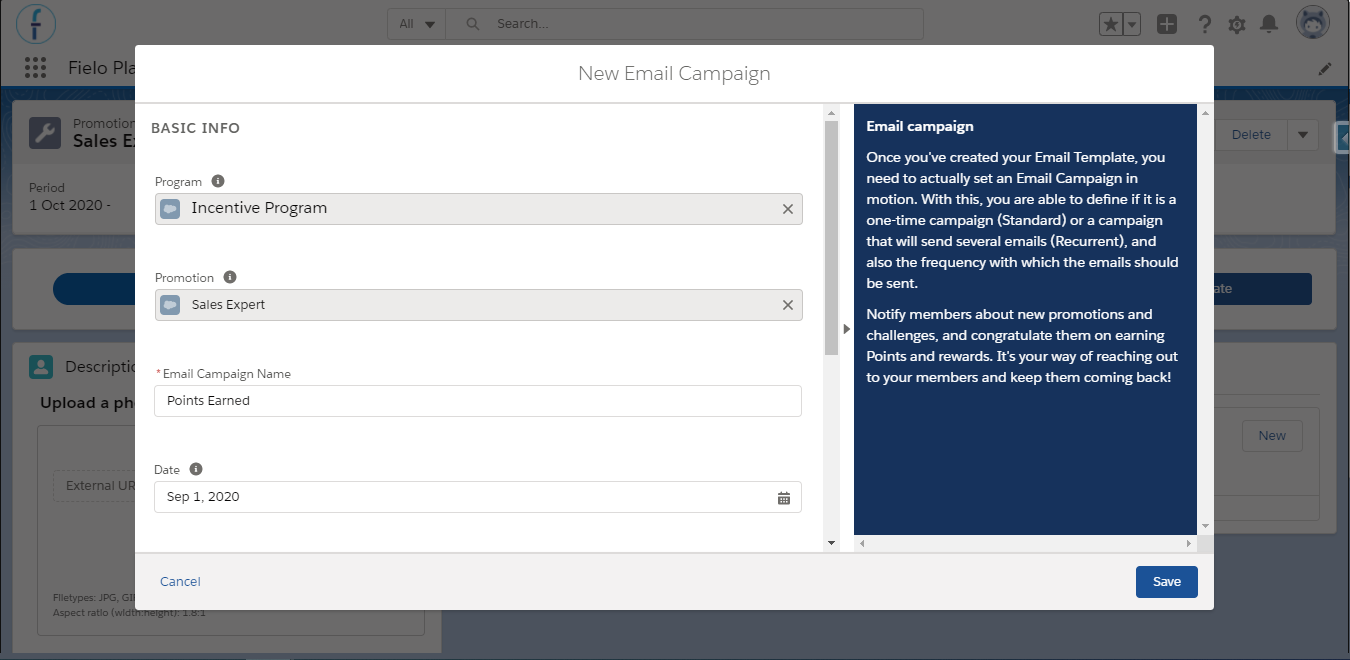
Challenge-based Email Campaign
Finally, click Save.
Updated over 1 year ago