
Program and Multi-Program Management Tools
Create and manage Program Terms & Conditions
Programs establish the framework for your incentive and loyalty program. They allow you to develop and manage the community of members that you want to incentivize. Fielo is Multi-Program, which means that it can handle more than one program at a time. This allows you to:
- Create different programs for different geographical areas, such as states or countries, or for different brands or product lines within your company.
- Build different loyalty portals for your different programs.
- Set up different incentives for your different programs.
Creating a Program
It only takes a few seconds to create your first program. First make sure you've activated the FieloPLT Library. Then, go to the Programs tab and click New.
In the Create Program form, enter a Program Name and Description.
If you've created any Models, you will also be able to select a Model to apply to your new Program. You can only apply a Model when first creating a Program.
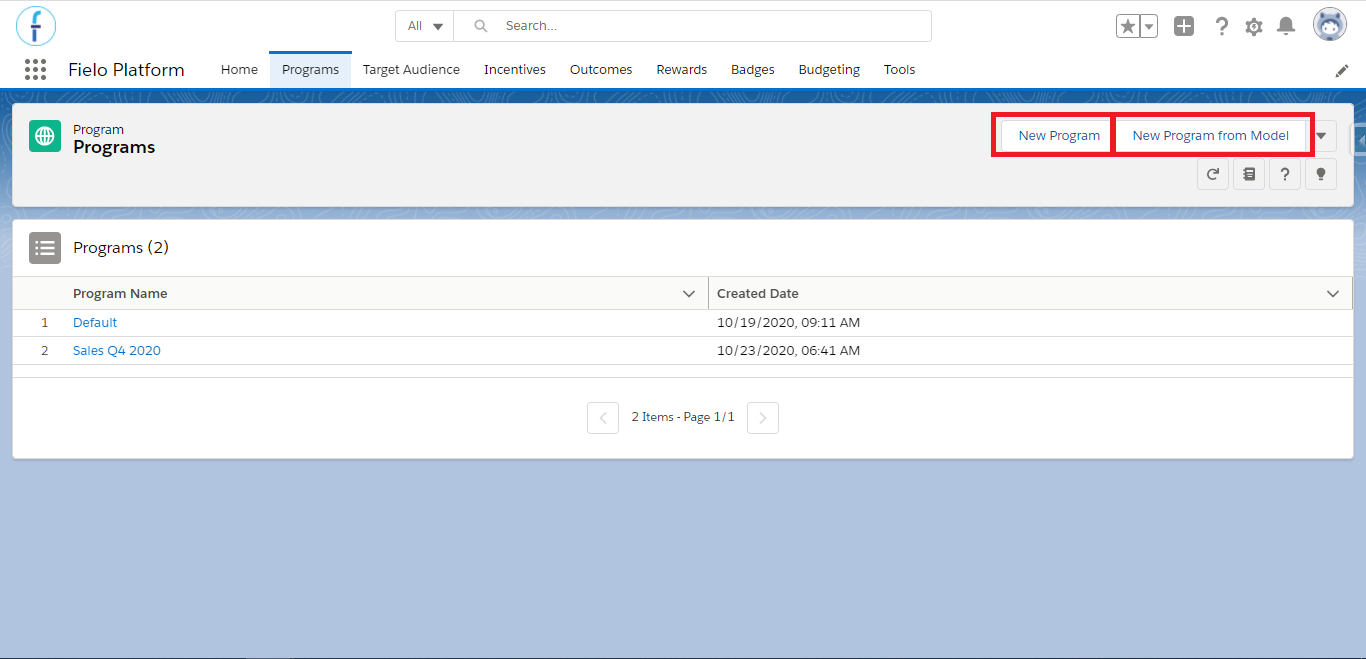
Create Program
Editing Program Settings
Now that you've created your program, you can manage some important configurations. Start by accessing the Settings tab on the detail page of the program you want to edit and click on Edit Program Settings.
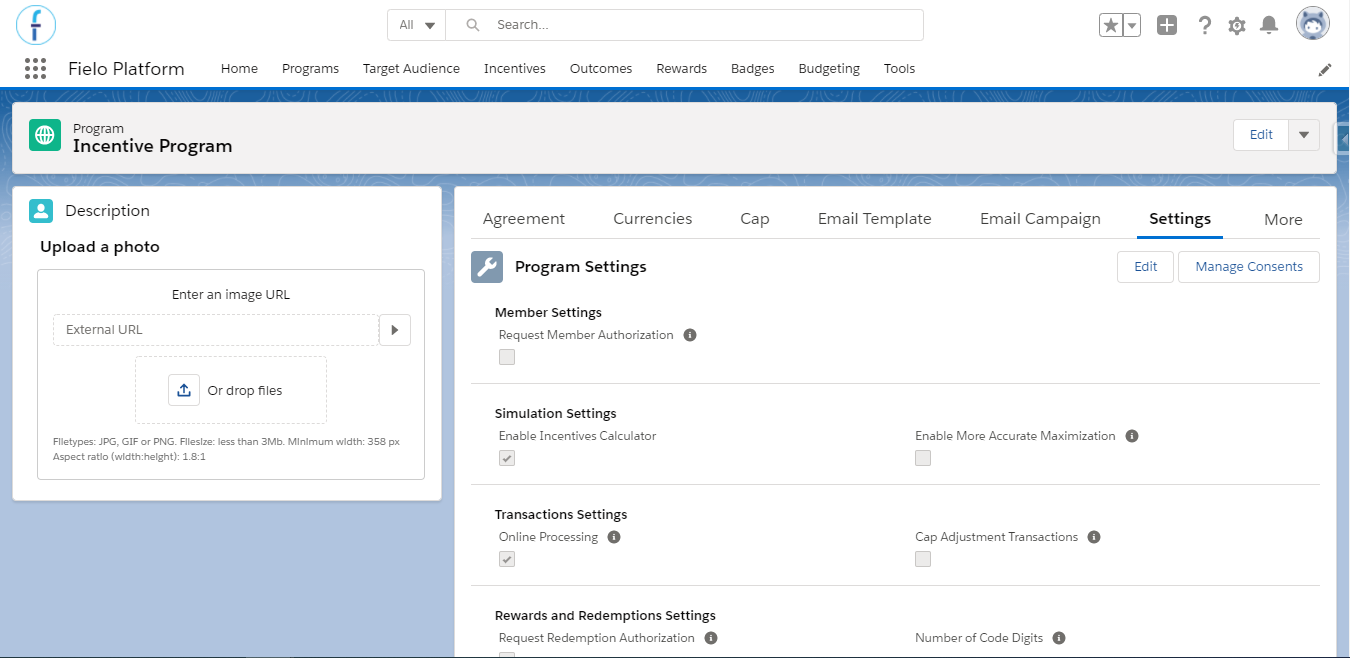
Edit Program
Member Settings
This section defines how new members will be registered in your Program.
Request Member Authorization allows you to double-check new member registrations. If , each new Member will need to be approved via an Approval Process before being included in the Program. Until then, the Status of the member will remain Submitted for Approval.
Programs with a Loyalty Portal in Salesforce Experience CloudIn Programs, using Request Member Authorization, Members with status Submitted for Approval will be able to log in to the loyalty portal, but will not be able to interact with the Program until they are approved.
Request UserRequest User is a field visible only through Classic View, which allows you to decide if a user will be associated with a new member. If , a new member will only be assigned a user if approved via an approval process. Until then, the status of the member will remain Pending User.
Because the registration component creates users directly through Salesforce, Request User cannot be used with loyalty portals on Sites.
Simulation Settings
In order to be able to use the Incentive Planner, you need to enable its use within your program first. Only after that, will you be able to see the Simulator Settings tab within the Incentives menu.
Enable Incentives Calculator enables the Incentive Planner use in your program.
Enable More Accurate Maximization shows up only when the previous field is . This field enables the delivery of more accurate results through the Simulation API maximization, meaning that it will support: all criteria operators (greater or equal, less or equal, etc.), more logical expressions (OR and custom expressions) and more than one segment per Incentive. However, it has an impact on performance, consuming more time.
Transaction Settings
Online Processing determines how Transactions are processed.
If , the transactions will be processed synchronously when recorded, that is, the rewards will be given to the member as soon as they perform the incentivized action. However, note that if several transactions are being created at the same time and the processing takes over 8 seconds (this is the default), the system will interrupt the job. Because of this, some records might not be processed and will be marked as is offline. You'll need to manually run the batches to process them or wait until they run automatically (once a day).
If , the transactions and trackers will be processed as soon as the member performs the incentivized actions (i.e. when records are created/edited), but only when the offline transactions and offline trackers batches run, will the member receive the rewards defined in promotions and challenges (i.e. currencies, funds, badges, or instant rewards). These batches run automatically once a day.
Cap Adjustment Transactions determines whether future adjustments you make for members will be taken into account in the cap limit or not. By default, it will be unchecked.
Rewards & Redemptions Settings
This section defines how Rewards and Redemptions are handled in your Program.
Number of Code Digits sets the number of digits that the Unique Codes of Redemption Items should contain. If you enter 8, for example, your codes will consist of eight numbers. Fielo allows for anywhere between 4 and 16 code digits.
Request Redemption Authorization allows you to review redemptions before they are finalized. If , each redemption will need to be either approved or rejected via an Approval Workflow.
Budget Settings
This sections refers to the approval process for budgets.
If you want that all your budgets go through an approval process, check the Require approval for budgetary funds field so it is set to true.
Agreement
Agreement sets the terms and conditions that Members need to accept in order to take part in the Program.
Program Management Tools
There are several tools to help you manage programs. You can access these tools in the top section or by clicking on the program detail page.
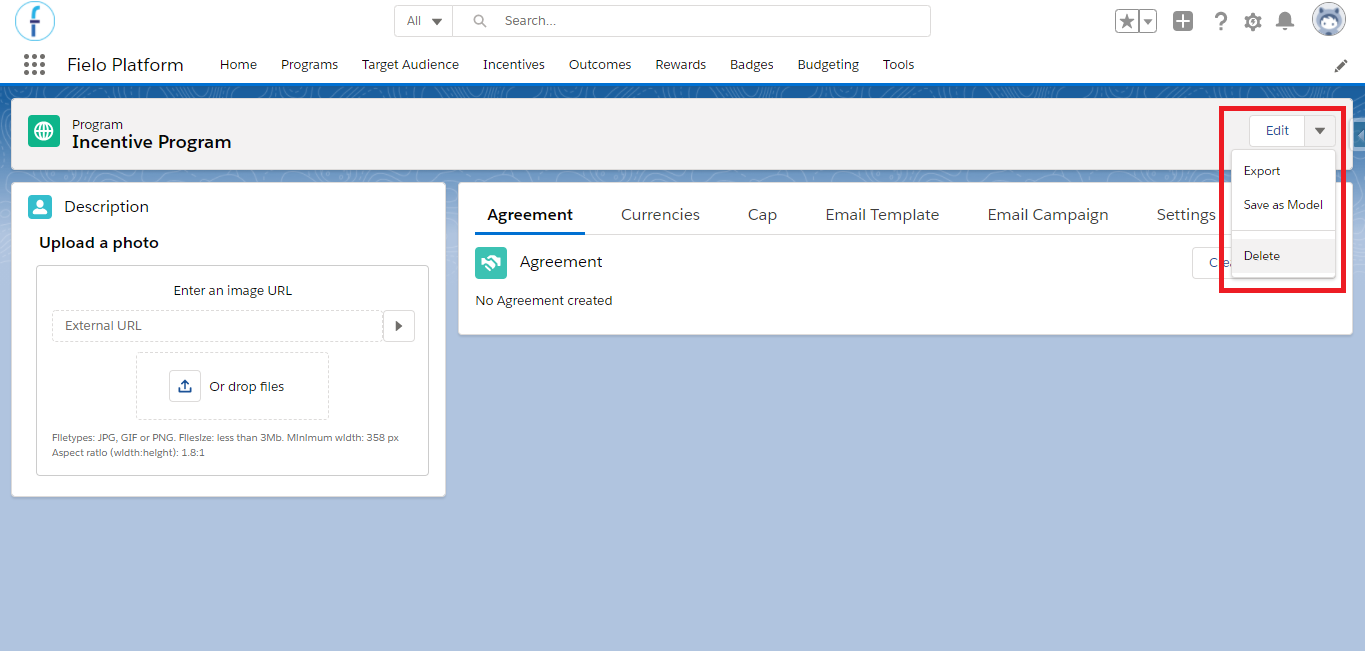
Program Management Tool Menu
- Delete
- Export
- Save as a Model
Export
The Export tool allows you to export all data from your program. It exports all program fields (including custom fields), Agreements, Levels, Segments; Badges and Currencies (including Program Currencies), as well as all Incentives (promotions and rules; challenges and missions) that belong to your program. Upon exporting, you'll get access to a JSON file in the following format:
Program (FieloPLT__Program__c)
FieloPLT__Reward__cFieloPLT__Badge__cFieloPLT__ProgramPointType__cFieloPLT__Agreement__cFieloPLT__ProgramAssignment__cFieloPLT__Segment__cFieloPLT__Criterion__c
FieloPLT__Level__cFieloPLT__Criterion__c
FieloPLT__Promotion__cFieloPLT__Rule__cFieloPLT__Criterion__c
FieloPLT__KPIDomain__cFieloPLT__EmailCampaign__c
FieloPLT__Challenge__cFieloPLT__ChallengeReward__cFieloPLT__Mission__cFieloPLT__Criterion__cFieloPLT__ChallengeReward__c
FieloPLT__KPIDomain__cFieloPLT__EmailCampaign__c
FieloPLT__KPIDomain__cFieloPLT__EmailTemplate__cFieloPLT__EmailCampaign__c
Unrelated Reward RecordsRewards that aren't related to your Program are only exported if they're linked to any other record in your Program.
Save as Model
Save as Model allows you to save your Program for reuse as a Model when you create a new Program. This way, you don't have to configure everything from scratch if your new Program has many of the same characteristics as this one.
Multi-Program Management Tools
You can run more than one program at a time. Multi-Program support is really useful for loyalty and incentive programs that, for example, operate in several geographical areas and require different functionality for each area.
There are several tools that let you manage general configurations for all of your programs. You can access these tools by navigating to the Program tab and clicking .
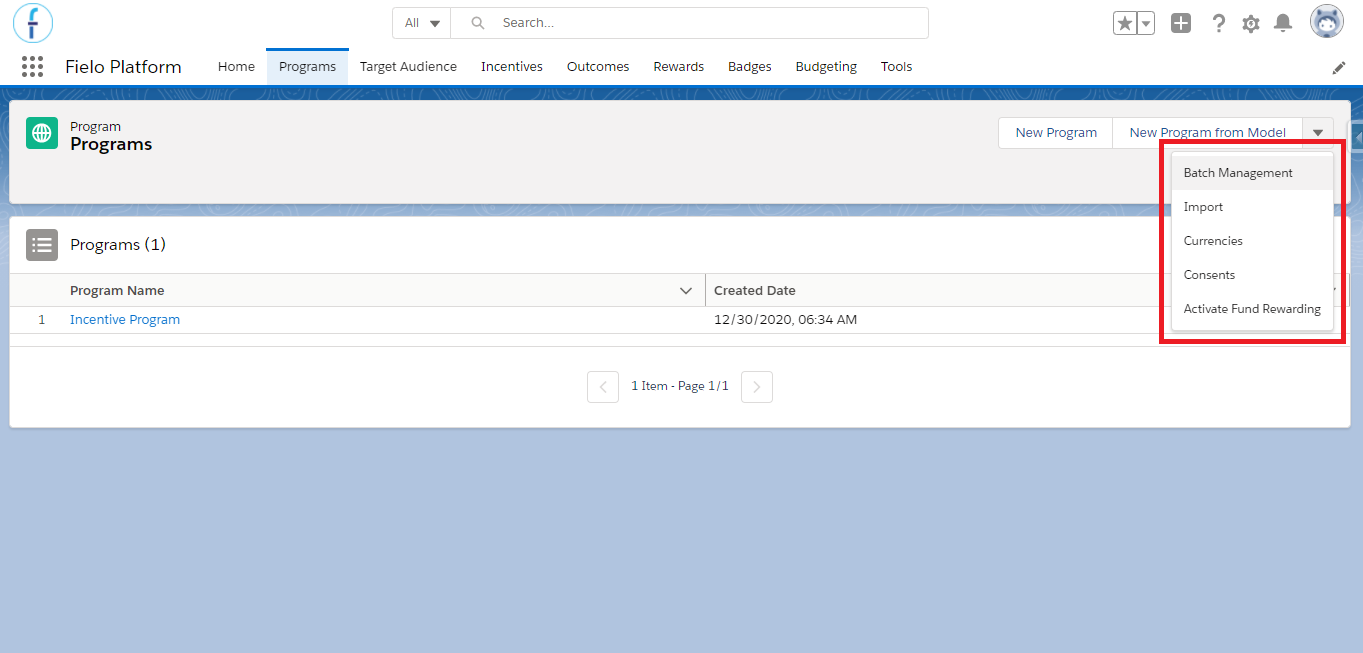
Multi-Program Management Tool Menu
Batch Management
Select Batch Management to access batch data and manually run batches for programs with Online Processing disabled.
Click Run next to a batch process to manually execute it.
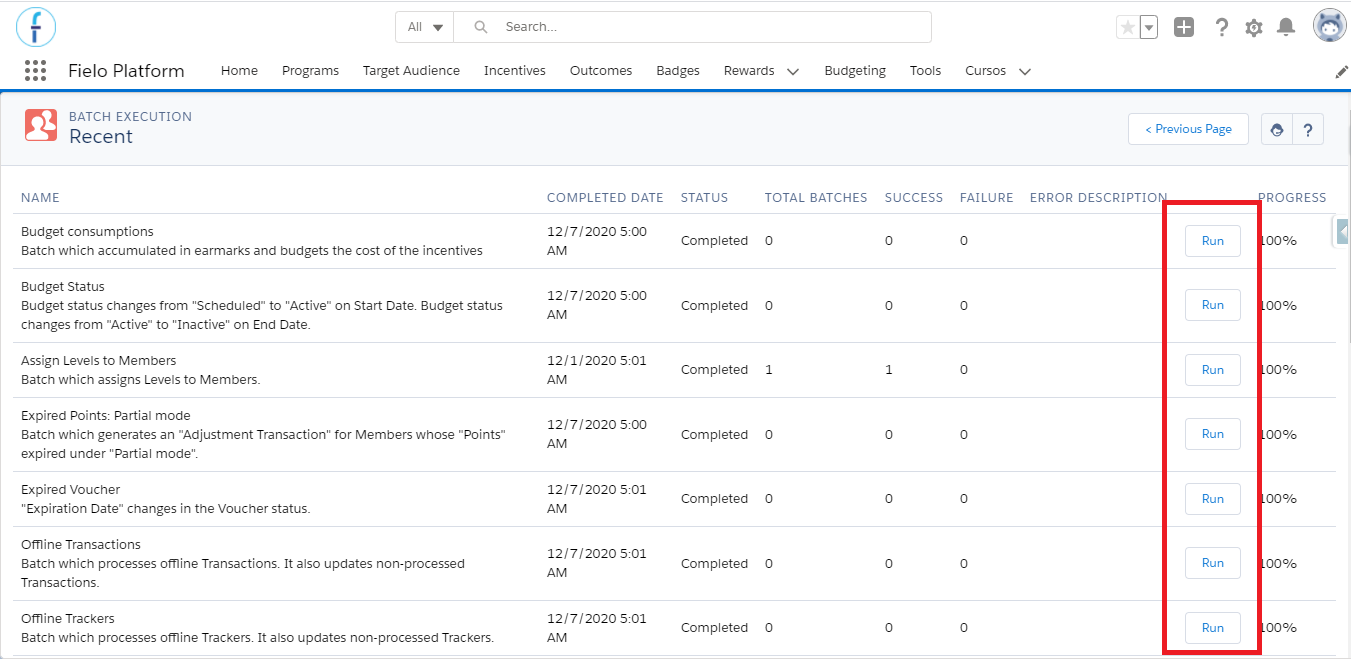
Batch Execution Menu
By default, batch processes run automatically every day at midnight, but you can change how many times each process runs within the week or month, the scheduled time for it, and even delete and create a new one. This could be done in the case of, for example, you needing to delay or interrupt the evaluation of levels for some time.
In order to overview every scheduled batch process that is added along with Fielo installation, go to Setup and quick find Scheduled jobs. There, you are able to manage or delete them.
If you wish to create a new automatic batch process, go to Setup, quick find Apex Class, and click on Schedule Apex. Enter a job name for it, select the apex class (which in this case is the batch), the frequency, the start and end date, and the time that it will run.
For the apex class, refer to the list below to know their API names.
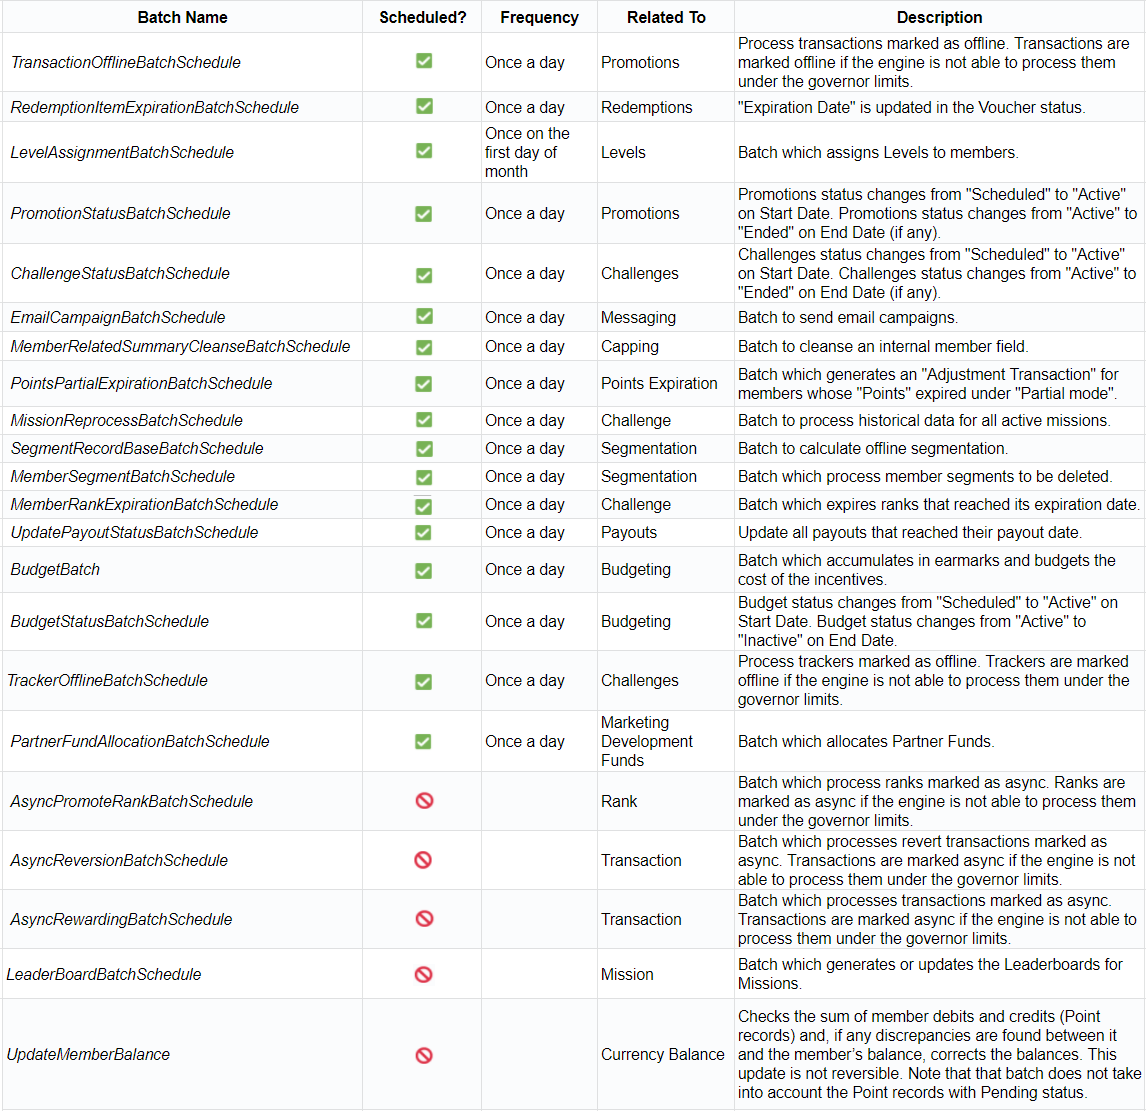
Challenge Batch SchedulingIf using leaderboards in any of your Challenges, be sure to schedule the Challenge Leaderboard batch to run before the Challenge Status batch (for example, one day prior).
Import
Select Import to upload a JSON file containing all the data from a Program you wish to import. This will create a new Program based on another one that you or a colleague has previously exported.
Since in most cases the file imported will be one that was previously exported from another Org, you won’t need to do too many changes in the file before importing. However, we do advise you to validate the JSON file before uploading and follow the steps below. Otherwise, the import process might fail.
If you are importing a Program to the same Org it was exported from and the Org still has the same data model, currencies, and PMB, then you don’t need to worry about these 3 steps.
- Make sure that the Org which you are importing the Program to has the same data model as the Org from where it was exported.
Check if both Orgs have the same objects, fields, configurations, and the same customizations in general. They must have exactly the same data model because the import will fail if the configuration is not the same. E.g. an incentive that you had in the original Program was incentivizing a custom object that doesn’t exist in the destiny Org.
- Export theFieloLocal library from the original Org and import it to the destiny Org.
To create in the destiny Org the same Behaviors Types and Actions that you have in the original Org, so as not to receive an error if any of your Incentives use them, you must export the FieloLocal library from the original Org and import it to the destiny Org.
For that, go to the Tools tab and access the library. Once there, click on Export.
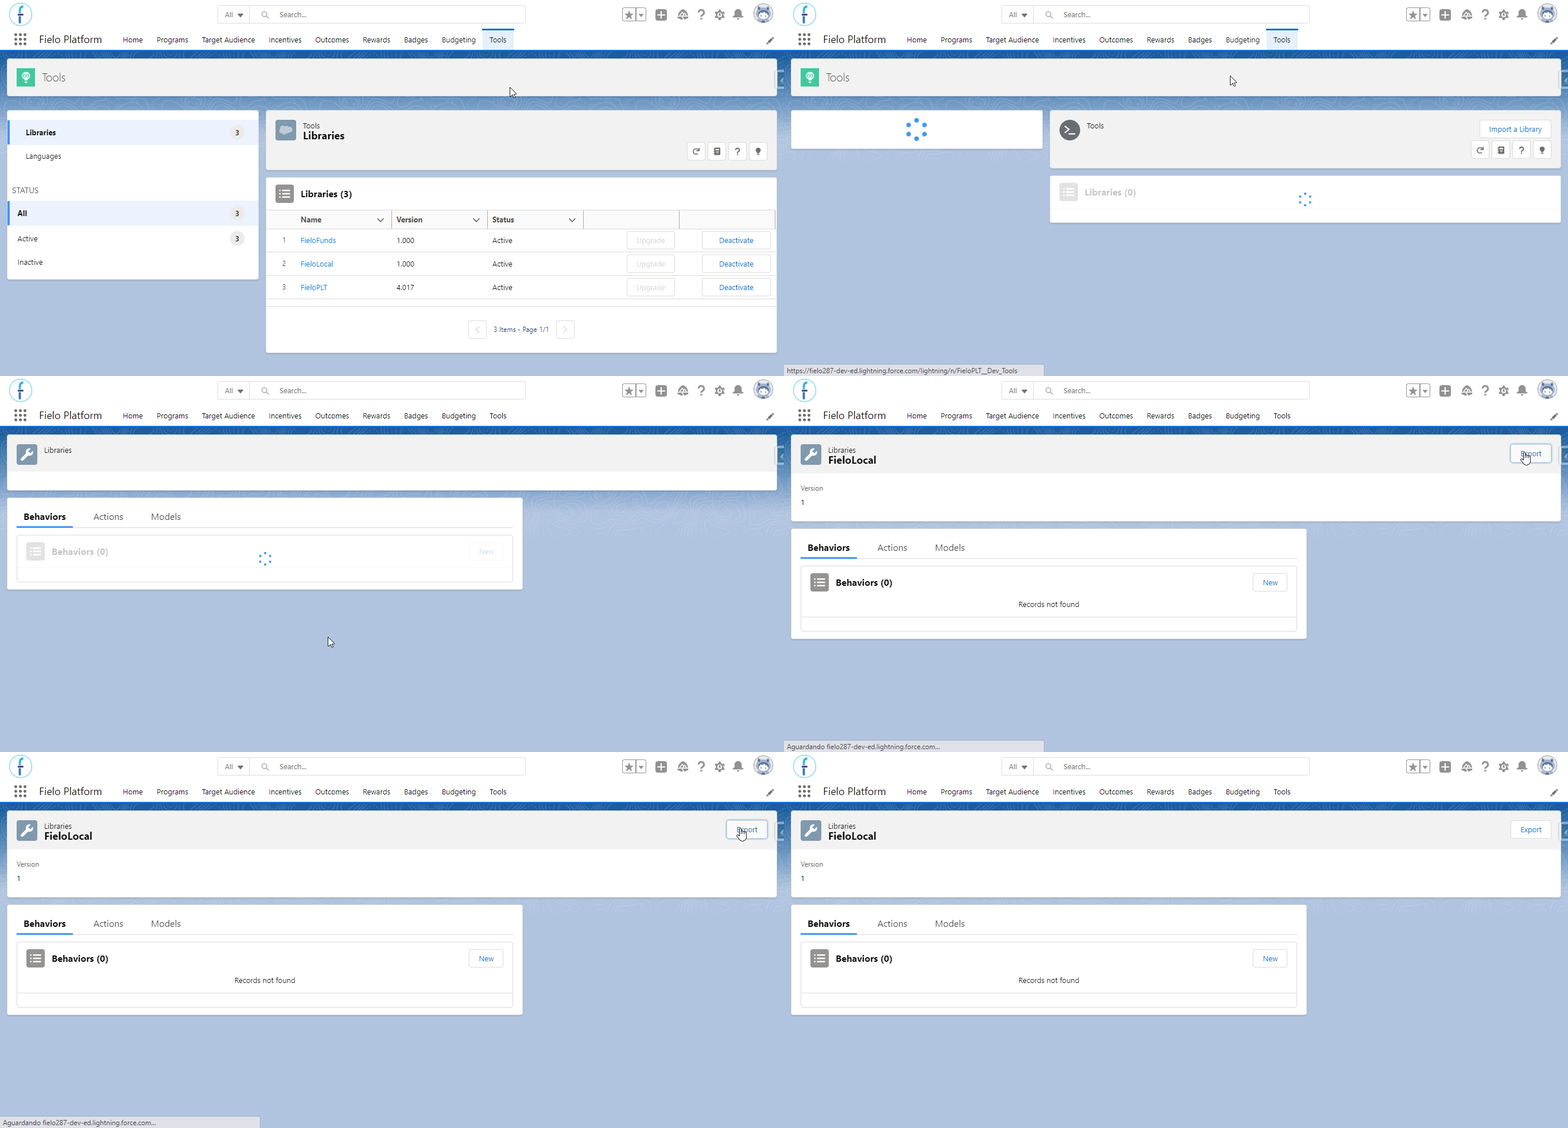
Exporting the FieloLocal library
When you have the generated JSON file, import it to the destiny Org using the same import feature (Programs > management tools > Import).
- When importing a Program that uses Funds Allocation Rewarding, create the PMB beforehand.
The Program that you exported might have been using Fund Allocation to reward members who have accomplished a Rule, Challenge, or Mission. If that is the case, then you will need to create a Partner Marketing Budget (PMB) in the destiny Org.
As it was explained above - regarding the currencies - you must edit the JSON file in order to replace the old PMB ID with the new one before importing the file. You’ll be able to find the PMB ID within its view page URL, and you will replace it in the file every time that “partnermarketingbudget__c" shows up (as this field’s value).
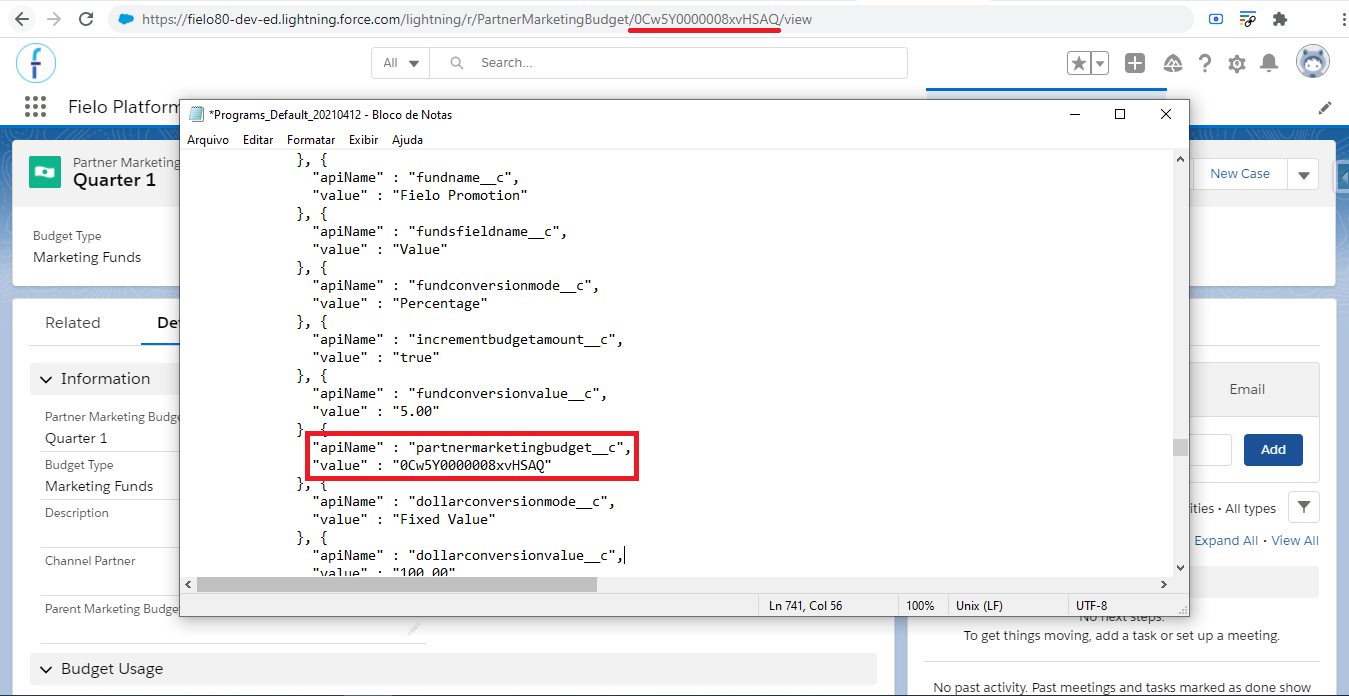
partnermarketingbudget__c and its value
Once you're ready, just hit Import.
If the program you're importing has Incentives using your own custom Actions, you must import them first through your Local Development Library.
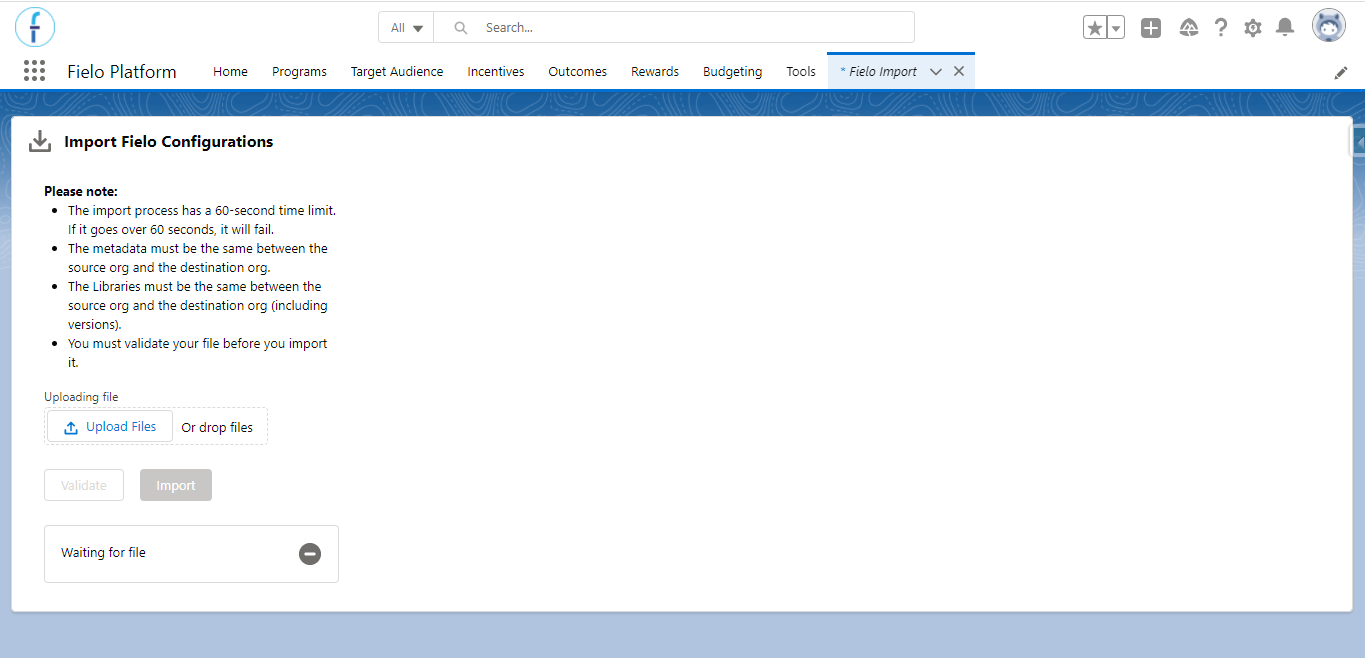
Program Import
Currencies
Custom currencies can be used across all of your programs. See our Currencies guide for more information.
Activate Fund Rewarding
Use this option in order to activate the Fund Rewarding option for your Promotions and Challenges. See Funds Allocation Rewarding for more details.
Updated over 1 year ago