
Incentive Planner
Incentive Planner API
When you have a Program with several incentives, it might get hard for the members to decide which ones they want to participate in. After all, they have their own objective when participating in your program: to make the most out of their effort and receive the greatest amount of currencies that they can, as a reward for accomplishing an incentive.
Because of that, it is important to:
- Show to the member an objective list of all the program incentives that they have the possibility to enroll in;
- What the member need to do in order to be able to enroll in these incentives and to win the reward (i.e. what criteria need to be accomplished); and
- Allow the member to calculate what they can win from each incentive.
All of these points comply with what the members want and what the Incentive Planner delivers, helping them to decide in which one(s) they will take part in - those that are more advantageous for them.
With that being said, you might be asking yourself: what exactly is the Incentive Planner? Objectively speaking, the Planner is a simulation API that you can use in order to present to your program members what are the incentives available in your program and to make it clear to them how much they can win in your program. Provide your partners with a pipeline view of your incentives and leave it to them to decide what (e.g. which opportunities, leads, courses) they must prioritize over time.
Let’s understand this with a real-case example. Imagine this:
- You have 5 Challenges and 4 Promotions that are incentivizing the Opportunity object and awarding Dollars. The amount of Dollars rewarded will depend on the incentive.
- Each Promotion Rule and Challenge Mission has their own criteria, such as "only opportunities that have an amount greater or equal to 10,000 will be taken into account".
- Only members from specific segments can enroll in these promotions and challenges.
After going through all of these challenges and promotions, the program member wouldn’t easily know in which ones he can participate (based on their segment) and which will award more Dollars, when considering the opportunities that they are working on at the moment. They would be confused and could even choose poorly thinking it was the best option. However, that wouldn’t happen after taking a look in the Planner.
Of course, you might want to consider that showing every incentive to the members might not be the best idea, as it would likely just keep creating some confusion. That's why creating a Preset is essential.
Before tackling the Preset concept, though, let’s understand a bit more about the Incentive Planner.
Basic Info
The very first thing that we need to address is that the Planner is meant to be used as an API. With that, Fielo grants you the base to build your work on top of: you can take it and use it in the best way possible, considering your objectives. Set your own UI, configuration, access and integrations!
Access the Incentive Planner API here.
Other than delivering a great deal of information regarding the incentives available in your program to the members, the Planner will automatically calculate three values from the currencies given by the incentives in your program and display it to members: what is eligible, potential and the maximization.
Please note: whenever we mention "record" from now on, it is referring to an Object record, such as an opportunity, invoice, lead, etc.
Eligible
Eligible is everything that the member is earning or will earn from the incentives that they are already participating in. In this aspect, eligible also means that the Member complies with the Incentive's criteria (e.g. the Opportunity needs to have an amount greater than $10,000) and segment.
Let's say that you have in your program 1 segmented promotion rewarding 50 Dollars and 1 challenge without segment rewarding 100 Dollars. A member called Abigail Wells - who is part of the segment - accesses the Planner and sees the eligible amount of 50 Dollars.
Potential
Potential is everything that the member can win, but is not winning yet. This is related to the incentives that are available (global challenges, incentives that they are enrolled in and incentives without agreement), but that the member doesn't have the requirements to win the related rewards yet - be that because they are not part of the segment or because they don't have any records that accomplish the incentive's criteria.
Following the example above, the Potential amount that Abigail will see when she accesses the Planner is 100 Dollars.
Maximization
This is the Planner's star metric. As mentioned before, one of the most important features in the Planner is to show the maximum amount that the members have the possibility to earn, and the Maximization is precisely that. At a high level, it basically sums the Eligible amount with the Potential amount: therefore, Abigail will see her Maximization as 150 Dollars.
However, there are some more details regarding how the maximization works. It might not always be as simple as summing the Eligible and Potential amounts, because sometimes the member must choose between one or more incentives to participate in and the maximization will define which combination will give to the member the greatest amount of currencies. Take a look here to understand more.
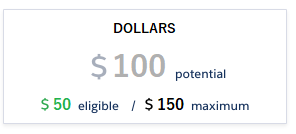
These values will help the members to visualize, in a straightforward way, what they can win with your incentives. It will help them to truly understand what they might be missing by not participating in more incentives and to contemplate if they should make the effort to try to participate.
Let's organize the data now!
Simulation Preset Settings
The Preset will tell the Planner what it has to look for and show to the members; without it, the Simulator would simply take all the incentives in your program and display them in the simulation. Imagine how troublesome that would be if you had incentives targeted for different segments, levels or even countries.
When you create a Preset, it is possible to define which incentivized behavior types (represented by the objects and actions used), segments, and currencies should be considered. Based on that, the Preset will organize the data before the simulation API is called, making it more focused and taking into account only the relevant incentives, requiring less development effort to set up the Simulation.
That will certainly make the developers' work easier!
Whatever incentive is disregarded by the Preset you define, it will also be disregarded from the eligible, potential and maximization calculations.
Before Starting
In order to be able to use the Incentive Planner Simulation, you need to enable its use within your program first. Only after that, will you be able to see the Simulator Settings tab within the Incentives menu.
For that, go to the Programs menu and access the program that you want to use the Simulator for. Go to the Settings tab, click on Edit and check the Enable Incentives Calculator field.
When you enable the Enable Incentives Calculator field, you can also choose to check the Enable More Accurate Maximization or not. If , it will deliver more accurate results through the maximization API, but will affect the performance.
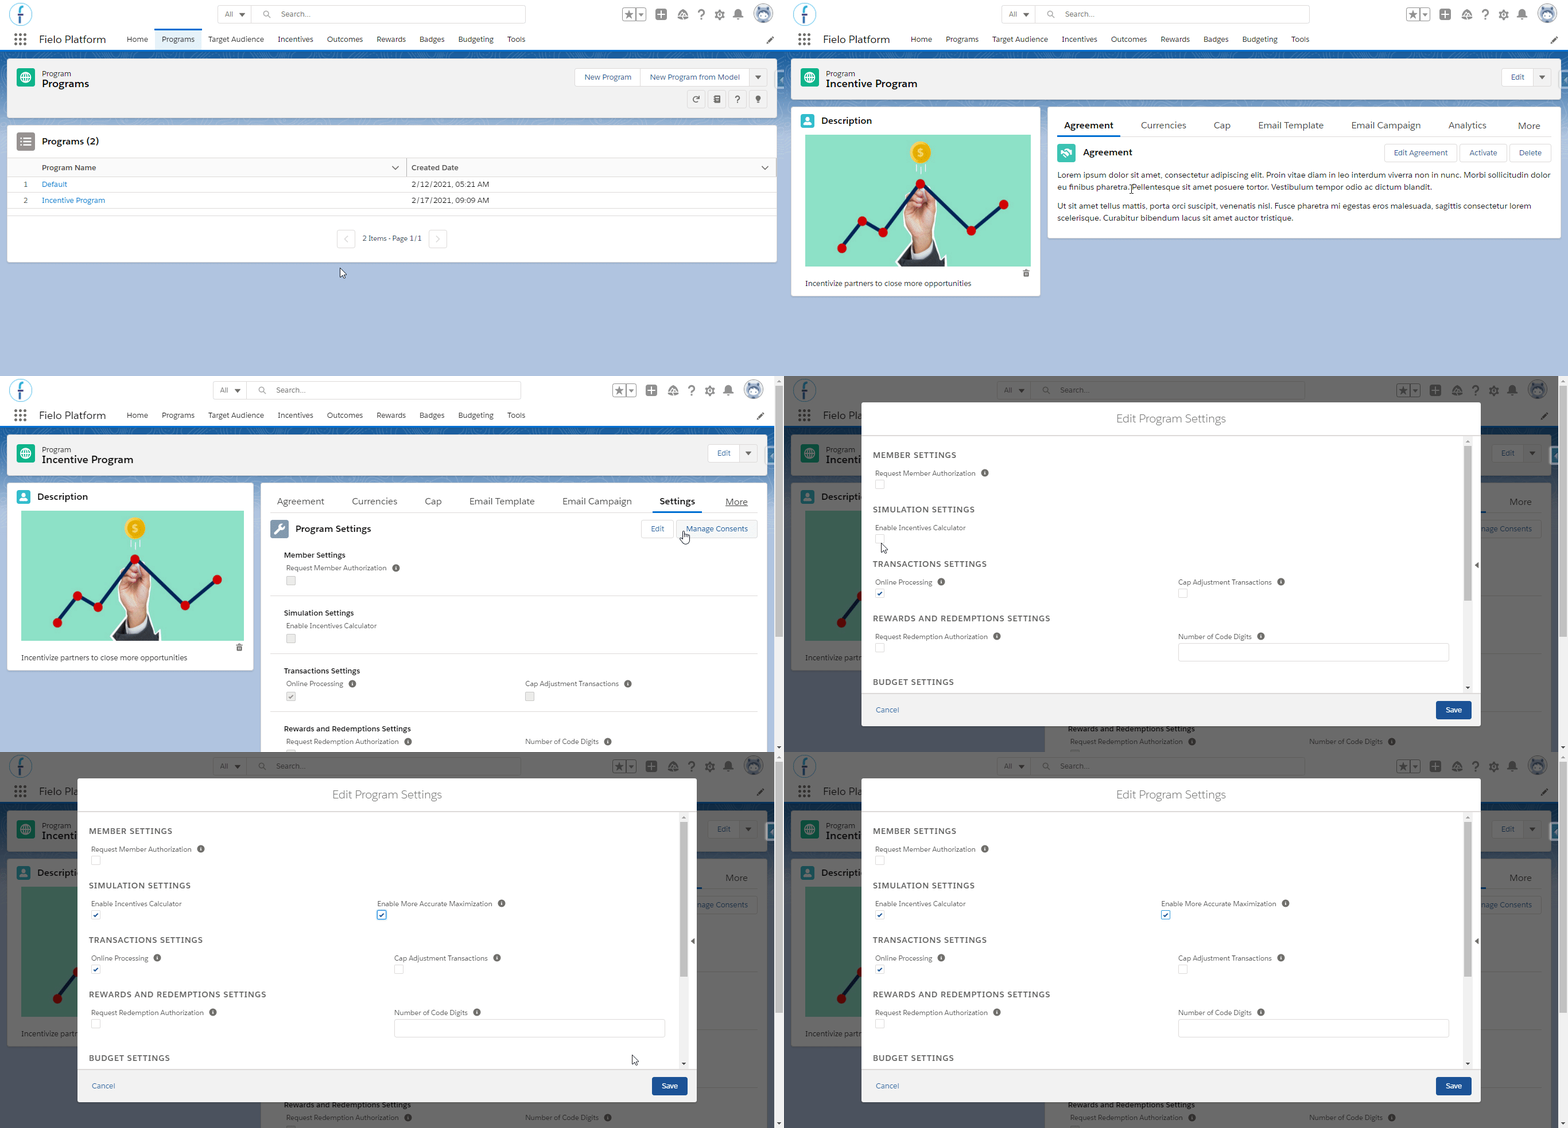
Enabling the Incentives calculator within the program
If you decide to uncheck the Enable Incentives Calculator field later on and there are Presets already created in your program, they will be deleted.
Creating a Preset
For the remainder of this text, let's follow Louis' case. He is the Marketing director of Tread Manufacturing, the tire company. Right now, he wants to incentivize their distributors to close more opportunities with new retailers and, for that, they have a number of incentives in place.
Louis's objective is to create a Preset that will show the Florida distributors all the relevant incentives from which they can earn currencies.
He goes to the Incentives menu, accesses the Simulator Settings tab and clicks on New Preset to create a Preset.
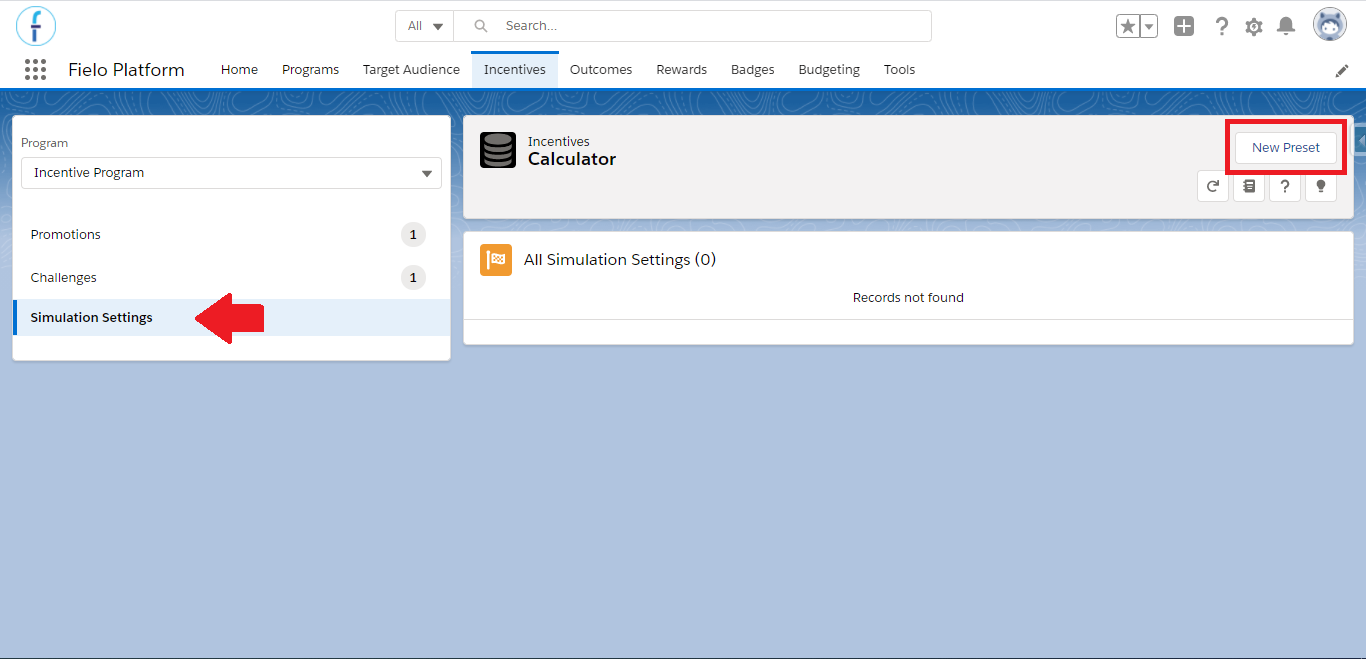
Click on 'New Preset' to begin
The first step is to give this new Preset a Name. This won't be displayed to the members, so you can enter whatever is most relatable to what you are going to use this Preset for.
Then, if you want, select the Segments that will be able to access this Preset. If the member doesn't belong to any of the segments selected and tries to run the Simulation related to this Preset, they will receive an error. Otherwise, you can leave this field blank in order to allow all members to access the Simulation generated using this Preset.
You can also define Currencies, so that the Preset takes into account only the incentives that reward those currencies that you select. As it is with the segment, in case you leave this field blank, all incentives will be taken into consideration, no matter what currency they reward.
Only the Currencies and Segments that are Active and related to the program will be available to be selected.
Other than that, the Eligible, Potential and Maximum amounts will always refer to one currency at a time. If you select more than one currency in the same Preset, these amounts will be divided by currency.
Next, look for and choose the Object and Actions that the Preset must consider for the simulation: only the promotions and challenges that incentivize them will show up in the Simulation created using this Preset. Note that the objects available are those related to the Active behavior types that you have in your ORG and the actions available will be the ones related to the object you chose beforehand.
You can select only 1 object per Preset. If you wish to offer simulations for more objects, create another Preset.
Finally, the last step to complete the Preset creation, is to choose the Excluding Criteria. Selecting a field here is not mandatory, but it can help you to narrow down the number of incentives shown to the member in the Simulation version that they will see, making it be more customized.
The most important difference between the excluding criteria and the other options, is that the previous ones are applied to the Preset as a whole and, when based only on them, all the members will see the simulation the same way. That is, if you don't select any excluding criteria field, all the program members would see the exact same incentives as available.
However, the excluding criteria allows you take advantage of the data from the fields used in the criteria setup in the:
- Promotion Rules;
- Challenge Missions; and/or
- Segments - if any was used in the promotion or challenge.
Any field selected in the excluding criteria changes what incentives the Incentive Planner Simulation will show to each member. The Preset will rearrange the simulation depending on which member is seeing it, removing some Potential incentives from the list and also not taking them into account for the maximization.
You can use this in other situations as well, such as when you don't want the Individual members to see incentives intended for the Organization members. For that, select the "type" field.
When you are ready to go, click on Save.
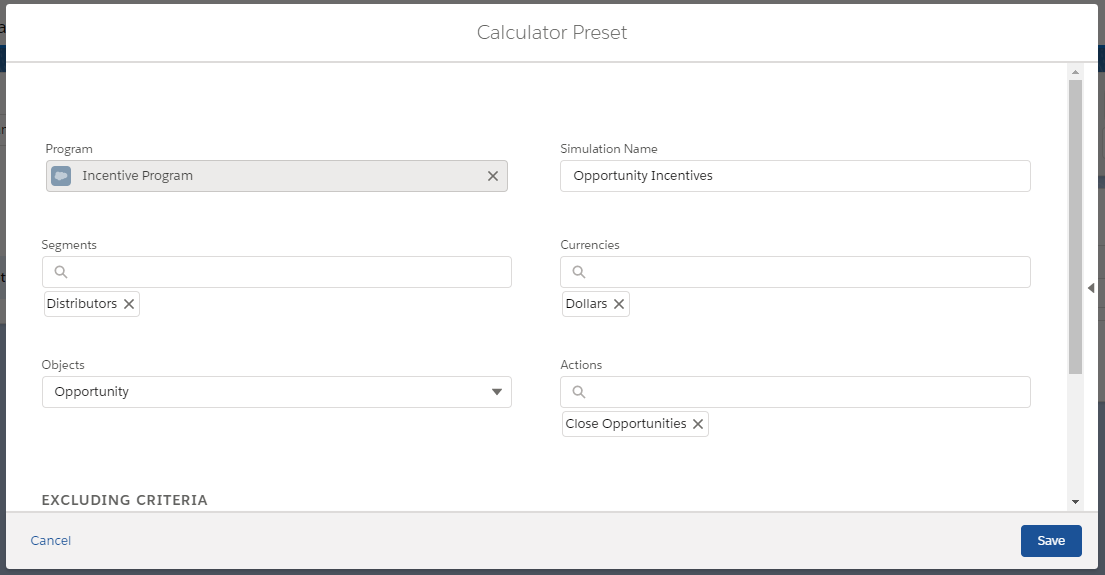
Louis' Preset creation form
What the Simulation API delivers by defaultThe simulation that uses the Preset created will allow members to:
- Overview all the object records (e.g. opportunity, invoice, course - depends on what you chose in the Preset) that they have and select some to simulate with.
- See in which incentives the records selected can be used in and how much currencies they will win in each one.
Editing a Preset
You can edit any Preset whenever you need to. Go to the Incentive menu and, within the Simulator Settings tab, find the Preset that you want to edit and click on next to it to open the options.
Click on Edit and change whatever you need to. Note that, if you change the object used, you'll have to select the action and Excluding Criteria again.
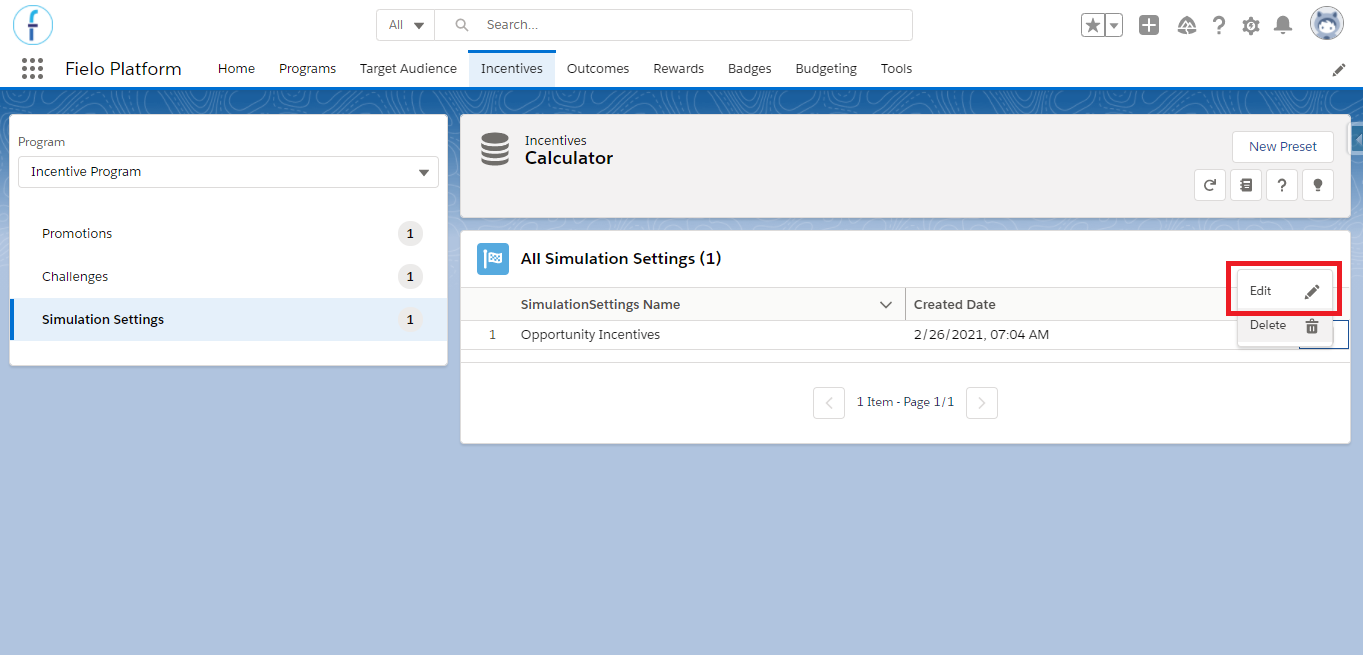
Click on Edit
Activating a Preset
After everything is ready, Louis contacts the Tread Manufacturing developer team so that they can set up the API and build the Planner Simulator's UI for the members.
The member’s experience will greatly depend on how you develop the Simulation UI. Every detail related to how the Incentive Planner works by default was mentioned in this page.
However, Fielo makes available this repository where you can find code that you can use as a reference in order to build your own PIP component for Experience Cloud Sites.
Updated over 1 year ago