
Challenge Ranks
Create a tiering scheme within your challenge
Rank Overview
Ranks within a challenge have two benefits. You create multiple layers of accomplishment for your members and can even provide exclusive offerings as they reach new goals. For example, you can enable functionality or access to specific features based on the members current rank within the challenge. Keep in mind that challenge and mission rewarding are totally independent of ranks.
Let's go through a scenario where you would want to use ranks for your missions.
Imagine you have challenge that has 3 missions based on a fixed metric within it:
- Reach out to 5 clients
- Sell $1,000 of Product A
- Sell $5,000 of Product B
Add Ranks
Ensure you are in the challenge you want to create ranks for. Click on the Ranks tab and select the Add & Manage Ranks button on the right.
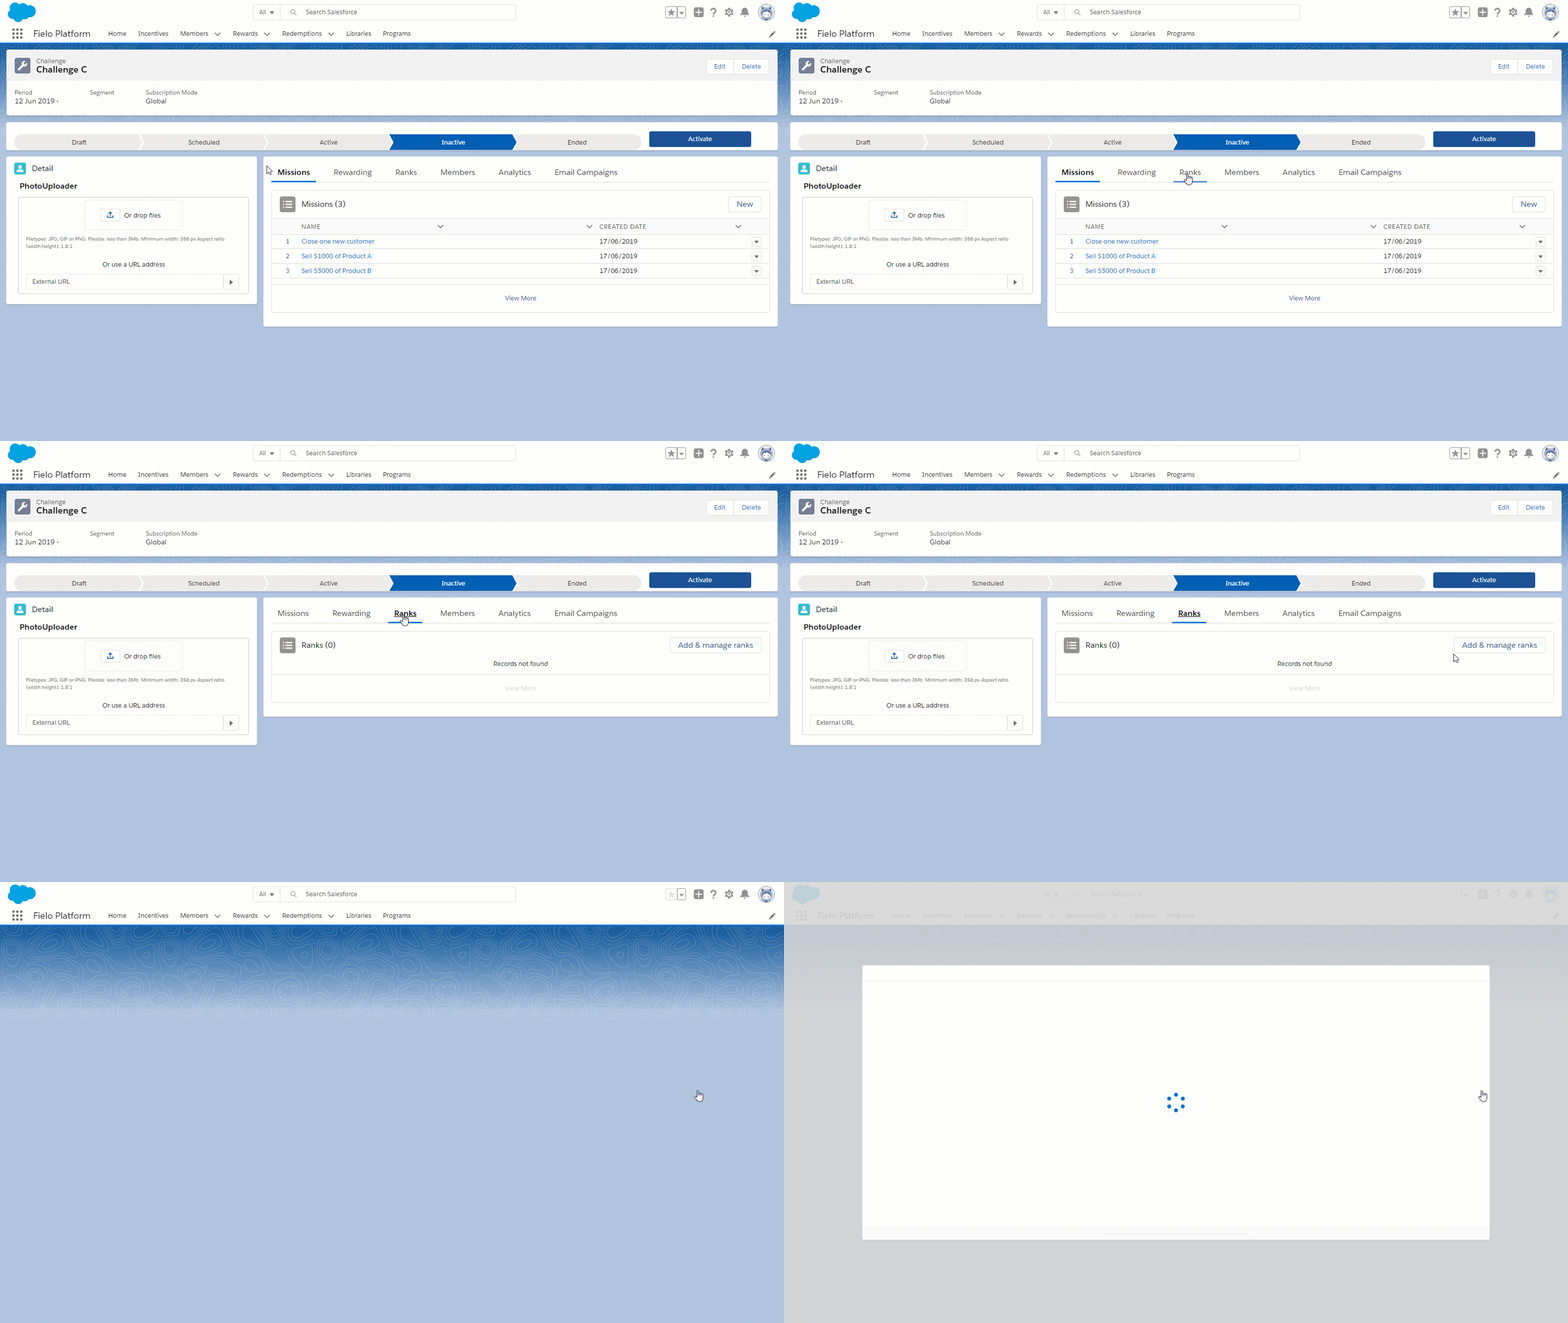
You will start out by creating the base rank for every member that is part of the challenge.
Base Rank
Base ranks are optionalCreating a base rank is optional. Enabling the base rank means that any member entered into the challenge will automatically start out with that rank. If this is an option you don't want to include, keep the option deselected.
Click on Set a new rank and type a name that best suits your base rank. The best practice is to name it something that reflects its "beginner" status. For example, you could label your base rank "Beginner", "Junior" or "Padawan".
Once you have named it and selected it as your base rank, click on Done.
Additional Ranks
As you develop more missions within your challenge, it makes sense to define higher levels of ranks as members achieve more difficult missions. To create additional ranks, click on Add Rank. Again, click on Set a new rank to define this new rank.
You will want your ranks to be progressive which means you probably want to start with the easiest mission first. The first, and easiest, mission will be to reach out to 5 clients to get to the Junior level. In the Name field, type "Reach out to 5 clients" and click Next
Only missions based on a fixed metric can be used as criteria for Ranks.
Promote Rank
You now have to determine which mission(s) a member will need to complete in order to achieve this rank. In this case, select Reach out to 5 clients.
Demote and Maintain Rank
An efficient way to keep your members engaged in the challenge is by setting up the possibility for them to lose their progress. By using Demote Rank, you can create a deadline for them to be promoted in rank, otherwise bringing them back down (demoting them) to a lower rank after the time is up.
If a member ranks down, all the progress of the higher-ranked missions will be reset, except the ones configured to be preserved.
There’s also the possibility to activate Maintain Rank, which would keep the member on their current position in case they perform selected missions, in other words, members who complete the maintaining rank missions but haven't been able to rank up will keep their current position.
To activate it, still in the Add & Manage Ranks window, under Promote Rank, check Demote Rank. You will also be given the option to activate Maintain Rank.
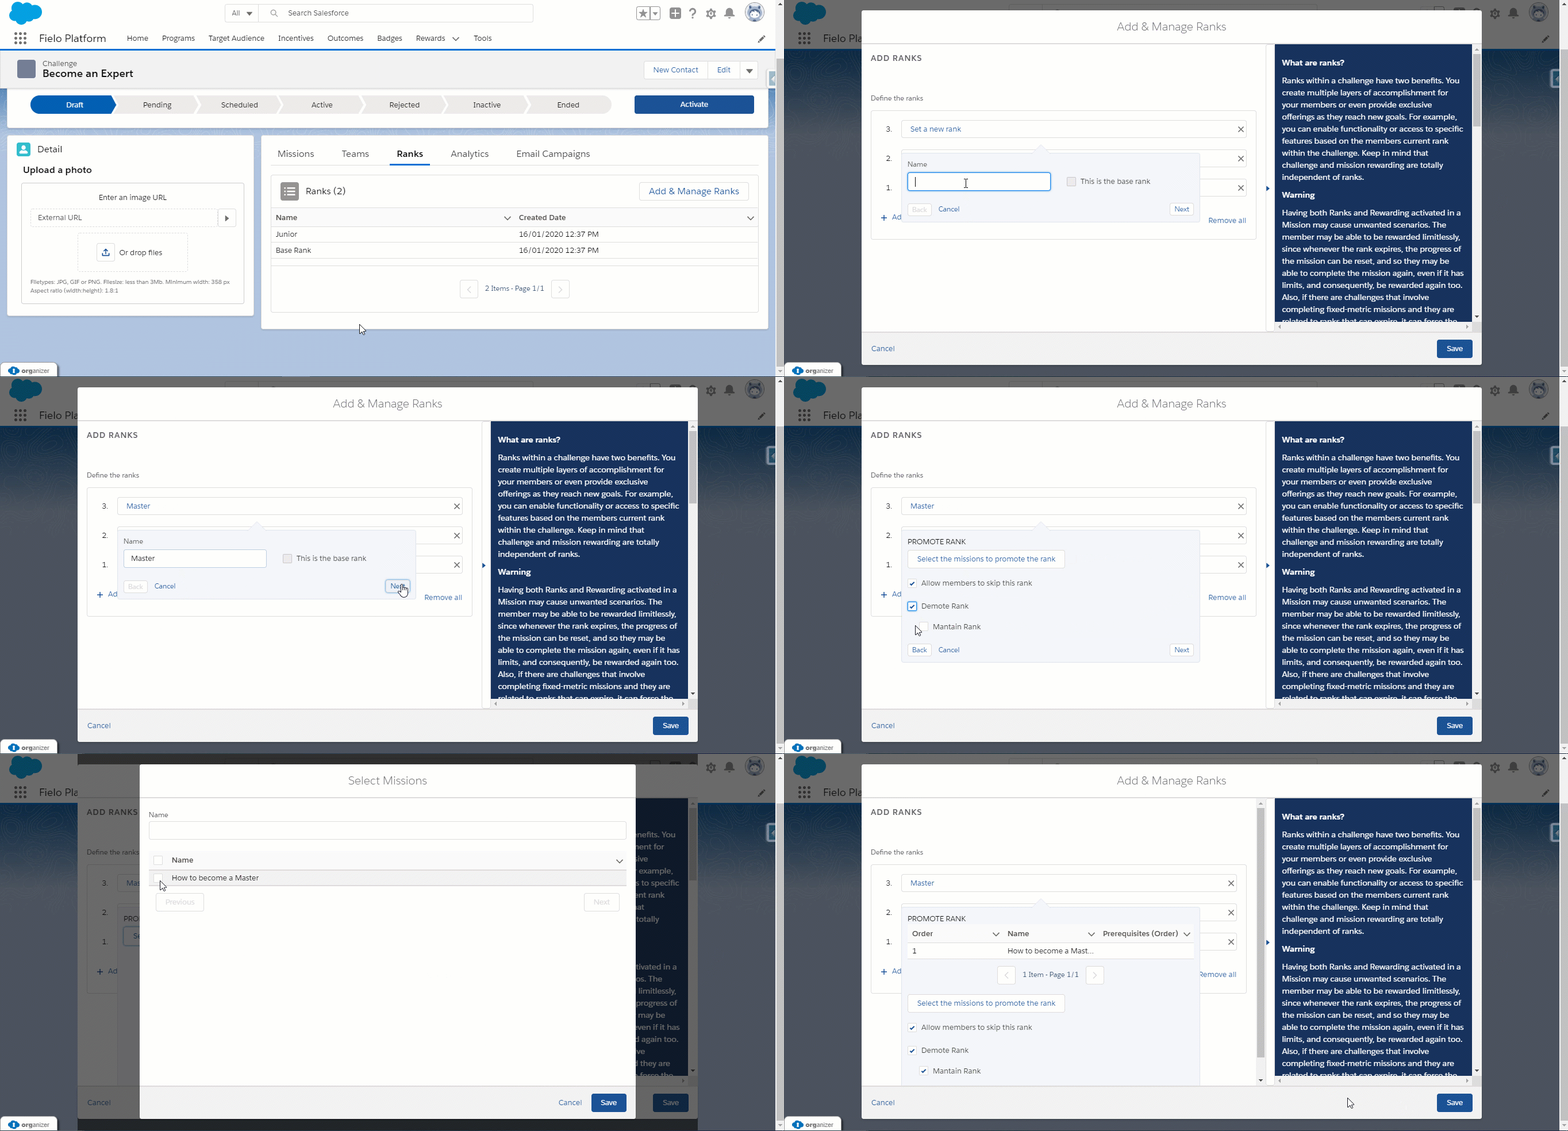
Rank Expiration
Rank Expiration will determine the period of time that members have to either promote from their current position or perform missions to maintain it. If none of these actions are accomplished when the time is up, they’ll demote to a lower rank.
In the Rank Expiration menu, choose between a period of time or a specific date in the future to be the expiration date.
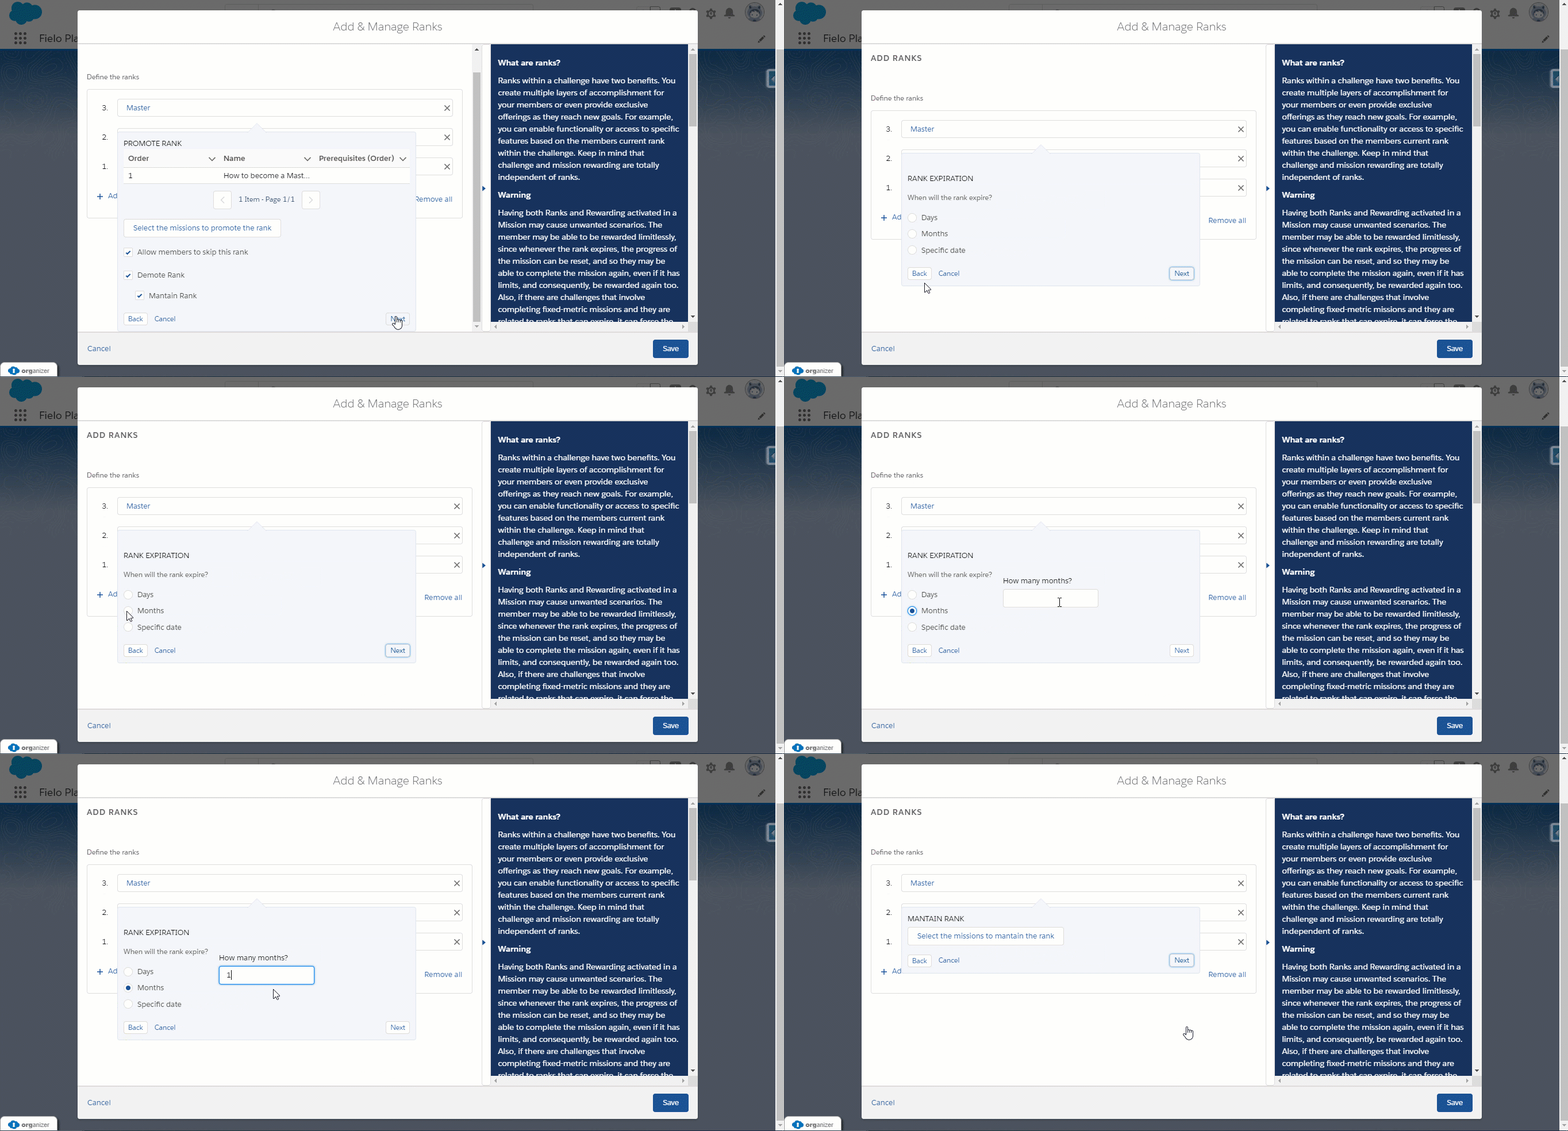
Select the Mission to Maintain the Rank
If you have chosen to give your user the power to maintain their rank, a page will come up for you to select which mission they should complete in order to keep their position.
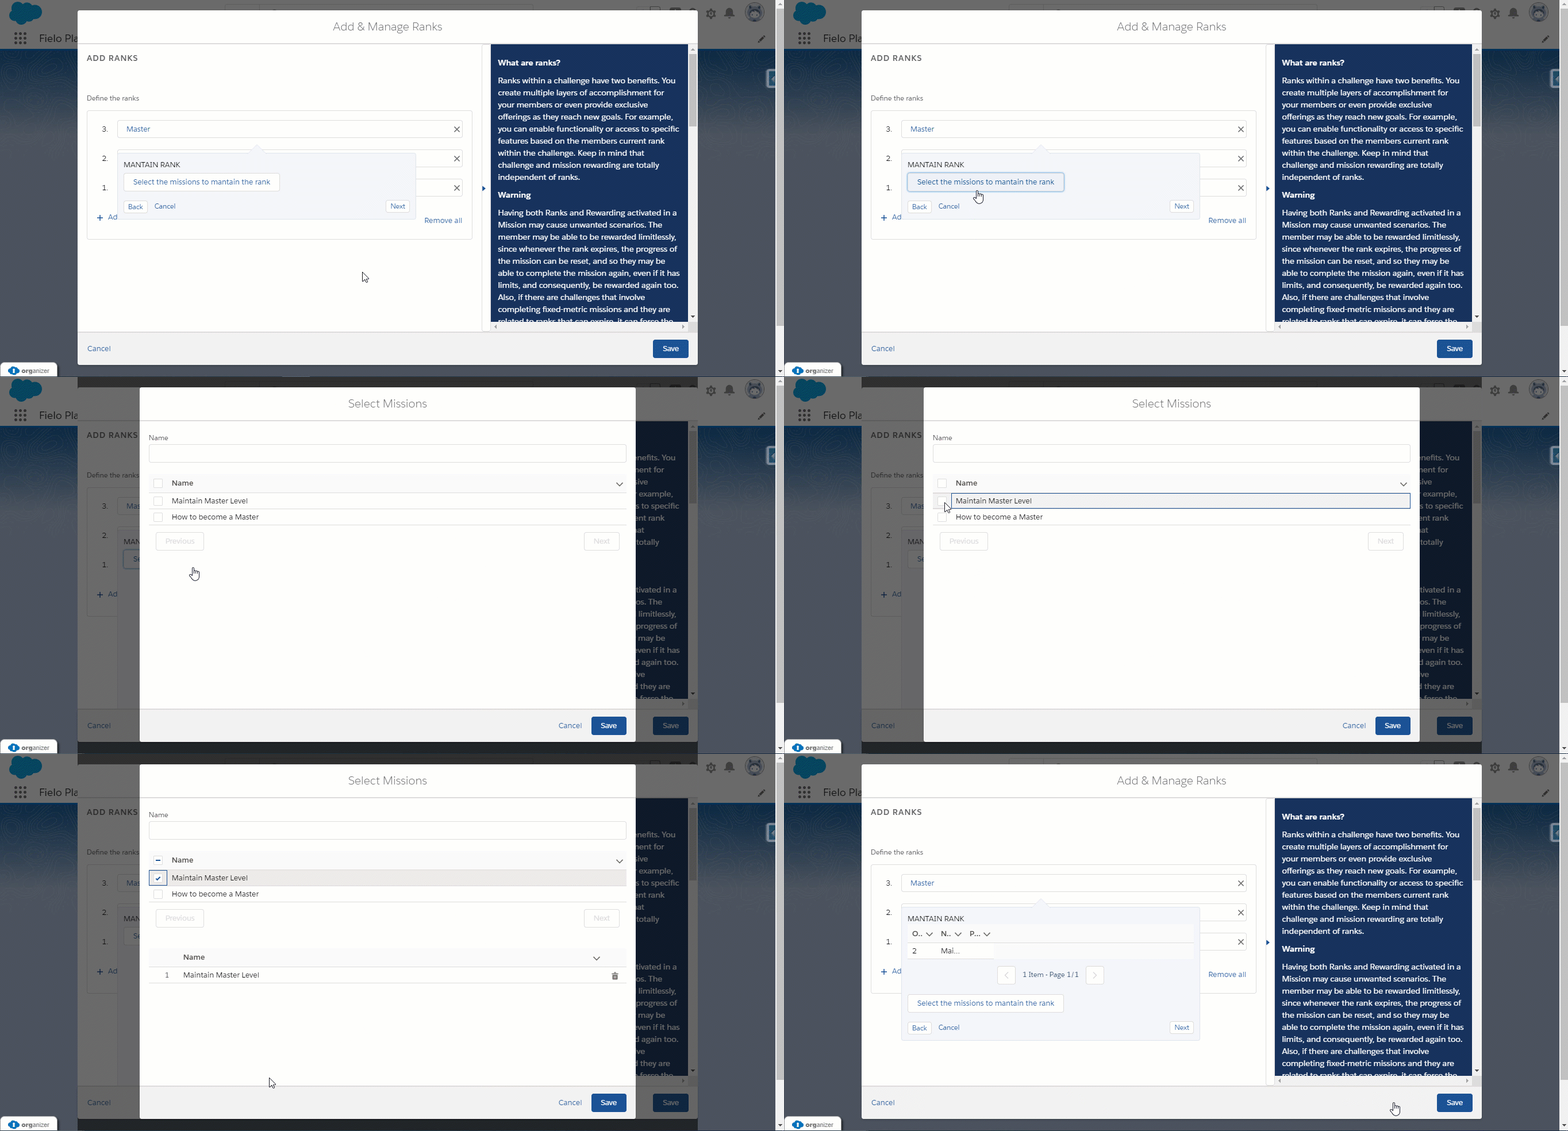
At this point, we have created three rank levels: Base, Junior, and Master. You will now be given the option on how to demotion should happen. There are two options:
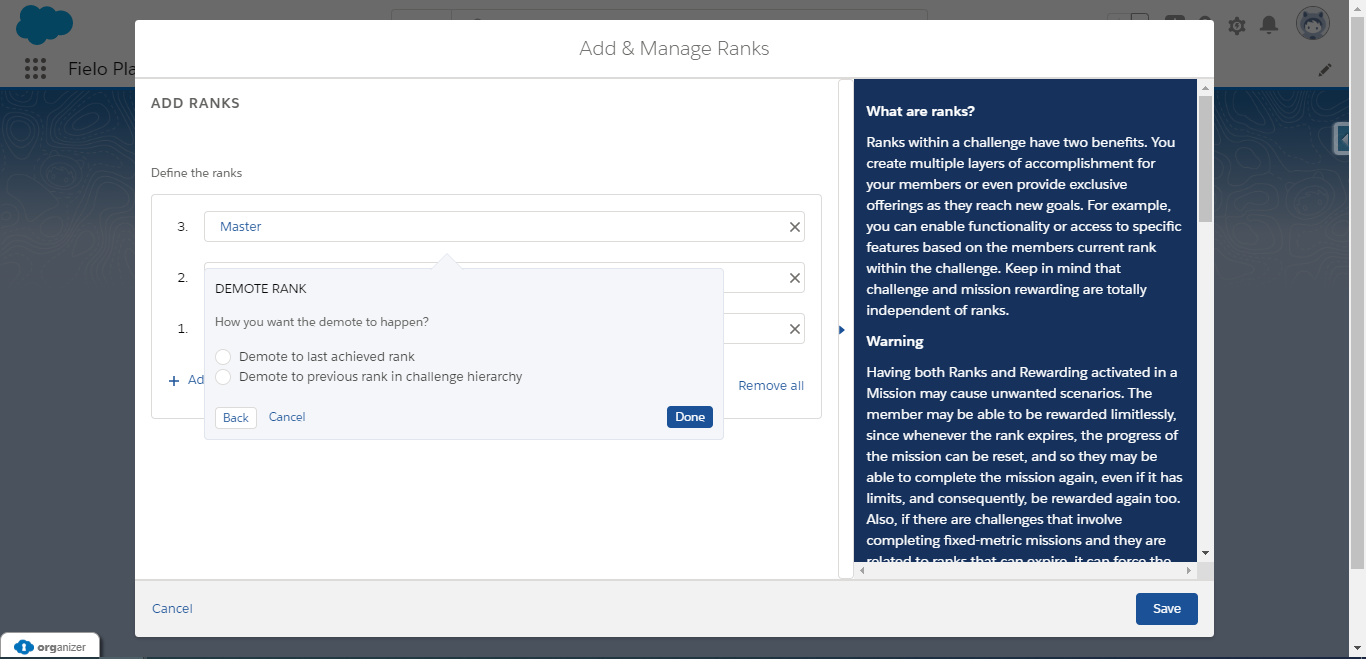
Demote to last achieved rank
The member may have skipped the Junior level, up ranking directly from Base to Master. If this member hasn’t been able to complete the missions to maintain the Master level, he would then go back to the previous rank of his history when the rank expiration date is due.
In this scenario, by choosing Demote to last achieved rank, the member goes back to Base.
Demote to previous rank in challenge hierarchy
Following the same structure of the previous example, the member may have skipped the Junior level, up ranking directly from Base to Master. If this member is not able to complete the missions to maintain the Master level, he would rank back to the previous rank available after the rank expiration date is due, in this case, Junior.
In this scenario, the member goes back to Junior.
Apply Rank Promotion When
You may run into a situation where a rank requires two or more missions to be completed in order to achieve that rank. The last rank in this example will show how that is possible.
Make sure you are still in the Add & Manage Ranks window under the Ranks tab. Click on Add Rank and give the rank a name that fits best. In this case, the name will be "Master Seller". Click Next so that it will bring you to the Promote Rank section. Select two or more missions that are needed to be complete for achieving this rank. When two or more missions are selected, the Appy rank promotion when section will appear, giving you 3 options to choose from.
-
All missions are completed
-
Any mission is completed
-
The following expression is met
An example of an expressionIf selected, you must enter a formula with logical operators. For example, if you enter (1 AND (2 OR 3)), a member will need to accomplish the mission whose order is 1 and either the mission whose order is 2 or the mission whose order is 3 in order to qualify for the rank.
When entering a formula, make sure to add up to two conditions between the same parenthesis. For example, instead of (1 AND 2 AND 3), use ((1 AND 2) AND 3).
In this example, the final rank will be called "Master seller" and will require the mission to sell $1,000 of Product A and the mission to sell $5,000 of Product B to be completed in order to achieve this rank. From the 3 options, All missions are completed will be selected.
Again, there aren't any custom actions that need to be used for this rank, so go to the Done button and click it to complete this rank.
Allow Members to Skip this Rank
If you want to give members the ability to rank up faster, you may want to enable “Allow members to skip this rank” for particular ranks.
When enabled, members will be able to skip a particular rank when they complete missions that qualify them for a higher rank. For example, if you have 3 ranks, Bronze, Silver, and Gold, you can enable “Allow members to skip this rank” for the Silver rank. If the member is ranked Bronze and completes the missions needed to reach Gold, they would skip the Silver rank and go right to Gold.
In our scenario, we will not be selecting this option.
Custom Action
Ranks can be a great way to provide perks to members that reach a specific rank. For example, if the member reaches the Gold rank, they can gain access to exclusive products that only Gold members have access to.
If you don't see the custom action section when creating a new rank, though, the admin must create the Apex Class. Check out this guide for further setup.
Add, Delete, or update a Rank
Ensure you are in the challenge you want to delete a rank for. Click on the Ranks tab and select the Add & Manage Ranks button on the right. Each rank will have an X on the right side of it. Click the X for each rank you would like to remove. Once you are ready, click save.
Challenges need to be in Draft or InactiveIt is not possible to edit a Rank when the related challenge is not in Draft or Inactive status
Updated over 1 year ago