
Challenges
Create and configure Challenges
Challenges are a way of encouraging members to perform particular behaviors and drive engagement. Challenges can be addressed to different audiences (depending on Segmentation) within a specific time period and may go through a range of statuses along the way.
Challenges include one or more Missions, which may include Objectives.
Creating a Challenge
From Incentives, choose the Program you want to create a Challenge for from the Program menu. Then, go to the right of the screen and click on the New Incentive or New Incentive From Model button. Below is a brief description of each.
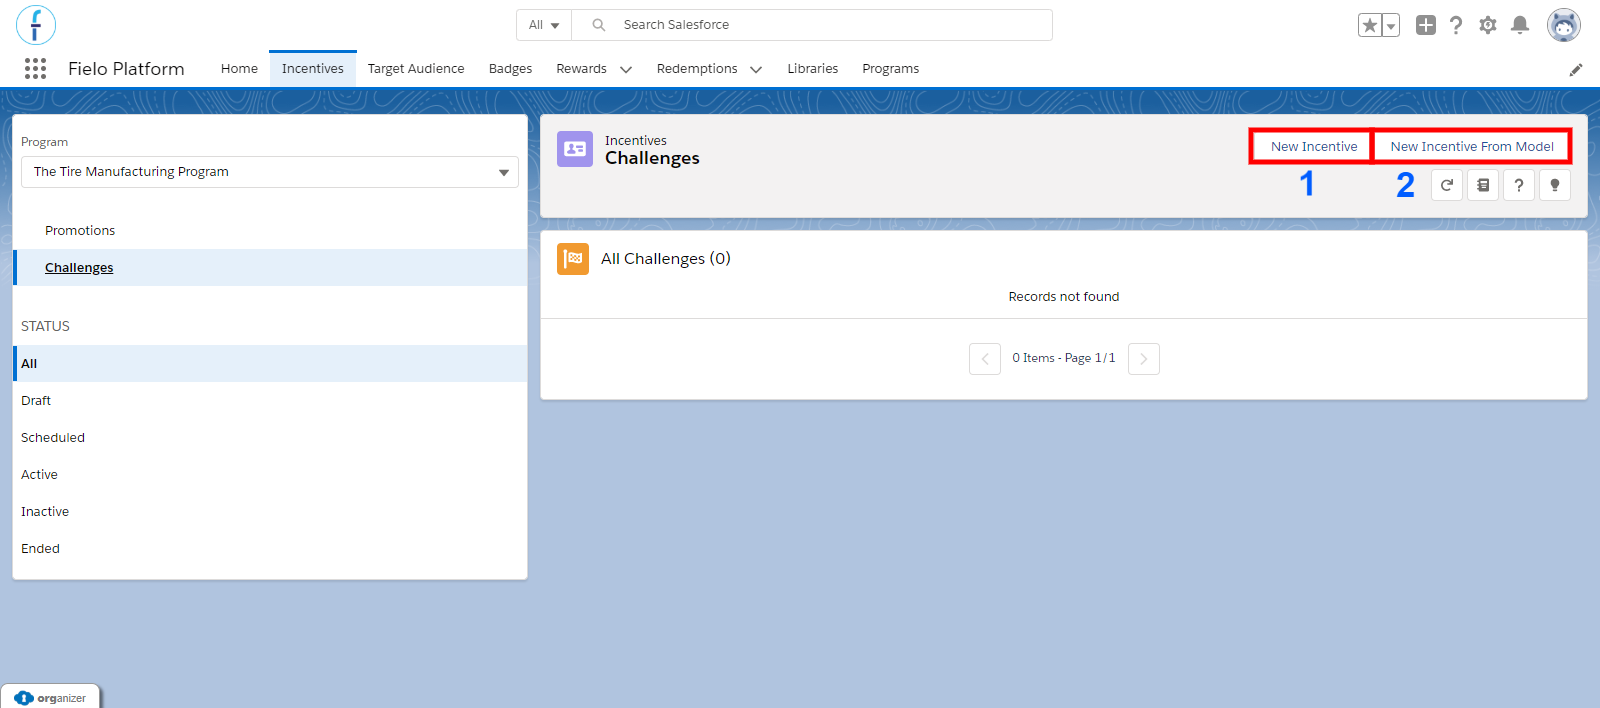
Challenges section in incentives tab
-
New Incentive - Creating a new Challenge from scratch.
-
New Incentive From Model - Models are pre-configured, reusable templates that allow you to create programs and incentives faster and easier. Create new models from existing programs and incentives and use them as a starting point for new ones.
We have a Wizard to help you along!We have included a handy Wizard to help you through the process. This will give you insight into what a feature will do as well as some examples along the way to help put it into context.
Tread Manufacturing wants to incentivize their distributors to sell $20,000 worth of all-season tires to retail stores, so let's see how they would do it.
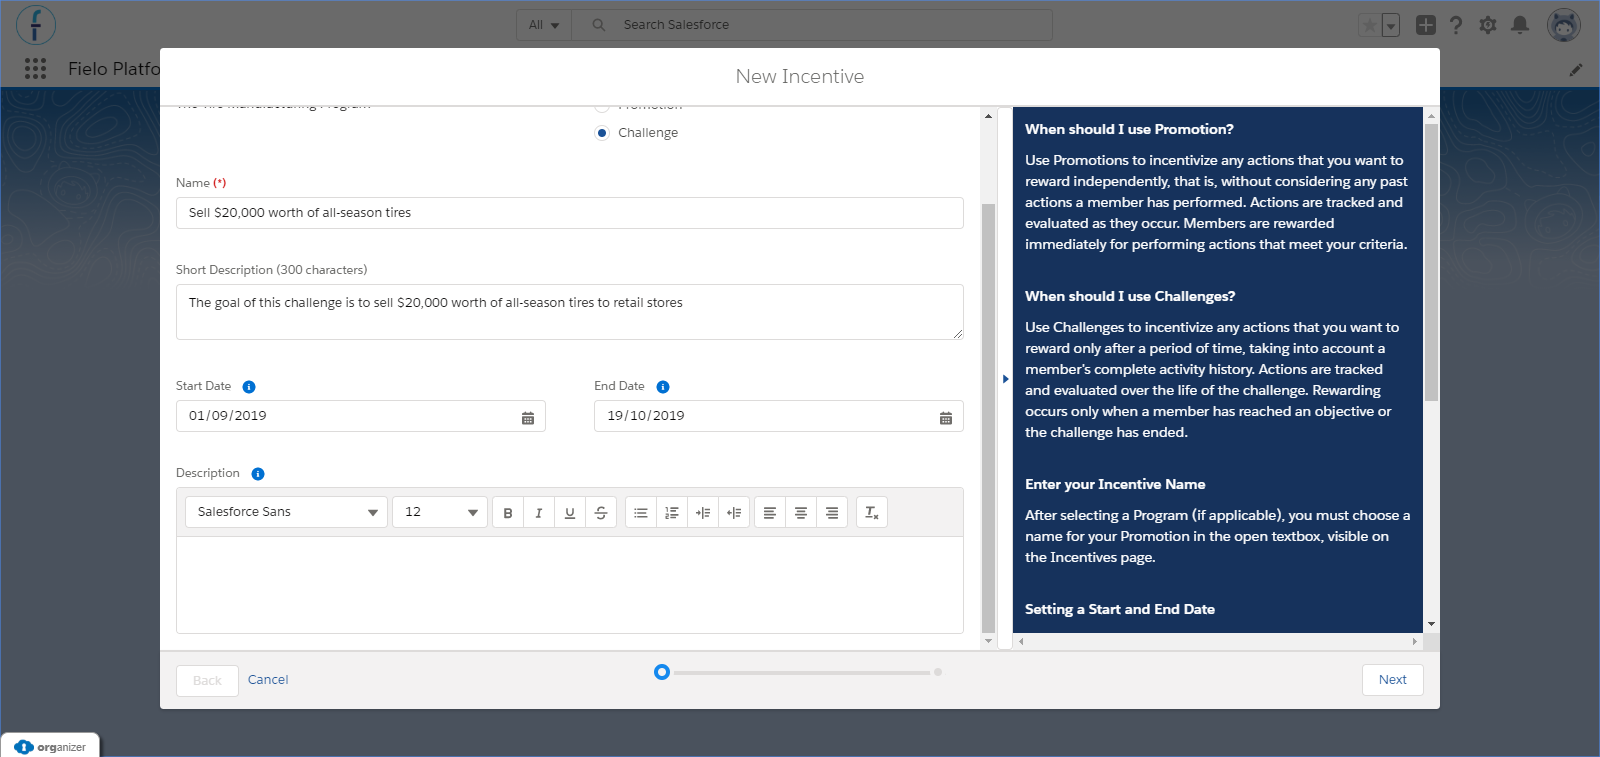
Creating a new challenge
Choose Incentive Type
First, you need to specify whether you are creating a Promotion or a Challenge. In this case, click Challenge.
Enter a Name and Description
Enter a name and description for your Challenge. Your members will see these, so make them exciting!
Set a Start and End Date
Next, choose start and end dates for your Challenge. Challenges must always have a Start Date and are automatically made Active on that day. They don't always need an end date; if one is not provided, the Challenge will last indefinitely.
Once all that has been entered, go to the lower left and click "Next".
UTC Date/Time & the Challenge's periodSalesforce processes all transactions considering the UTC (Coordinated Universal Time) Date/Time that they were created in, not the ORG's Date/Time. So, if they are different, Salesforce might understand that the member performed the incentivized action in a day before or after the Challenge's period that you intended, causing the member to not be rewarded for it.
You should take that into consideration and - if it imposes an issue for you - convert your time to UTC and define the Challenge's period accordingly or create a formula to save your ORG's time in the transactions.
Select a Target
Challenges can target two different audiences, Members or Teams. If you choose Members, the Segments section will appear below to allow you to choose how you want to segment individual members. Otherwise, if Teams was chosen, you go ahead and save the Challenge. You will be able to add your teams after the challenge has been created.
Otherwise, if you chose Member, continue below to Segments and Subscription Mode
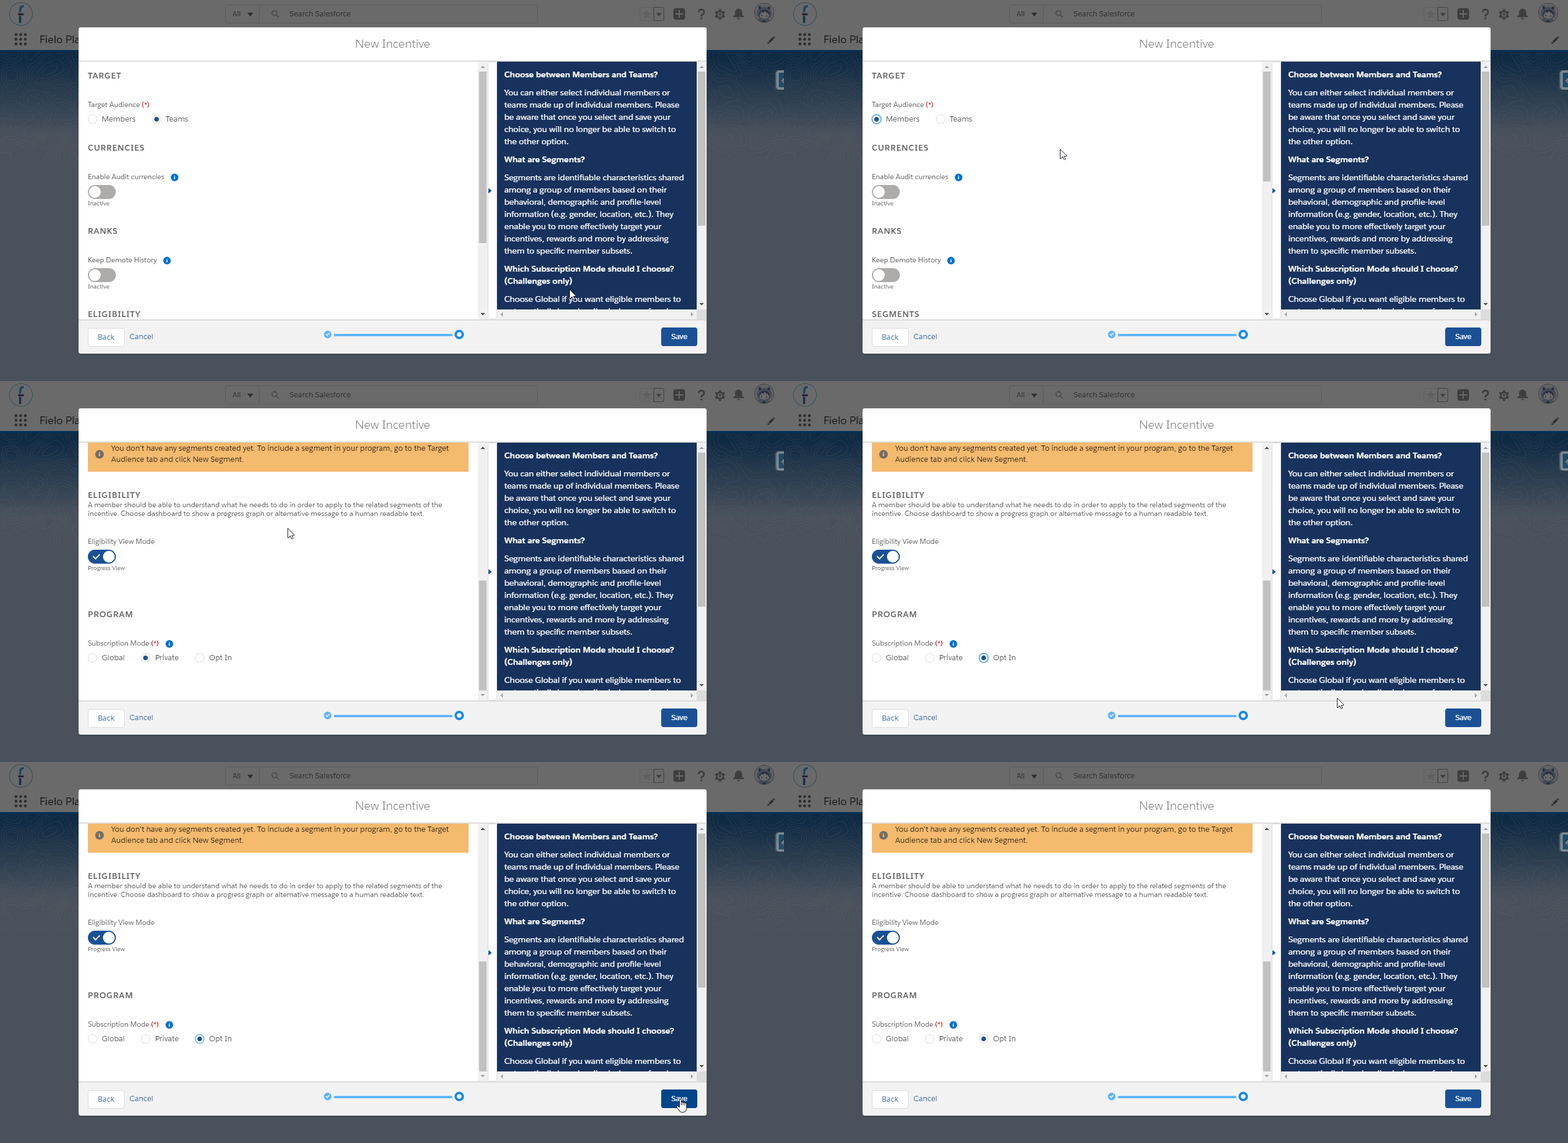
Selecting the target audience, segments and eligibility option
The segmentation section will not show if there are no segments set up. If you want more information on how to create a segment, click here.
Currencies
This is an optional feature, related to currency audition for payouts. If Enable Audit currencies is checked, every currency will be related to the record (e.g. a closed-won opportunity) that generated it.
It represents a way of keeping track of which object record, related to the incentivized action, generated a payment to the member.
Select a Segment (Optional)
You can target your Challenge to one or more segments you've defined in your program. To add a segment, select it on the list to the left and click . To remove one, select it on the lift to the right and click .You can leave your Challenge open to all segments by leaving the list on the right empty.
Please be aware that once you select and save your choice, you will no longer be able to switch to the other option.
Eligibility
This is an optional feature for Fielo's Challenges and Incentives Lightning Components for sites, which displays to members what they still need to accomplish in order to be able to enroll in a Challenge. It will be applied to Challenges that have Opt-in or Global subscription mode.
Other than activating it, you also have the choice of showing logged members a Progress View or a Description View:
Progress View: it will compare their current information with the segments' criteria selected above and it will show to the logged member, through a dashboard, the conditions required for them to be able to participate in the Challenge.
Description View: it enables you to write a customized message to be shown to the logged member in the site instead of the dashboard. If chosen, a text box will appear below so that you can write that, for example, it is necessary to be invited in order to participate in the Challenge.
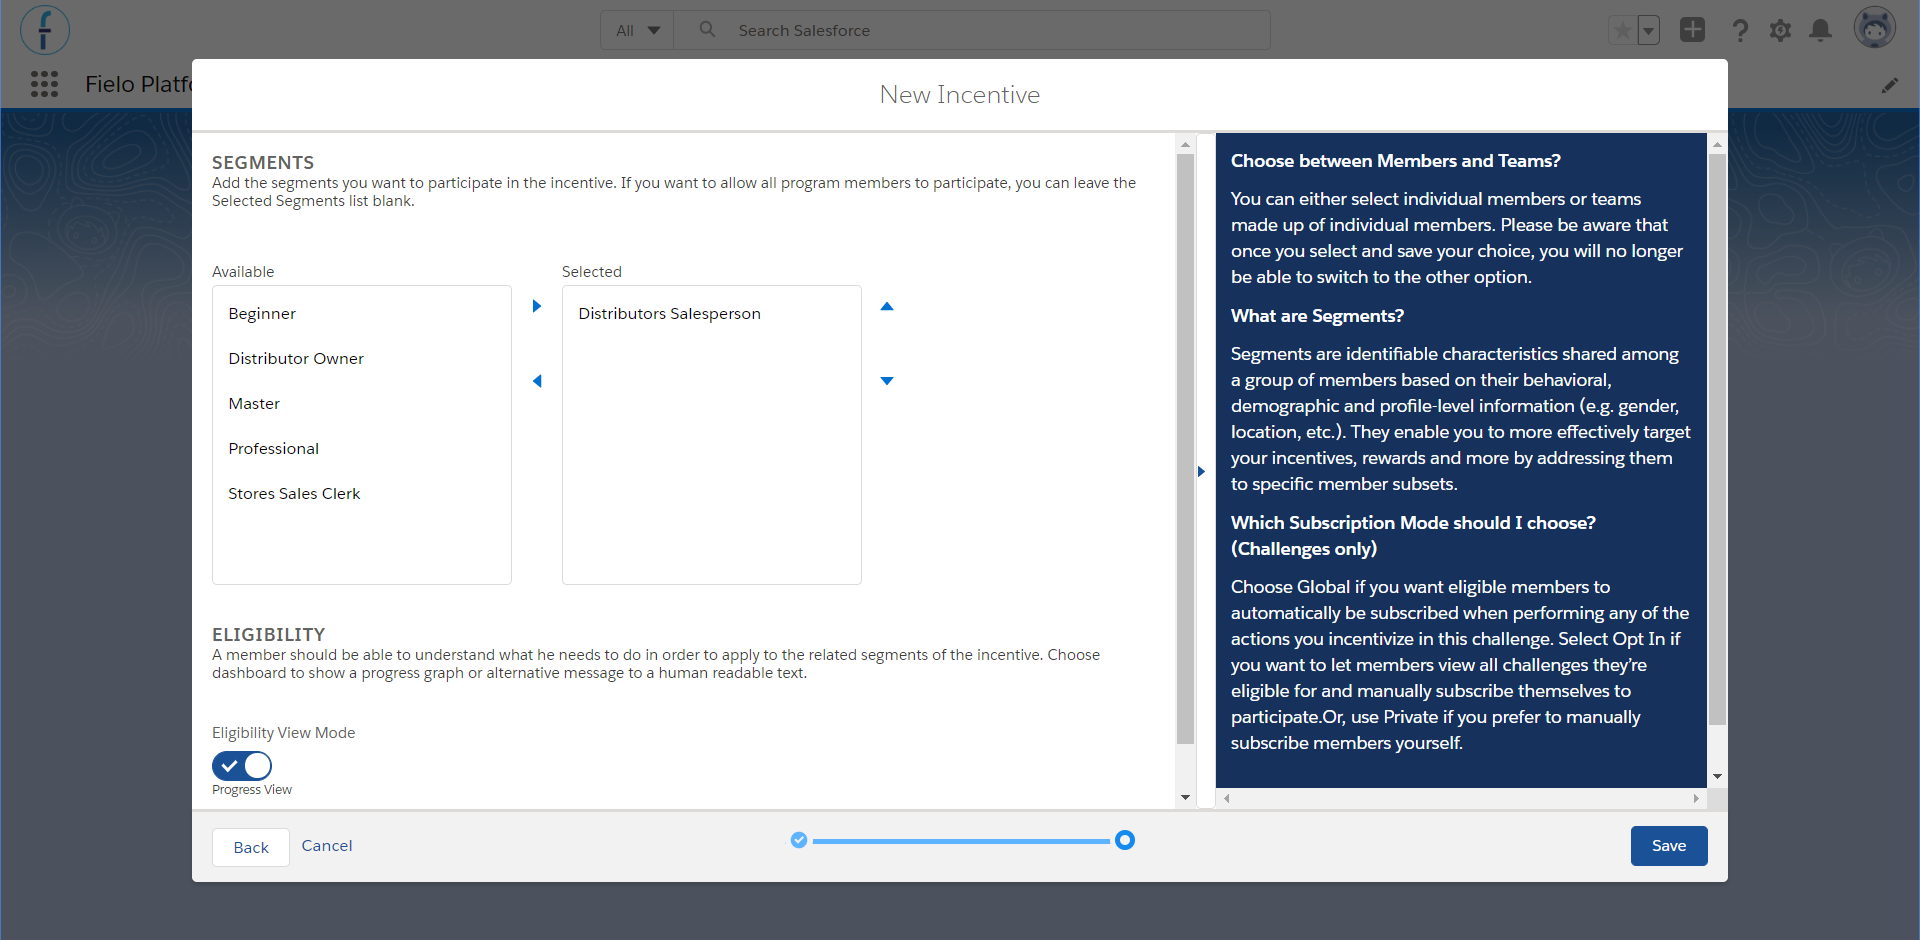
Eligibility modes
Choose a Subscription Mode
If you don't have segments createdThe Segments section will just have an warning box informing you don't have any segments created. To include a segment in your program, go to the program detail page. In the Segments list, click on the "New" button.
Lastly, choose a Subscription Mode that best suites the Challenge. The types are:
- Global: Use if you want members to automatically be subscribed when performing any of the actions you incentivize in this Challenge.
- Private: Use Private if you prefer to manually subscribe members yourself.
- Opt In: Use if you want to let members view all Challenges they’re eligible for and manually subscribe themselves to participate.
Once you are done with that, click on the Save button.
Using Segments in your ChallengeNote that, if using segmentation, only members in your targeted segment(s) will be able to participate in your Challenge, regardless of Subscription Mode.
Upload a photo
After saving you Challenge, you might want to use a picture as a cover for it. Choose something that relates to your challenge's description, as this will appear within lightning components for logged members in your community.
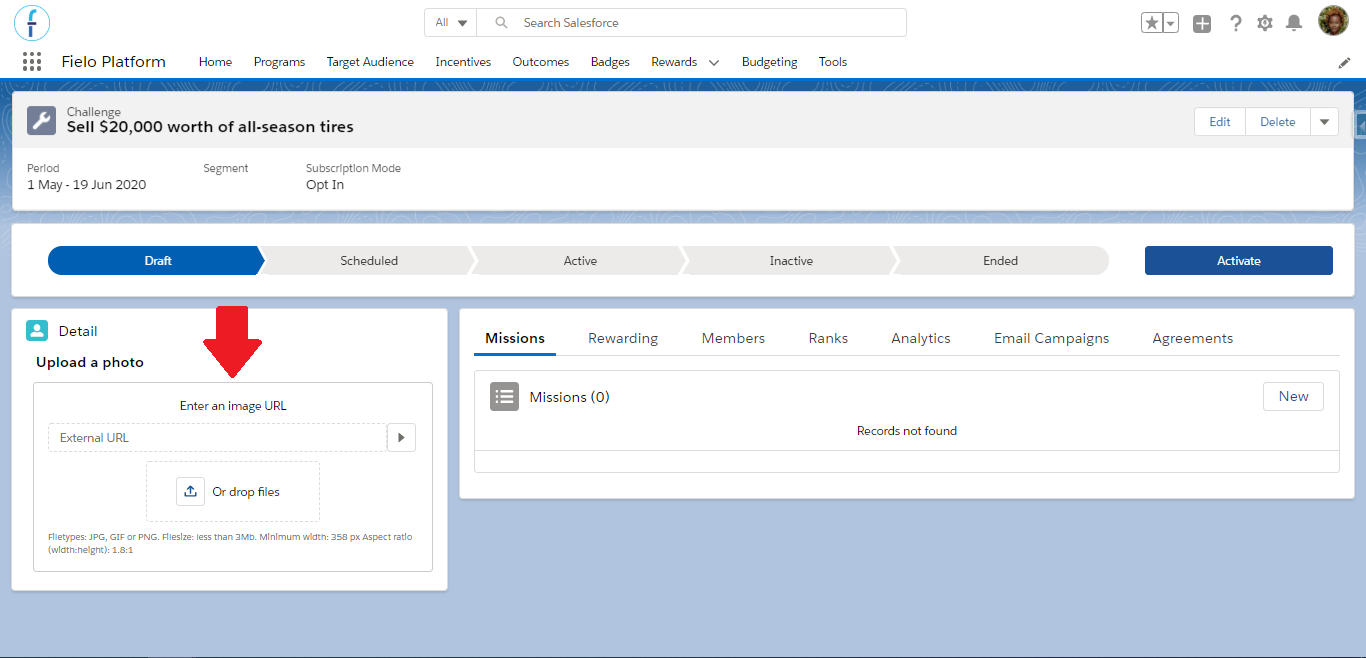
Note that, by default, Fielo avoids the usage of External URL in order to prevent browser hijacking. Deactivating the validation rules allows to use it under the responsibility of the client’s Salesforce Administrator.
In order to be able to use an external URL for your Challenge's photo, you must first deactivate the DisallowExternalImage validation rule. For that, go to Object Manager in Setup and, within the Challenge object, access the Validation Rules tab to deactivate the rule.
Editing a Challenge
Upon saving, your Challenge will be created with the status Draft. This is so that you can fully configure your challenge by creating Missions, assigning Rewards and more.
If you are already inside your challenge, go to the top right and click Edit.
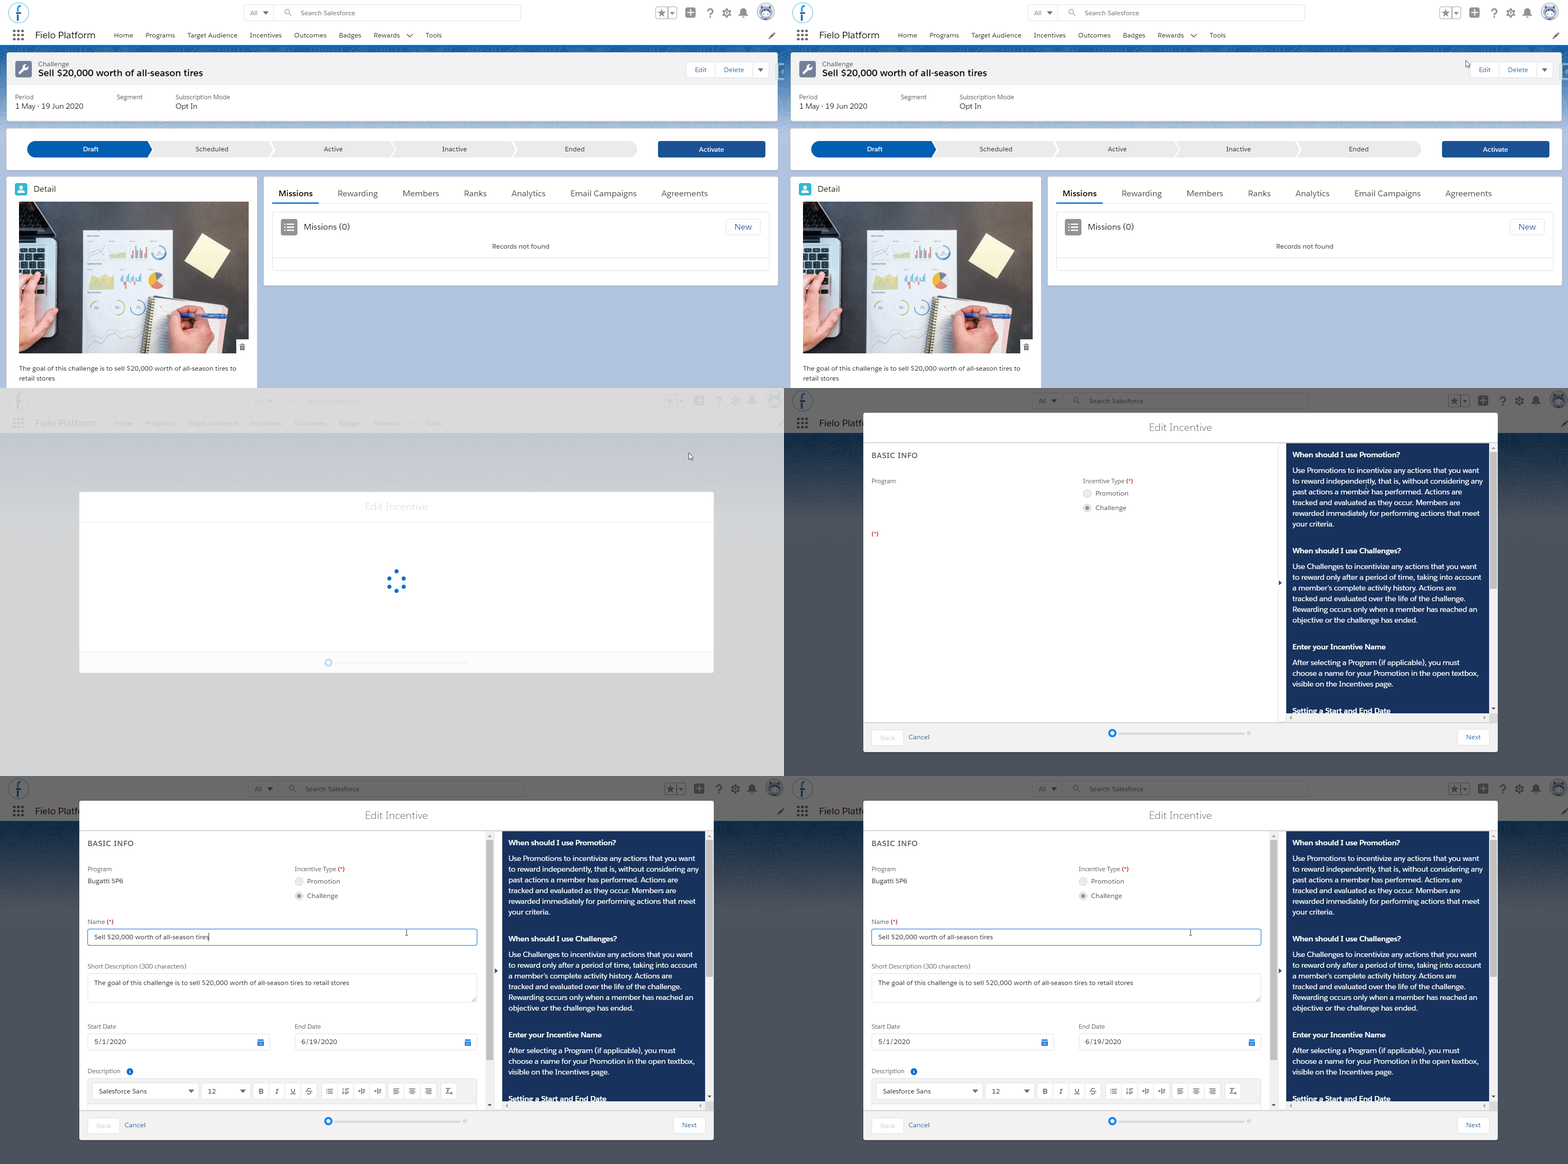
Editting a challenge
If you are coming from another location, go into the Incentives tab, choose your program from the Program menu, and click on the INCENTIVE STATUS where your program would be. (For example, if it is still in Draft mode, it would be under the Draft category)
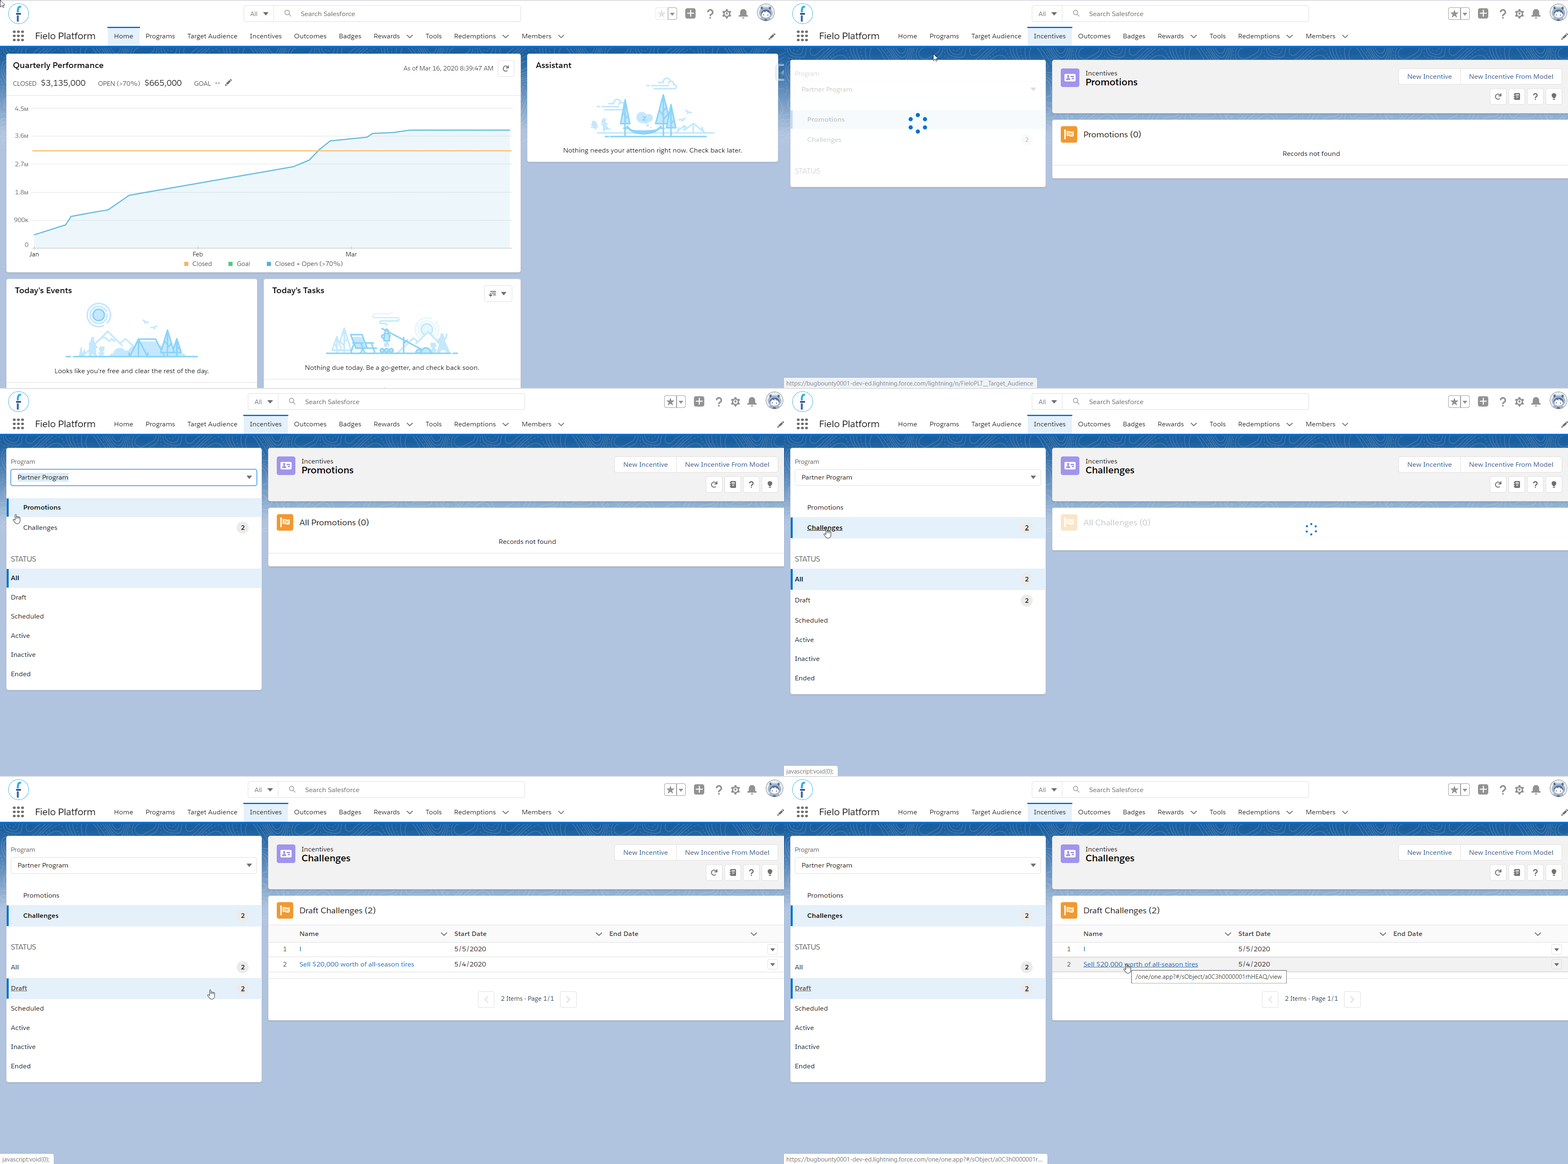
Accessing challenges
Missions, Rewarding and MoreNow that you've created your Challenge, it's time to start building out the behavior(s) you want to incentivize by creating your first Mission!
Agreement
In addition to the Agreement that can be set throughout the entire Program, Fielo gives you the option of setting terms and conditions that members will be prompted to confirm acceptance to when first accessing a Challenge that has an opt-in subscription mode. Otherwise, they won't be able to take part in the Incentive.
It is not possible to create an agreement for challenges with Global or Private subscription mode.
From the Agreements tab, click on Create Agreement. Write your terms in the text box that will appear, or choose a model from another challenge's agreement, and click Save afterwards.
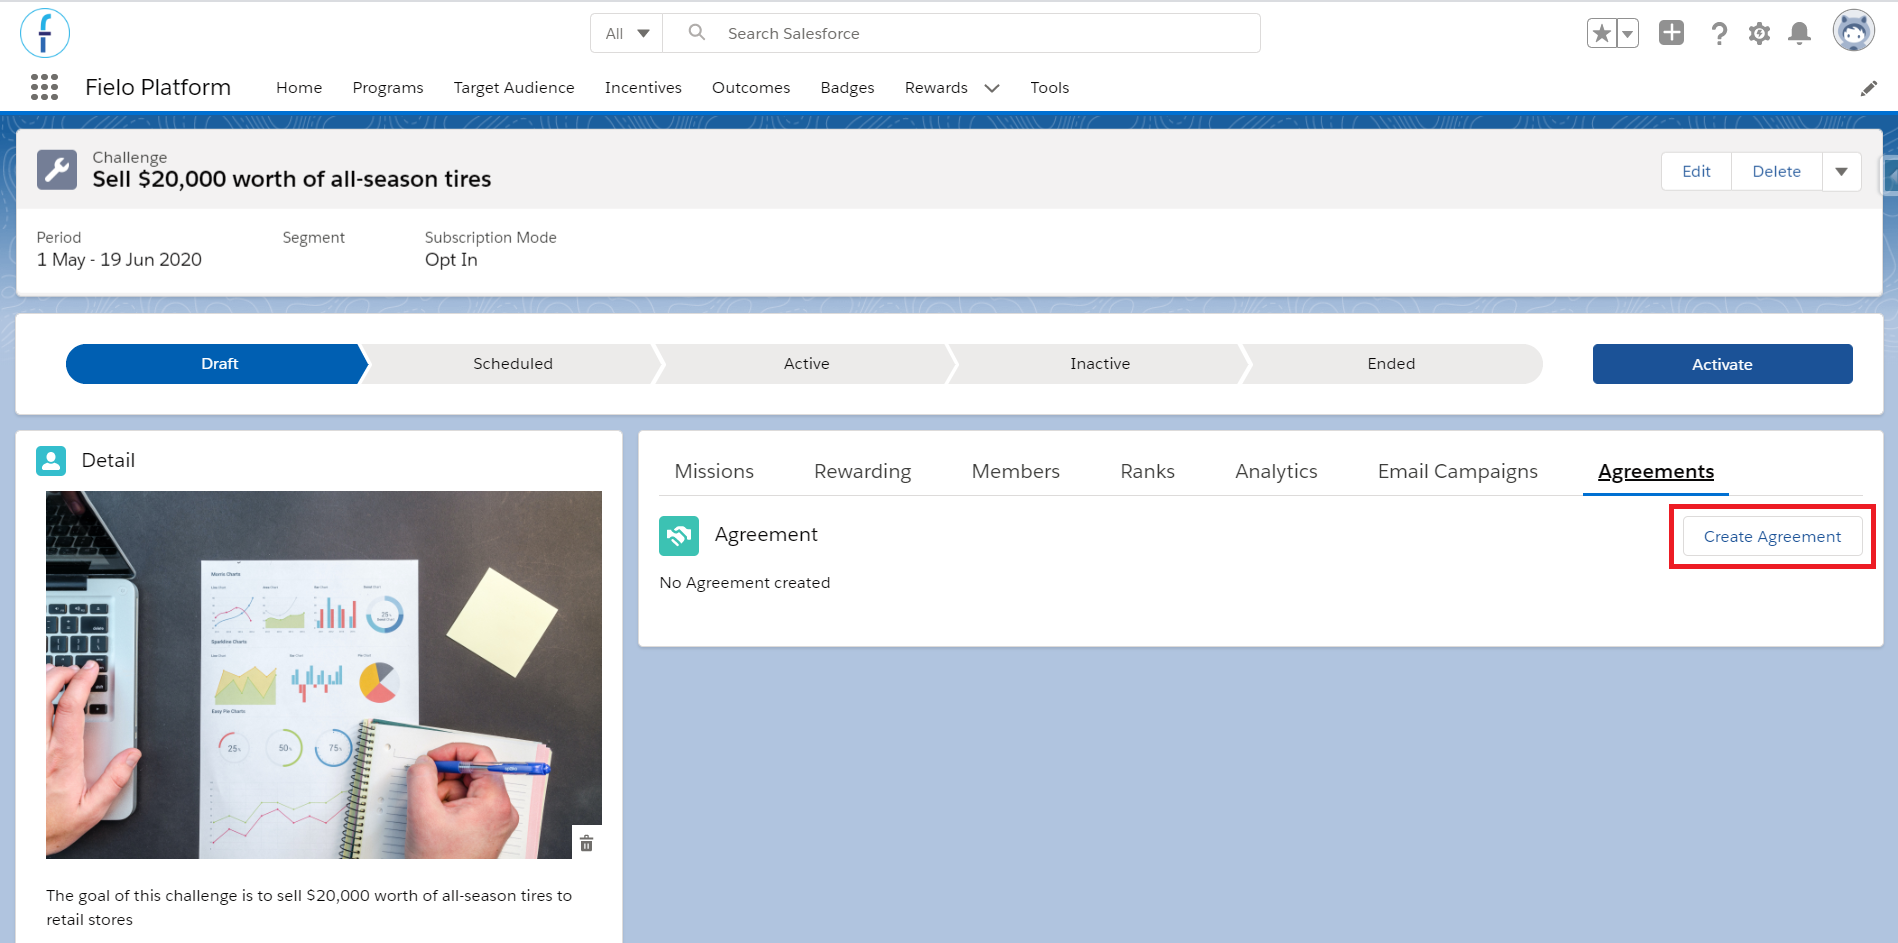
New agreement button
Agreement modelThis is a way of using the same terms already written for a current agreement you have in another challenge. In order to be an option to be used as a model, it can't be from a promotion.
The model's name is the same as the challenge to which it is related. You can alter the text after selecting its name and the text box is populated.
After you save it, the agreement is created in a draft status and, as long as it is still a draft, you are able to delete it. Do not forget that for it to be shown to members you'll need to activate it first. When that occurs, its status will change from draft to current.
You can still edit the agreement even if it is no longer a draft, though. A new version will be created and set to current while the old one will be deprecated and the member will be prompted to accept it again in the next time they access the site. They won't be blocked from taking part in the Challenge if they don't, their actions will still be taken into account to complete it.
Other than that, the program administrator can keep track of every agreement that was accepted by the member. A list will be available in the Agreements History tab within the member's page in your Org, presenting its code, the incentive or program they were created for and created and end date.
Note that the created date displays the time and date the member accepted it, and that the end date will only be populated when the member accepts a new version of the agreement related to an incentive or program. Every agreement with an end date, then, can be consideres invalid.
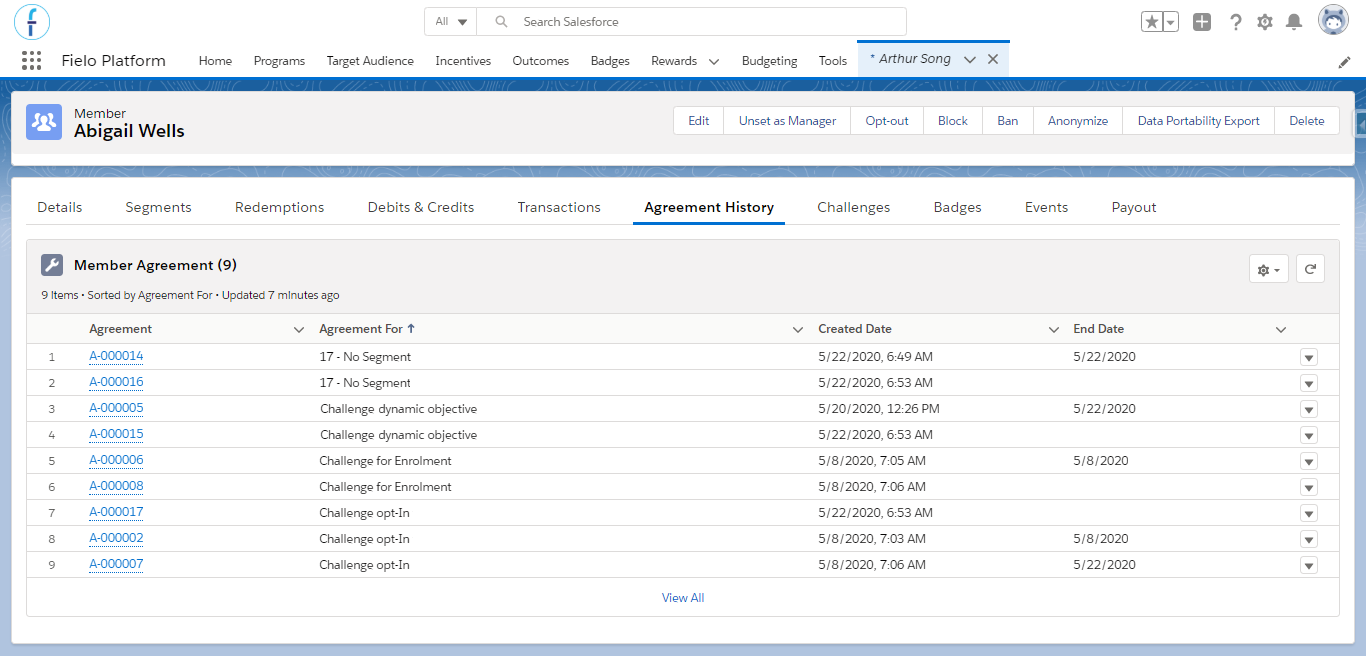
Agreement history
Activating a Challenge
You must activate your Challenge before members can participate in it.
Before activating your Challenge, it must have at least one Mission or Ranking set up.
To activate a Challenge, click Activate on the Challenge page.
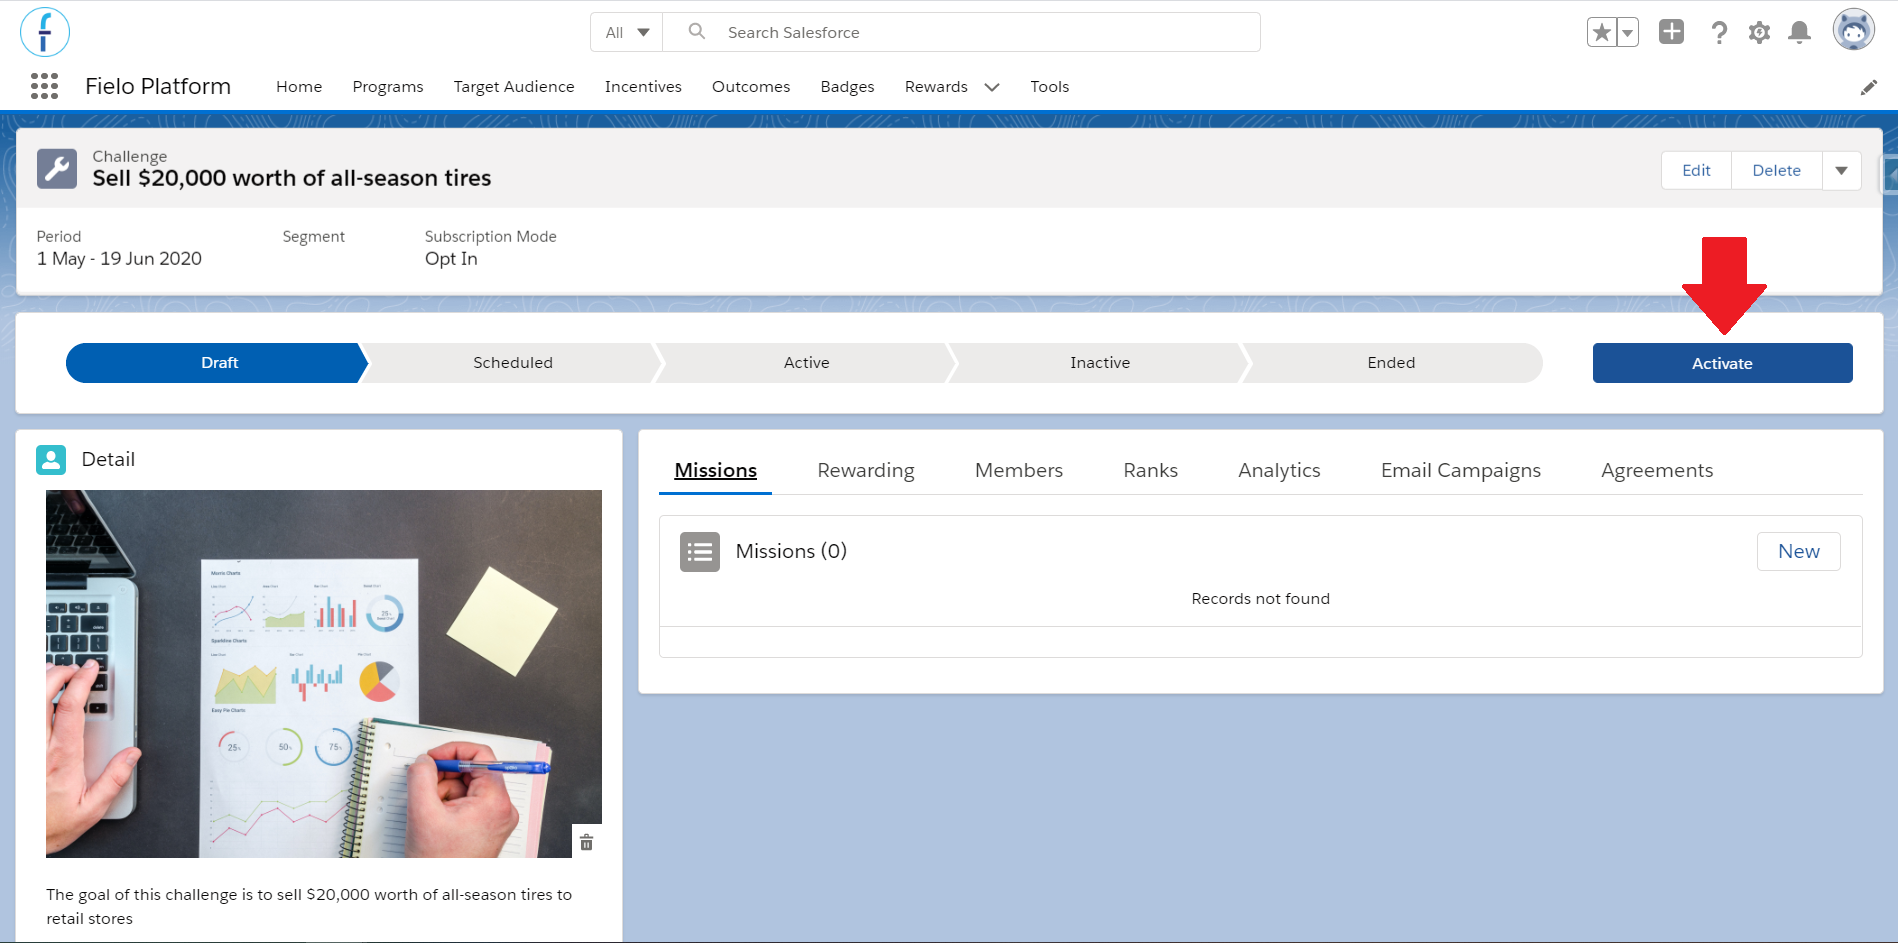
Activate the challenge button
Delete
In order to delete this challenge, you need to go into the challenge itself and in the top right you need to select Delete.
Updated over 1 year ago