
Payouts
Reward your members monetarily
What would it be like if you wanted to offer a different reward type that is not points, miles, badges or redeemable items in your program, a reward that could be seen as having greater value by the members?
A currency that generates payouts is a great option for you! Since it is a way of directly rewarding members with cash, it attracts more attention and can incentivize them even more to perform a specific action or group of actions, such as closing an opportunity or selling more this quarter than the last one.
You can create a new promotion or challenge, or edit an incentive that already exists, in order to include payout as a prize in it. The tire company Tread Manufacturing, for example, wants to add payouts as a reward for a challenge that incentivizes their distributors to close $100,000 worth of opportunities with retail stores.
Before starting, though, there are some concepts to understand and processes to take care of in order to be able to set up a payout currency as a reward type for your incentive. Let's understand them.
Basic info
First of all, you need to know that there are five statuses that your payout can be in:
- Open: as a rule, all payouts will be created in this status.
- Pending: this stage will be given when the Payout Date set up on the promotion rule, challenge reward or mission reward equals today. While in it, the payout will wait for the Program administrator or managers approval - if an approval process was set in Salesforce.
- Approved: when the admin approves the payout.
- Rejected: when the payout is rejected by the administrator.
- Paid: this status will be accomplished after the payment is done and the administrator or your payment provider changes its status.
Payout status is automatically updated once a day. However, you can perform this update immediately by running a Batch.
Approval Process for Payouts
The approval process is an optional way of having a workflow in place for your ORG users. It's a particularly good setup if your company requires acceptance from more than one manager or director for a payout to be paid.
The process is created through Salesforce and with it active, it will be created a queue where only after the first person gives their approval, will it move on to the next one, until it goes through everyone and the payout is finally approved.
In Tread Manufacturing the regional manager is the first person who has to give their "ok", and then it goes through to the sales director, in order to get his acceptance too. Only after the payout has gone through them both, its status changes to Approved.
Note that when only one person is responsible for approving the payout, they will be the administrator and be able to directly approve any Pending payout. There will be no need to have an approval process.
How Payouts Work
Payouts are not automatically given to the member when they earn the award. The record will be created with an Open status and will go to Pending only at the set Payout Date in the incentive that generated it.
After it is created, though, you can manually submit the payout for approval from the payout record page or from the Outcomes tab (where you can also do it in bulk) in order to change it from an open status to pending, at any time. This will also change its status to Pending.
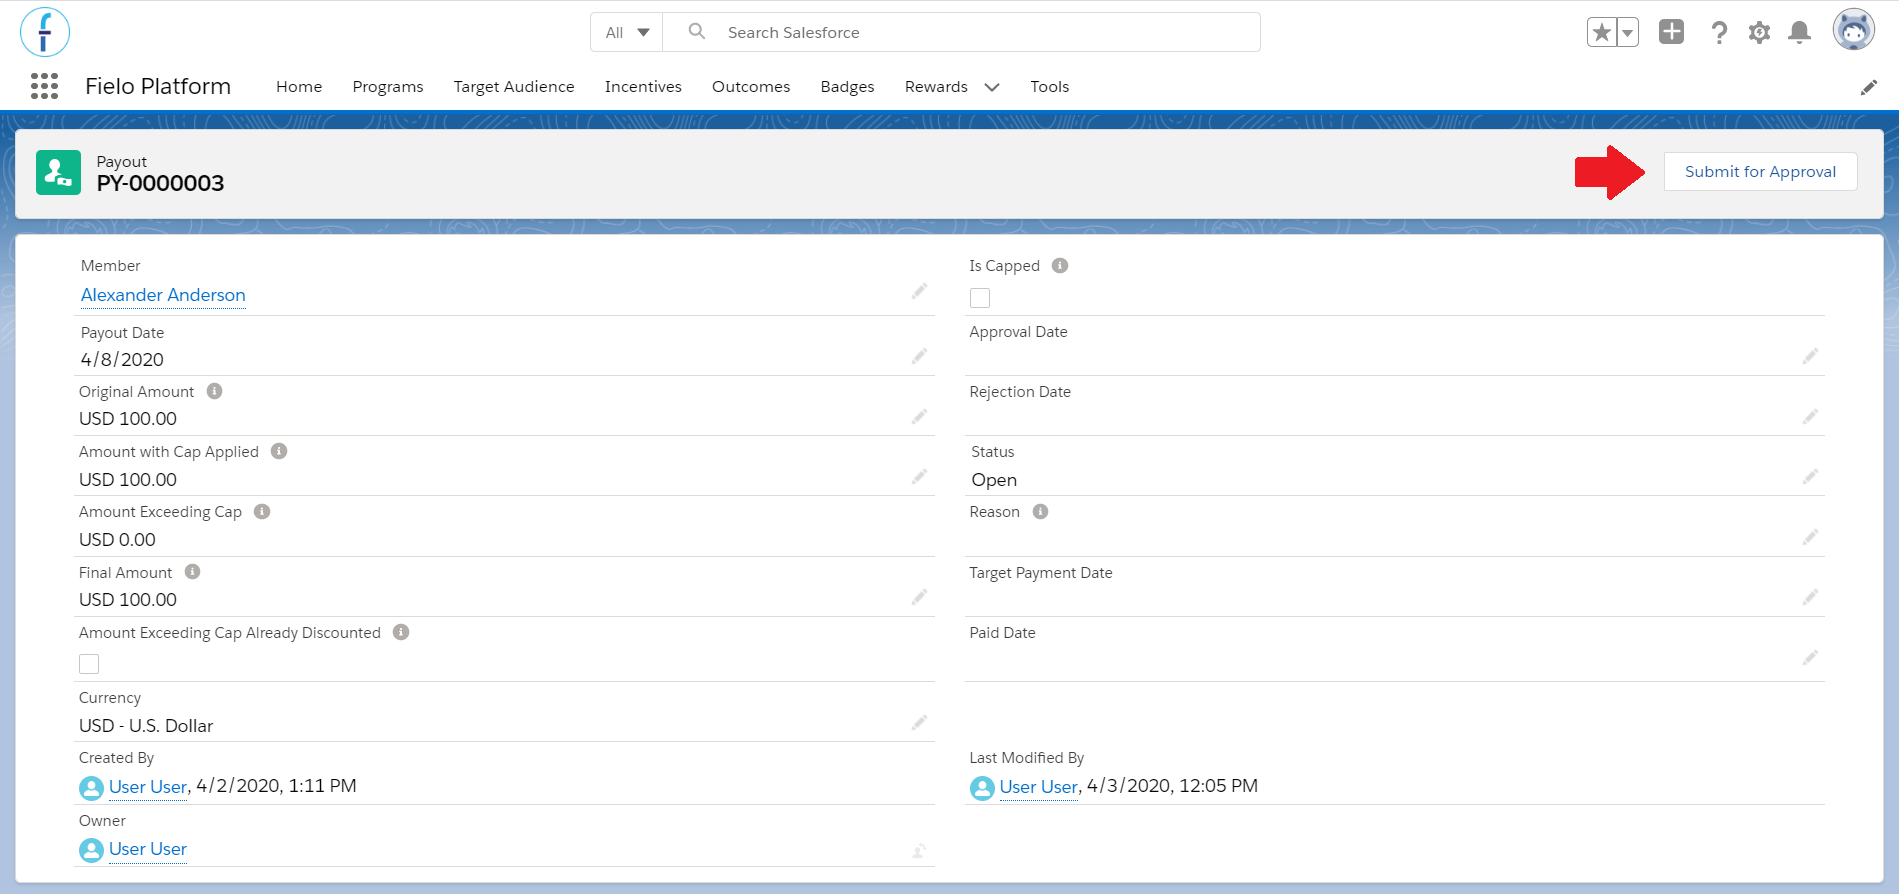
Submit for approval button
CappingTo make it easier to keep track of everything occurring with your payout, if a cap was applied to the Payout, you can find information about it (such as original amount and amount with cap applied) in each Payout page.
Beware that the Approved, Rejected and Paid status can only be applied manually by the administrator or through the approval process.
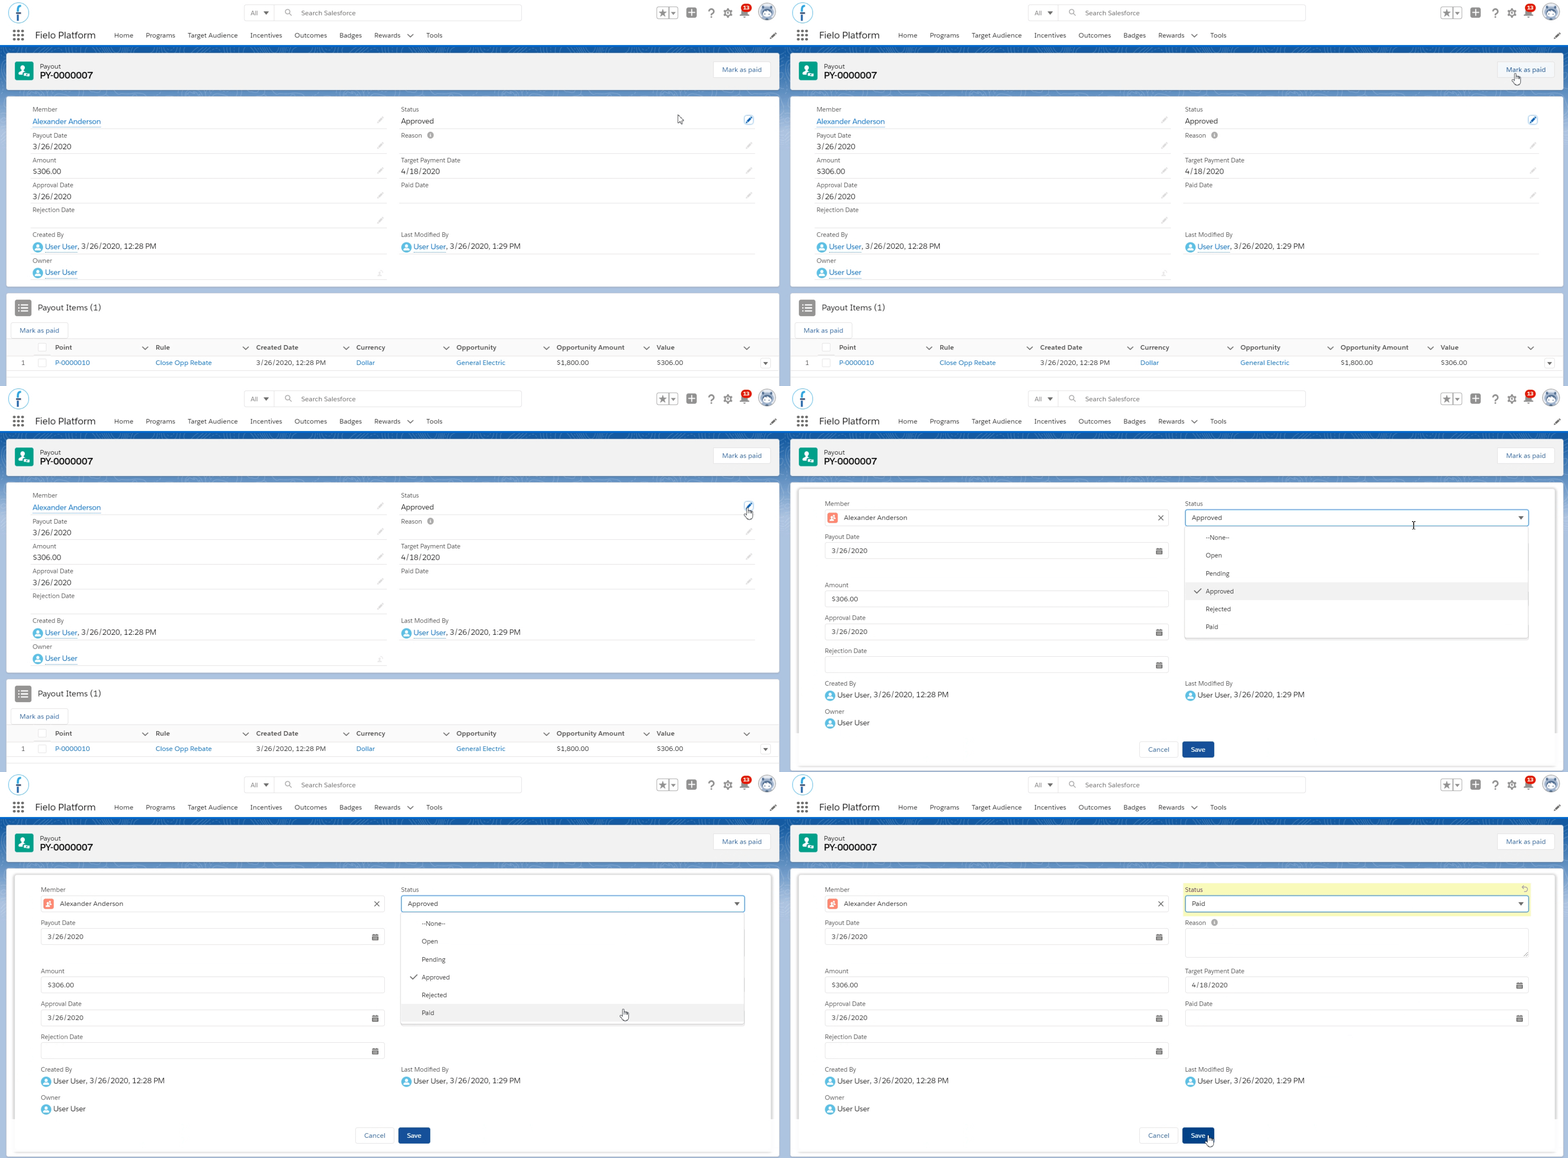
How a Program administrator would change the payout status. Usually, it is done through the approval process.
Reopen a Payout
In case some kind of mishap occurs and you need to reopen a payout that was marked as Rejected, you can do it through the Outcomes tab, by selecting the record and clicking on Reopen. It will go back to Pending status and the approval process, if available, will begin again.
Member balanceWhenever a payout is marked as paid or rejected, that amount will be deducted from the member's balance. If reopened, it will be increased again. Remember to always keep its status updated.
The member balance is available to you on their page within the ORG and they will also be able to see it when accessing the experience cloud site, if you have one.
Payout Details
You can check all payouts' information, status and payment details, through the Outcomes tab or through each member's page, in their Payouts related list. The latter is where you can see the adjustments made and which incentivized Action generated it, linked to each payout record.
In the Outcomes tab, you can easily filter all of your payouts by Payout Date range, amount range, member and member email:
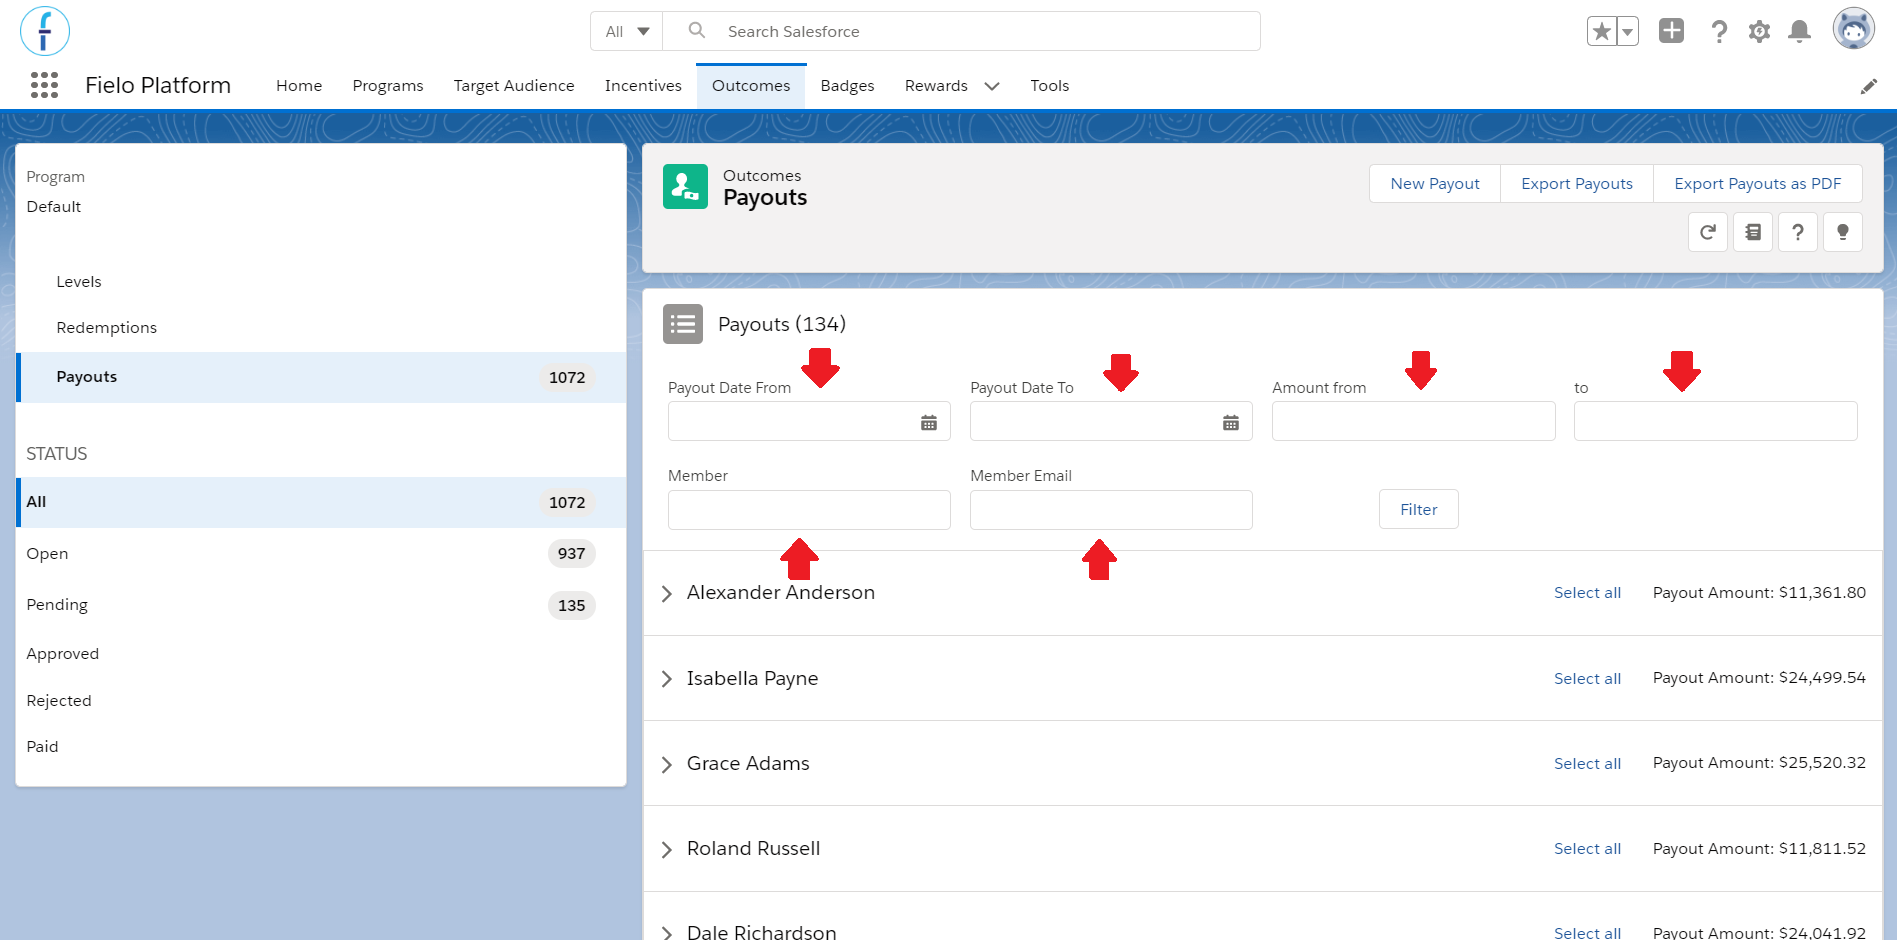
Payouts tab in Outcomes
Here it is also displayed the payout details, as mentioned above. As you can see, they are grouped together by member and you can expand the details by clicking on the arrow to the left of their name.
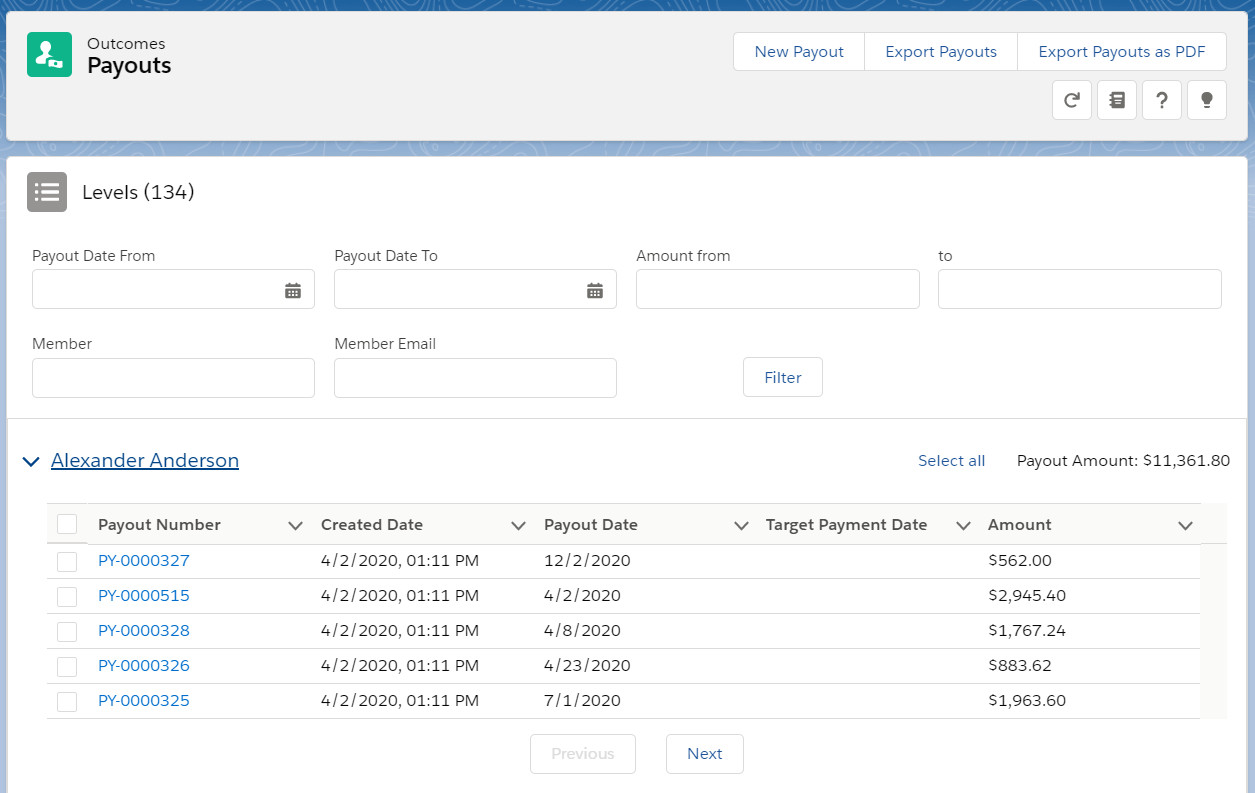
Payout details
- Payout Number: this is an automatically generated reference name that identifies each Payout uniquely.
- Created Date: this shows the day and time the payout was created.
- Payout Date: here it is displayed the date set as the payout date for that incentive.
- Target Payment Date: this is the date the payment is planned to be done, as informed by the program administrator. Note that when the payout is marked as Paid, there will be another field with the actual payment date.
- Amount: this shows the amount to be paid for that payout.
Check out the guide below to learn more about setting up a payout for your incentives.
Create a New Currency and Program Currency
The first step is to make sure that you have already created a new currency in your Org. For the payout to be activated in this currency, you'll need to check the Generate Payout field.
Decimal numbersWhen you set the Generate Payout field, the system will understand that whatever value you include later on must have 2 decimal numbers. This can't be altered.
Let's say that you change your mind and don't want this currency to generate payout, though. In fact, as long as it is still set as a draft, you can uncheck the Generate Payout option and it will be a standard currency that the members can gather.
Remember that new currencies are created as a draft at first. It is necessary to set it to active in order for it to be enabled to be used as a reward.
The second step is to create a new program currency. Go to your Programs page and on the Program Currencies related list, click New. Click here for more details on how to do that.
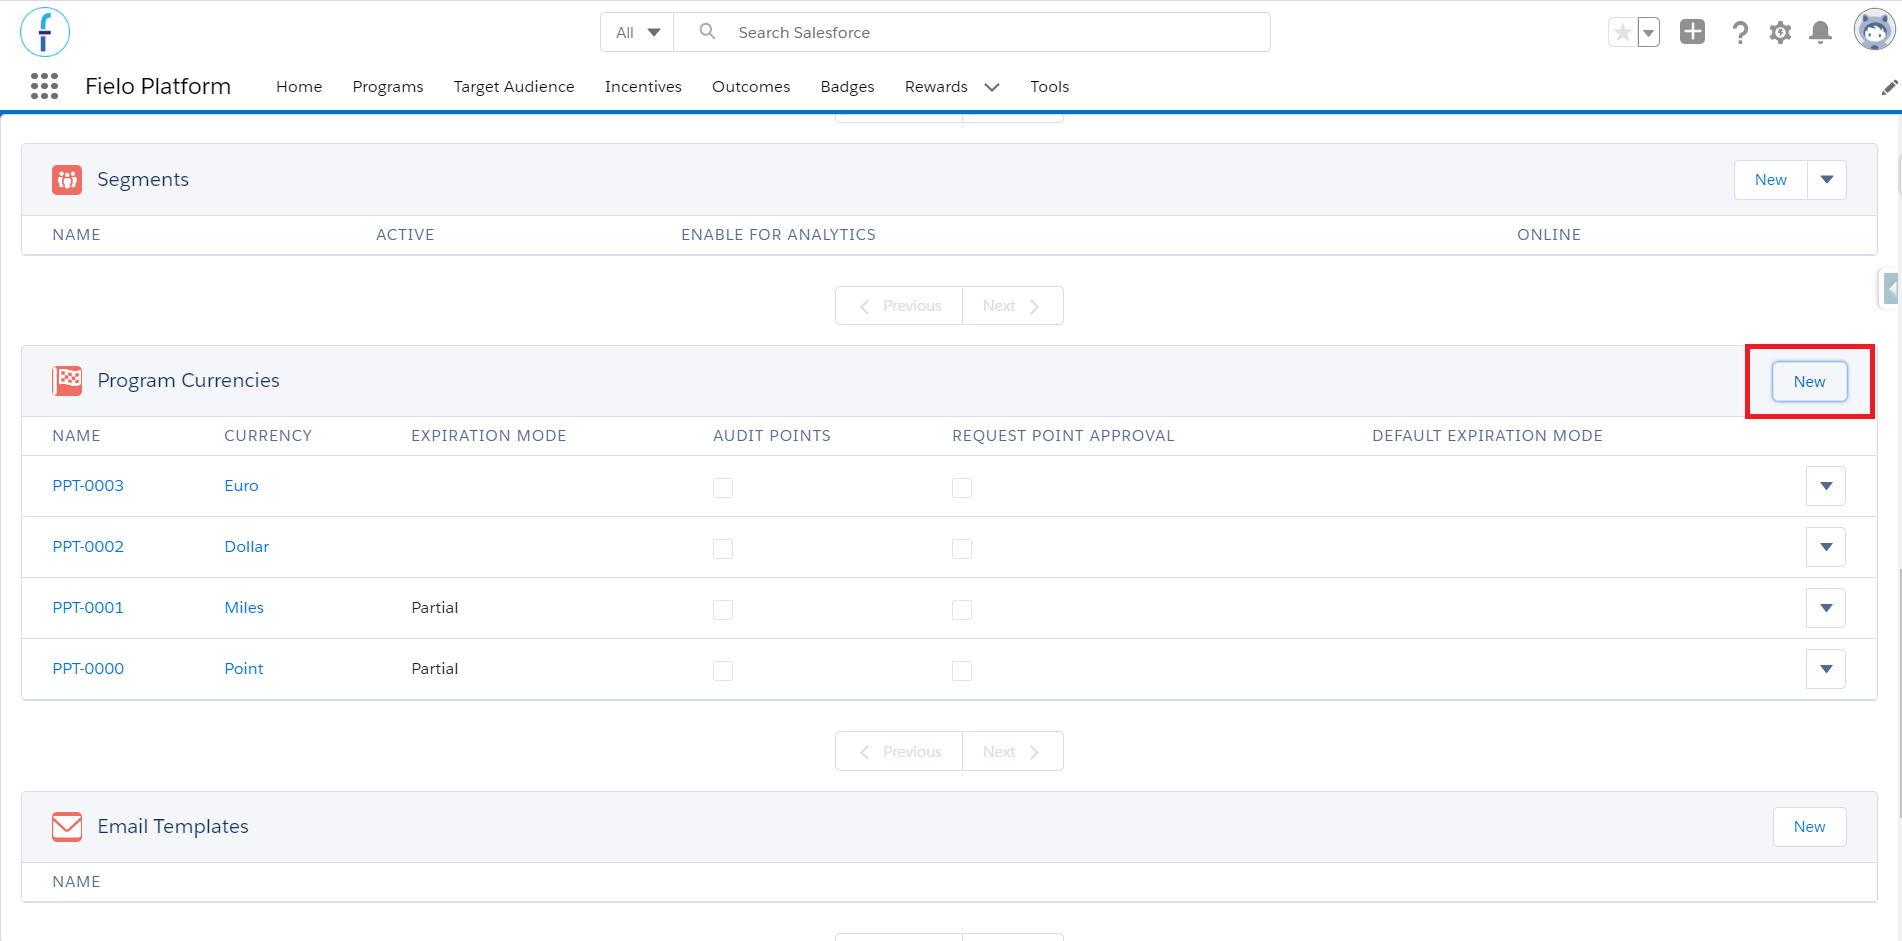
Set a new program currency
Setting the Payout Currency as a Reward
With the new currency created, the next step will be to associate it to a incentive, being that a promotion rule, a challenge reward or a mission rewarding, so that it can be used as a reward to your program members.
Tread Manufacturing wants to add the currency Dollars as a reward for a mission they created a while ago that has as objective sum $100,000 worth of closed-won opportunities. For that, they go to the mission's page and, within the Rewarding related list, click on New. They select the Percentage Conversion Mode for the Money field, inform the value as 5% and choose the Payout Date Mode as a challenge finished.
With that they will be awarding their members, the ones who closed the opportunities, with 5% of the Money from the opportunities. And their payouts will be submitted for approval at the same date set for the challenge to end.
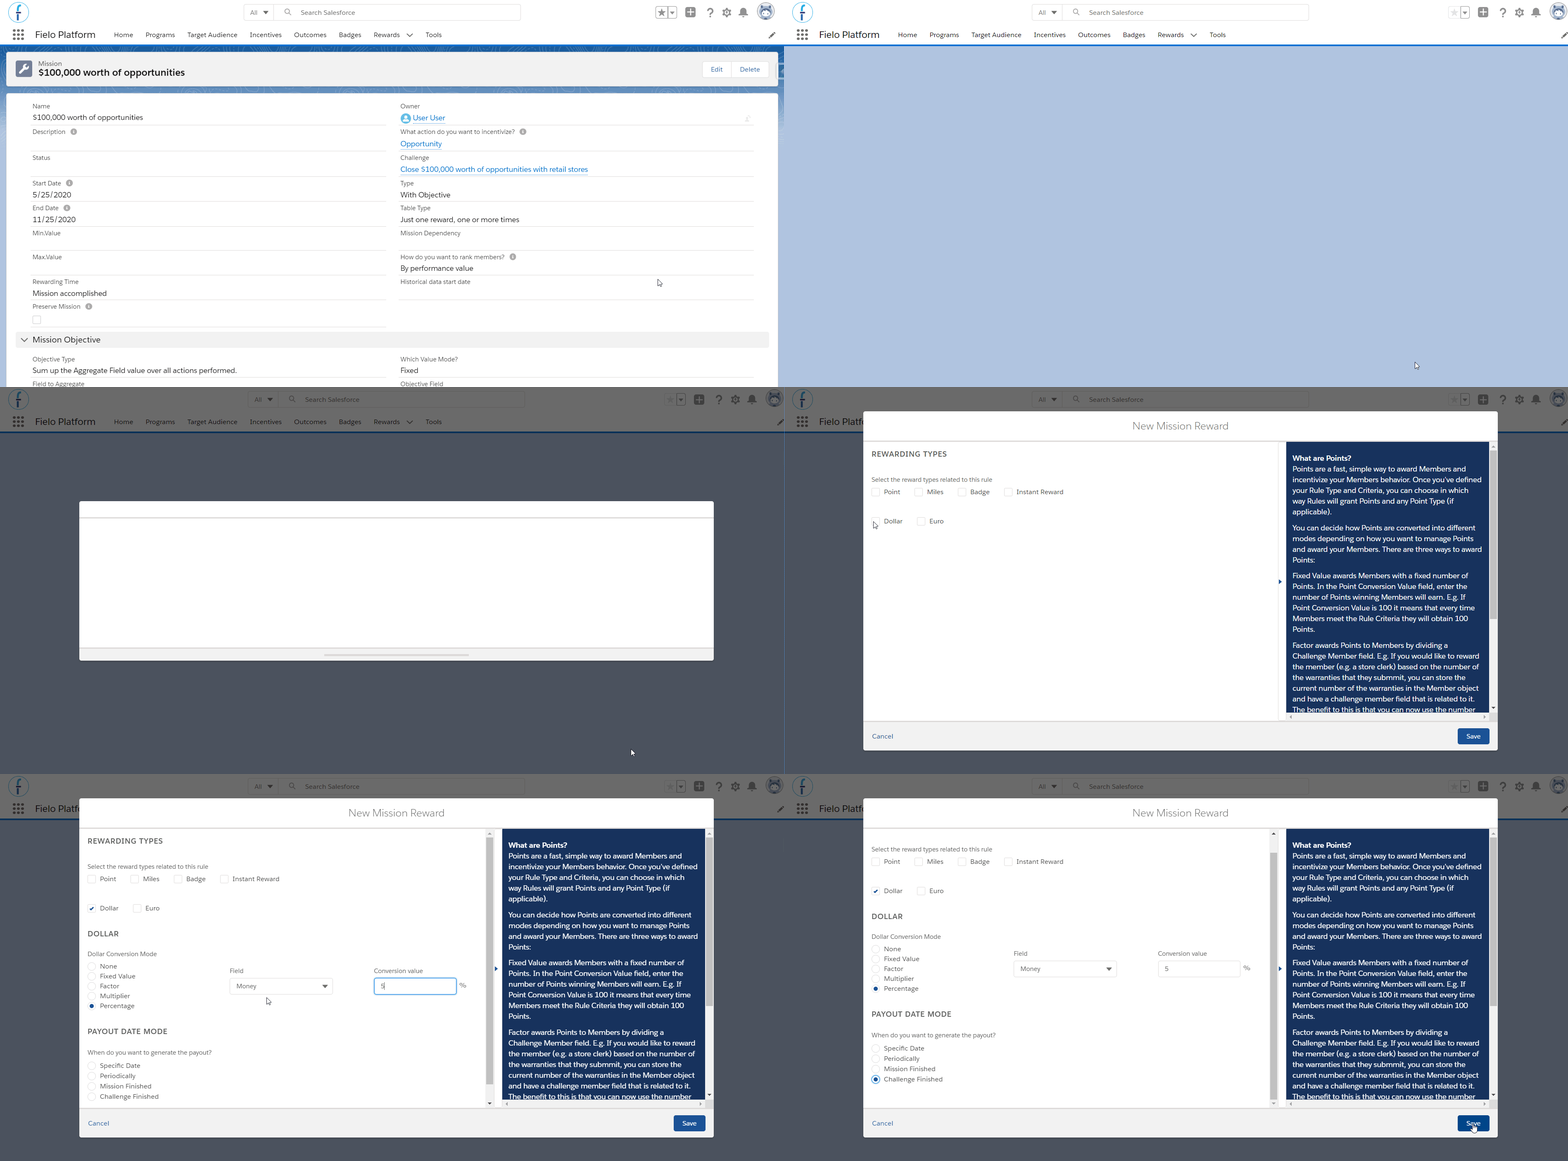
Choosing the reward type in a mission.
You can also give a payout to members considering their performance position or metric, if your mission has a compare among members performance measure. This is used when, for example, your mission rewarding is set to give $ 200.00 to members who are ranked in the first to fifth position.
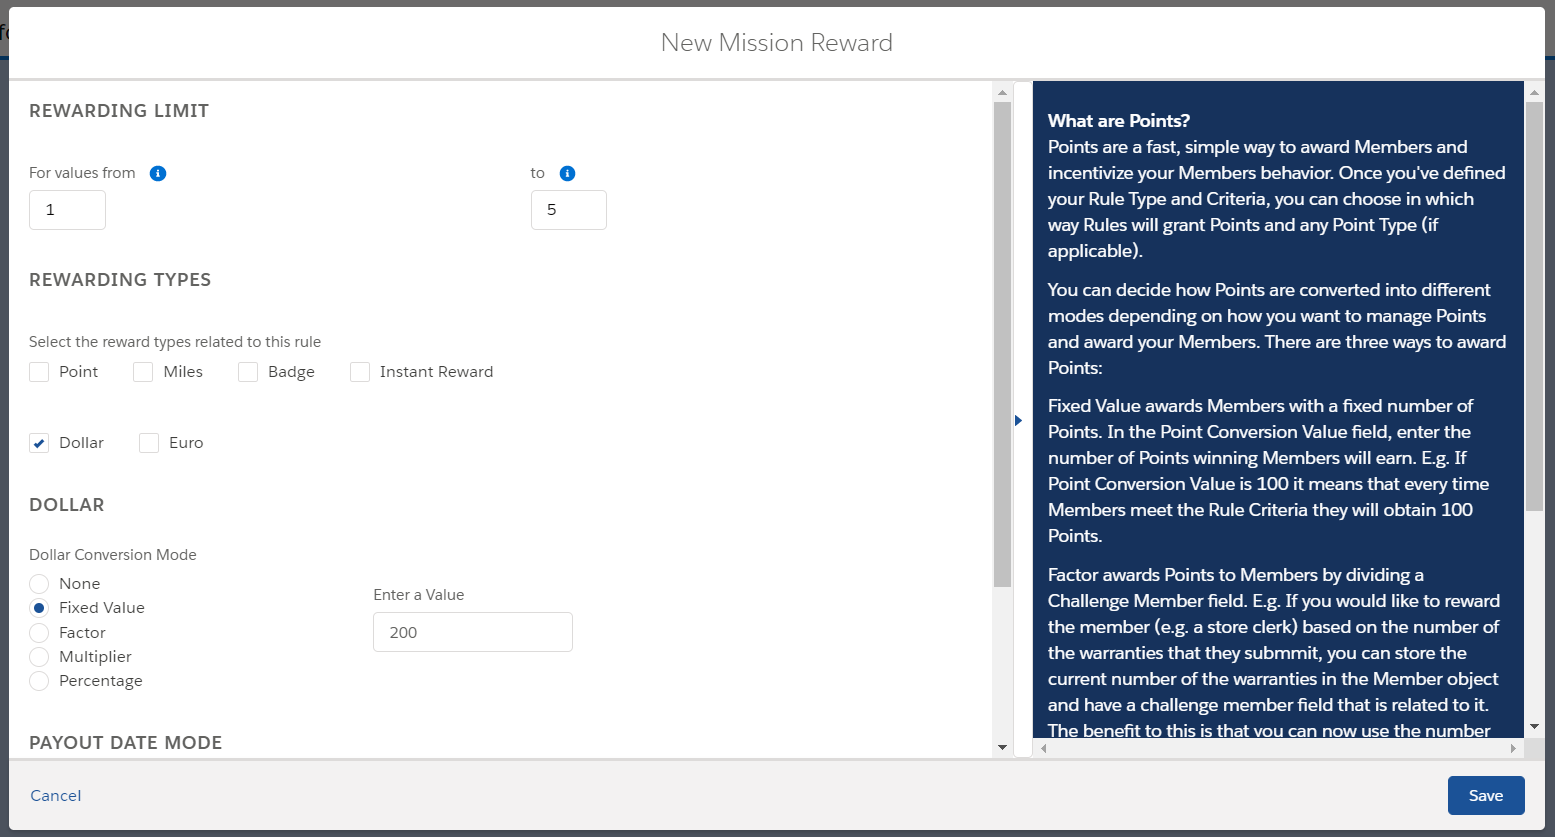
Choosing the reward type within a 'compare among members' challenge.
It is also possible to deliver payouts to members based on their level, so that they receive a greater or lesser amount depending on which level they are in. This can be configured as a reward for any type of mission, but not as a challenge reward or in a promotion rule.
The Required Fields
When you define the rewards' type, you will need to specify a Conversion Mode for your currency with payout. It can be:
- Fixed Value: awards a fixed amount. In the related field, enter the exact amount you want the members to earn.
- Factor: awards an amount calculated by dividing any numerical field of a challenge, mission or promotion member by the fixed number you enter in the Conversion Value field.
- Multiplier: awards the amount by multiplying any numerical field of a challenge, mission or promotion member by the fixed number you enter in the Conversion Value field.
- Percentage: this is specific for when the chosen currency generates payout. It awards the amount by calculating the percentage of any numerical field of a challenge, mission or promotion member, according to the value you enter in the Conversion Value Field. You can add up to 2 decimal numbers to the percentage (e.g. 2.45%).
In case your challenge mission uses Historical Data as aggregation, you can use the Goal and Growth fields within Percentage. The former is the goal value calculated by the system based on the period for comparison you chose, and the latter is the subtraction of the actual value from the goal, which gives you the opportunity to award the member with a percentage of the amount that is over the goal that they were meant to reach.
For example, let's say that Tread wants to give to their member a payout that equals 20% of the mission goal. They select Percentage as Conversion Mode, Goal in Field and insert 20 in Conversion Value. If they want to incentivize this member to beat the goal, though, they would use Growth in Field. This way, if the member sells $1,000 and the goal was $800, the payout amount will be $40 (20% of $200).
Next, you will inform a Payout Date Mode - this can be changed later, if needed. This date you choose is when your payout status is going to be changed from Open to Pending.
Differently from other currency types, you won't enter an expiration date. Currencies that generate payout doesn't have an expiration date.
There are some different options for the Payout Date, as you can see below:
- Immediately, is a specific option for promotion rules, it enables the payout to be generated straight as Pending.
- Specific Date, set a particular date for the system to process the payout.
- Recurrent date, that can be:
- Weekly, in which the system will process the payout at the same day every week. You'll need to inform the day (sunday to saturday).
- Monthly, in which the system will process the payout at the same day every month. You'll need to inform the day you wish to use (1 to 31). If the month doesn't have 31 days, the payout will be processed at the month's last day.
- Quarterly, in which the system will process the payout at the same day every quarter. You'll need to inform the starting month (January to December) and day (1 to 31). If the month doesn't have 31 days, the payout will be processed at the month's last day.
- Annual, in which the system will process the payout every year at the same month and day. You'll need to inform the day (1 to 31) and month (January to December).
- The last option is to set the Payout Date Mode as the challenge's or mission's End Date, defined when the incentive was created, so that the payout goes to Pending only when it ends.
As soon as the payout is given, the system will sum it to the member's balance. Even if its status is still Open.
Grouping payouts
As a way of organizing your payout records better and to help you spare some time in any analyses you might do, the system will group payout records whenever possible. This means that you will have a Payout with one or more records (i.e. Items) related to a member, displaying the summarized amount of that Payout.
The grouping will happen only when the Payouts:
- have the same Payout Date;
- are going to be awarded to the same member;
- were created for the same currency; and
- are Open.
Let's see a Payout page from one of Tread Manufacturing salespeople. In this case, each item represents an opportunity that he has marked as closed-won, which apply to be summarized in the updated $100,000 worth of opportunities mission.
Note that in only one payout record, we can see the total Final Amount and also overview its items.
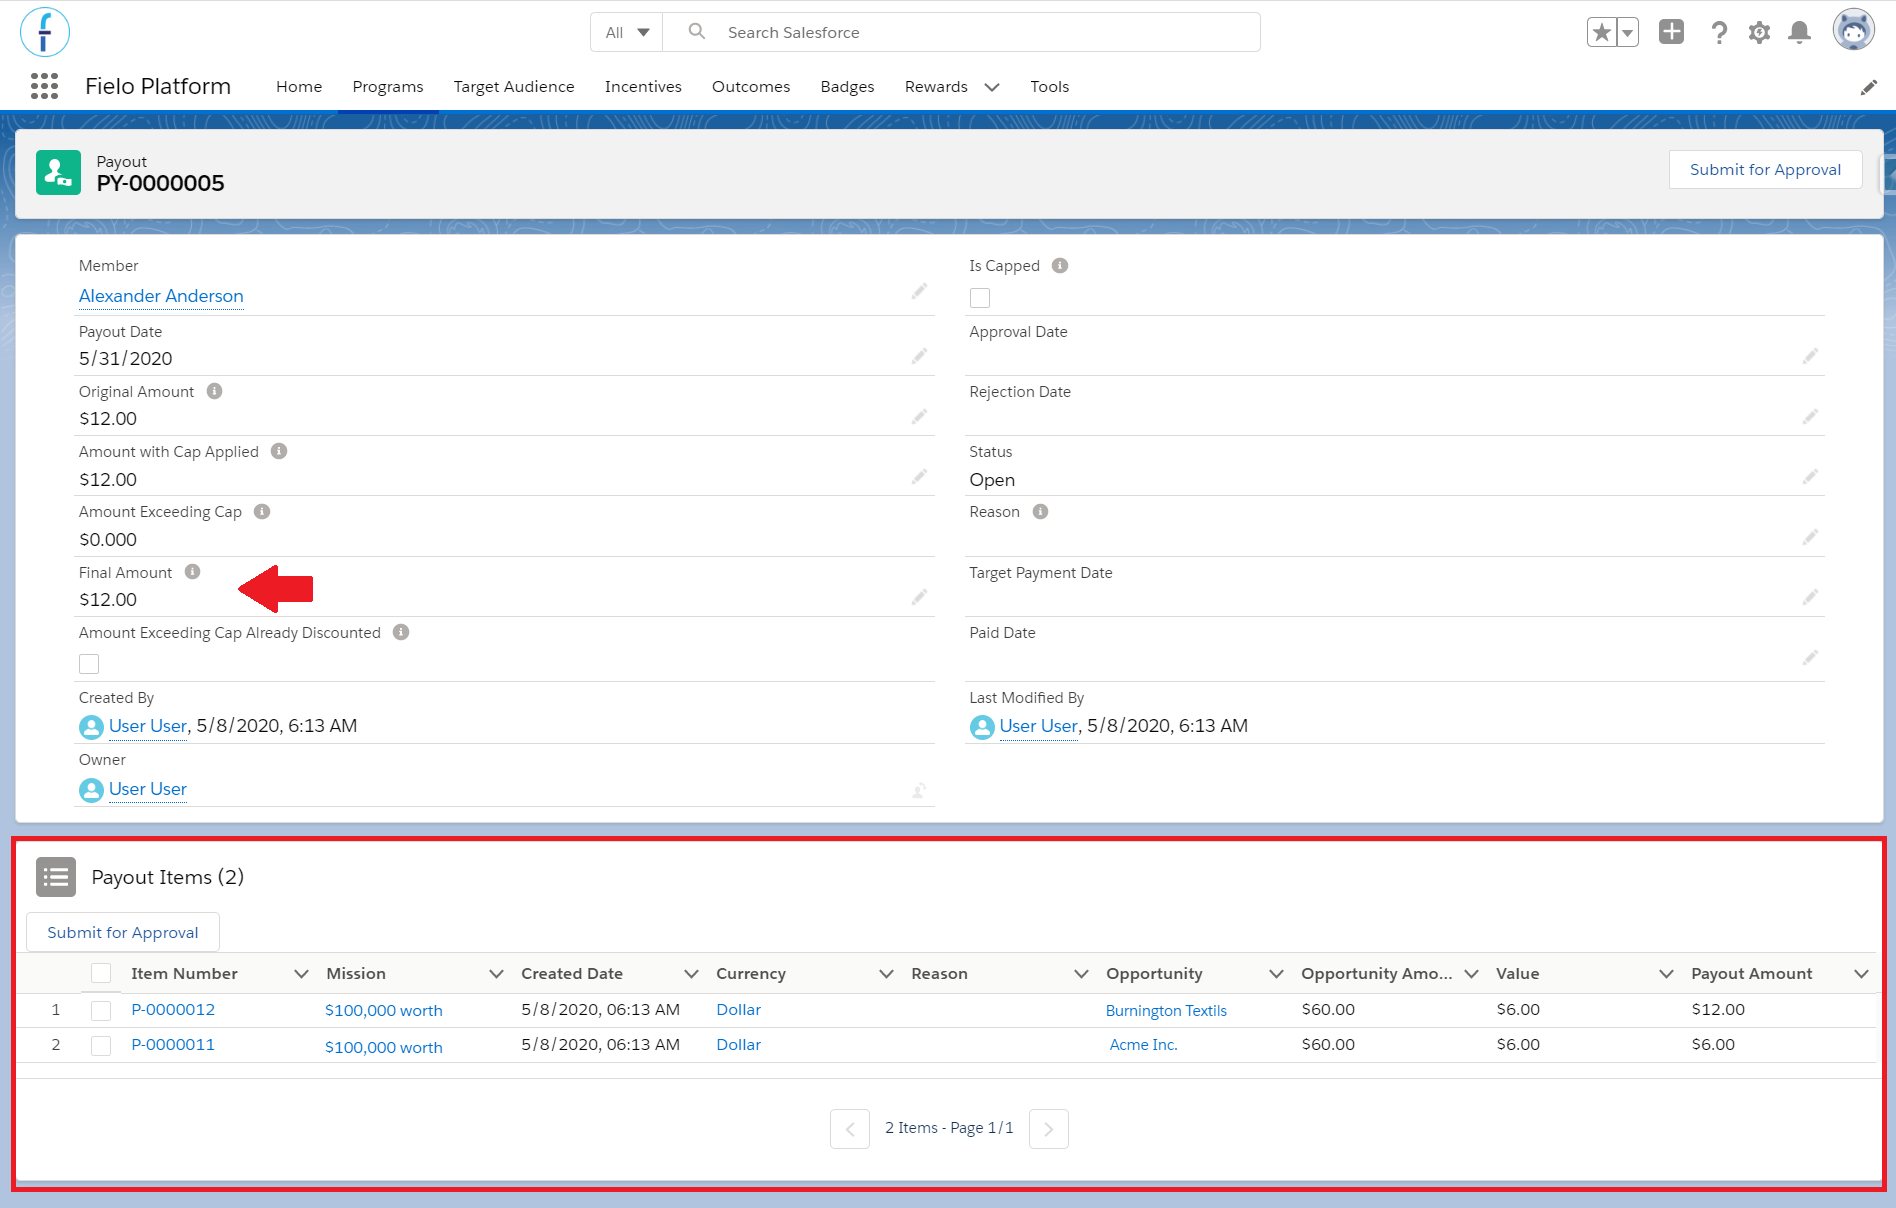
Payout Items
The Payout Items related list gives you a quick overview of the most important information you need to know, such as:
- Item Number: this is an automatically generated reference name that identifies each item uniquely.
- Rule/Mission: this is the rule or mission that generated that item.
- Created Date: this shows the day and time the item was created.
- Currency: it displays the currency used in that payout.
- Reason: this field is populated when the payout was created manually or edited, with the reason as to why you did it.
- Opportunity: here you can see which incentivized action is related to that currency, that is, the one that generated it.
- Opportunity Amount: the total amount of the opportunity.
- Value: this is the value of the currency, the amount that will be given to the member.
- Payout Amount: it shows the summary of amounts from the payouts created until the day you're seeing it.
Check out the following examples to better understand further details of this feature:
Payout Date ImmediatelyIn case you have a promotion that has the Payout Date set up as Immediately, it will not be grouped, since the payout status goes straight to Pending.
However, if there is already a group of payouts and the admin changes the Payout Date from one of its items through the rule or reward, this specific item amount will be split from the group and transferred to the new date.
Even if the challenge or mission is already in progress, you can change the Payout Date from the reward.
Let's see another situation:
Audit Currencies
The grouping will also happen when a challenge requires more than one action from the member in order to give a payout to them (e.g. they have to close more than one opportunity). In this case, a payout will be generated only when the member accomplishes the whole requirement, with two or more payout items that will display the name of the record, related to the incentivized action (e.g. a closed-won opportunity), that triggered it.
That is also valid for when the challenge has a Teams audience. The payout and payout items within it will be created for each member of the team.
This is, though, an optional feature. You can turn it on and off when creating the challenge or even after, when editing it. If turned off, when the payout is created it will not display different payout items, it will be only one item.
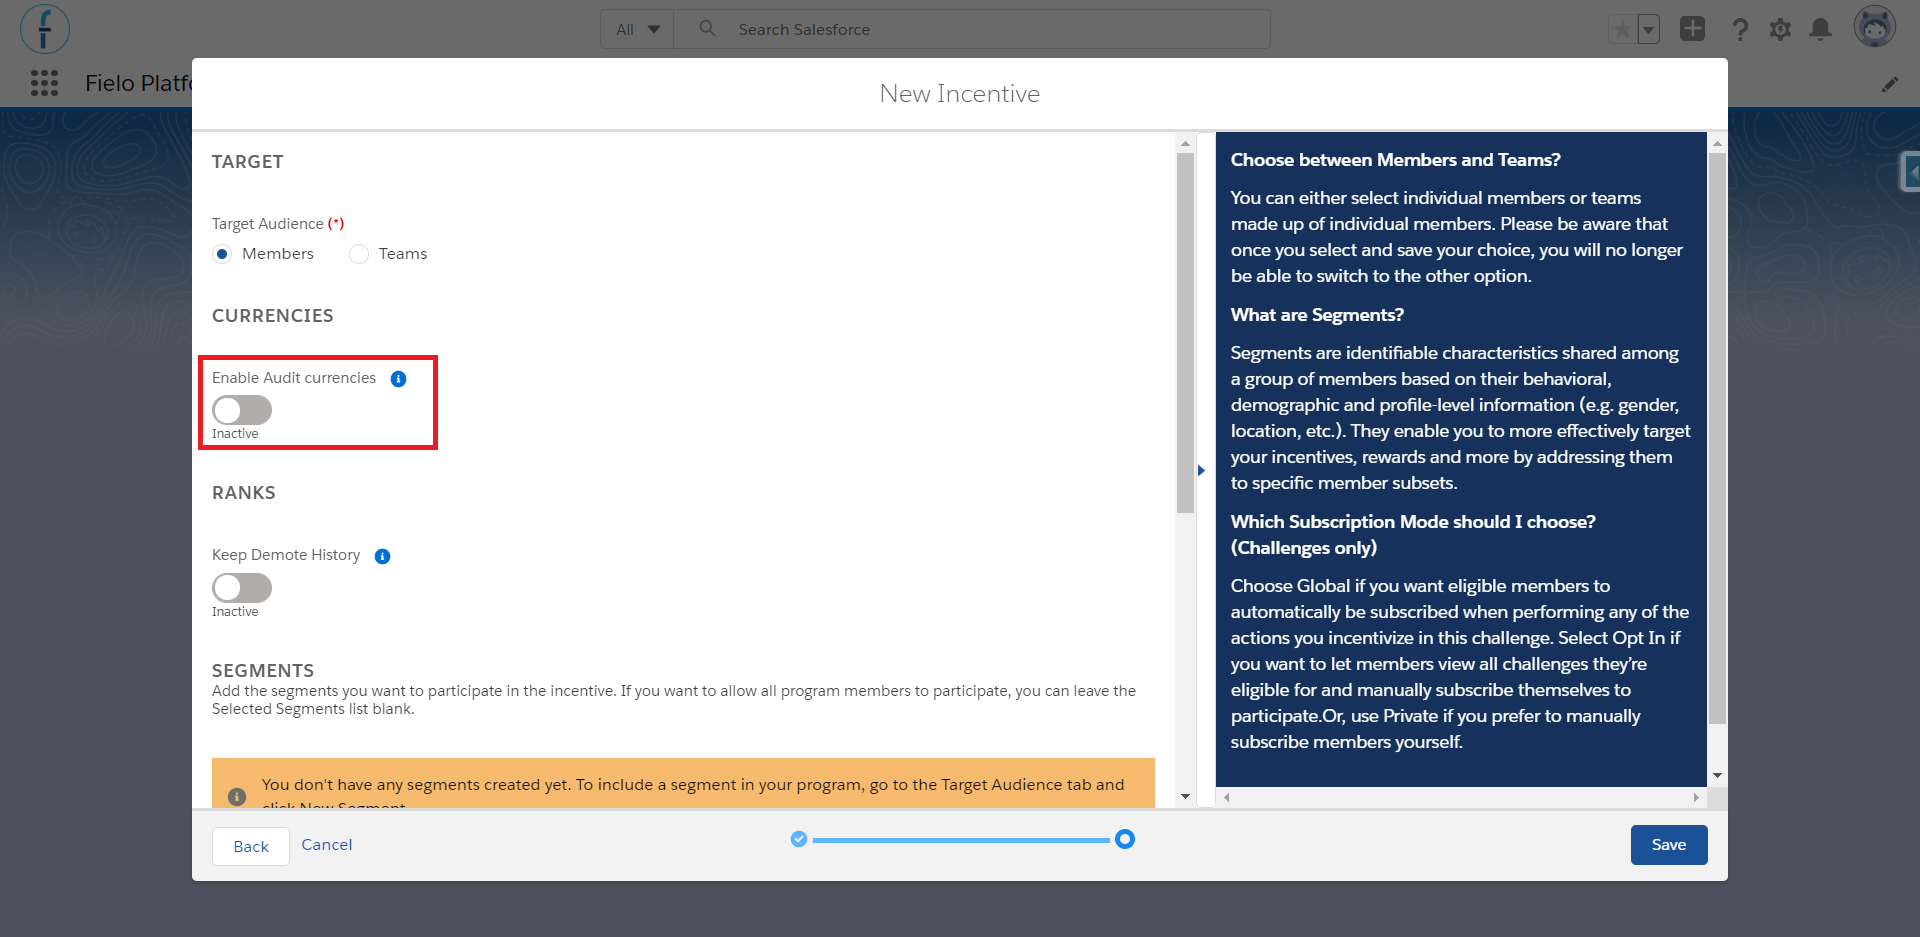
Turn on the Enable Audit Currencies option to keep track of every record that generated a payout.
Create a Payout
You can manually create a payout when a member from your program has accomplished or done something that wasn't incentivized in a promotion or challenge, but you wish to reward them for that even so.
Imagine that one of Tread's salespeople has closed a particularly large opportunity that will increase the company's revenue and improve its image in the market. The sales director believes it is important to reward this kind of behavior, so he decides to give the member a payout that is not related to any incentive created before.
There are three ways of doing that, and the new record is going to be generated in a Pending status and wait for approval.
- Go to theOutcome tab and then to the Payouts section. Click on New Payout.
You'll need to inform the name of the member, or their email address, and a reason as to why you're creating this new payout.
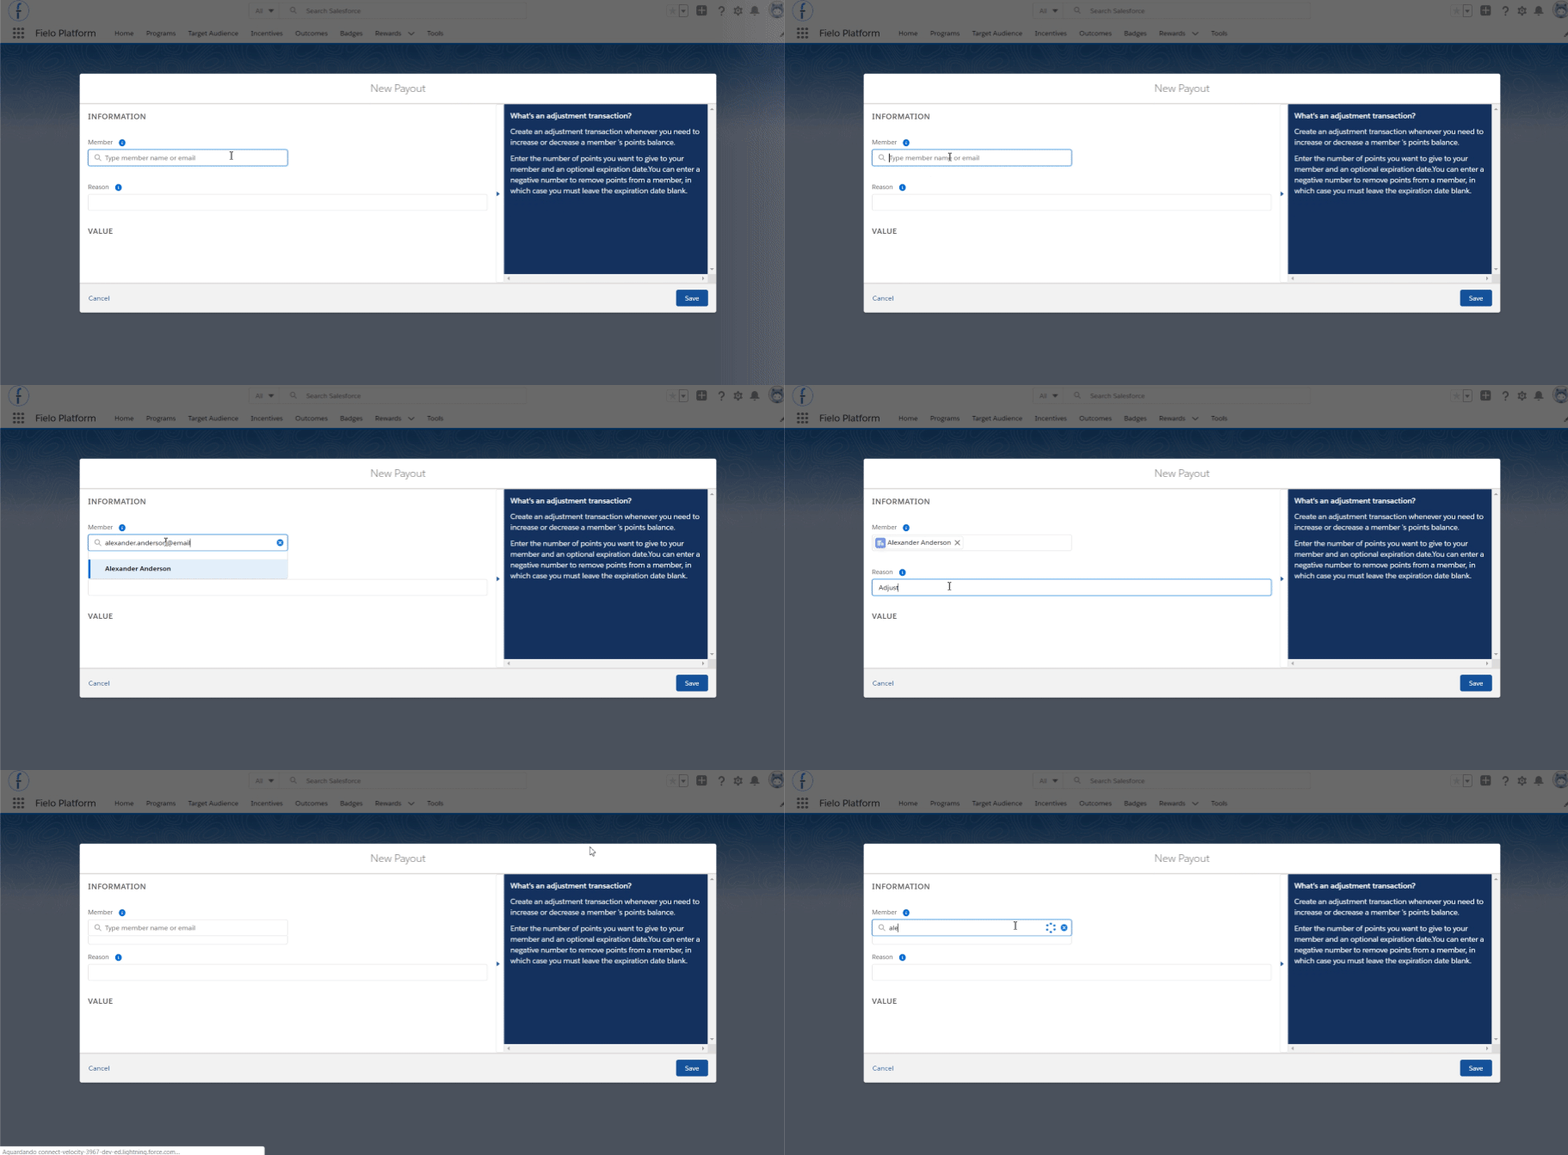
Creating a payout
- Go to the member's page, in the Payouts tab and click onNew.
You'll also need to inform a reason and the currency value.
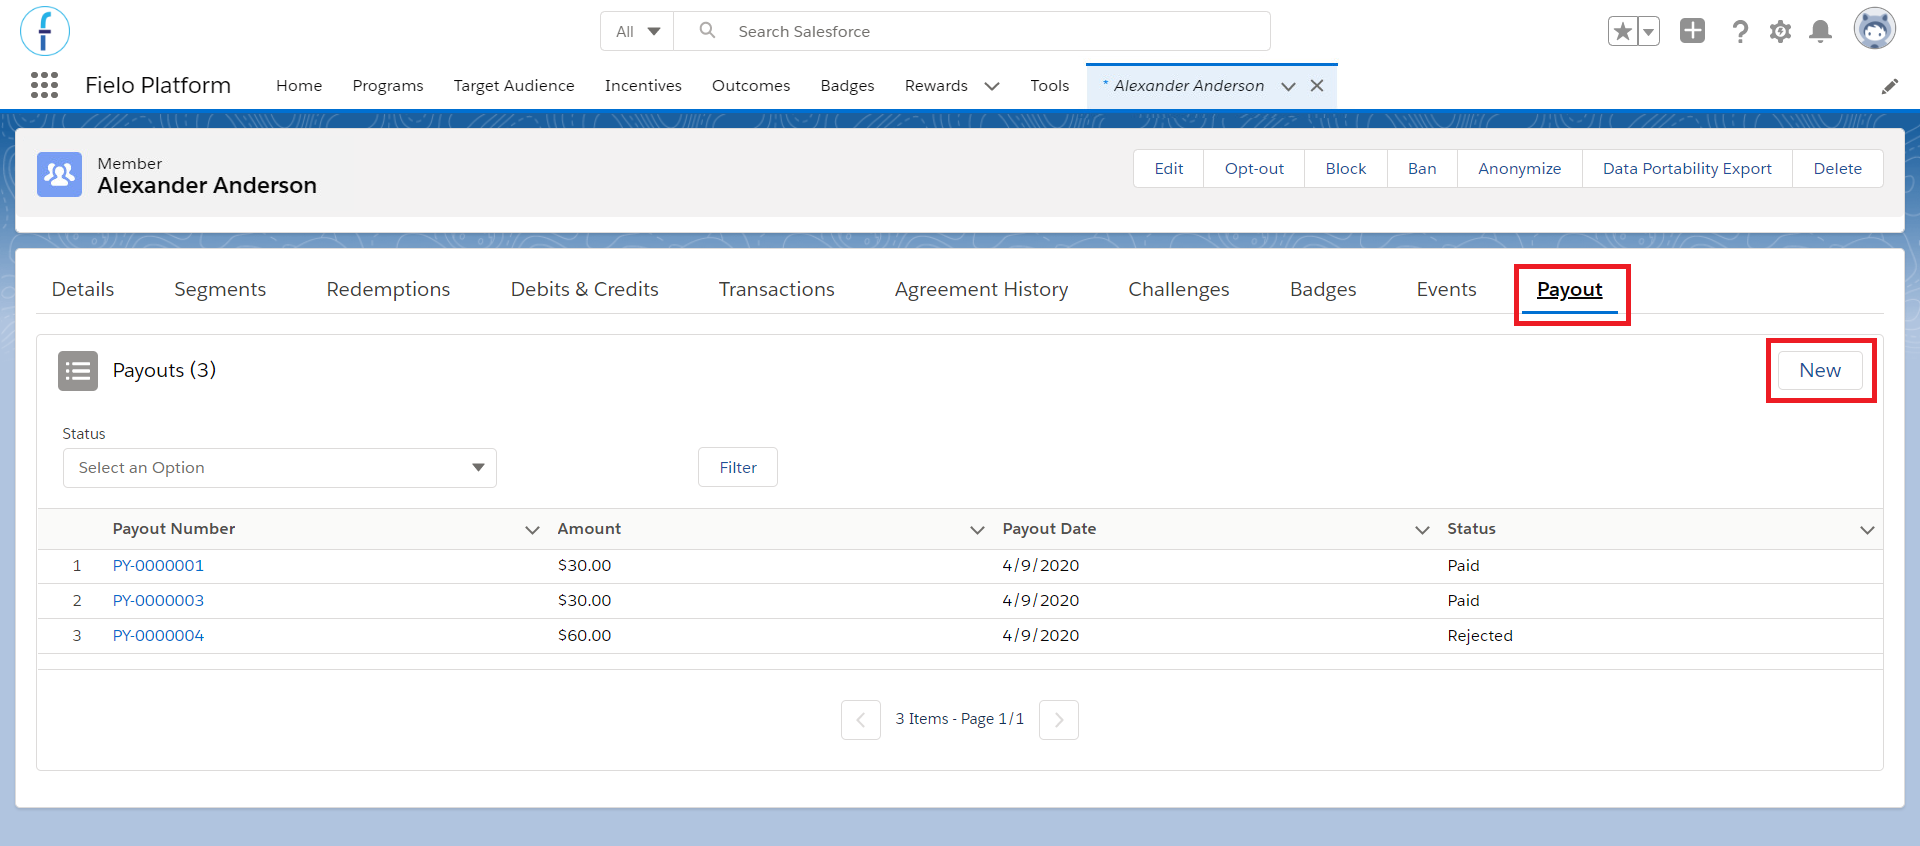
New payout button
- You can do anadjustment directly from the member's page, through the Transactions tab.
As the other options, a text box will appear and you will need to provide a reason as to why the adjustment is being made.
Note that it is not possible to create negative adjustment transactions for currencies that generate payout.
None of these options to create a payout will be related to any action, rule or mission.
Edit a Payout
If you ever need to change the Payout amount of a existing record, it is also possible! As long as it is still Open or Pending.
Go to the Payout record page and click on the pencil right next to Amount. This will allow you to change the value.
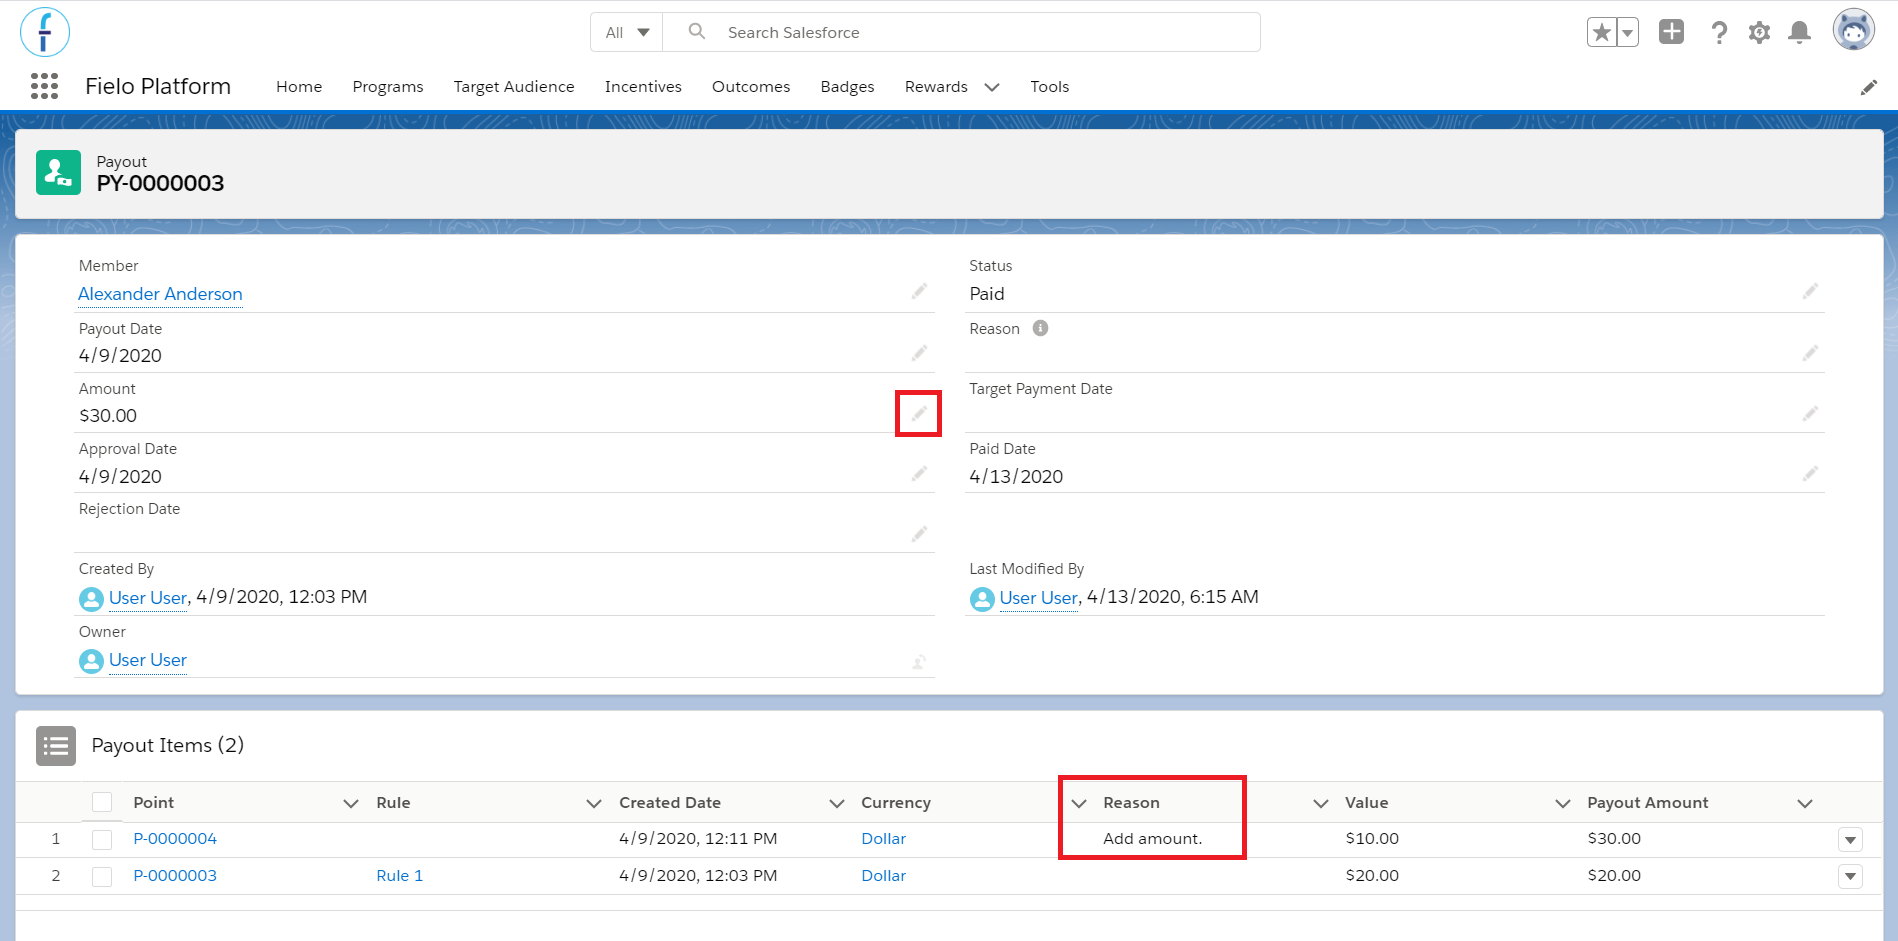
An user with permission can change the payout amount by clicking on the highlighted icon.
After inserting the new value, provide a reason for the change and save. The approval process, if if available, will begin again and the historical data with every change made is saved and can be seen below.
A payout cannot be revertedTo revert a currency that generates payout, the payout must be Rejected and then have its amount edited.
Payment Provider
You can integrate Fielo with an external payment provider through our API. In this case, the provider will receive the payment details, when it's due and do the payment automatically. You won't need to worry about getting all the member information and do the money transfer yourself.
With the integration, the payout status is changed in the platform by the provider. As soon as the transaction is confirmed, the payout goes from Approved to Paid.
Don't have a provider integrated? Don't worry!You can always export your payout items as a PDF, XLS or CSV file. When you have the file,you can import it to your ERP or any other program that processes the payments.
Updated over 1 year ago