
Upgrade from Winter '20 to Spring '20
PLT v2.96.24
If you're using Fielo’s Winter '20 release (versions 2.74 through 2.76), upgrade to Spring '20 (v2.96) to take advantage of all the newest features. Points? Miles? What about cash? Yes, now it is possible to offer payouts, such is in rebate programs, and also to control and limit your expenses with budgeting. Find out more about these and many other new features clicking here. Continue below to upgrade to the latest version.
Versions Prior to 2.69.xIf you're using a version prior to FieloPLT v2.69:
Follow these upgrade instructions to get you to Summer '19 release (v2.69) before proceeding.
Please, make sure you're logged into your Salesforce org and have system administrator permissions before getting started.
How to Upgrade
Before proceeding, follow these steps to upgrade:
- Click here to access the Fielo installation package.
- If any internal users that are not admins will use Fielo, click Install for All Users. Otherwise, click on Install for Admins Only.
- Click Upgrade. When the first part of the upgrade process is finished, you (or the org admin) will be notified by email.
After the install process finishes and if you are in fact upgrading Fielo from a previous release to the Spring '20 release, performing ALL the following manual steps is MANDATORY.
Upgrading within Spring '20
If you are upgrading your ORG from an older Spring '20 version to a newer one, take a look at the following observations before proceeding.
-
If your ORG has a FieloPLT version ranging from 2.92 to 2.92.6: please refer to the section about Points again. This section has been updated.
-
If your ORG has a FieloPLT version ranging from 2.92 to 2.95.10: please take a look at the audit points, mission and community profile sections again. These sections have been updated.
Otherwise, if your ORG has a FieloPLT version ranging from 2.95.11 to 2.96.17 and you have already performed all the following steps, there is no need to perform them again when upgrading to the newest 2.96.18 version.
In case you are upgrading from any version prior to v2.92, please follow all the steps below.
Update Library
By upgrading the FieloPLT library, you guarantee all the changes made in Spring '20 take effect.
The changes performed by this action are the following:
- Event behavior status is set to Active.
- Important fields are added to the Mission Member related list.
- Important fields are added to the Transaction page in the Points related list.
- Both Cap adjustment transaction field and Budget settings section are added to the Program creation form.
- A Cap sub-type field is added to the Program's page on the Cap related list.
On the Tools tab, look for FieloPLT in the Libraries section and hit Upgrade:
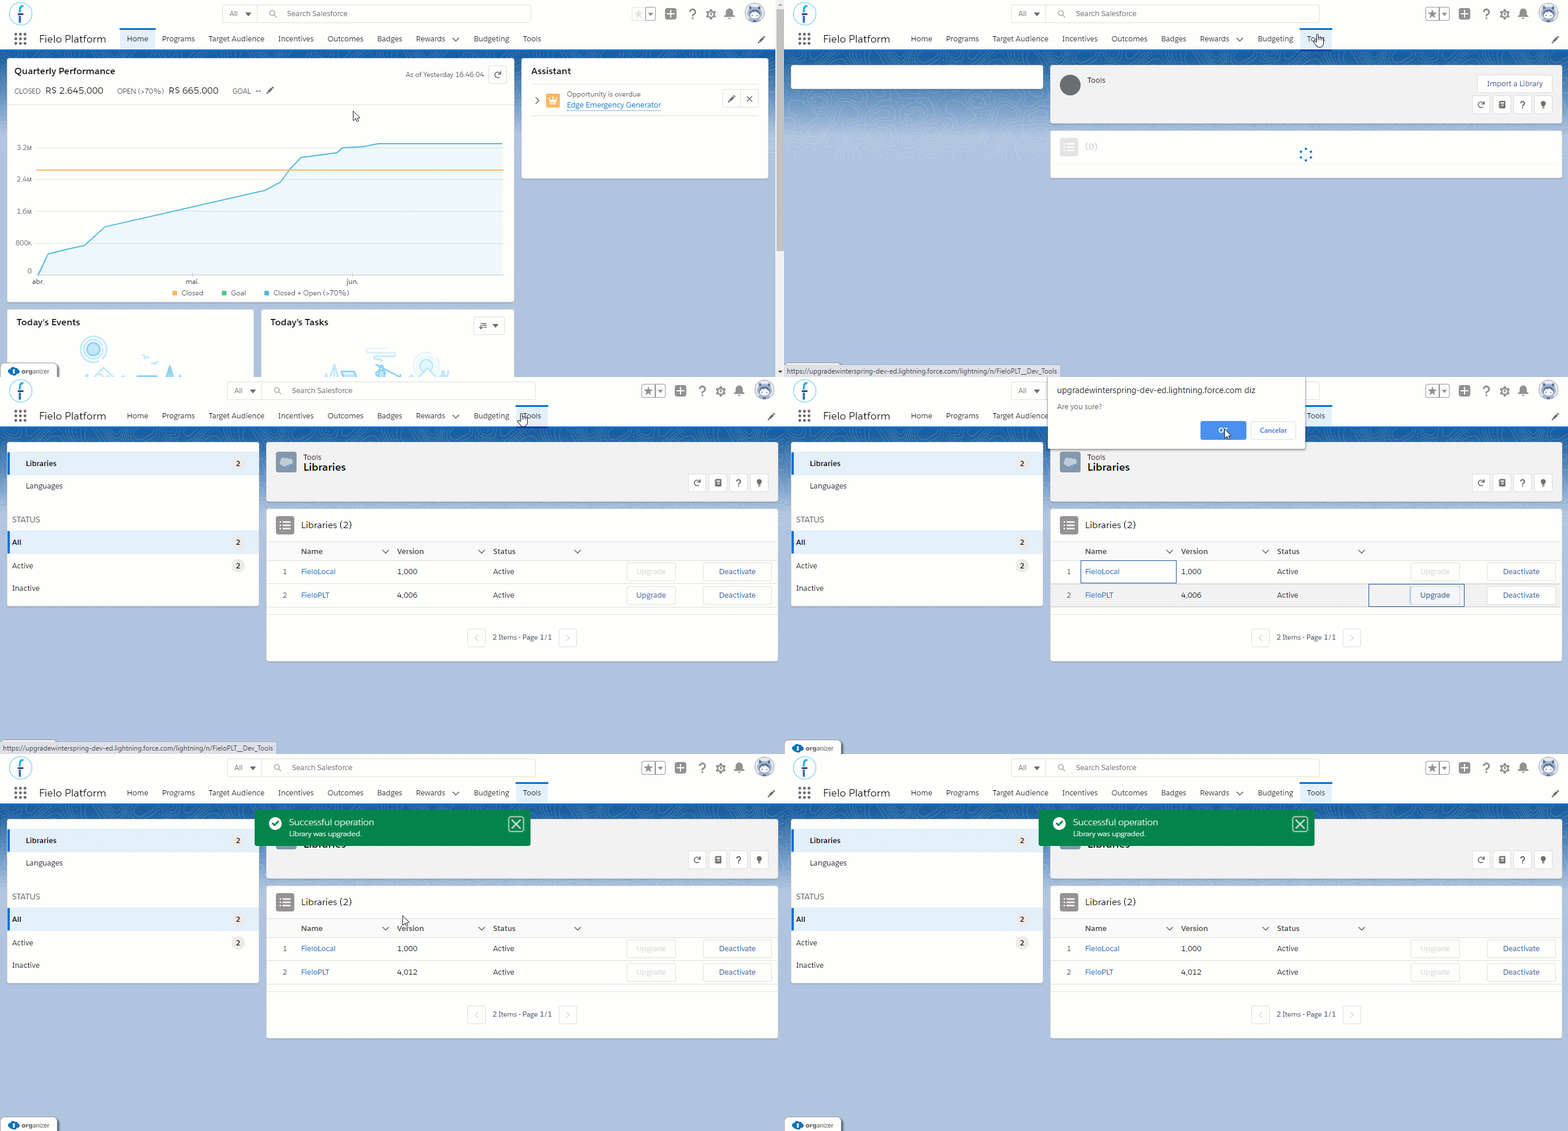
Once Spring '20 is up and running, follow the steps below to ensure you'll be able to make the most of the new features:
Community User Profile
If you are using any of the Fielo components in Experience Cloud, be sure to review the Community User profile(s) that you're using for your members and make sure that they have the necessary object and field permissions and apex classes enabled. AND/OR that the Fielo Community Member Permission Set is assigned to all community users.
This is important, so that logged members won't be blocked from viewing Fielo Lightning Components. You can find more details about that here.
Salesforce Experience CloudPreviously known as Community Cloud, as of Salesforce Spring '21 release, it is now referred to as Experience Cloud and/or Site.
Change Data Capture
By selecting the Member entity on the Change Data Capture configuration page, the fields related to the points on the member's details page will be automatically updated upon an Event creation or alteration.
On Setup, look for Change Data Capture. From the Available Entities list, find Member (FieloPLT__Member__c) and add it to the Selected Entities list.
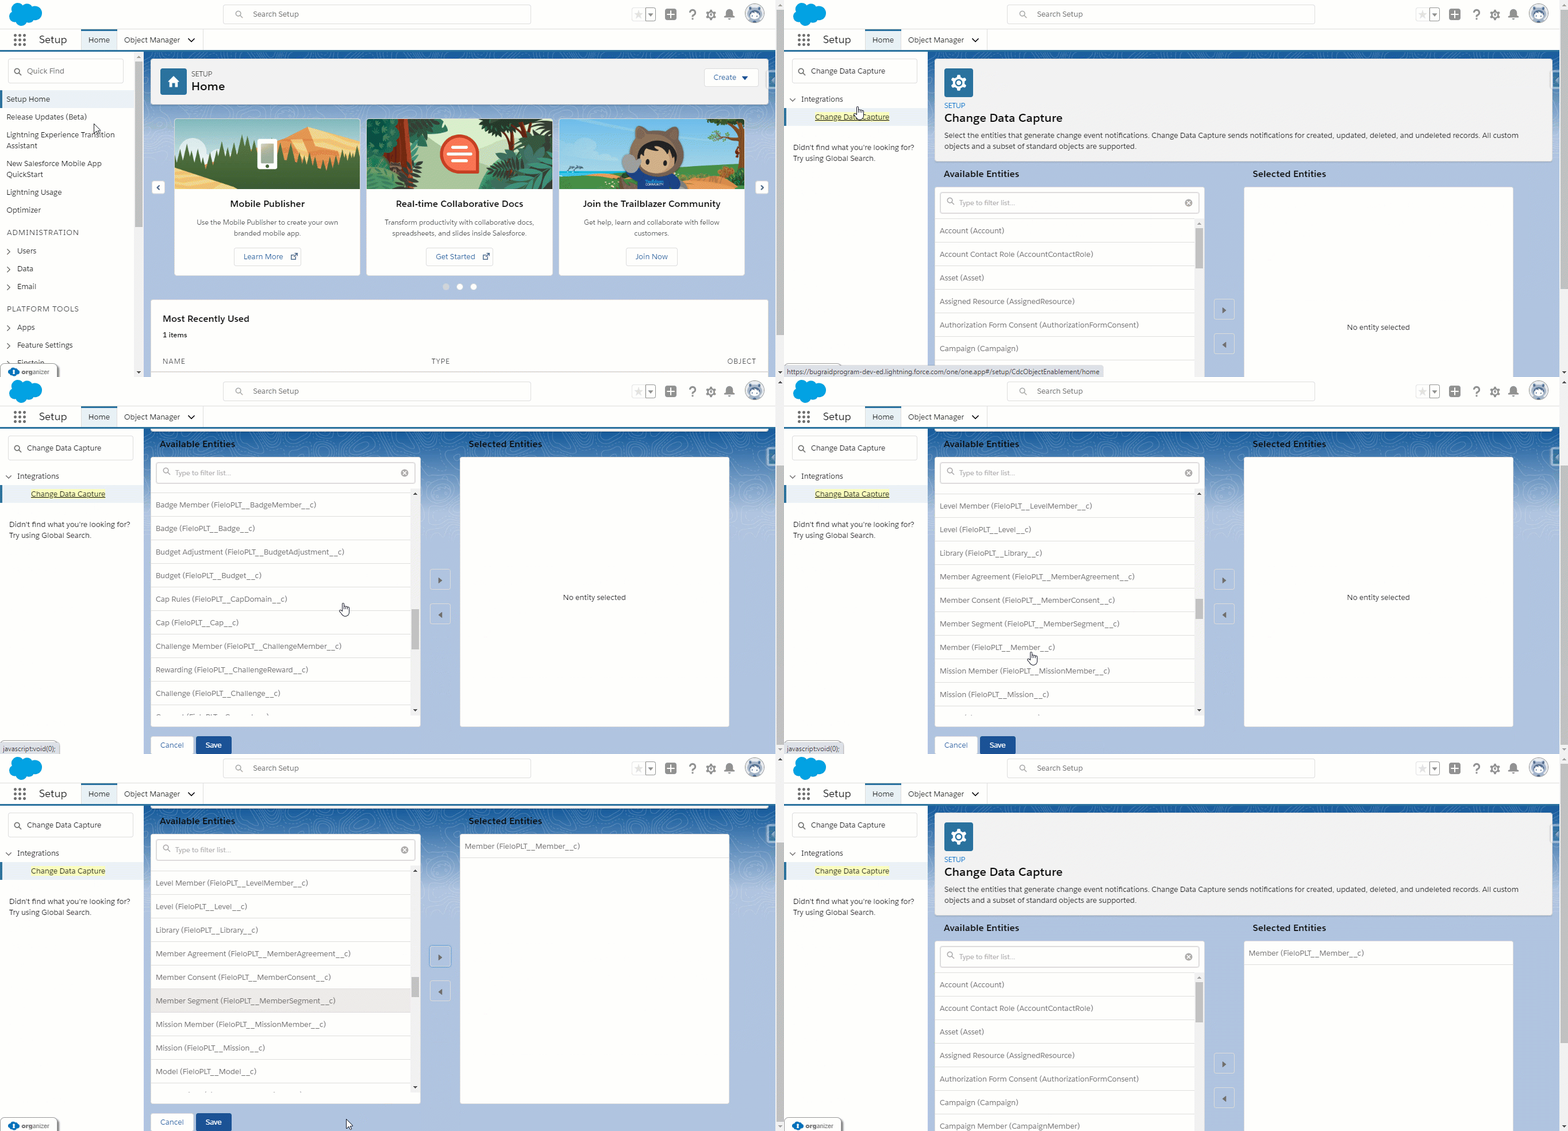
Don't forget to save before leaving.
Enable Audit Points
Audit Points is used to track down which activity generated each point record. For that to be available for all your actions, you'll have to enable the Audit Points in all of your Behaviors.
From the Tools tab, go to Libraries. For this step, make sure to check all Libraries by clicking on their name, in order to access each Behavior you have.
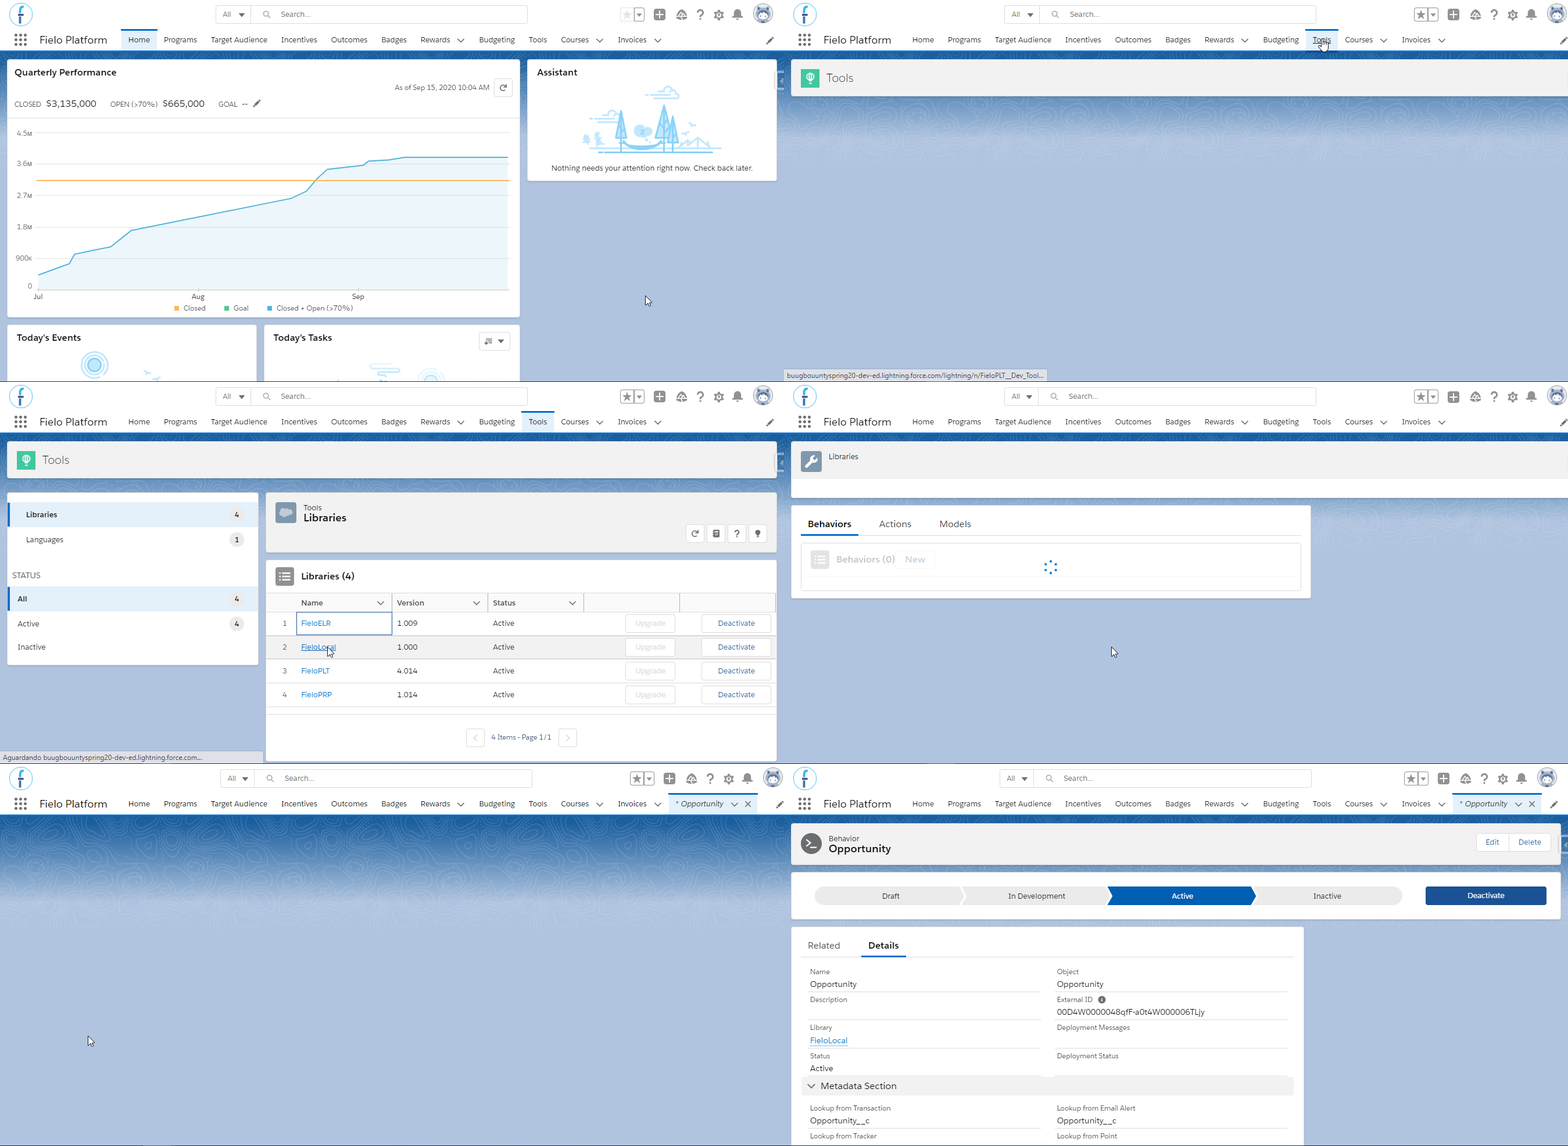
Accessing the 'Opportunity' Behavior in FieloLocal Library.
If you are accessing Libraries from Salesforce Classic or from the Libraries tab (instead of Tools), click on Local Development in order to access the FieloLocal Library.
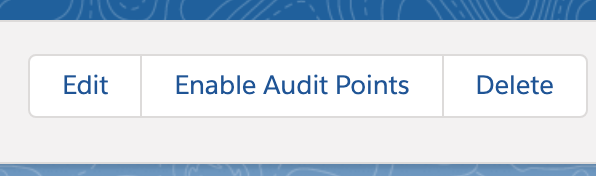
On every custom Behavior page (i.e. all Behaviors minus the default one, Event, that is stored in the FieloPLT Library), you'll find a button on the top-right corner of the screen with the option to Enable Audit Points. Click on it.
After you enable Audit Points, go to Setup and, then, to Object manager. Once there, look for and enter the Point object. In the Fields & Relationships tab, check if a Lookup field was created for every single one of the custom behaviours: its label must be equal to the behavior object's name.
If the field wasn't created for any of the custom behaviors, you must create it manually, relating it to the object used in the behavior.
This manual step has to be done for every custom behavior in your org.
Sharing Settings
When using the rewards catalog component, the member logged in will want to be able to have access to both the Currency records and the Program Currency records. Follow the steps bellow to grant the correct access:
On Setup, look for Sharing Settings and click to Edit. Both Currency and Program Currency objects need to have the Default External Access set to Public Read Only.

Don't forget to save before leaving.
Layout and Object Configuration
Member
By following this step, Fielo admins will be able to see the acceptance history for program- and incentive-level agreements on member record pages.
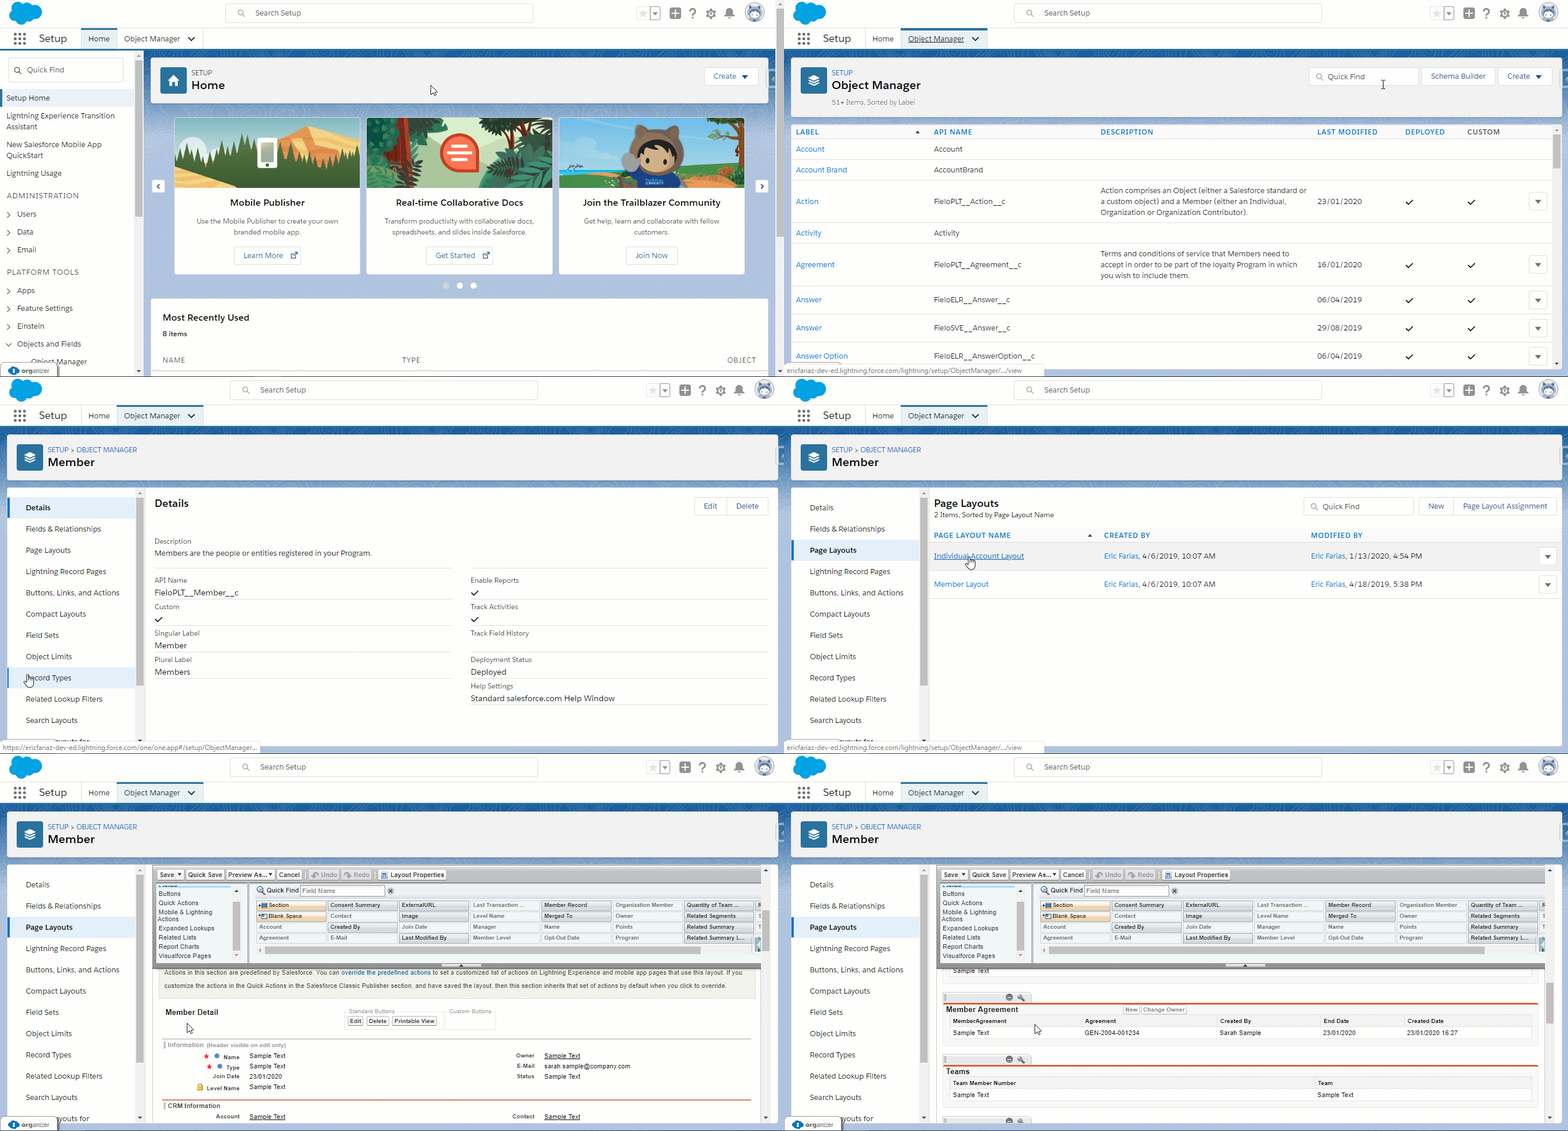
Start by going to the Object Manager. Search for Member and click on Page Layouts. You will need to go into Individual Account Layout and find the related list named Member Agreement.
Click on the 🔧 icon, in the Columns section, find the field named Agreement For and add it to the Selected Fields. Also change the Sort By drop down list to the newly added Agreement For.
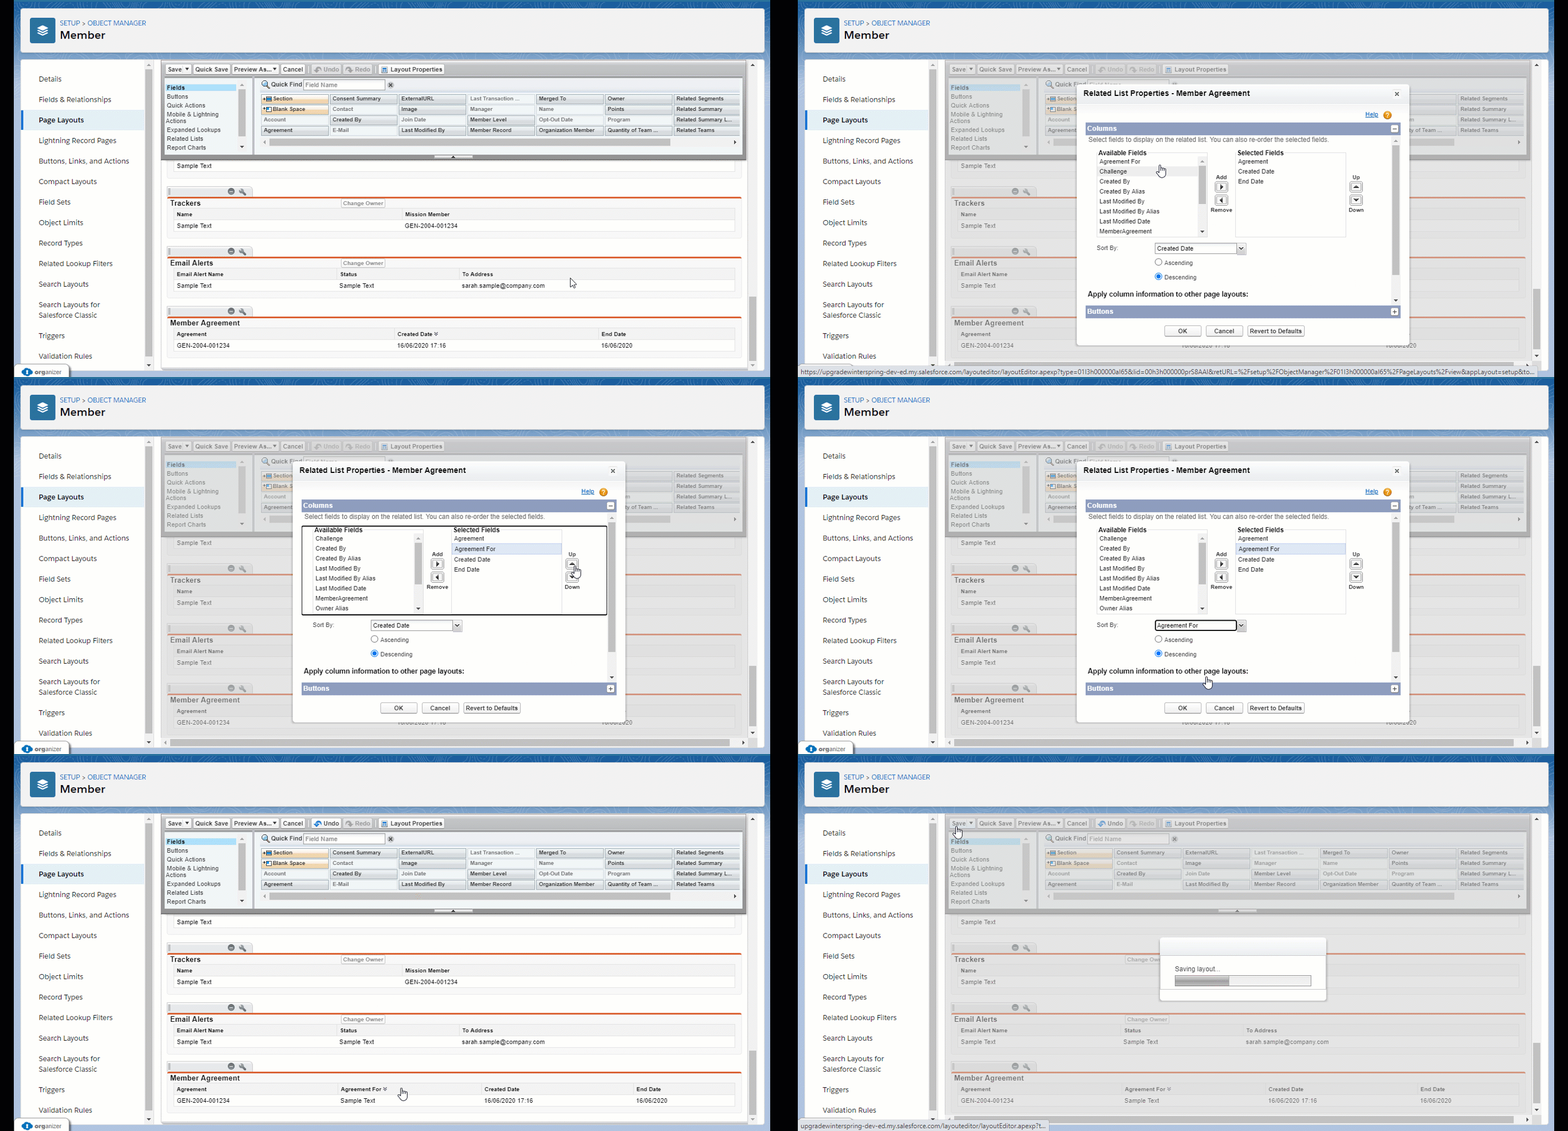
Don't forget to save before leaving.
Point
By executing this step, Fielo admins will be able to see more granular data on Point record pages.
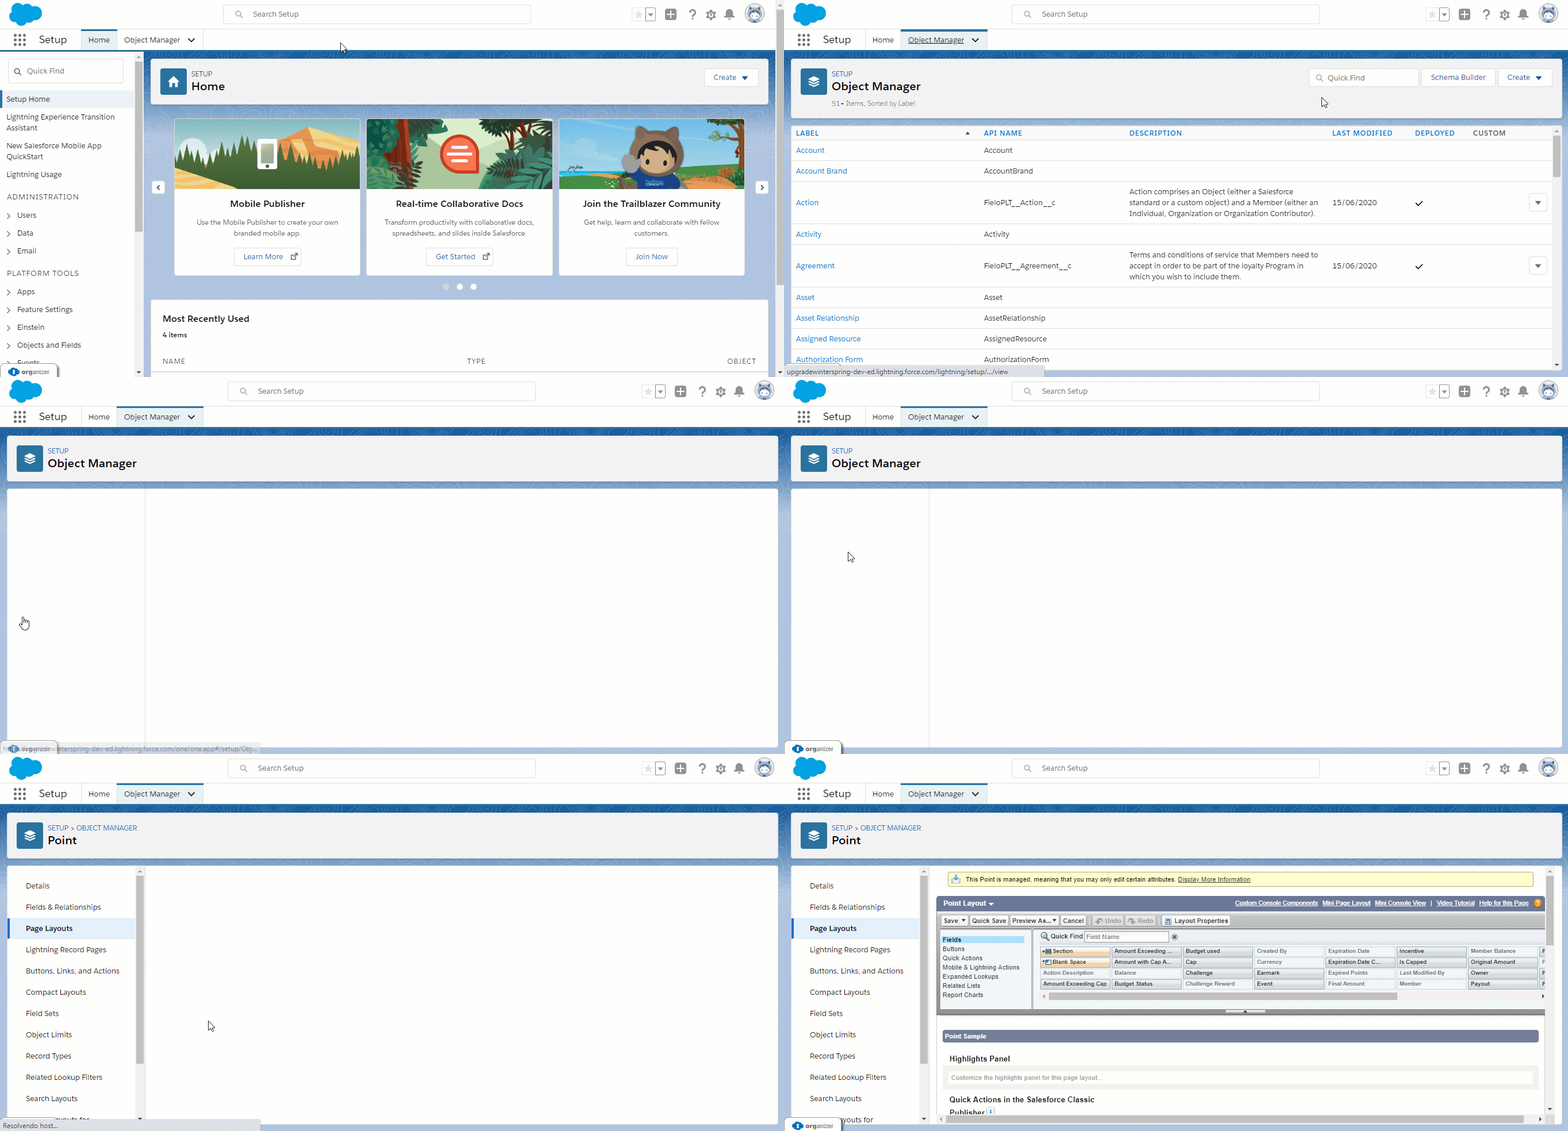
Go back to the Object Manager and look for Point. Click on Page Layouts and then Point Layout
The following fields related to capping have to be added to the Balance section - some of them may be added already, in this case, add the remaining ones:
| Column A | Column B |
|---|---|
| Earmark | Cap |
| Amount Exceeding Cap Already Discounted | Is Capped |
Capping detail fieldsThe fields Original Amount, Amount with Cap Applied, Amount Exceeding Cap, Final Amount, Expired Points, Used Points and Balance, which also refer to capping, can be seen in the Details dynamic section within the point record page (if there is data to be shown).
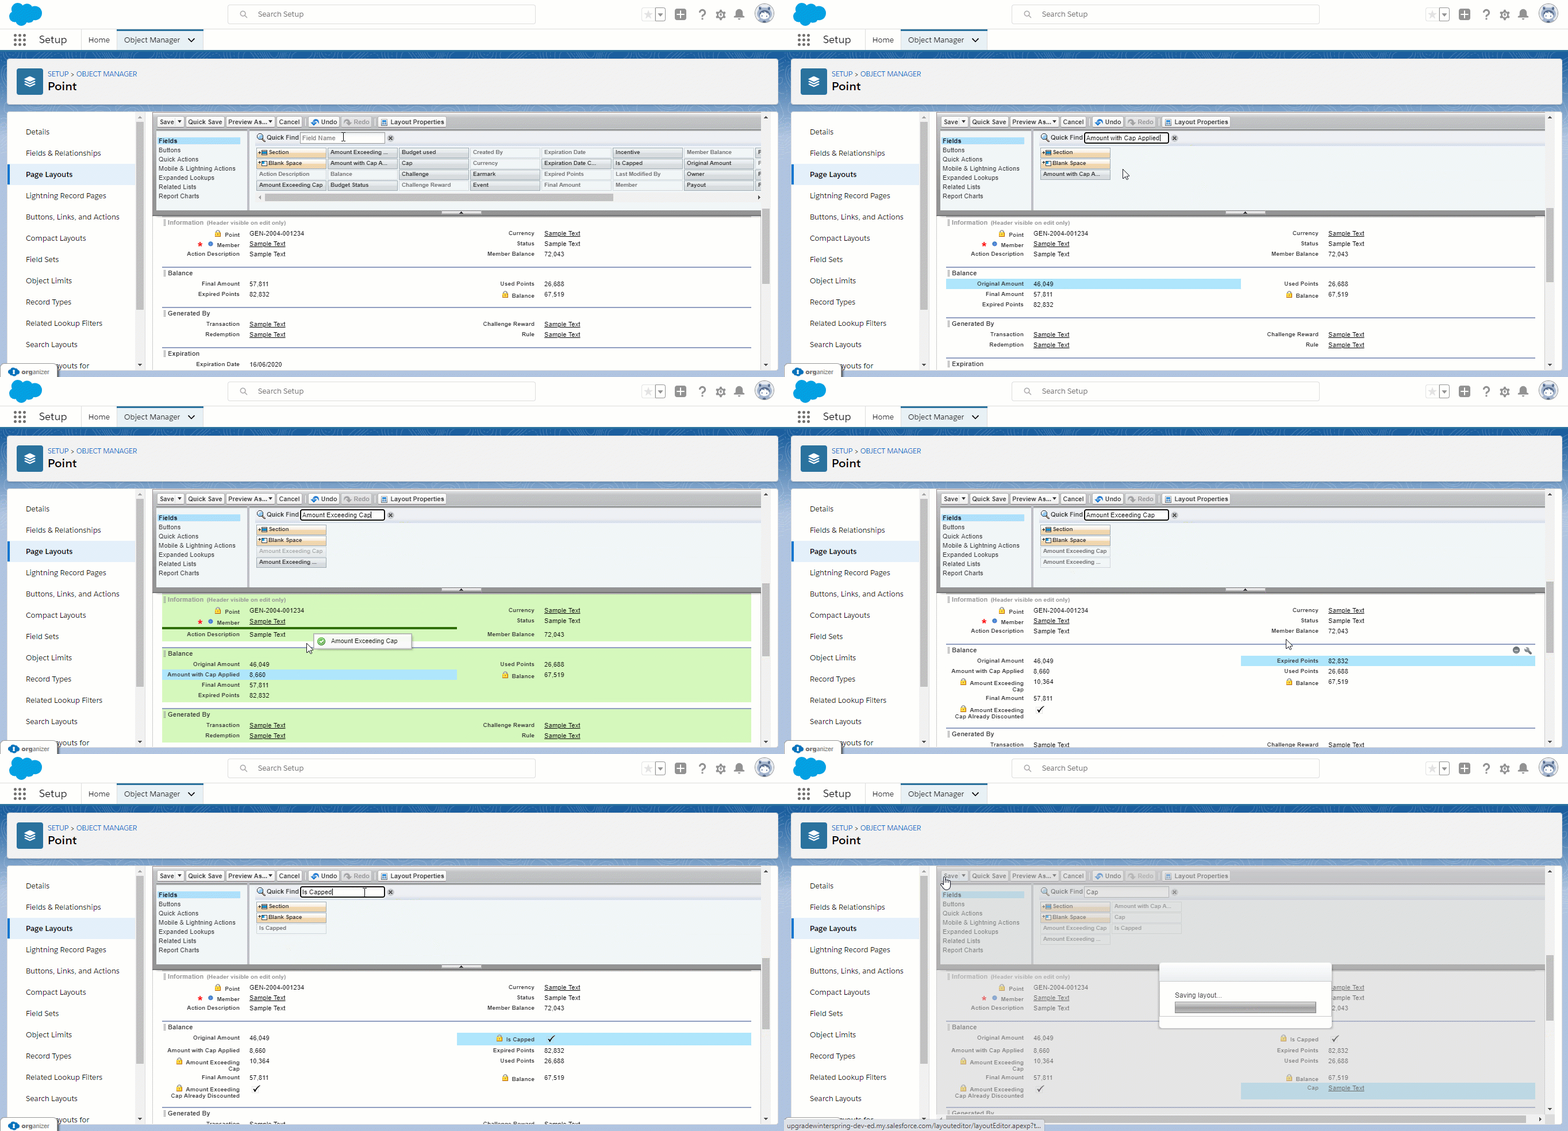
You can also add the following fields related to budgeting:
- Earmark
- Point Cost
- Budget Status
- Budget used
Don't forget to save before leaving.
Cap
By performing the following steps, Fielo admins will be able to configure capping for all rules and see more data on Cap record pages.
Once again, go back to the Object Manager and look for Cap. Once it opens, select Fields and Relationships and find the field named "Scope of Application".
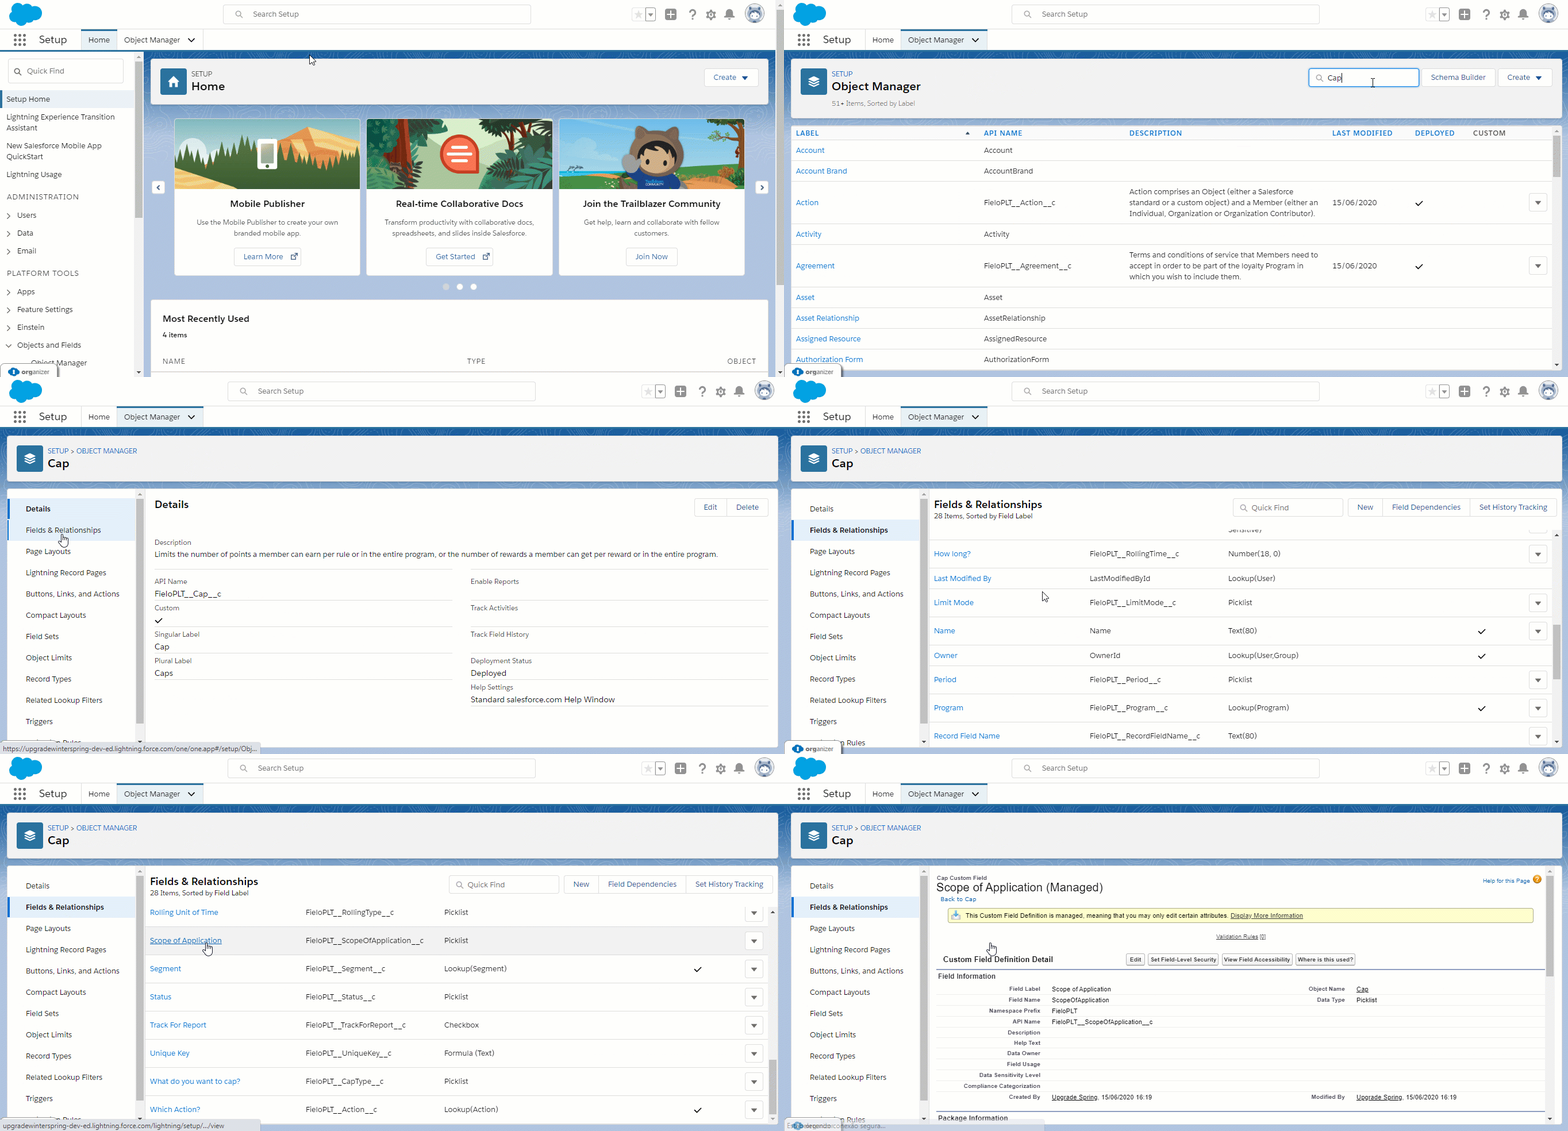
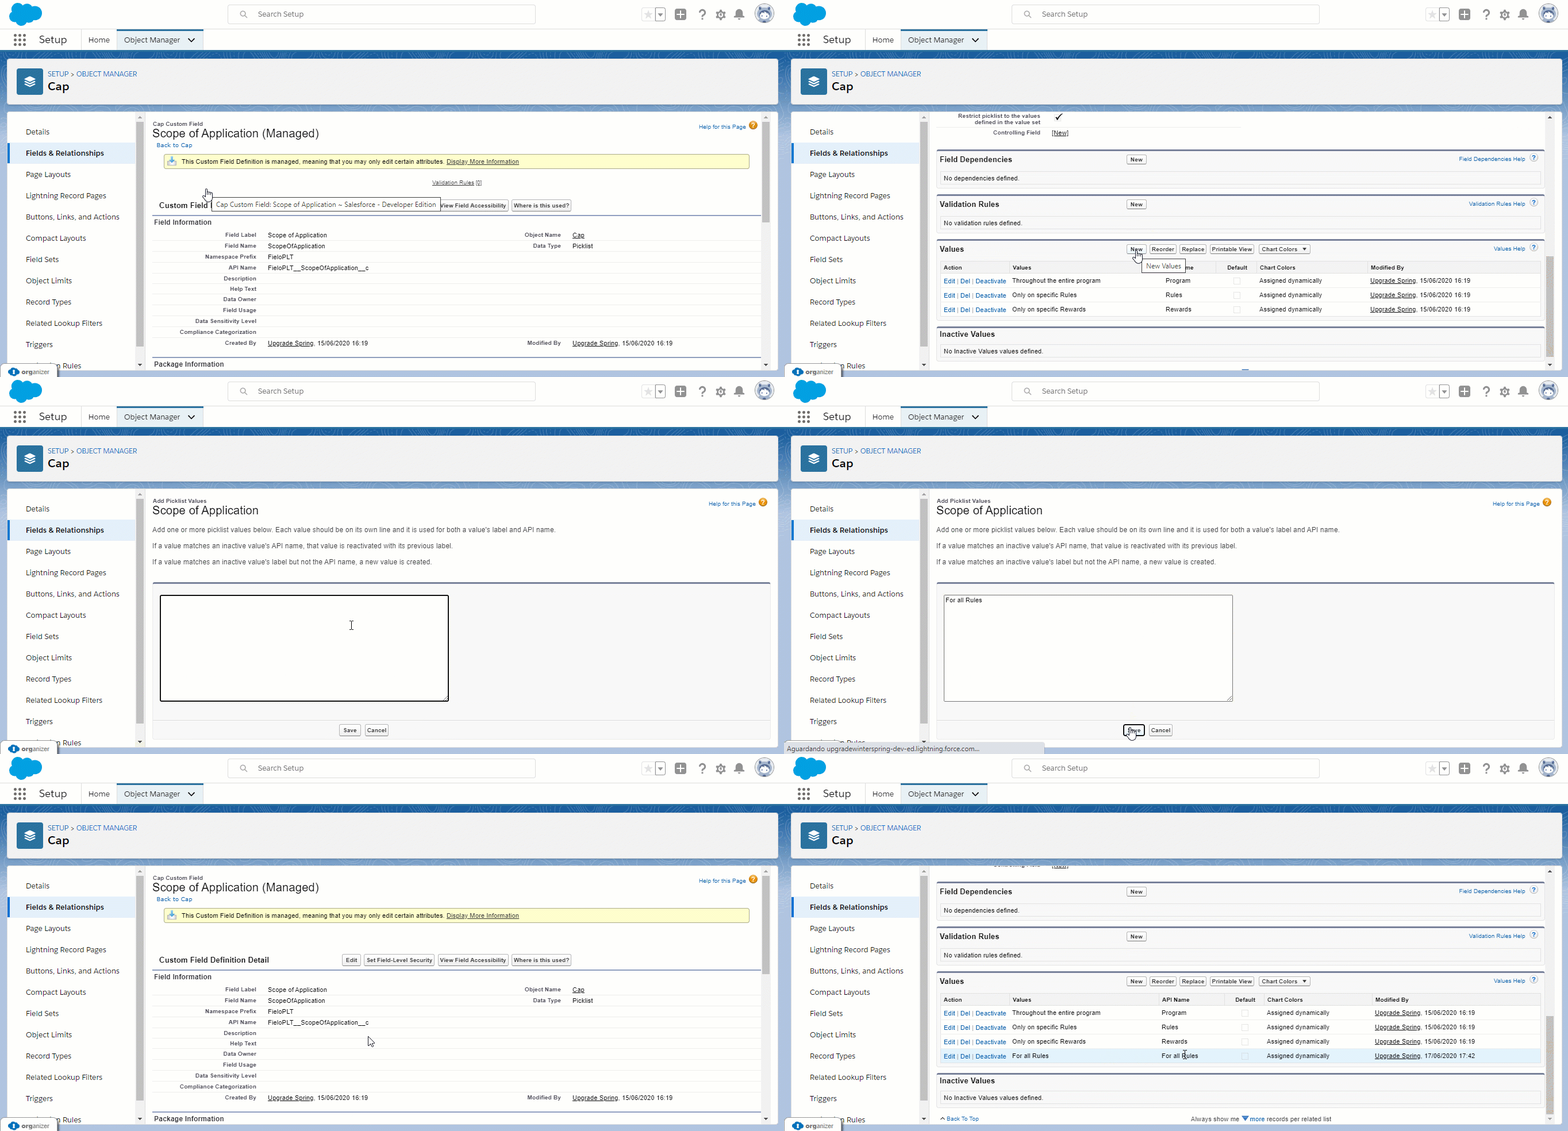
Scroll down until you find the Values section, where the picklist values are stored. Hit New and, in the text box, type in "For all Rules". Make sure both the value and the API have been added and are the same.
Now, on the left menu, click on Page Layouts. Select Cap Layout and add the fields Cap by period or by record? and Cap Mode to the Cap Detail section:
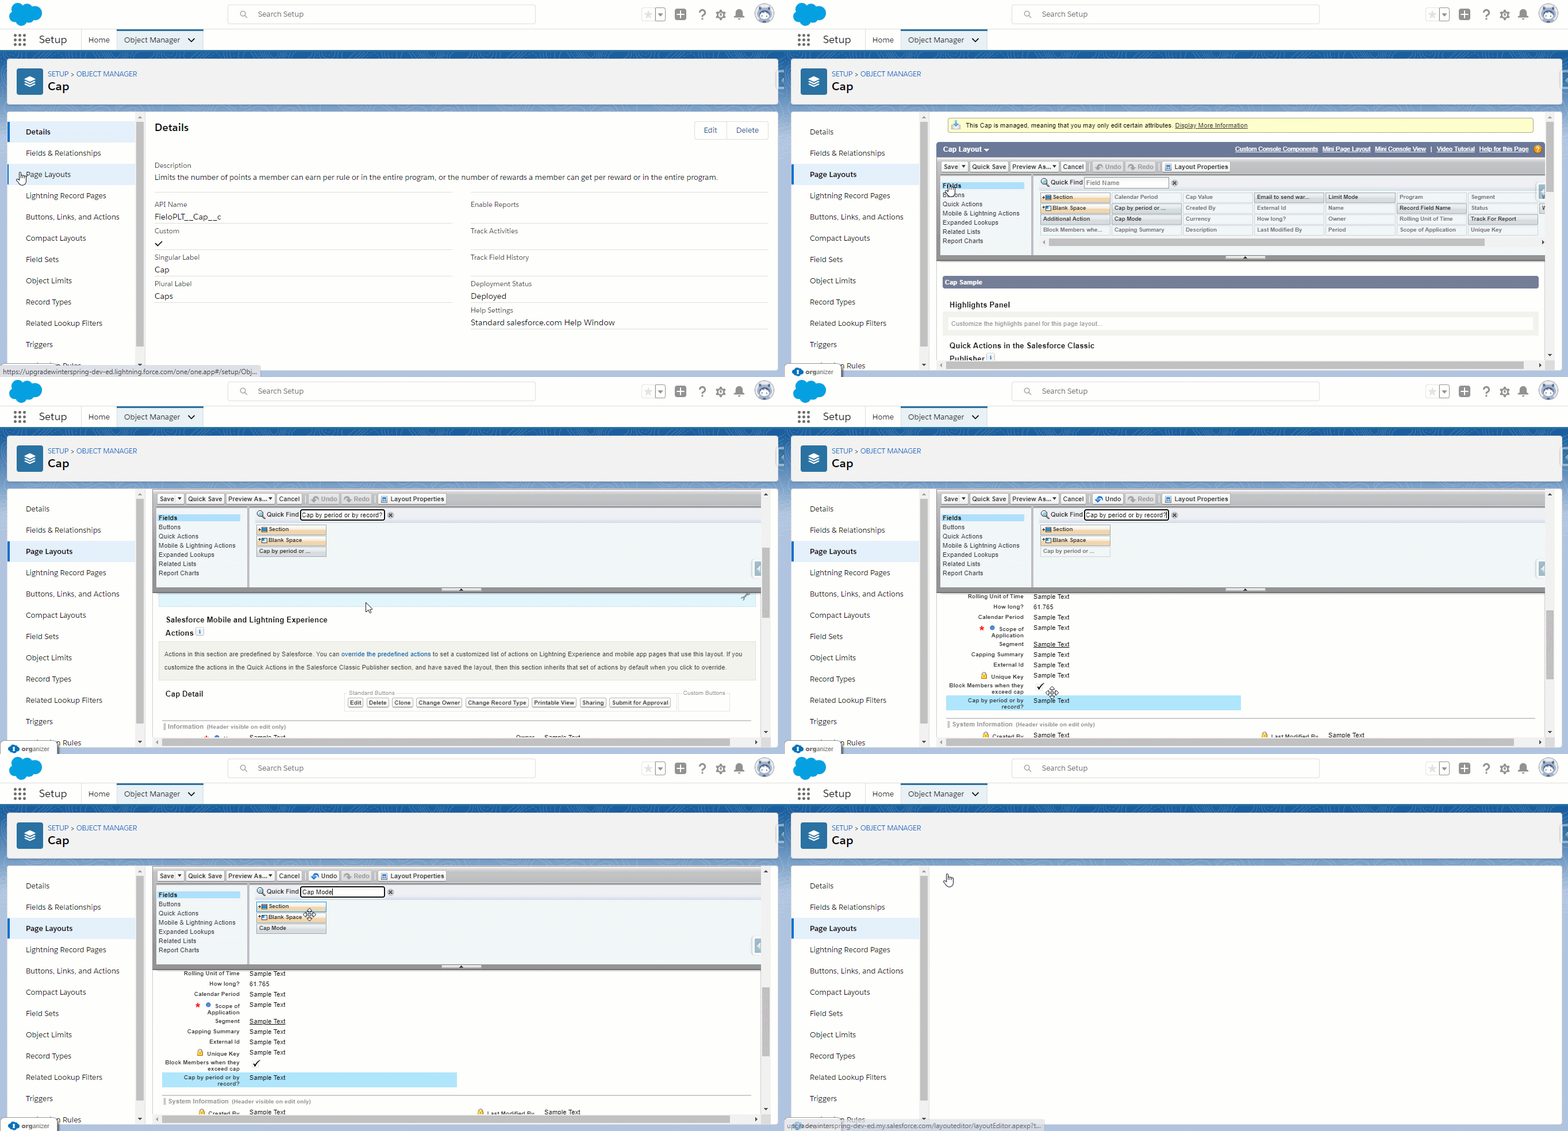
Don't forget to save before leaving.
Mission
This is a mandatory step when upgrading, so that Fielo Admins are able to use the new Table Type for challenge missions.
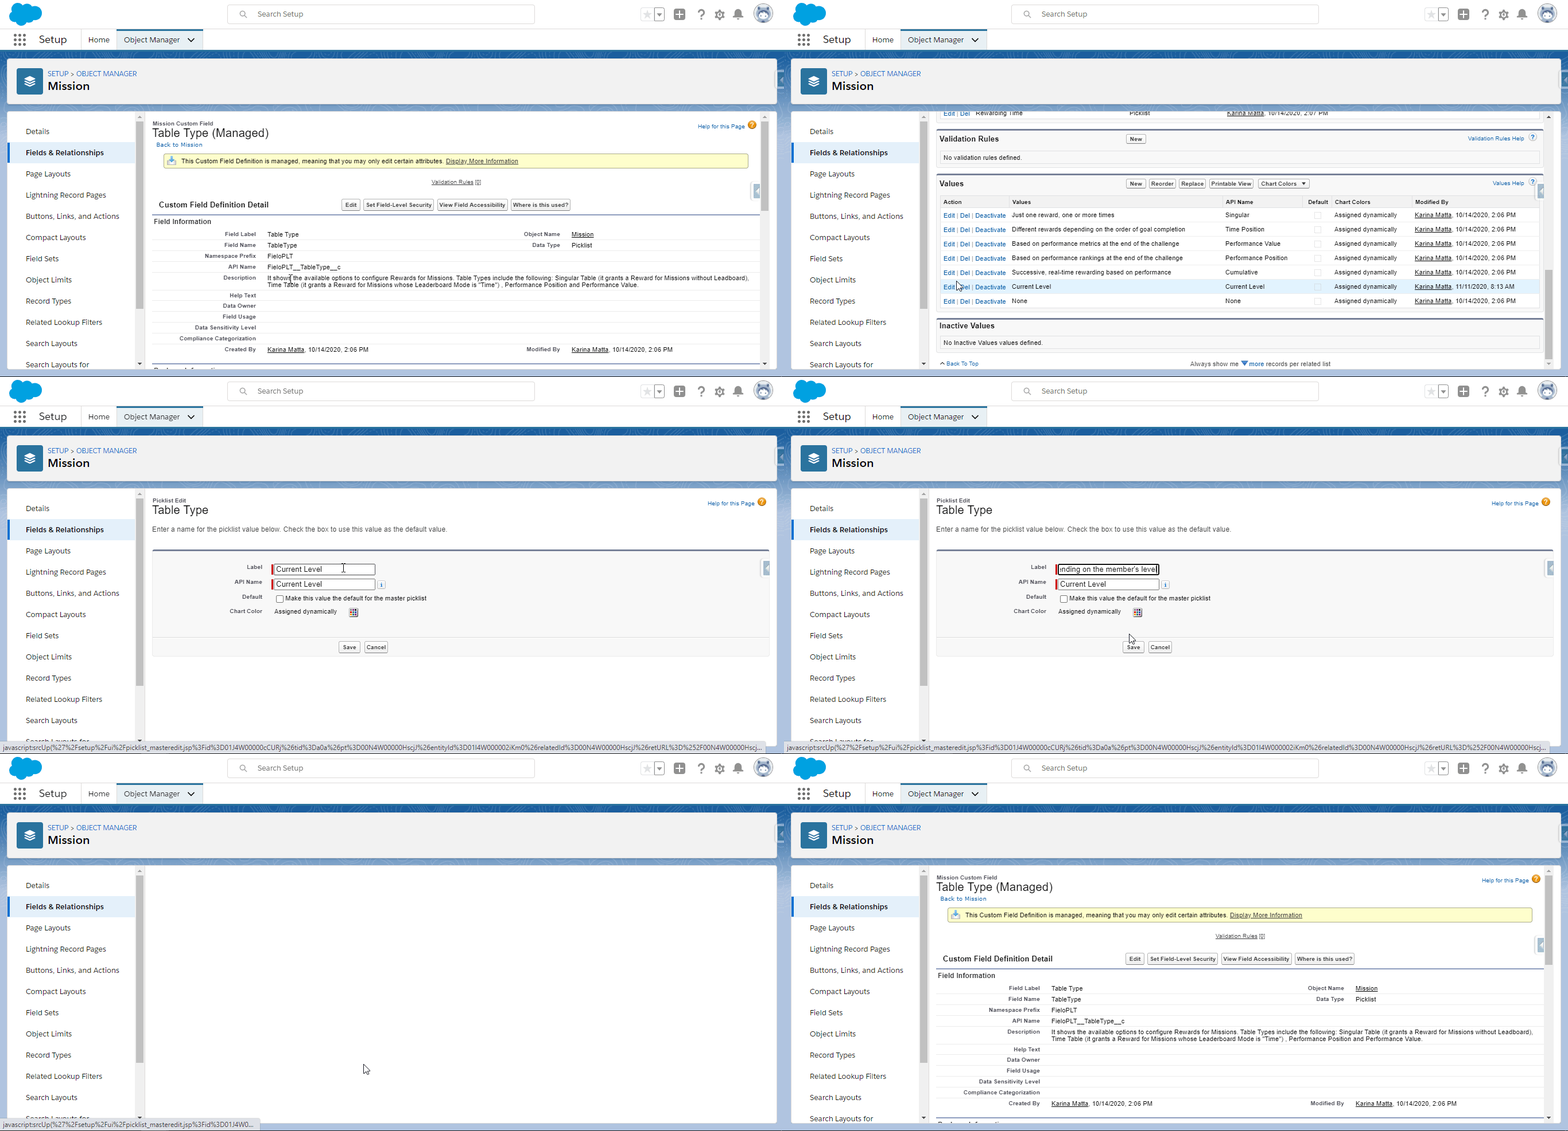
Go to Object Manager, search for and select Mission. From the left menu, access the Fields & Relationships tab, enter the Table Type field and follow these steps:
- Go to the Values section and click on New
- Write "Current Level" in the text box and Save
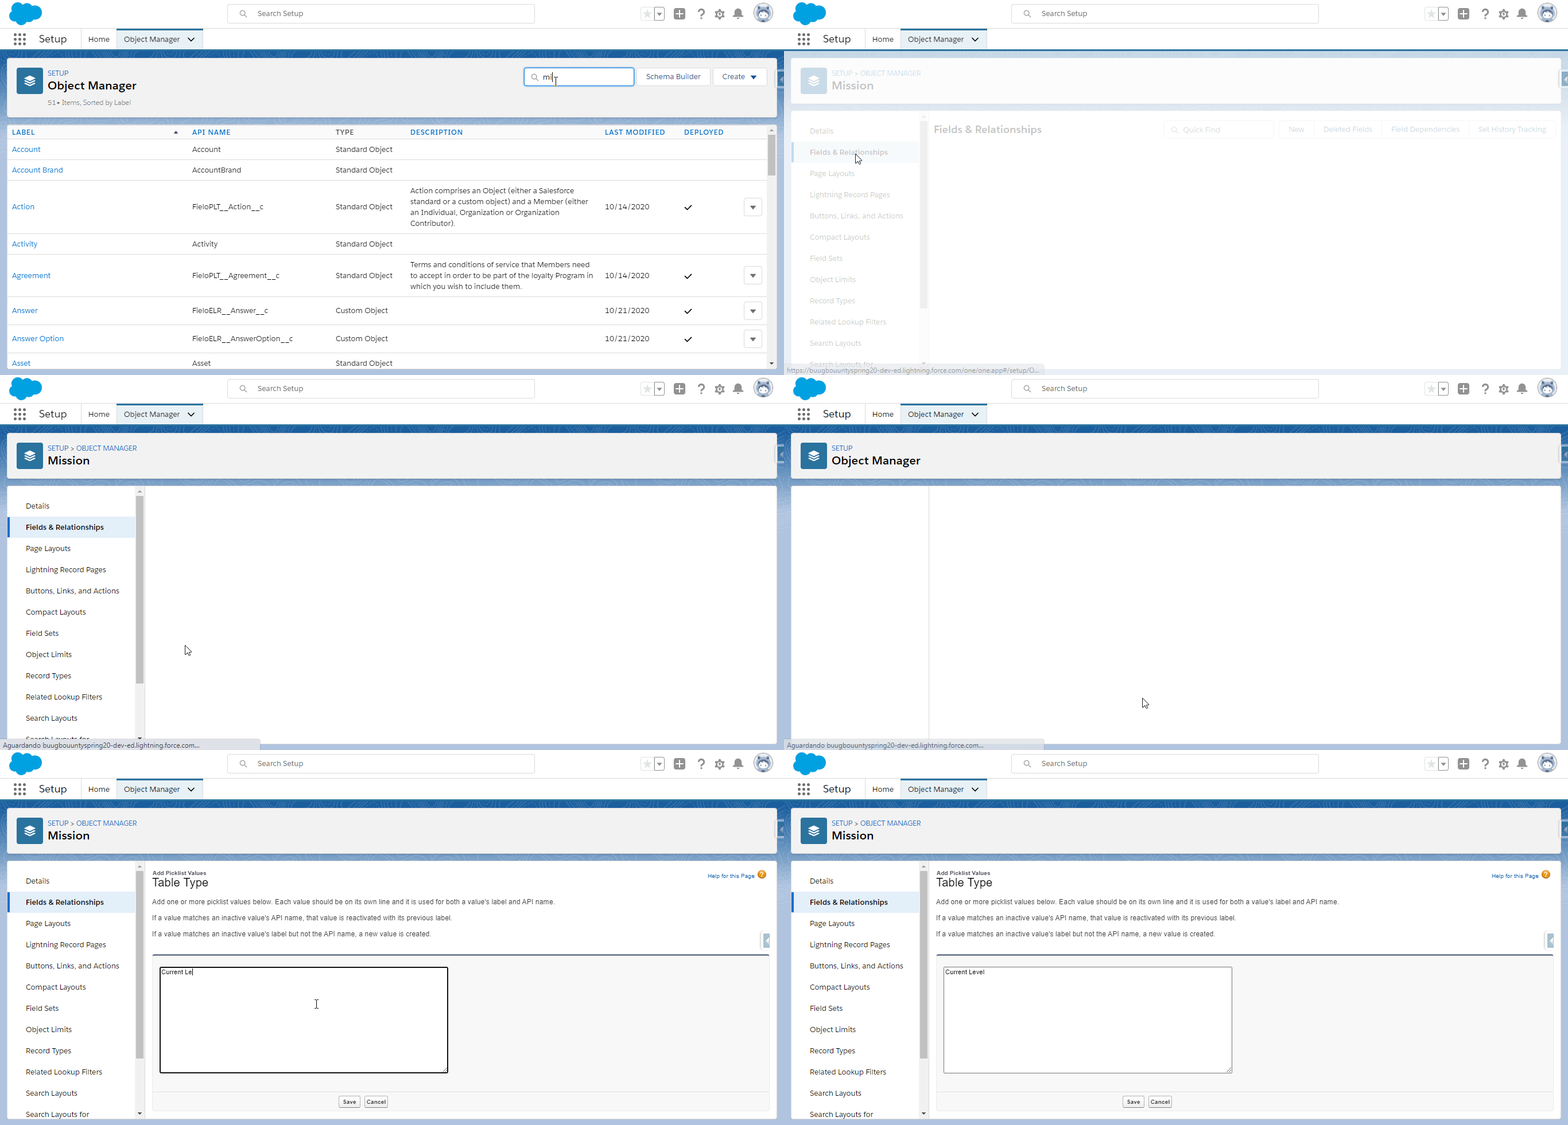
- Click Edit, in order to edit the value you just created
- In Label, write "Different rewards depending on the member's level" and Save.
Email Alert
When a Member signs in to your program using the Lighting Components, they'll receive two automatic Emails, one welcoming them to the program and another one welcoming the recently created user that is attached to the member. The current configuration of the user welcoming Email makes them receive it from themselves. Follow the steps below to change that:
Start out by creating an Organization-wide address - Skip this step if you already have one.
On Setup, look for Organization-Wide Addresses and add one.
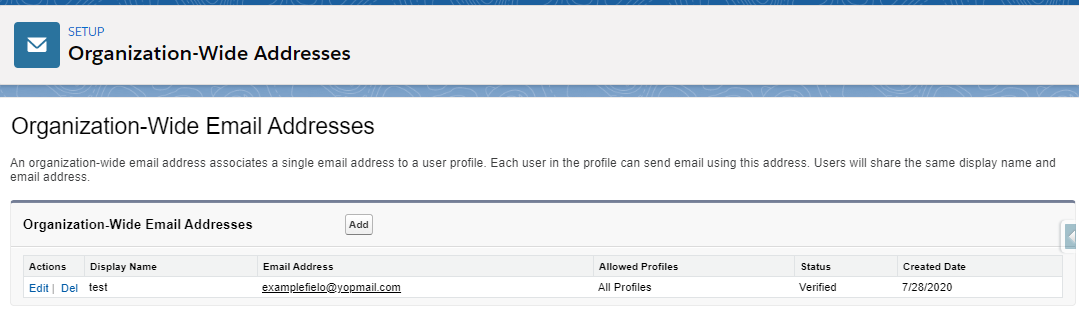
Don't forget to check your Email before proceeding, as it requires the address to be verified.
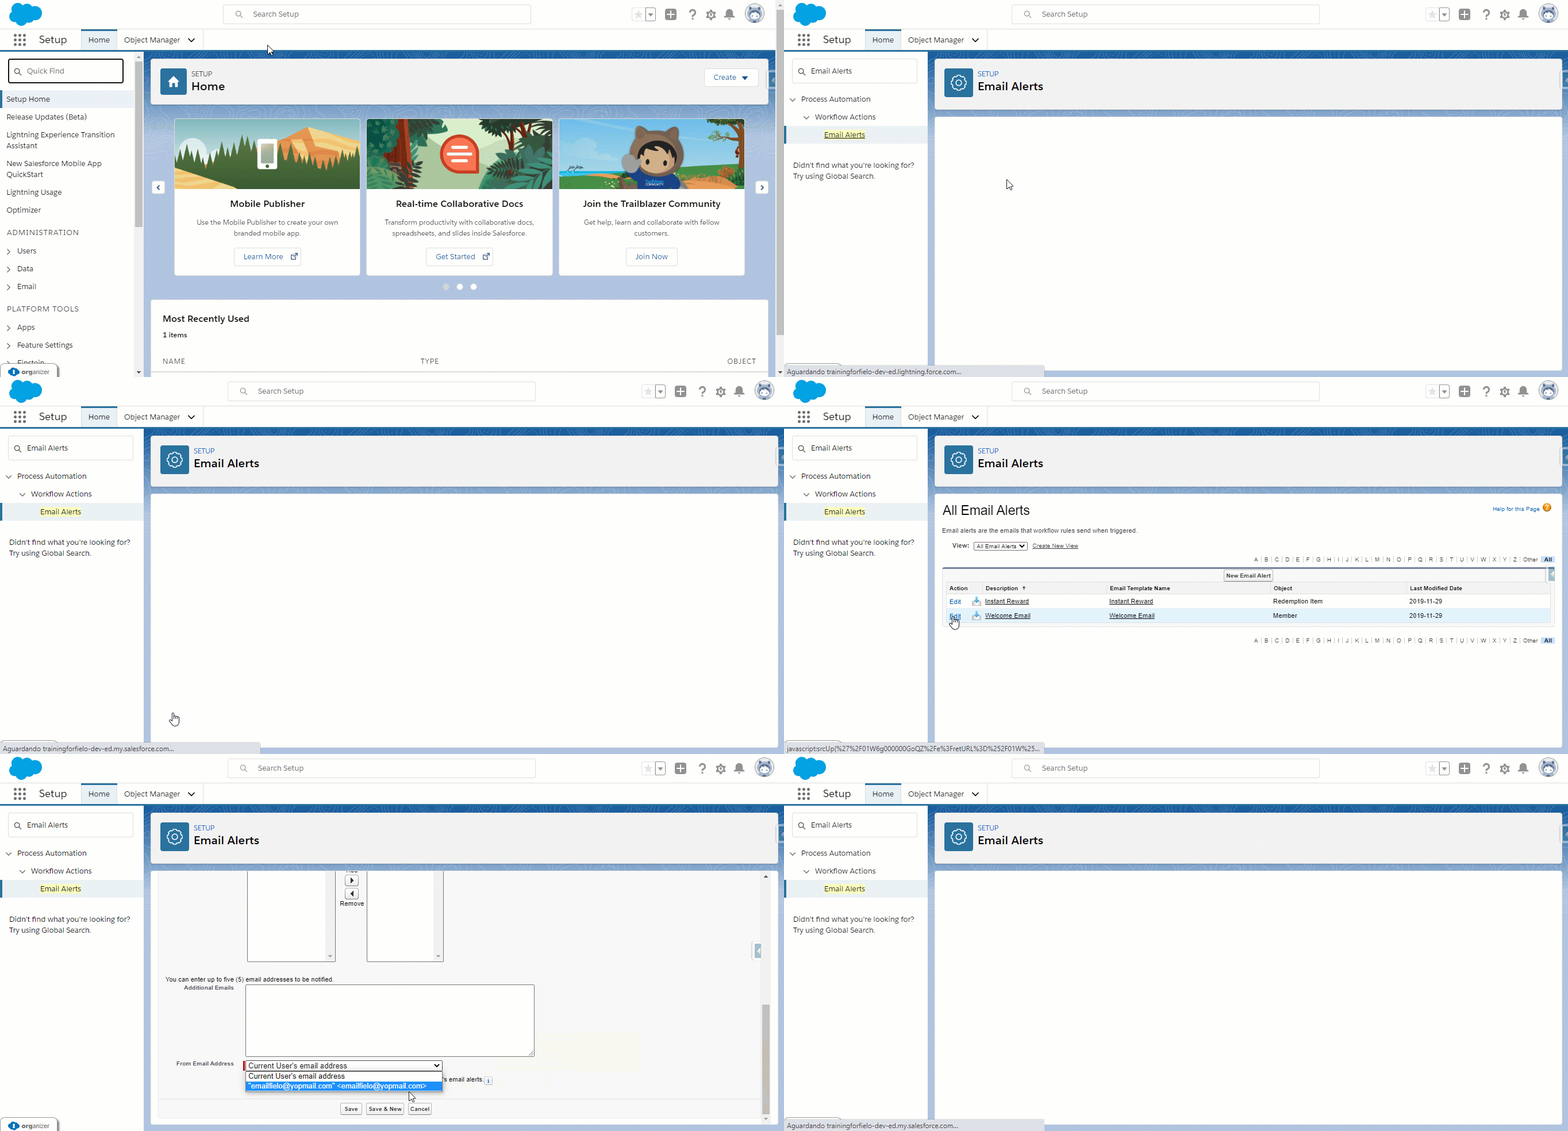
Now, look for Email alerts and find the one called Welcome Email.
Click Edit and scroll down to the bottom of the page, where you'll find a field called From Email Address with a drop down list. Select the Organization-Wide Address and hit save.
Fielo PRP v1.39
If you are an user of Fielo's Invoicing app, an important manual step is now required on version 1.39 or later for the system to keep performing smoothly.
Due to a change in the behaviors of the package - there used to be two behaviors for the Invoice Object, but now there's only one with two actions related to it - the processing is triggered by any change it may occur. By following this step, you guarantee the processing of the invoice is only done when a certain criteria is met.
For all active rules and missions in your program utilizing the action Members submits proof of purchase, a set of conditions will have to be added based on the status of the invoice.
From now on, all rules and missions that takes advantage of the invoicing feature will also have to include the following configuration.
On the Incentive tab, click on either the Promotion or Challenge that makes use of Invoicing feature. Find the Rule configured with the action Members submits proof of purchase and hit Edit.
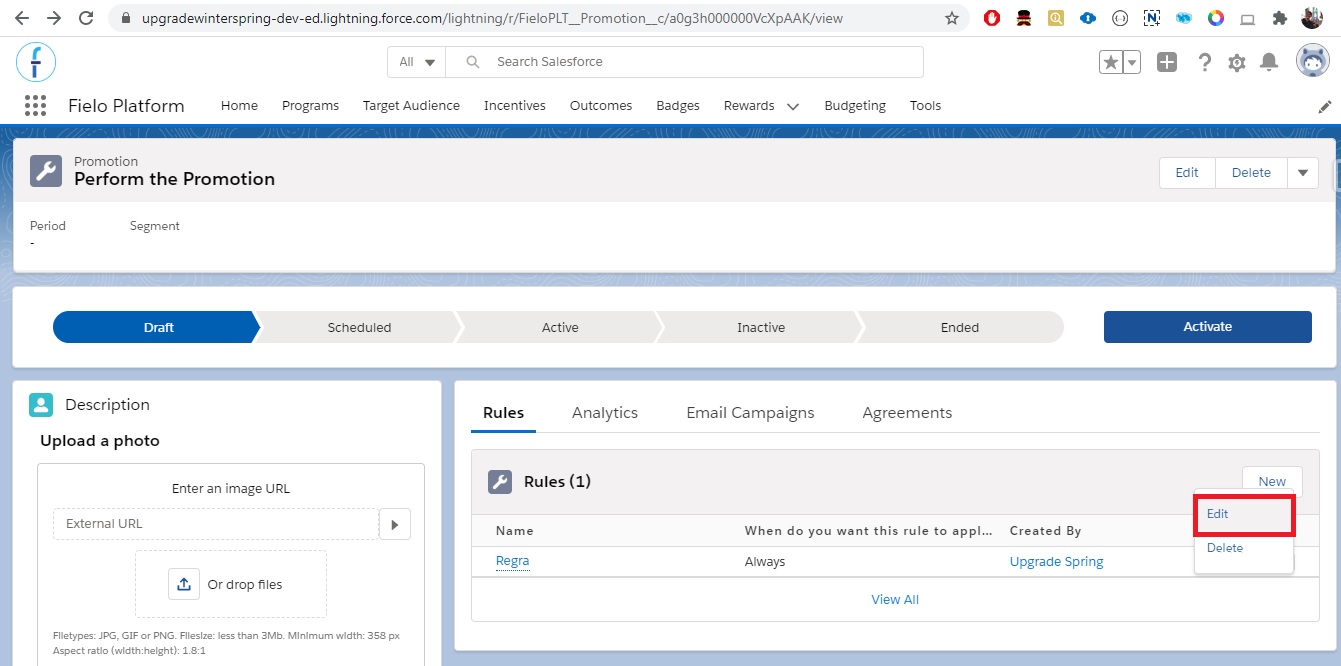
On the Basic Info page, click next.
Now, on the Criteria page, add a new condition. The field should be Status and the value should be determined by you.
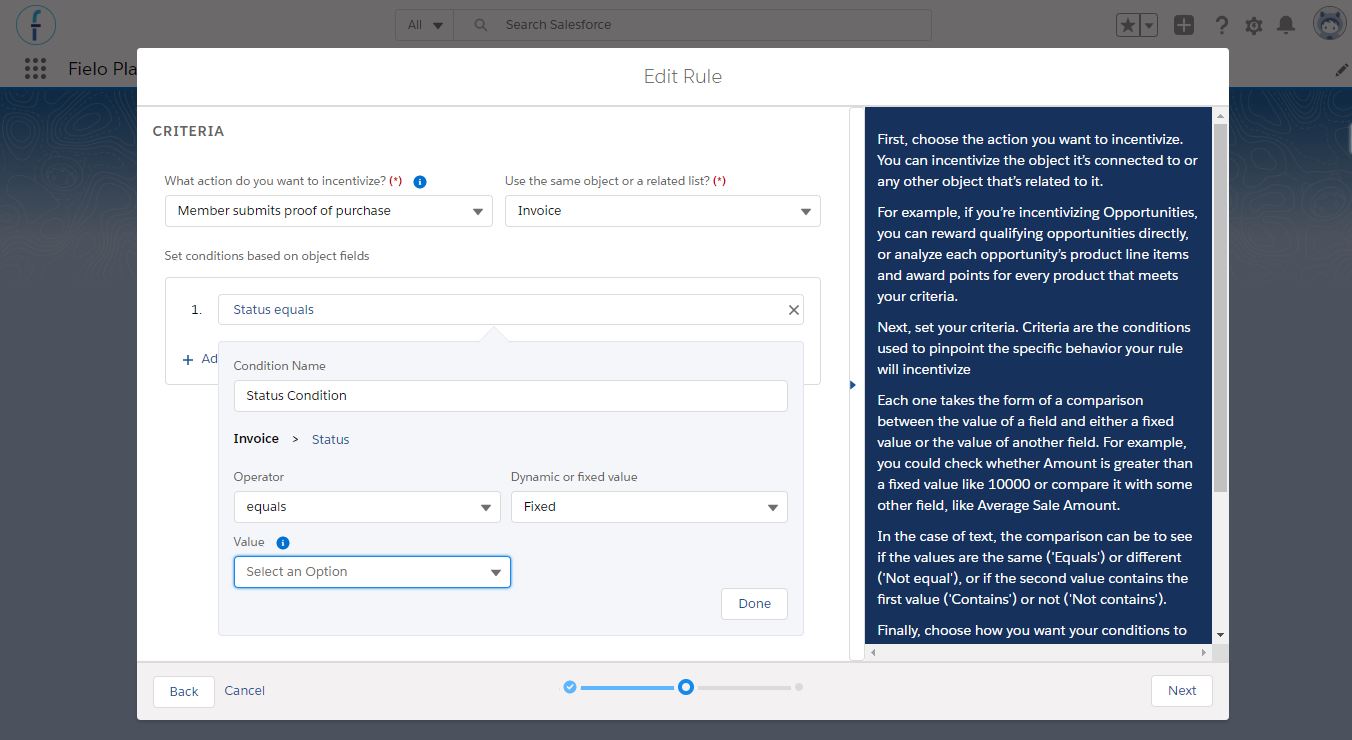
Click Next and Save before leaving.
Fielo ELR v1.73
In case you have a Fielo's Learning app version prior to 1.73 installed in your ORG, note that it is required to also upgrade its package after installing Spring '20, due to an impact on its library. If this step is not done, you might experience an error in the app.
Click here to log in to your org and install the newest FieloELR version.
Take a look at our Installation and Setup guide for the ELR package in case you wish to review the installation steps, but as long as you have followed them before, when you first installed the Learning app, there's no need to perform them again when upgrading.
Congrats!You're ready to go with Fielo Spring '20 edition.
Updated over 1 year ago