
Currencies
Currencies are different kind of points that can or cannot be monetary that your members can earn, together with standard Points or as an alternative to them. By creating different currencies, you can use units of exchange like Dollars, Miles, Hours, Tokens, Liters, etc. instead of or in addition to regular points.

Before Starting
Before continuing, make sure you've installed and set up IAS. You should also have created and configured your program.
Customizing Fielo Standard Points
Fielo programs already come bundled with our standard currency, Point. If you want to award Points to your members, either exclusively or in addition to other types of currencies, then you're already set to go!
However, if you have no desire to use the word Points in your program, you can (and should) customize this standard currency to use whatever term you prefer. This will make other configurations easier down the line. Let's see how, using an example where, instead of Points, we want our reward units to be called Sales Points.
Step 1: Translation Workbench Override
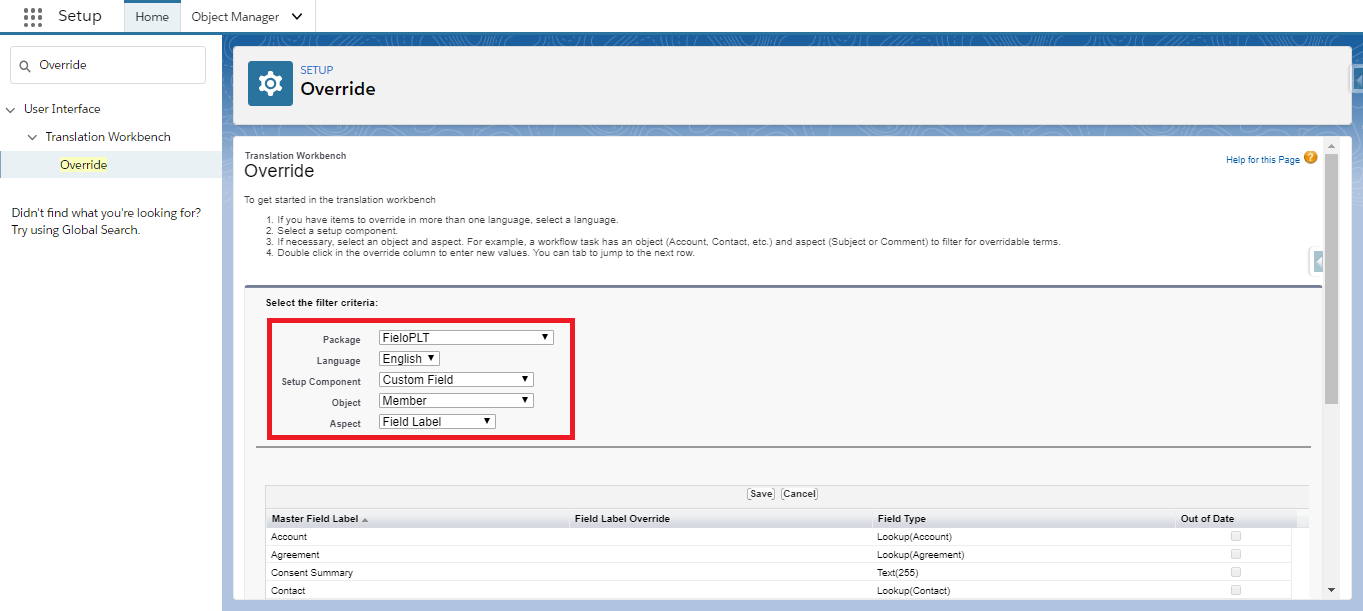
Make sure Translation Workbench is enabled in your org and that your preferred language is activated. Then, from Salesforce Setup, quick find and select Override.
Step 2: Select Filter Criteria
Make the following selections:
- Package: FieloPLT
- Language: Your preferred language
- Setup Component: Custom Field
- Object: Member
- Aspect: Field Label
Step 3: Enter Your Preferred Word
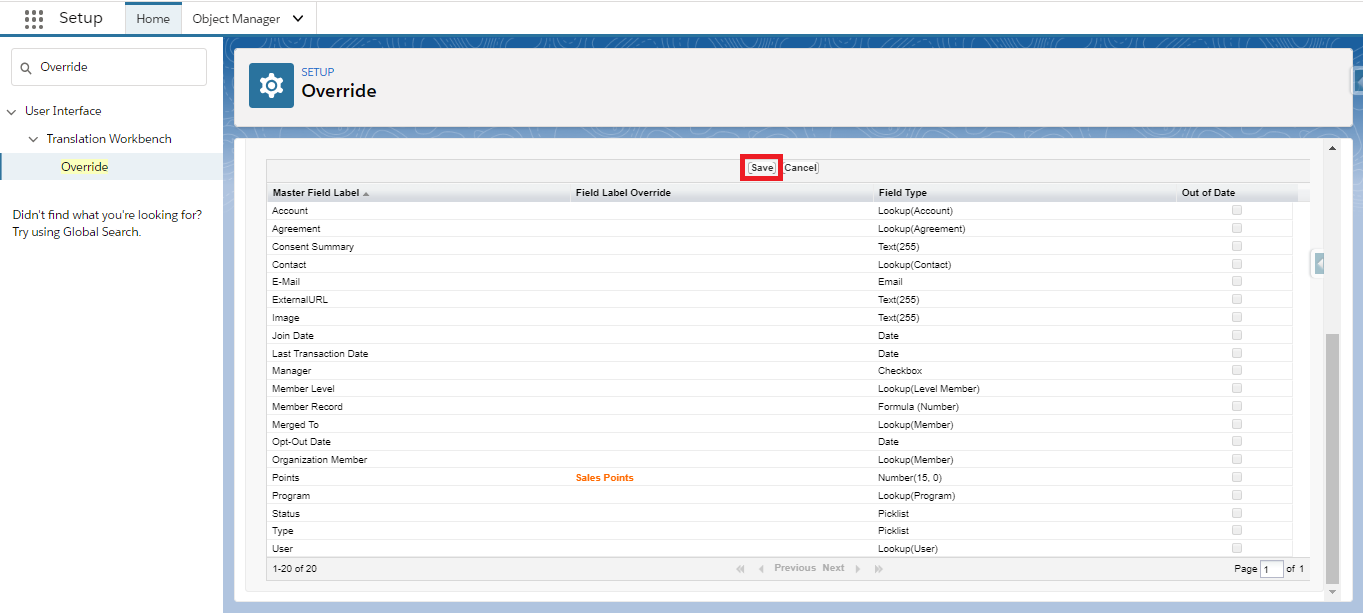
In the row corresponding to Points, double-click under the column called Field Label Override, and enter your preferred term (in our case, Sales Points). Press enter and click Save.
Step 4: Repeat Steps 2 and 3 for Your Other Objects and Fields
Now, just as you did for the Points field in Member, override the fields in the table below, always replacing the word Points with the term you prefer to be displayed to members and loyalty managers.
For fields that include other words besides Points, be sure to include those words in your override, as well. For example, the field Point Expiration Date should become Sales Point Expiration Date.
| Object | Field(s) |
|---|---|
| Transaction | Points and Point Expiration Date |
| Redemption | Points |
| Redemption Item | Points |
| Reward | Points |
| Rule | Point Conversion Mode, Point Conversion Value, Point Expiration, Point Field Name, Point Expiration Date, Point Expiration Mode and Custom Point Expiration |
| Challenge Reward | Point Conversion Mode, Point Conversion Value, Point Expiration, Point Field Name, Point Expiration Date, Point Expiration Mode and Custom Point Expiration |
That's it! All your user interfaces, both internal and member-facing, will now show your preferred terminology for standard Fielo currency.
Creating a New Currency
As you know, we include a default currency named Point, which you can use as is or customize with another word. However, if you want to use other currencies beyond the standard one, including ones that allow decimal numbers (e.g. 3.52 liters), you can create your own!
Let's see how you can create a new currency called Stars.
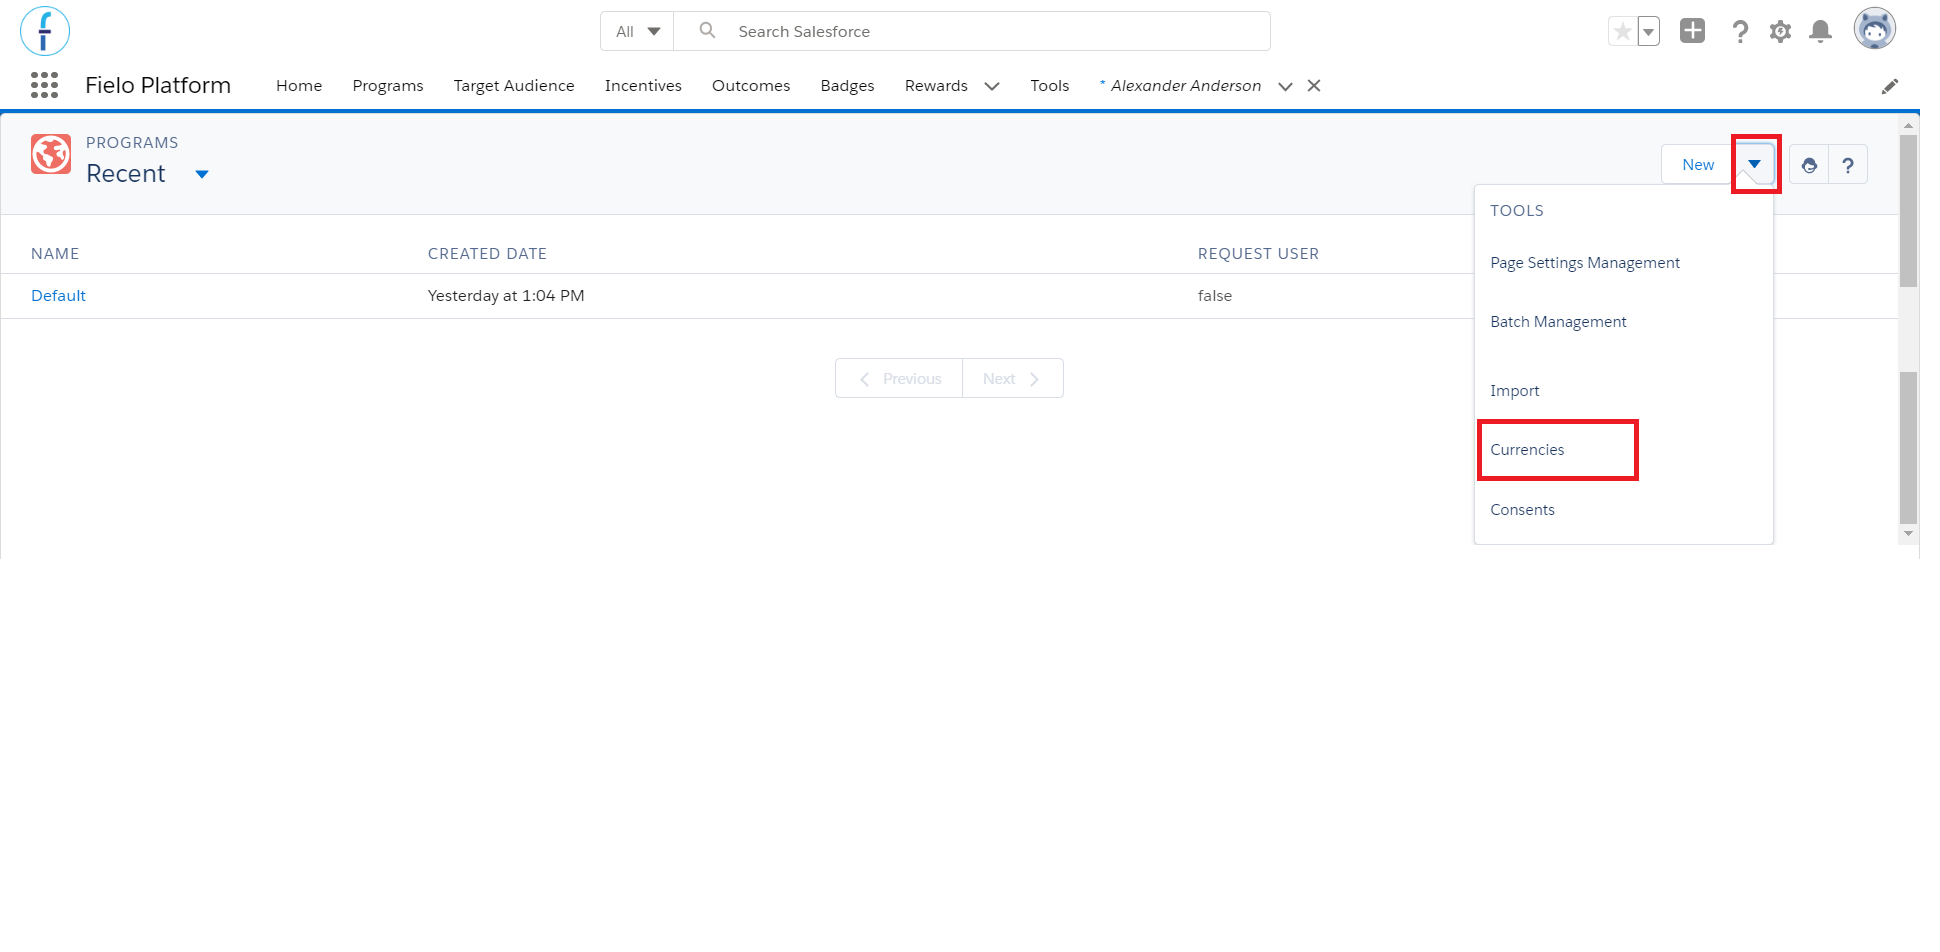
From the Programs tab, access the programs list by clicking Manage Programs (the list might automatically appear if you have multiple programs). Click and select Currencies.
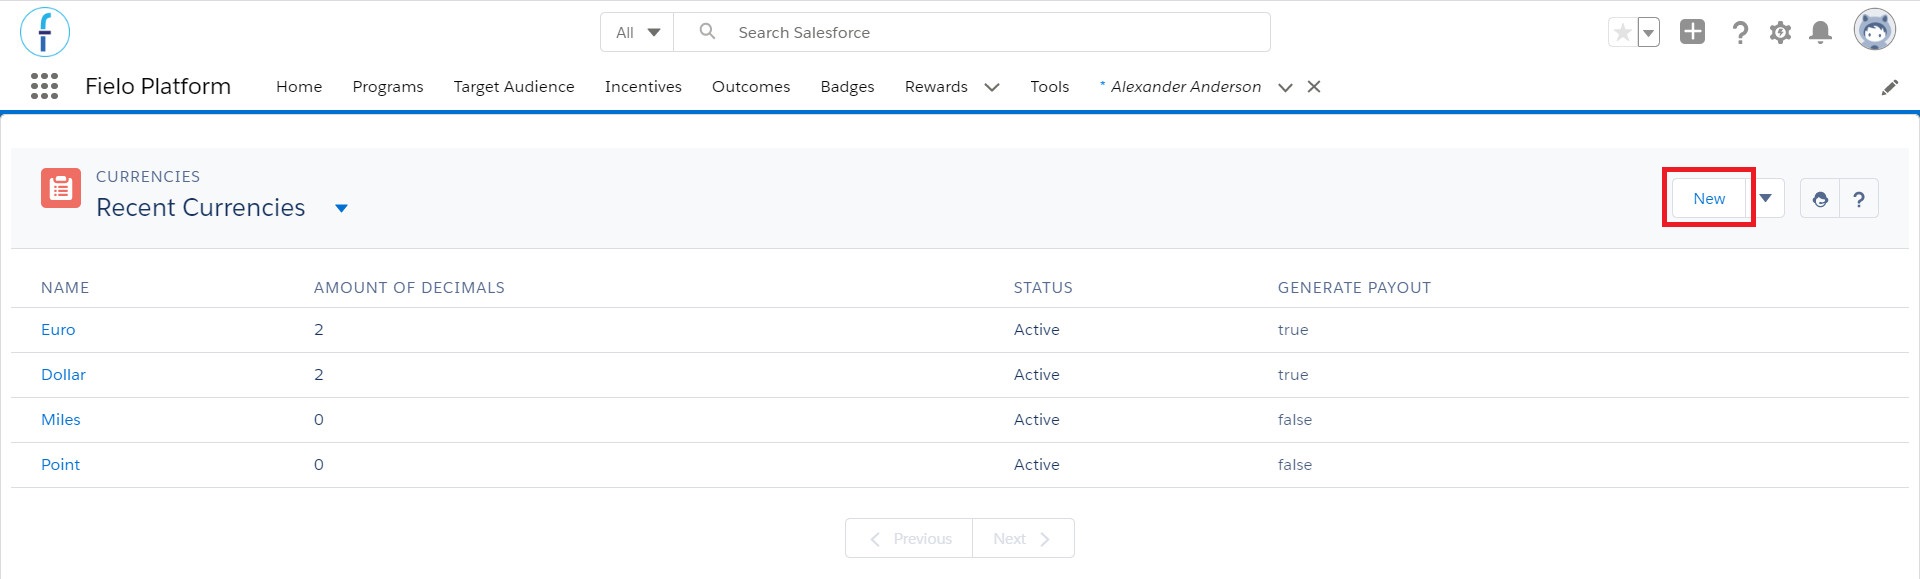
On the Currencies page, click New.
Enter the name of your currency in plural form and the number of decimal places you want to show.
You can have a maximum of 3 decimal places. If you don't want any decimal places (i.e. you want only whole numbers), leave the Number of Decimal Places field blank.
If you're creating a currency to be used as a Payout, remember to check the Generate payout option. It will automatically have only 2 decimal numbers.
When you're ready, click Save.
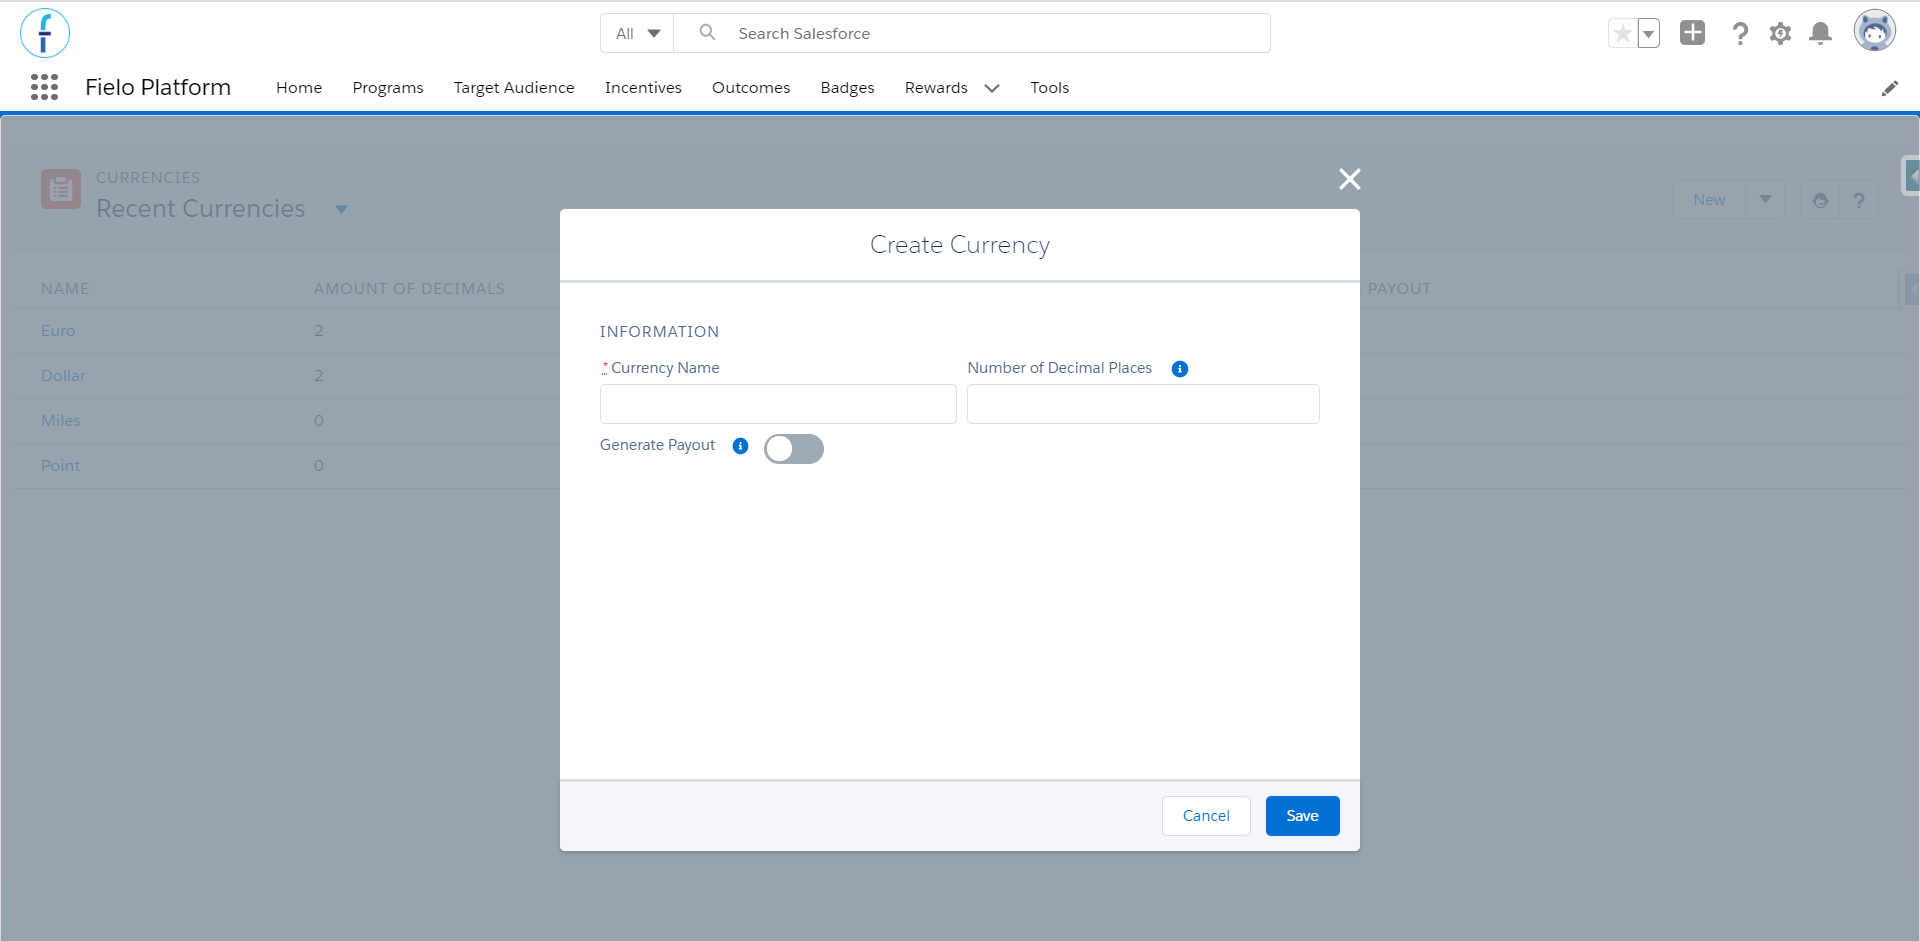
You now have a new currency in Draft. If you made a mistake in the name or number of decimal numbers, you can still edit your currency to make any changes.
You can only edit your currency before implementing it. Once it's implemented, you cannot change its name, the generate payout option or the number of decimal places allowed.
On the currency page, you'll also see the new fields that will be created in order to connect your new currency to Fielo objects.
Before implementing your new currency, though, you need to set a Remote Site to your Org. In order to do that, go to Salesforce Setup, quick find and select Remote Site Settings and then click on new remote site.
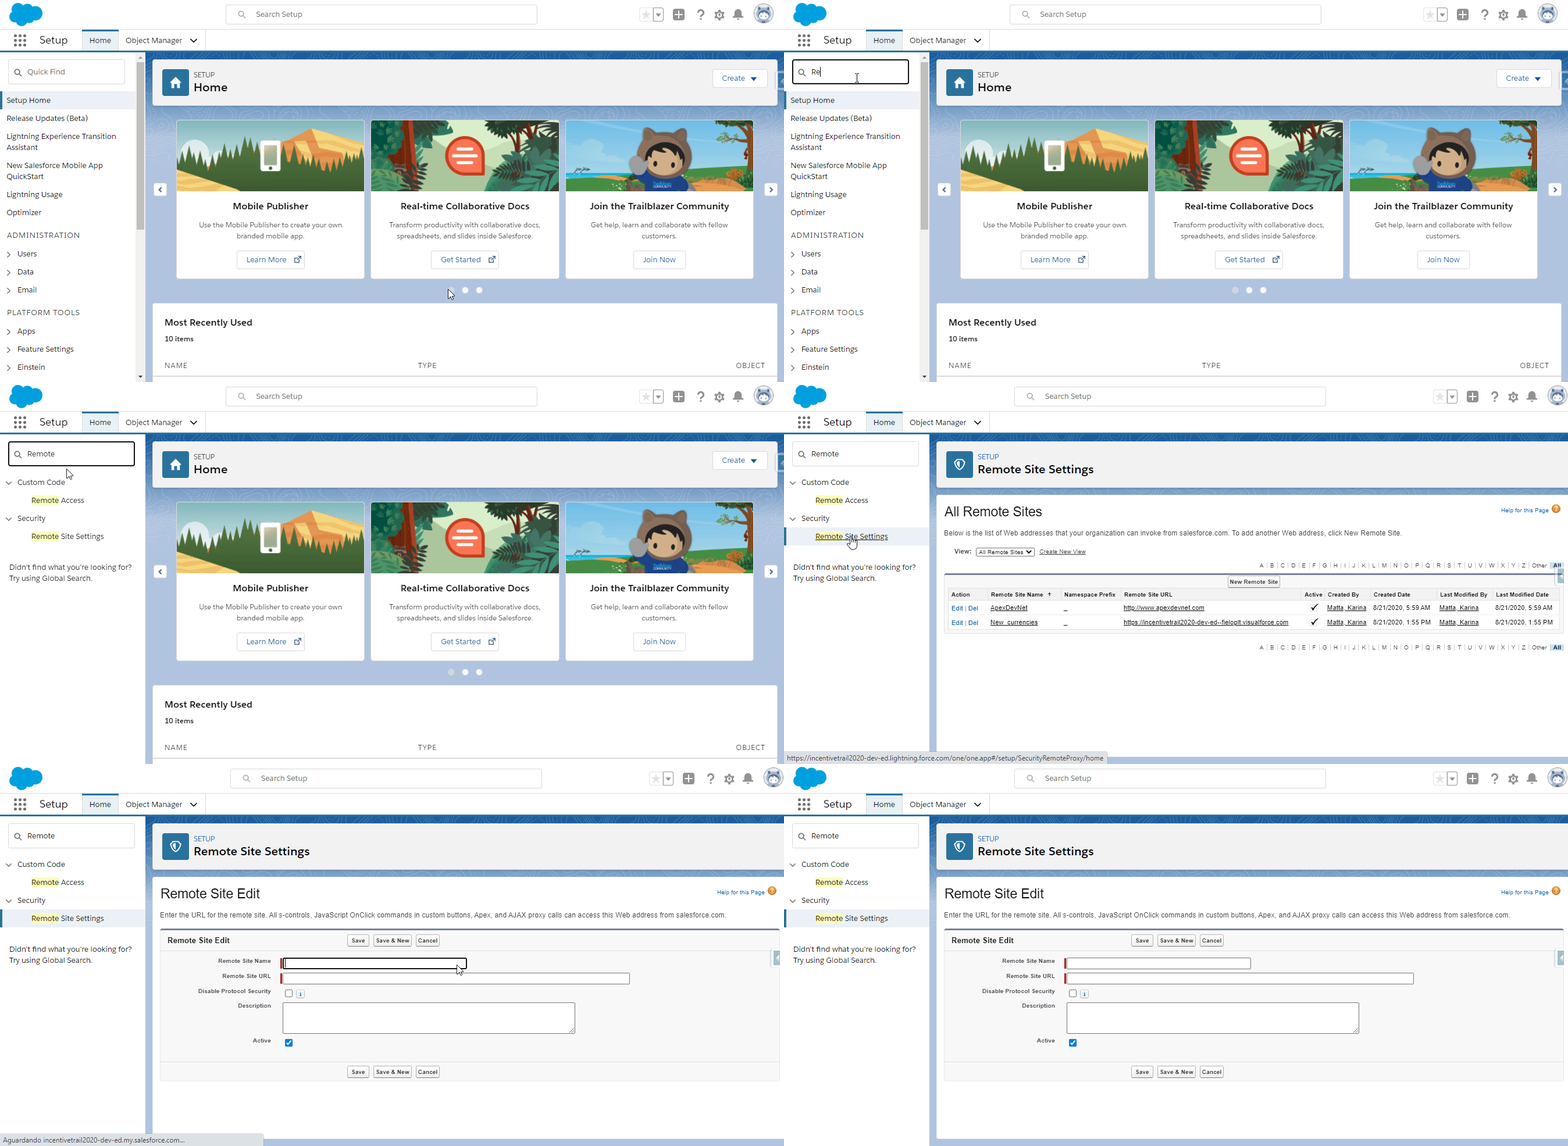
In the Remote Site URL field, add https://[Domain].visualforce.com/services/Soap/m/42.0, replacing [Domain] with the Salesforce domain where the currency is being created. Insert a Remote Site Name you prefer and click on Save.
Or:
If you try to implement the currency before setting the Remote Site, an error message will appear. Copy the URL the system displays in the message, paste it in the Remote Site URL field, insert a Remote Site Name you prefer and click on Save.

Now you will be able to implement your currency! When you're ready to rock and roll, click Implement Currency.
Program Currencies
Program Currencies map all existing currencies to the program where they'll be used. This means that for every currency you want to include in a program, you must create its corresponding Program Currency.
Program Currency determine which currencies each of your loyalty programs will have and let you specify unique settings for each type.
New ProgramsWhen you create a new program, all currencies that you've already created will be included in the new program automatically.
Creating a Program Currency
To create a new Program Currency, simply choose the Program in which you'd like to use your currency. Once there, navigate to the Program Currencies related list and click New.
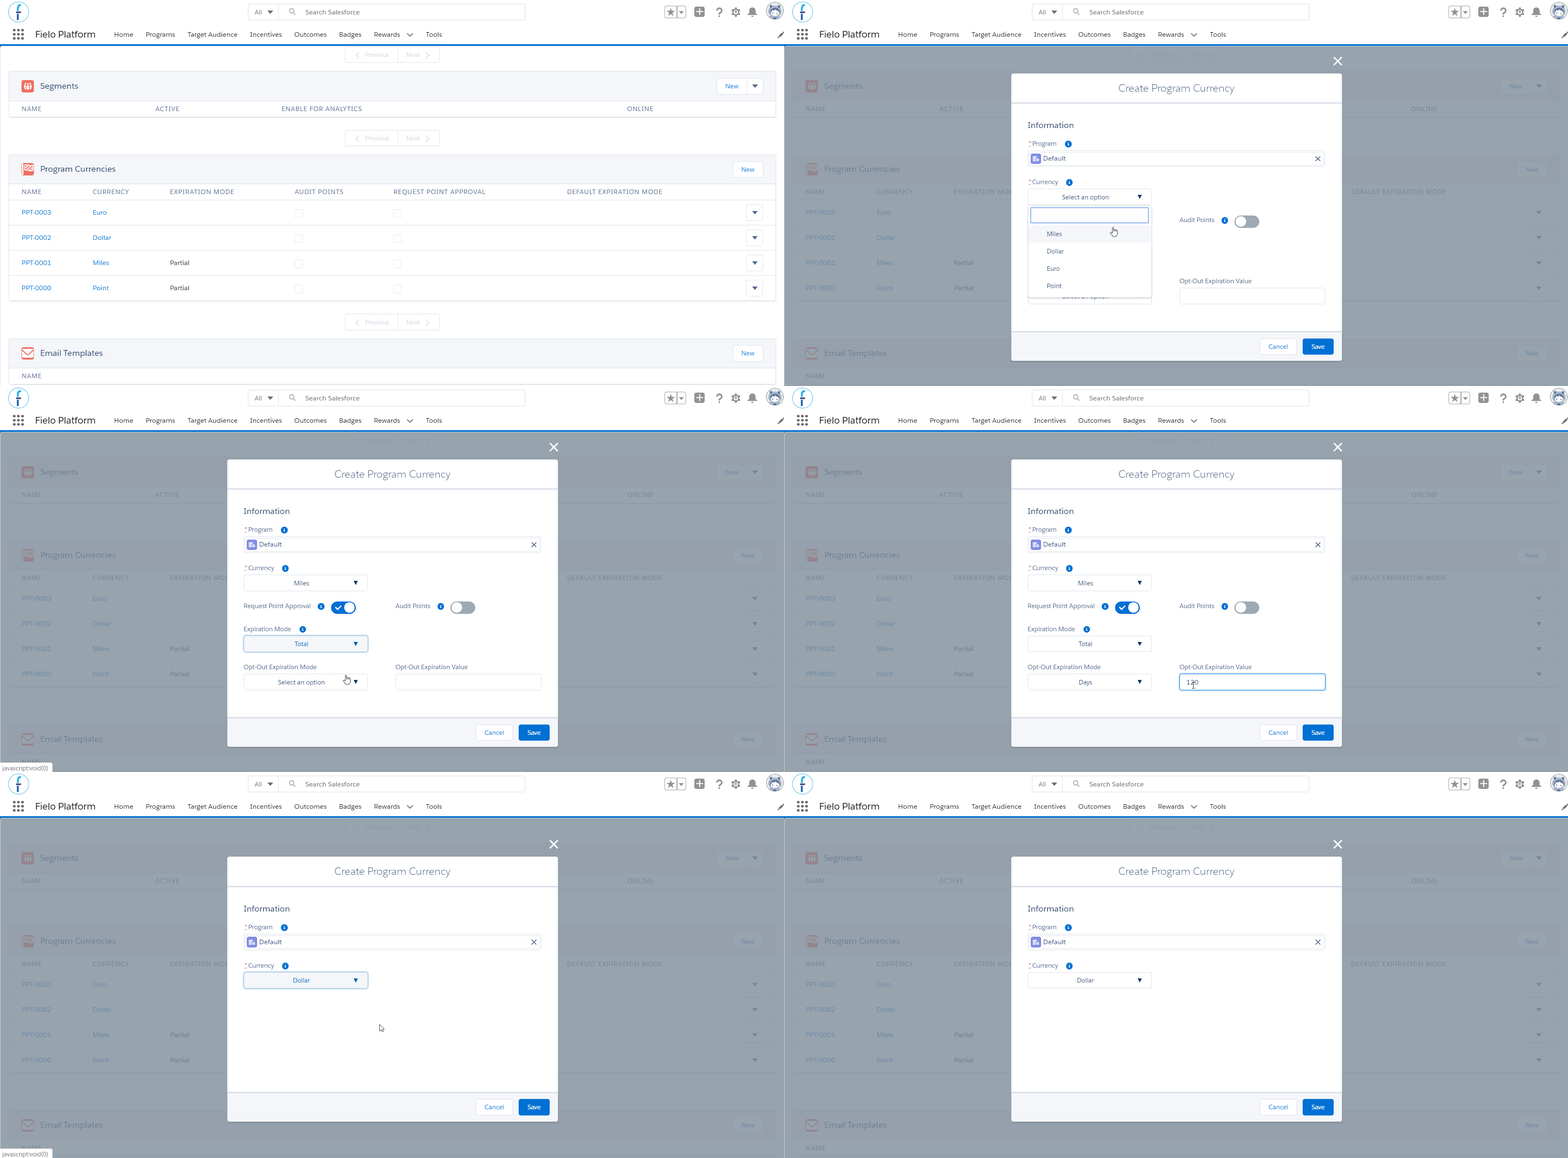
Now you need to check and complete the following Program Currencies settings:
- Program: the program you're connecting your currency to. By default, the program you're in is already selected.
- Currency: choose which currency you want to connect to the current program.
- Request Point Approval: When , each new currency record must be approved before giving it to members and an Authorization Workflow must be established. In this case, currencies are generated with the status of Pending and are only made part of a member's balance upon approval. Otherwise, when , all point records are created with a status of Approved.
- Audit Points: When , IAS will track which currency is used in each redemption. It applies only to redemption transactions' currency consumption - does not apply to expiration transactions.
- Expiration Mode is where you choose if records for this currency will ever expire and, if so, how. There are three expiration options:
- None: Points generated by a currency will never expire. They'll remain valid as long as the program they belong to exists.
- Total: All currency records from a member's balance will expire completely by means of a transaction of type Expiration. The expiration date must be prior to the date the expiration takes place and the member must have a positive balance. Total Expiration Mode only works by using the Expire Total Points API or Expire Total Currency API.
- Partial: Currency records expire independently according to the Rules or Challenge Rewards that generated them. Expiration is carried out by the batch process called Expired Points: Partial Mode, and each record is expired individually. The expiration date must be prior to the date the expiration takes place and the member always maintains a positive balance.
Regardless of expiration mode, only currency records with status of Approved can be expired. Currencies that generate payouts cannot be expired.
- Default Expiration Mode & Value: If your program currencies is using the partial expiration mode, you can (optionally) set a default expiration period. This means that, when you award this currency in a new Rule or Challenge Reward, the expiration period that you specify here will be automatically filled in. This is also how the expiration date will be calculated for points refunded from reverted redemptions.
- Opt-Out Expiration Mode & Value: If a member opts out of the program, this (optional) expiration period sets a time limit on how long the member has to redeem any points they may have. This won't apply if the member's points would already have expired in less time than the time period you set here. If you don't set a time period, the expiration date that points already have will still apply. If you set a mode and set the value to 0, member points will be expired immediately upon being opted out.
Once you're happy with the all the settings, click Save.
For Currencies that have Partial Expiration Mode to expire on a regular basis, you need to schedule a batch process manually.
- From Salesforce Setup, quick find and select Apex Classes.
- Click on Schedule Apex.
- Give it the name "Partial Expiration Point Batch" and, for Apex Class, search for and select PointsPartialExpirationBatchSchedule.
- Under Frequency, choose Weekly and check all days.
- Give it an end date of as far out into the future as possible and a preferred start time of 12:00 AM.
- Click Save.
Editing Program Currencies: Point
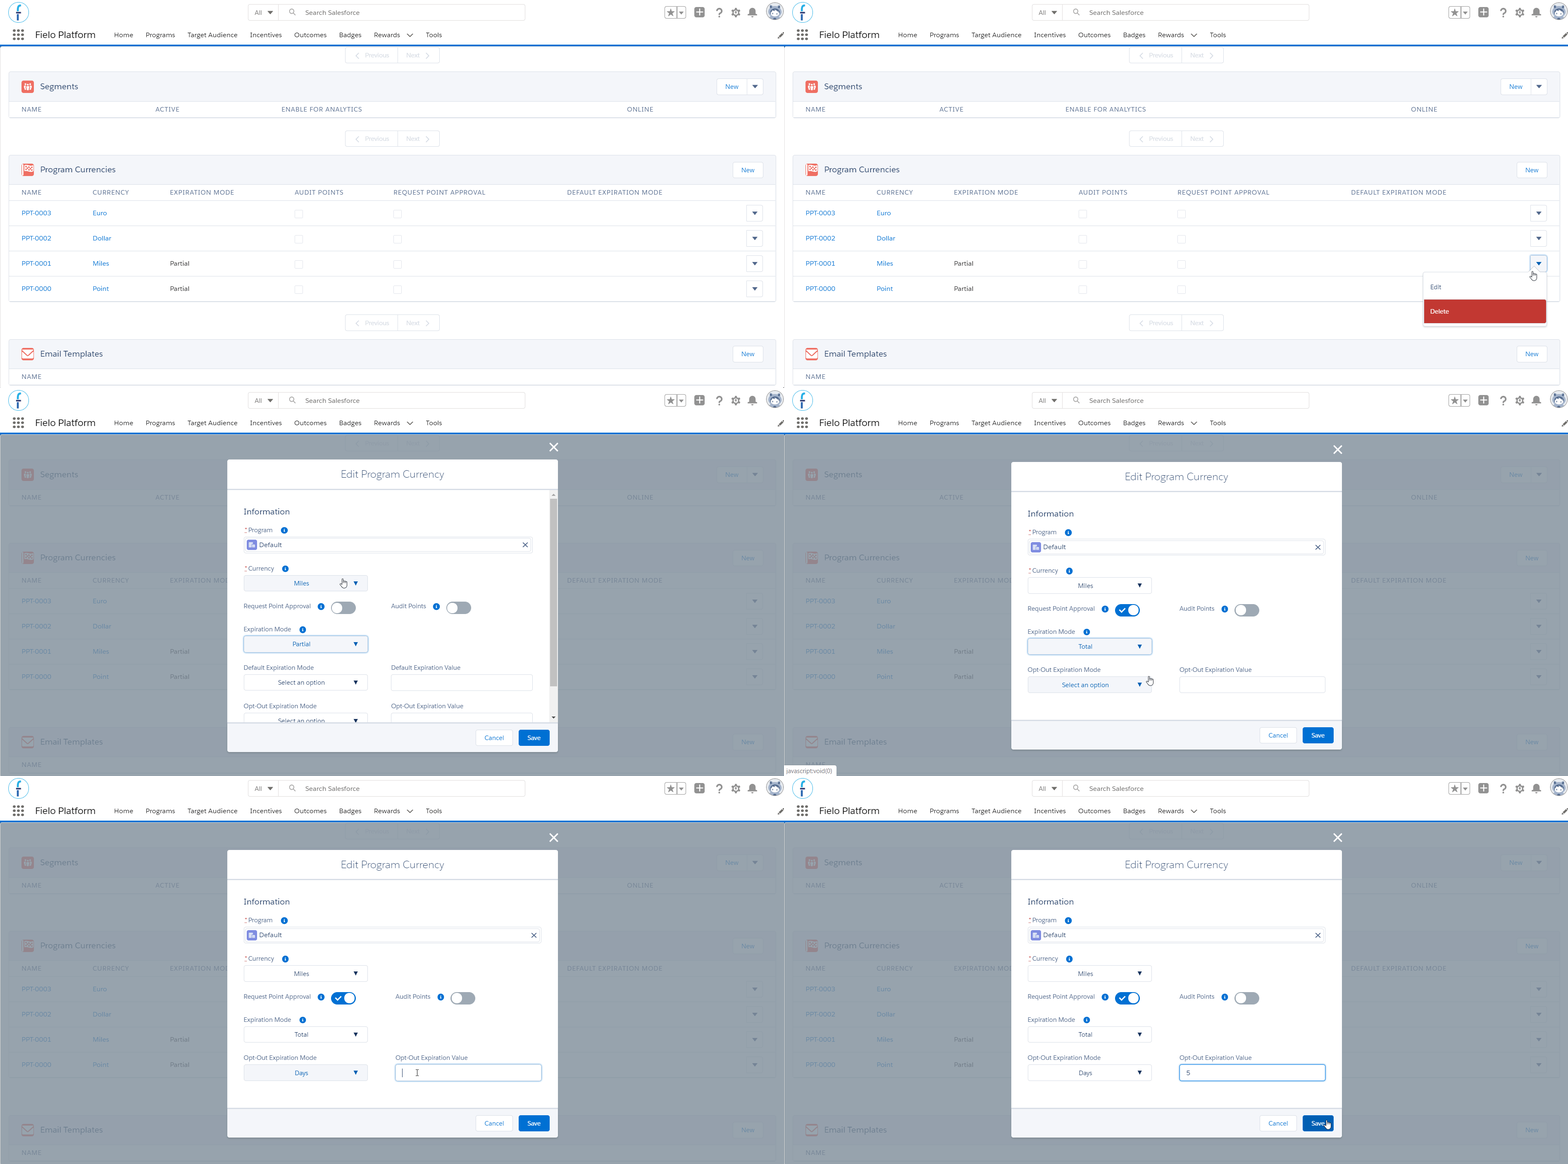
If you're using standard Points, you can change the default settings just by editing Point.
Updated over 1 year ago