
Upgrade from Spring '21 to R1 2022
If you're using Fielo’s Spring '21 release (v2.114), upgrade to R1 2022 (v2.134) to take advantage of all the features added to the platform and improvements done. With this release, the users will have a greater first-time experience with the platform, being able to set up a program with levels, segments, and incentives in a matter of a few minutes. It also brings completely revamped Analytics features, with more than 20 out-of-the-box reports that will help you to understand the program's performance.
Take a look at all of the new features available in R1 2022 by clicking here. Continue below to upgrade to the latest version.
Versions Prior to 2.114If you're using a version prior to FieloPLT v2.114, we suggest you follow all the Upgrading steps to get you to Spring '21 release (v2.114) before proceeding:
- Upgrade steps for versions 2.23 through 2.51.
- Upgrade from Spring '18 to Summer '18.
- Upgrade from Summer '18 to Winter '19.
- Upgrade from Winter '19 to Spring '19.
- Upgrade from Spring '19 to Summer '19.
- Upgrade from Summer '19 to Winter '20.
- Upgrade from Winter '20 to Spring '20.
- Upgrade from Spring '20 to Spring '21.
Please, make sure you're logged into your Salesforce org and have system administrator permissions before getting started.
How to Upgrade
Before proceeding, follow these steps to upgrade:
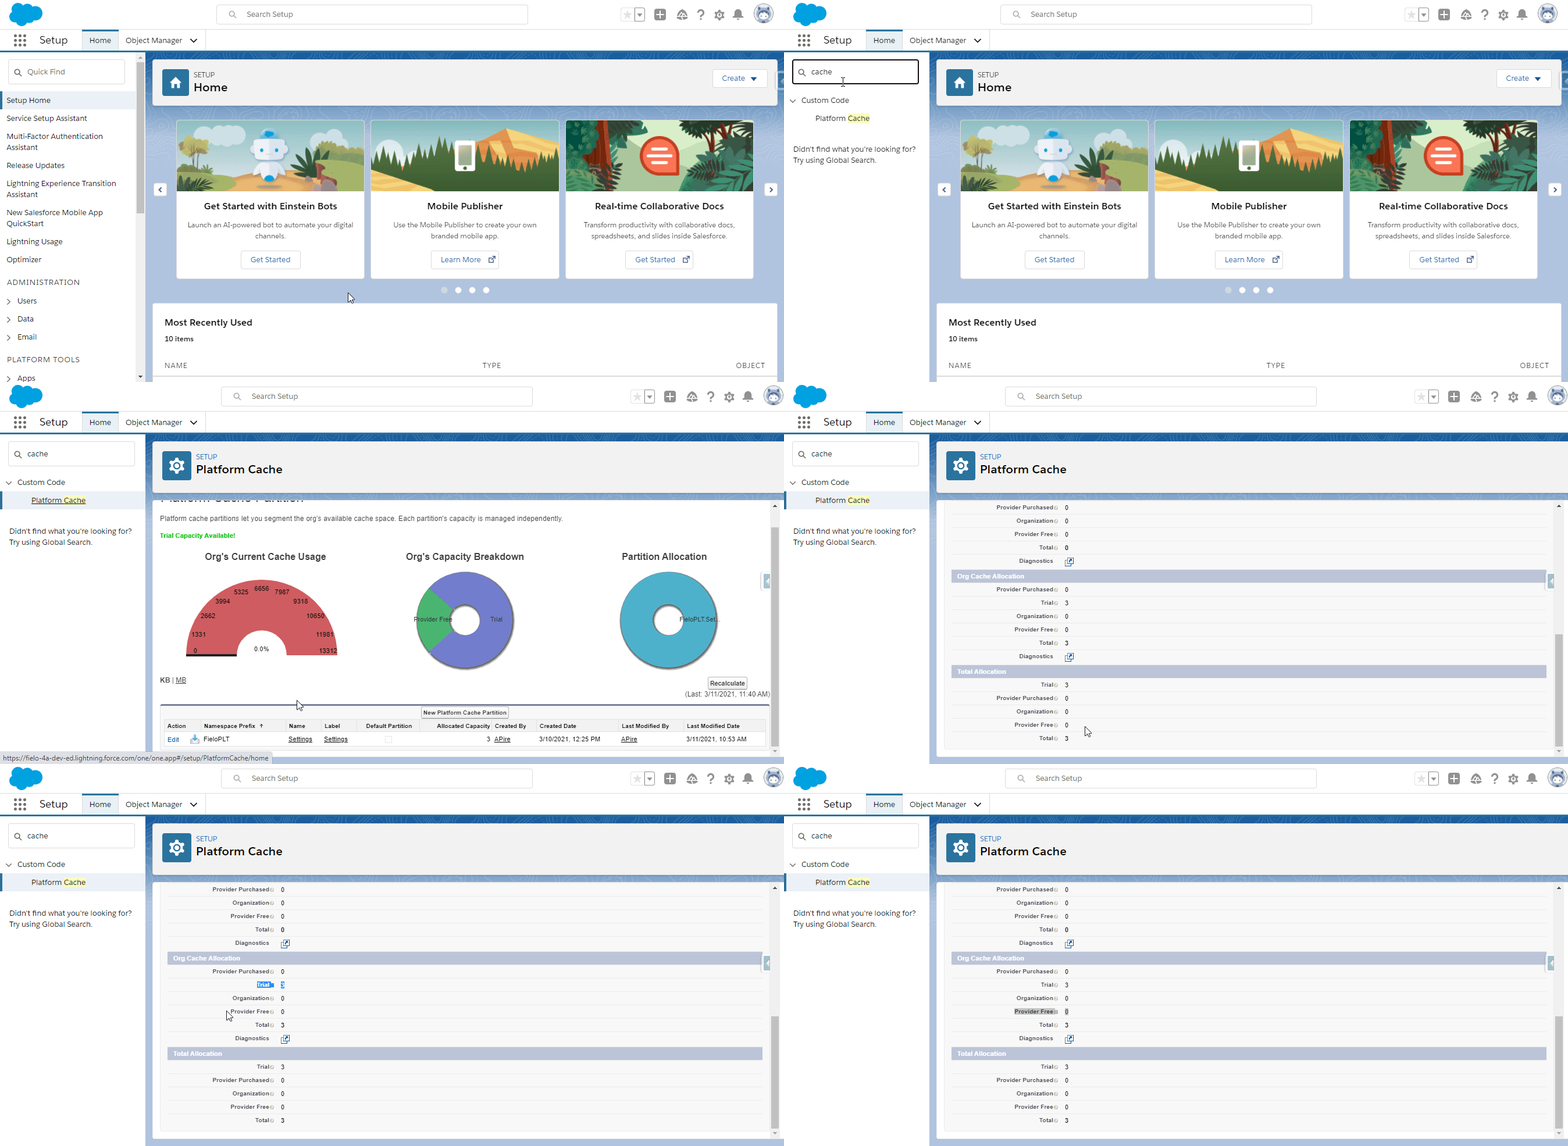
- Make sure that your org has Platform Cache enabled and 3MB or more of Org Cache allocated to FieloPLT.
- Before continuing, take a look at the Activate Incentives step in this guide.
- Click here to access the Fielo installation package.
- If any internal users that are not admins will use Fielo, click Install for Specific Profiles and select Full Access on the profile(s) of those users. If only System Administrators will use Fielo, or if internal users are granted permissions via the FieloPLT Admin permission set, click on Install for Admins Only.
- Click Upgrade. When the first part of the upgrade process is finished, you (or the org admin) will be notified by email.
After the install process is done - i.e. you received the email confirming that it was successful - and if you are in fact upgrading Fielo from a previous release to the R1 2022 release, performing ALL the manual steps is MANDATORY.
Skip Fielo Setup
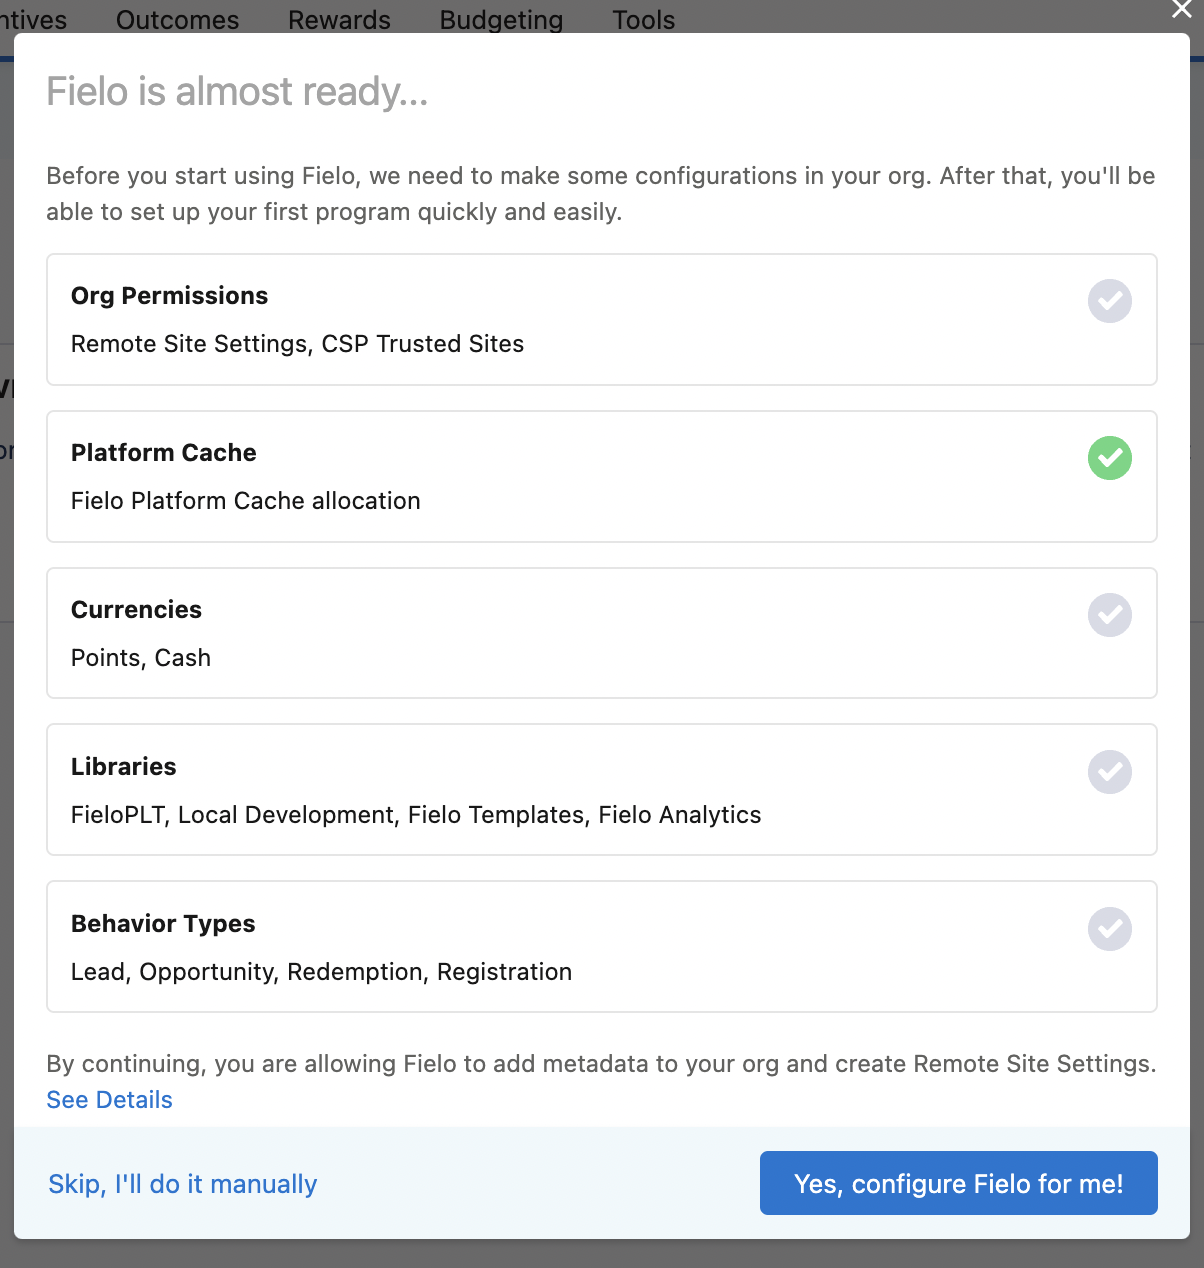
Since you already have Fielo up and running in your environment, you will want to skip the Setup modal. But before doing so, it's best to verify a few things first.
Keep reading...
Most customers will already have Org Permissions and Platform Cache set up (the first two checkboxes should be lit green).
If Org Permissions is not green...
In Salesforce Setup, go to Remote Site Settings and ensure that you have an endpoint pointing to your org's base URL.
Then, back in Setup, navigate to CSP Trusted Sites and verify that the following trusted sites are enabled with the CSP directives relevant to your use case:
MyDomain.my.salesforce.com, where MyDomain is your org's My Domain NameMyDomain.file.force.com, where MyDomain is your org's My Domain Name
If Platform Cache is not green...
In Salesforce Setup, go to Platform Cache and ensure that FieloPLT Settings has at least 3MB of Org Cache Allocation.
When all is good...
Go ahead and click "Skip, I'll do it manually."
Activate Analytics and/or Incentive Templates (Optional)
If you want to use our new suite of analytics, navigate to the Tools tab and activate the FieloAnalytics library.
If you want to use our new incentive templates for Opportunities and Leads, navigate to the Tools tab and activate the FieloTemplates library.
Activate Incentives
When you install R1 2022 in your Org, the Logical Expression field on Rules and Missions will be changed due to an improvement in the platform. Because of that, the Incentives without criteria will have a minor impact, which you can solve in two ways:
- Deactivate the Incentives before upgrading (Recommended)
Deactivate all of your Incentives before performing the upgrade and, when the upgrading process is complete, go back to the Incentives and activate them again.
In this case, your Incentives will not be processed for your members during the time that they are inactive.
- Leave the Incentives active and upgrade
If you choose to leave your incentives active during the upgrade process, all Incentives that were Active before the upgrade will automatically move to Edited status. To change their status back to Active, go to each of the Incentives and click on the Apply Changes button.
In this case, your Incentives will be processed normally for your members throughout the upgrade process. Clicking on Apply Changes will create a new version, but the mechanics of the Incentive will be the same as before. For performance and clarity purposes, we do not recommend leaving incentives in Edited status indefinitely.
Reward's Visibility (optional)
Fielo now allows you to decide if you want your program's rewards to be displayed in the Rewards Catalog lightning component (i.e. be available for redemption) or not. Before this change, all rewards that belonged to the program would be visible, including the ones that you just wanted to use as instant rewards.
When you upgrade your Org from Spring '21 to R1 2022, all of the existing rewards in the Org will automatically have the Show In Rewards Catalog option checked. So, if you had any rewards in your Spring '21 Fielo version that were marked as instant and that you don't wish to be available for redemption, you will have to edit this reward and manually uncheck the Show In Rewards Catalog option in it.
In fact, you must do this in all of the rewards that should not appear on the Catalog component, no matter if they are instant or not.
- Go to the Rewards tab in the Platform.
- Enter the reward page and click on Edit.
- On the form that will open, click on Next.
- Uncheck the Show In Rewards Catalog option.
- Save.
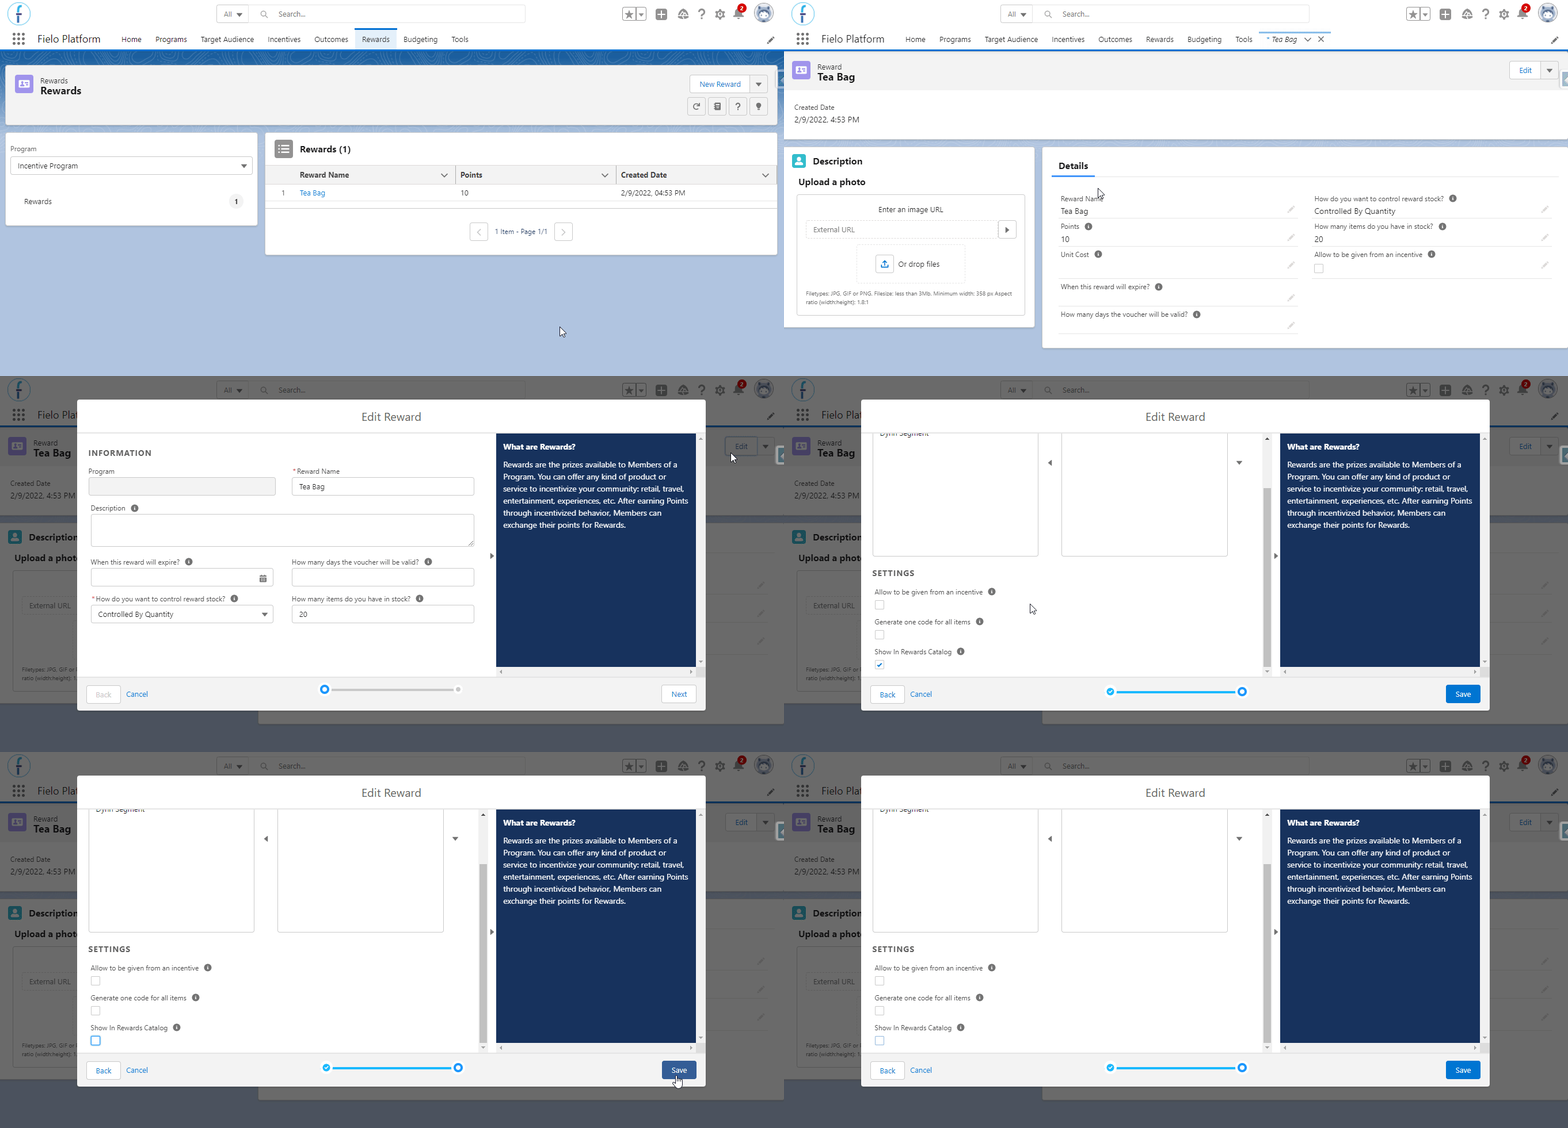
Making the reward visible in the Catalog
Registration Event Automatic Generation (optional)
With Fielo's new release, we have added a new Custom Setting that will automatically create a Registration event when an individual member is created - no matter how. It is automatically enabled when you use the Fielo Setup.
This feature will help you to better incentivize your members from the moment that they join the program: you can create a Promotion to give Points to members for registering into your program without any additional configuration. However, you can disable it if you wish to save storage space in your Org, for example.
For that, follow these steps:
- Go to Salesforce's Setup and look for and access Custom Settings.
- Once there, click on Manage next to Public Settings.
- Click on Edit in order to edit the settings.
- Look for the Generate Registration Event and uncheck it.
- Save.
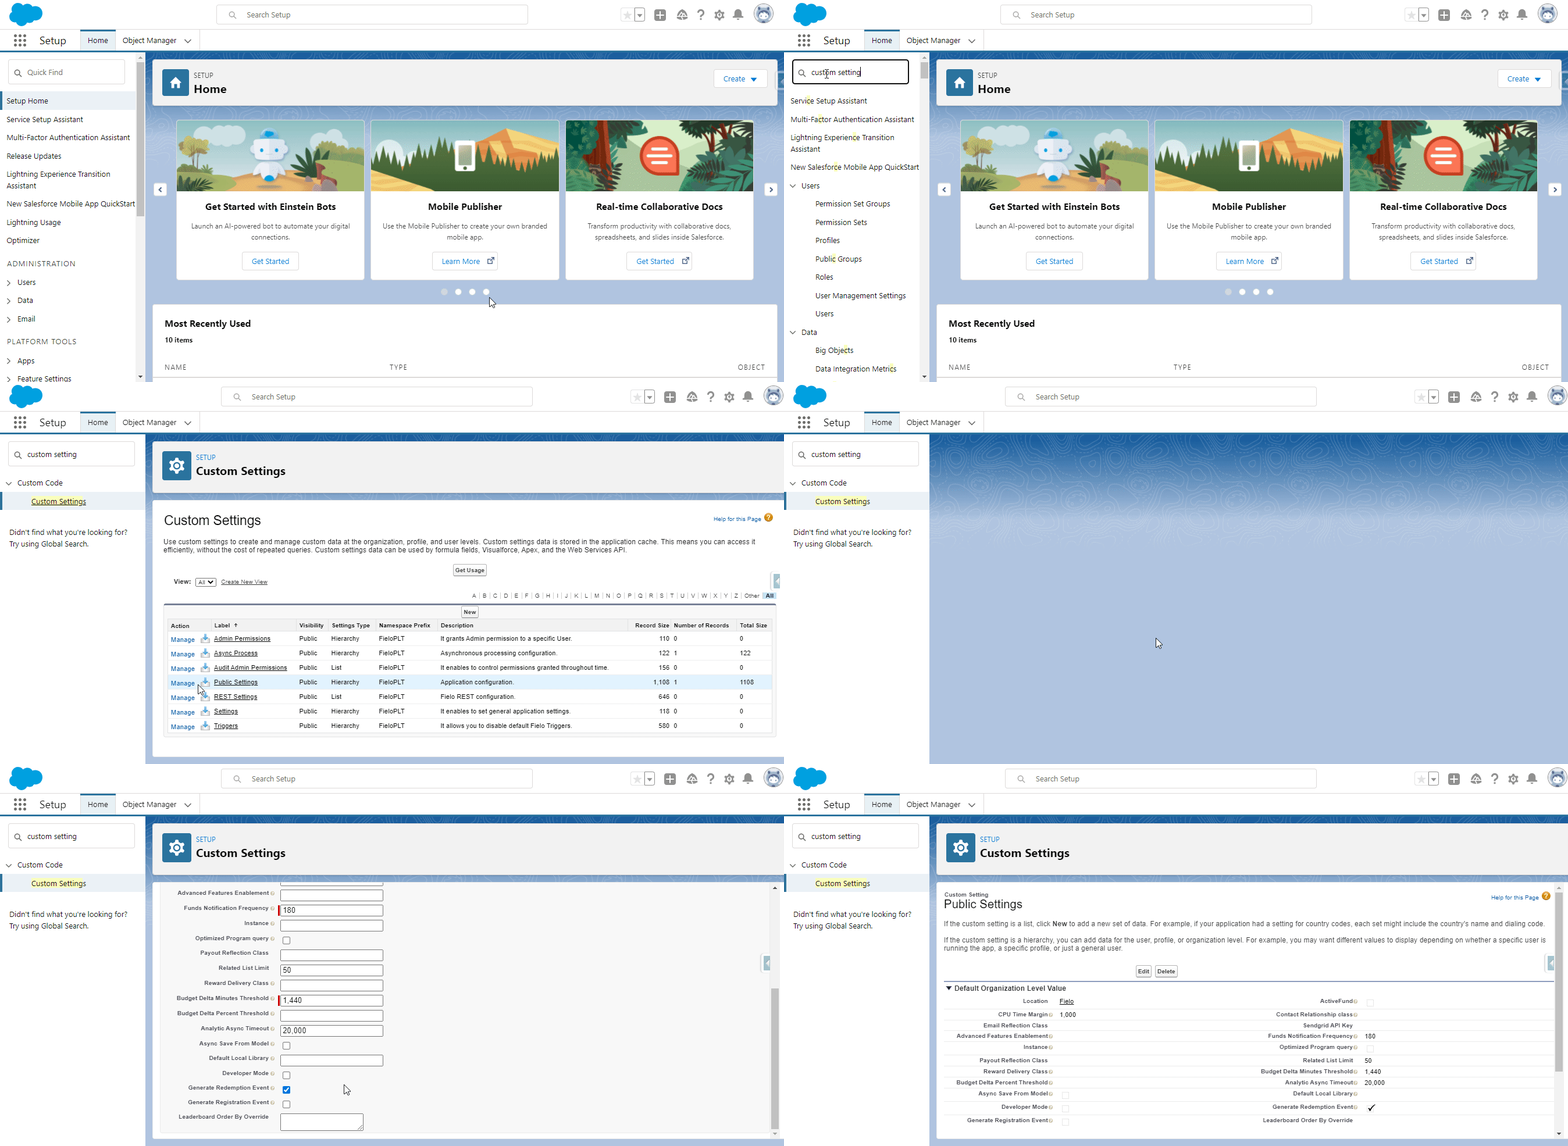
Disabling the Generate Registration Event custom setting
Badge Layout Configuration
In R1 2022, we have improved Fielo in Lightning Experience, so you will see that some page settings were replaced by Lightning Web Components, such as the batch management page and the badge page. However, because of that, the Badge's Page layout needs to be reviewed in order to add some related lists to it again.
For that, you'll need to follow these steps:
- Go to the Object Manager, where you are going to search for and access the Badge Object.
- On the Badge Object page, go to Page Layouts.
- Click on Related Lists and drag & drop these lists to the Badge layout:
Member Badges
Rules
Challenge Rewards
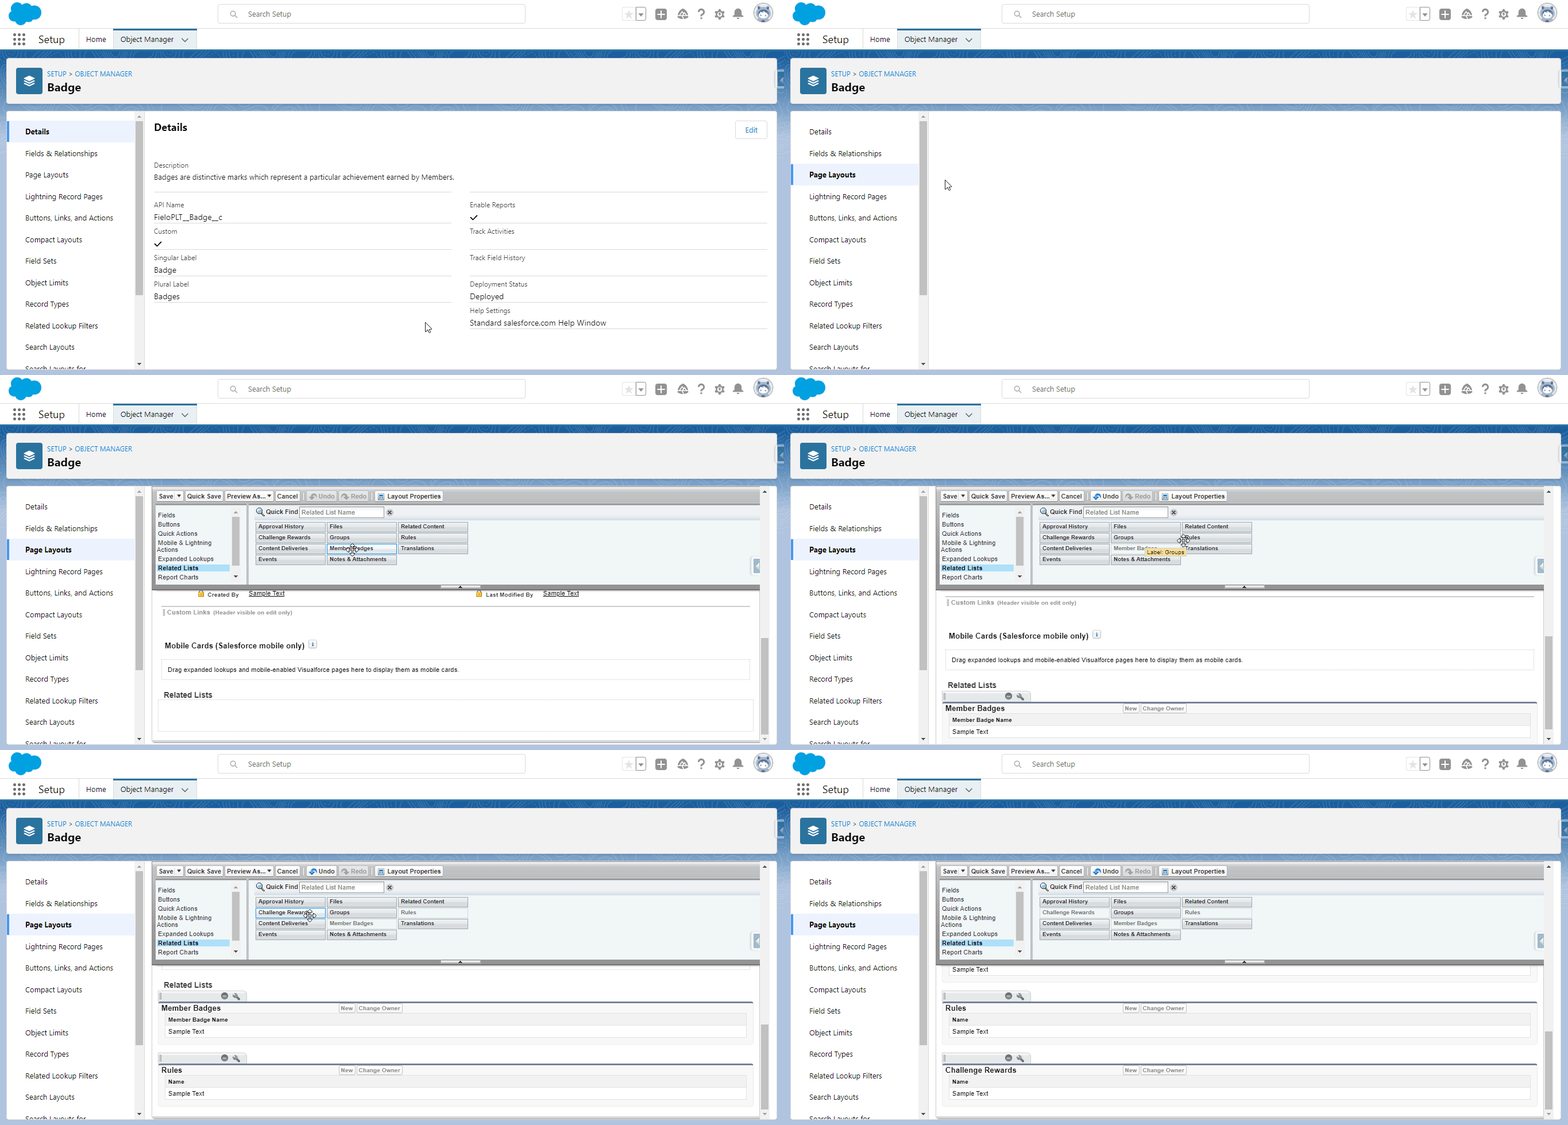
Adding lists to the Badge layout
- After that, you'll need to add a few fields in each related list. Click on the 🔧 on the Member Badges list.
- On the modal that will open, select the fields from the Available Fields column and send them to the Selected fields column. Check the image below (All Badge's related lists' fields) to see which fields must be added to each of the lists.
- Open the Buttons tab and uncheck all the buttons.
- Click on Ok and repeat this process (steps 4, 5, and 6) for the other two lists.
- Click on Save to save the alterations on the layout.
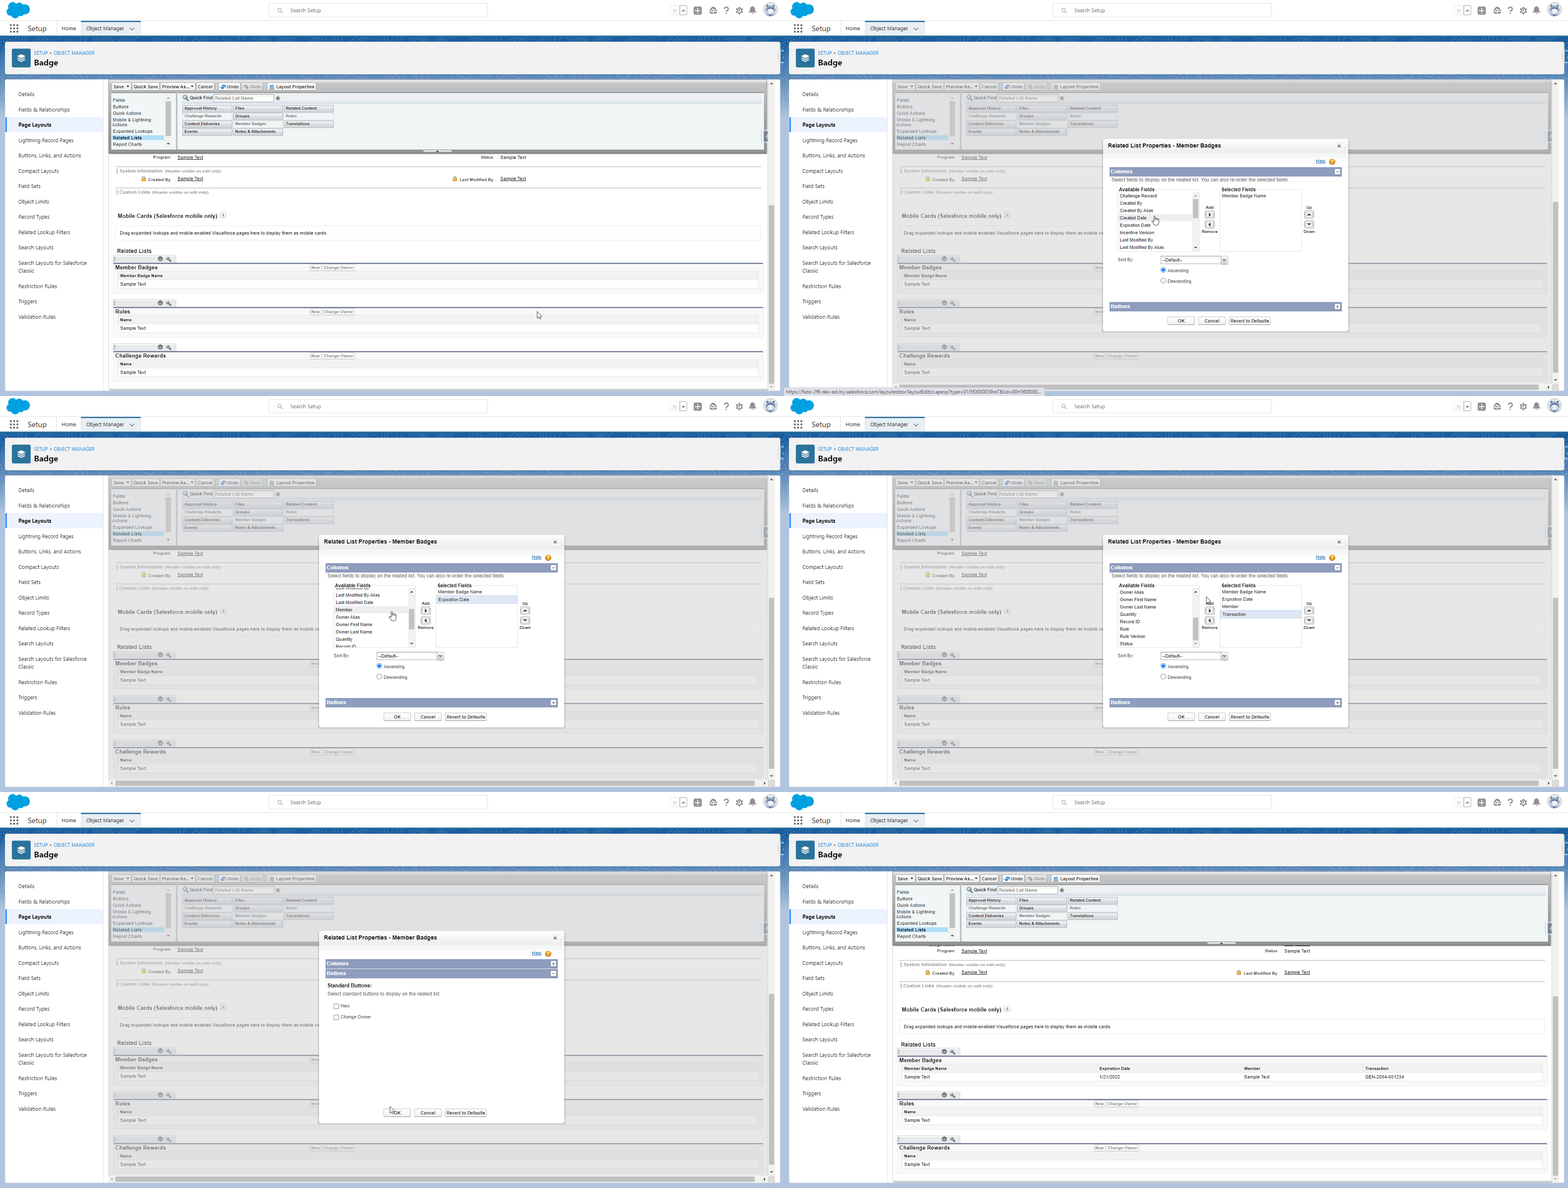
Adding fields and removing buttons from the Member Badges related list
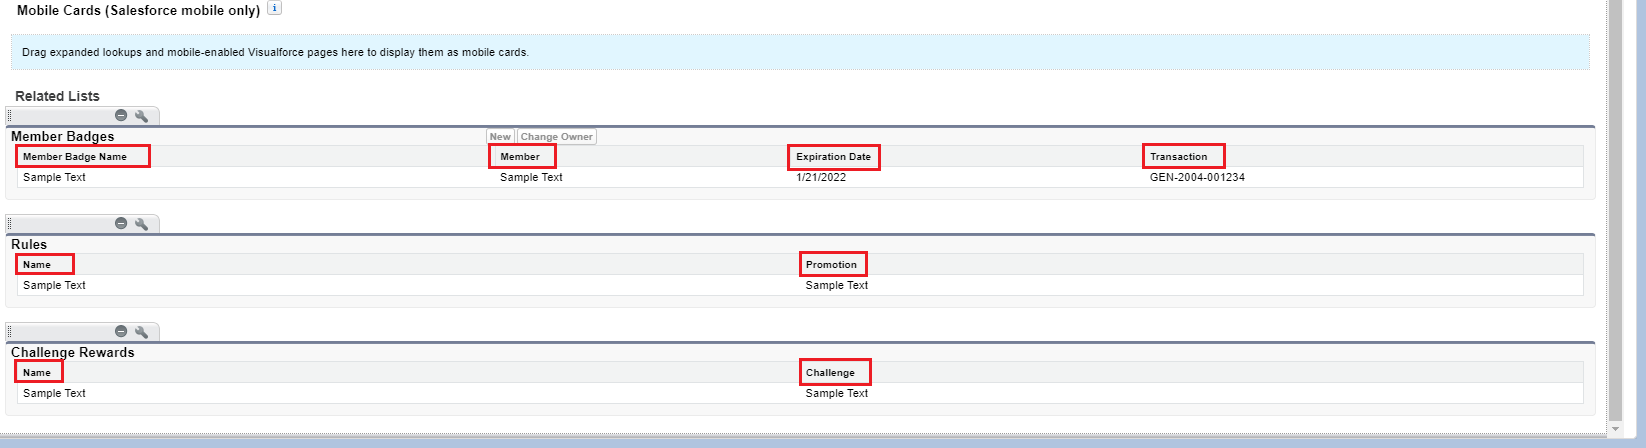
All Badge's related lists' fields
Library Layout Configuration
Another aspect that we have improved was the analytics, which now has its own library where you can check and manage all the KPIs that come with Fielo's installation. However, because of that, the Library's Page layout needs to be reviewed in order to add some related lists to it.
For that, you'll need to follow these steps:
- Go to the Object Manager, where you are going to search for and access the Library Object.
- On the Library Object page, go to Page Layouts.
- Click on Related Lists and drag & drop these lists to the Badge layout:
Behavior Types
KPIs
Templates
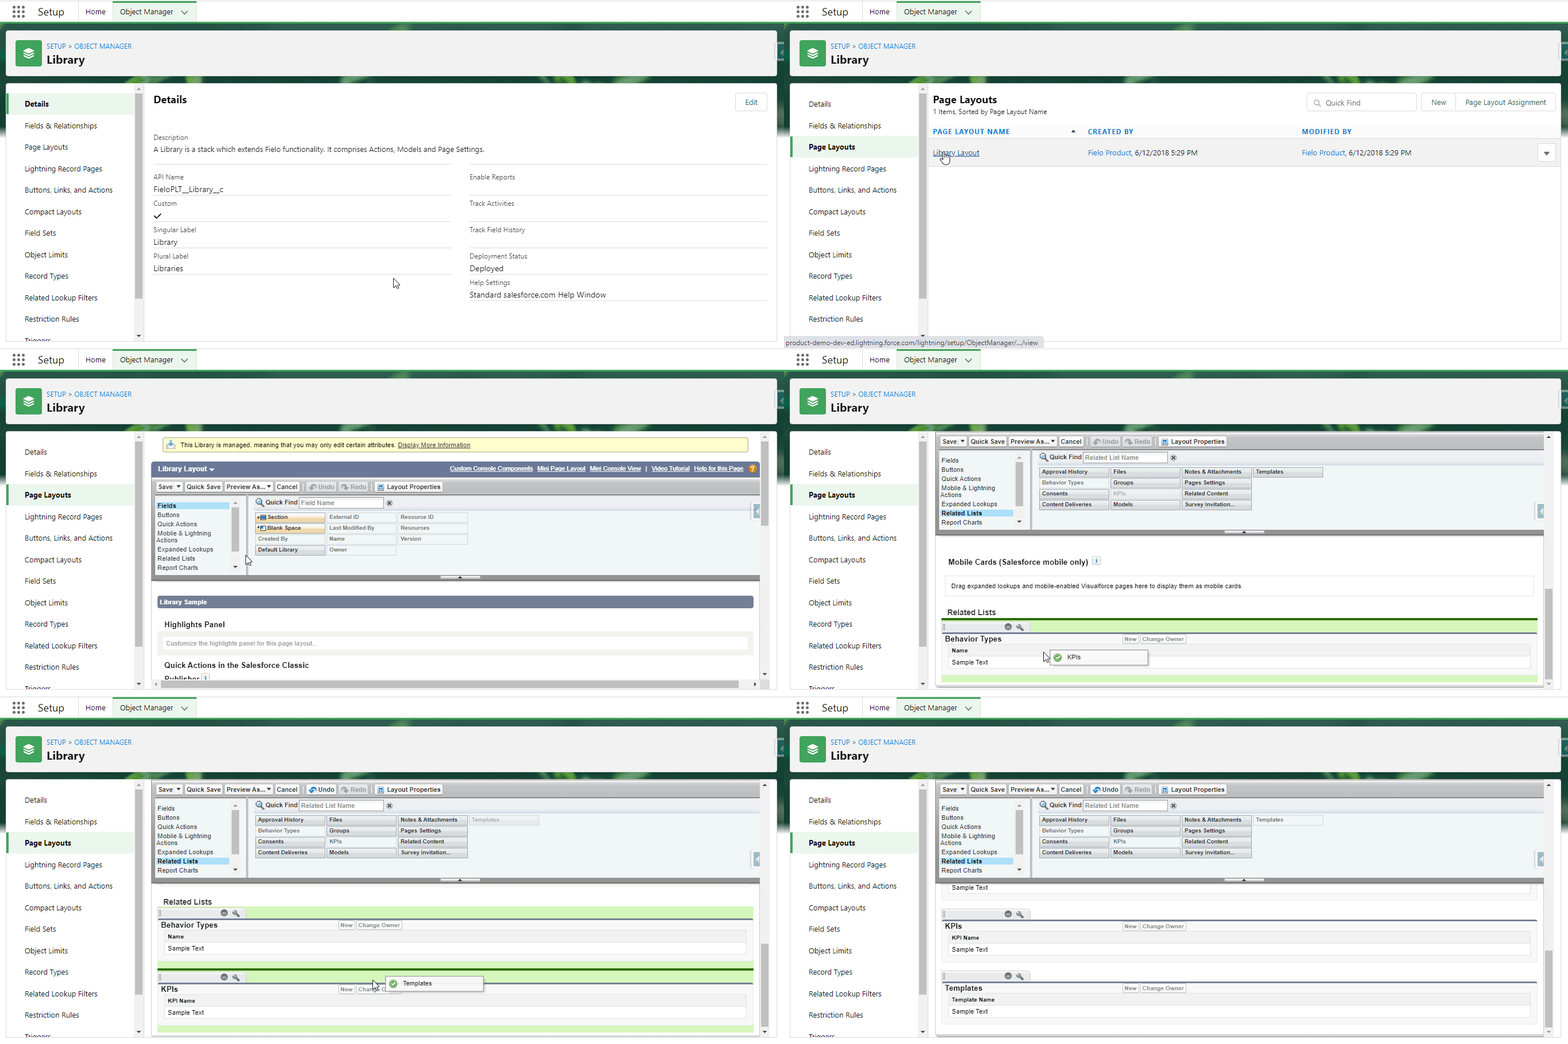
Adding lists to the Library layout
- After that, you'll need to add a few fields in each related list. Click on the 🔧 next to the Behavior Types list.
- On the modal that will open, select the fields from the Available Fields column and send them to the Selected fields column. Check the image below (All Library's related lists' fields) to see which fields must be added to each of the lists.
- On the Templates related list, also open the Buttons tab and uncheck all the buttons.
- Click on Ok and repeat this process (steps 4, and 5) for the other two lists.
- Click on Save to save the alterations on the layout.
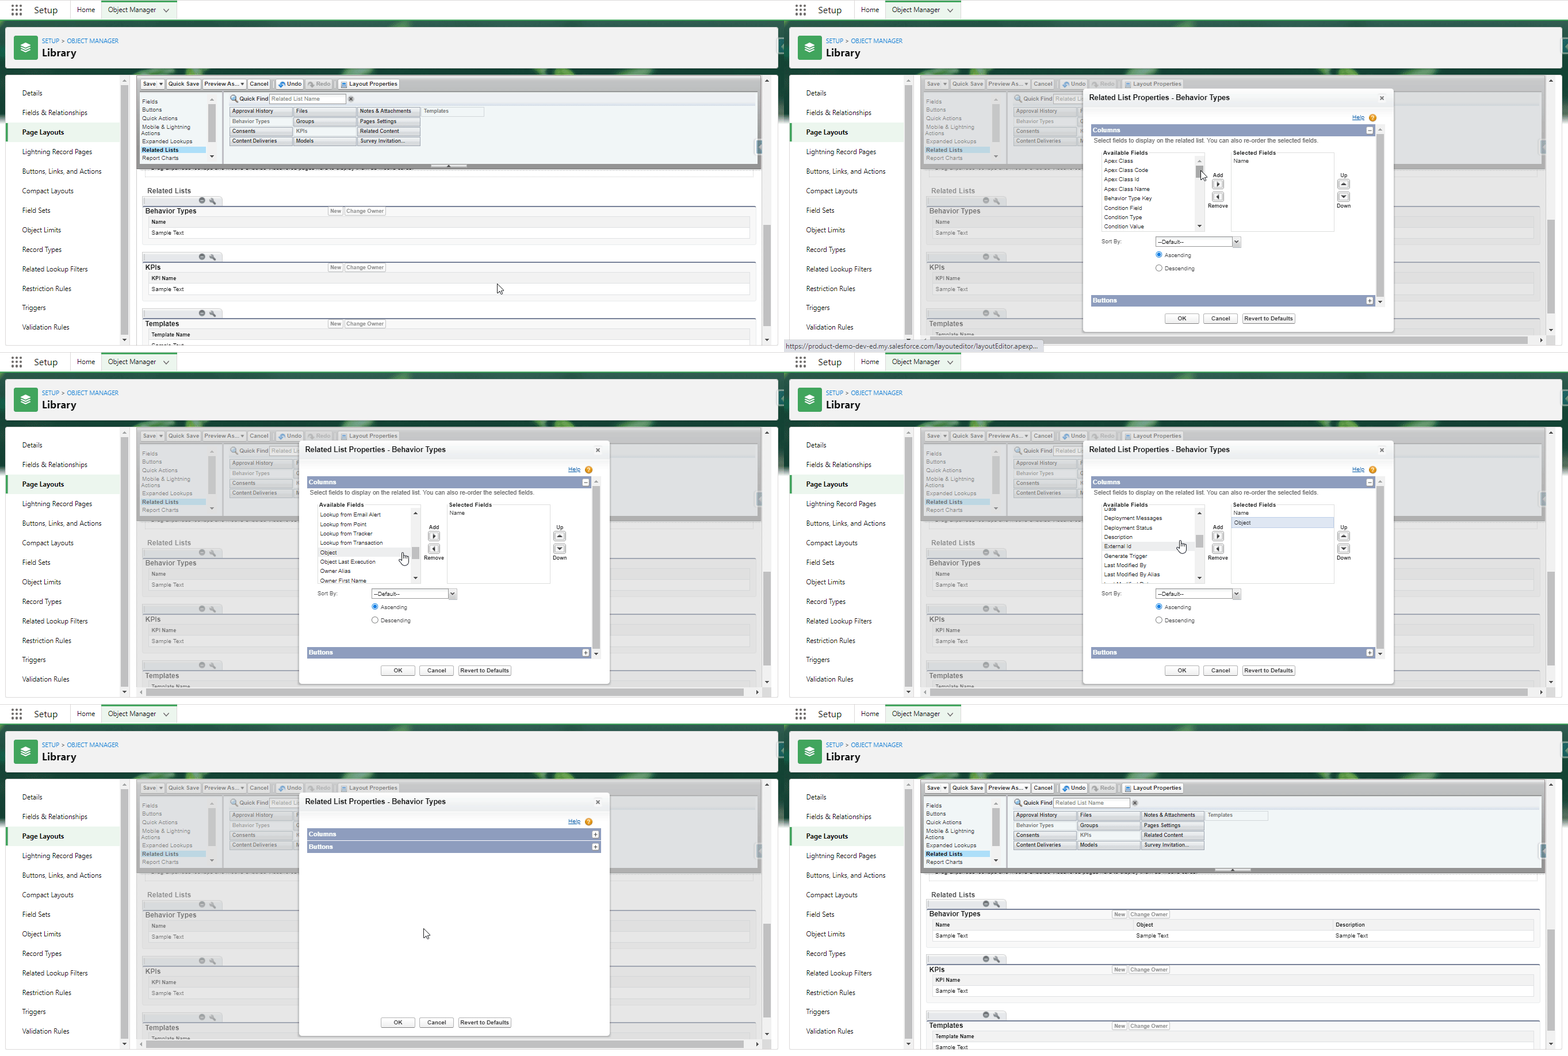
Adding fields on the Behavior Types related list
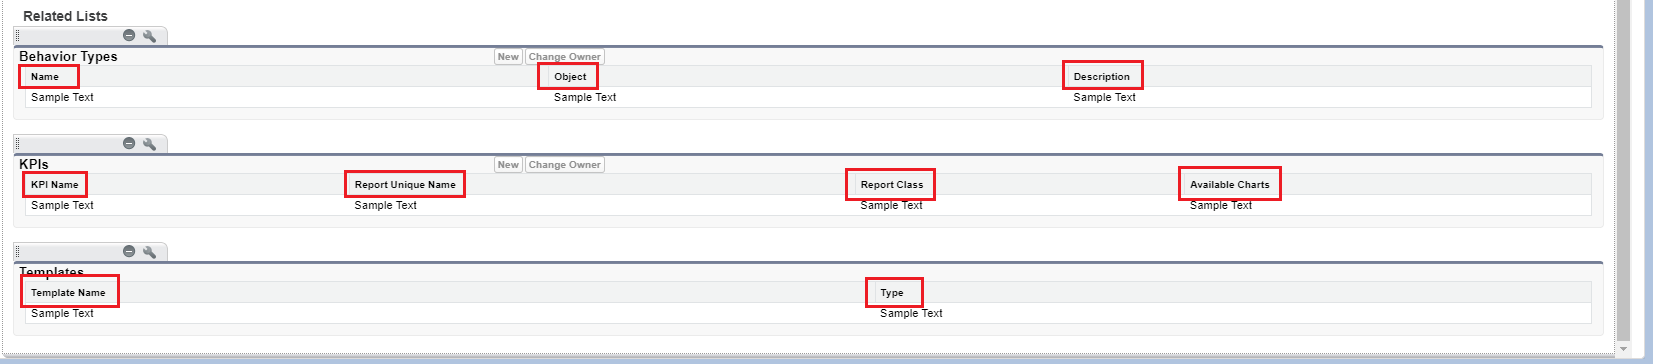
All Library's related lists' fields
Mission Member Fields
Fielo has performed a slight change on the Description and Helpt text from two fields that belong to the Mission Member object. We suggest you verify that the text was updated accordingly.
- Go to the Object Manager, where you are going to search for and access the Mission Member Object.
- On the Mission Member Object page, go to Fields & Relationships.
- Look for the Leaderboard Position field, access it, and click on Edit.
- Make sure that its Help Text has this text:
"It stores Mission Member ranking position based on the Leaderboard Value in descending order. This field is updated asynchronously by the 'Challenge Leaderboard' batch." - Save.
- Repeat steps 3, 4, and 5 with the Leaderboard Value field. The text in the Help Text should be:
"It stores the progress percentage of a Member who participates in a Mission (Mission Member). Leaderboard Value depends on Mission Type, Objective Type, and Objective Value/Field (if applicable)."
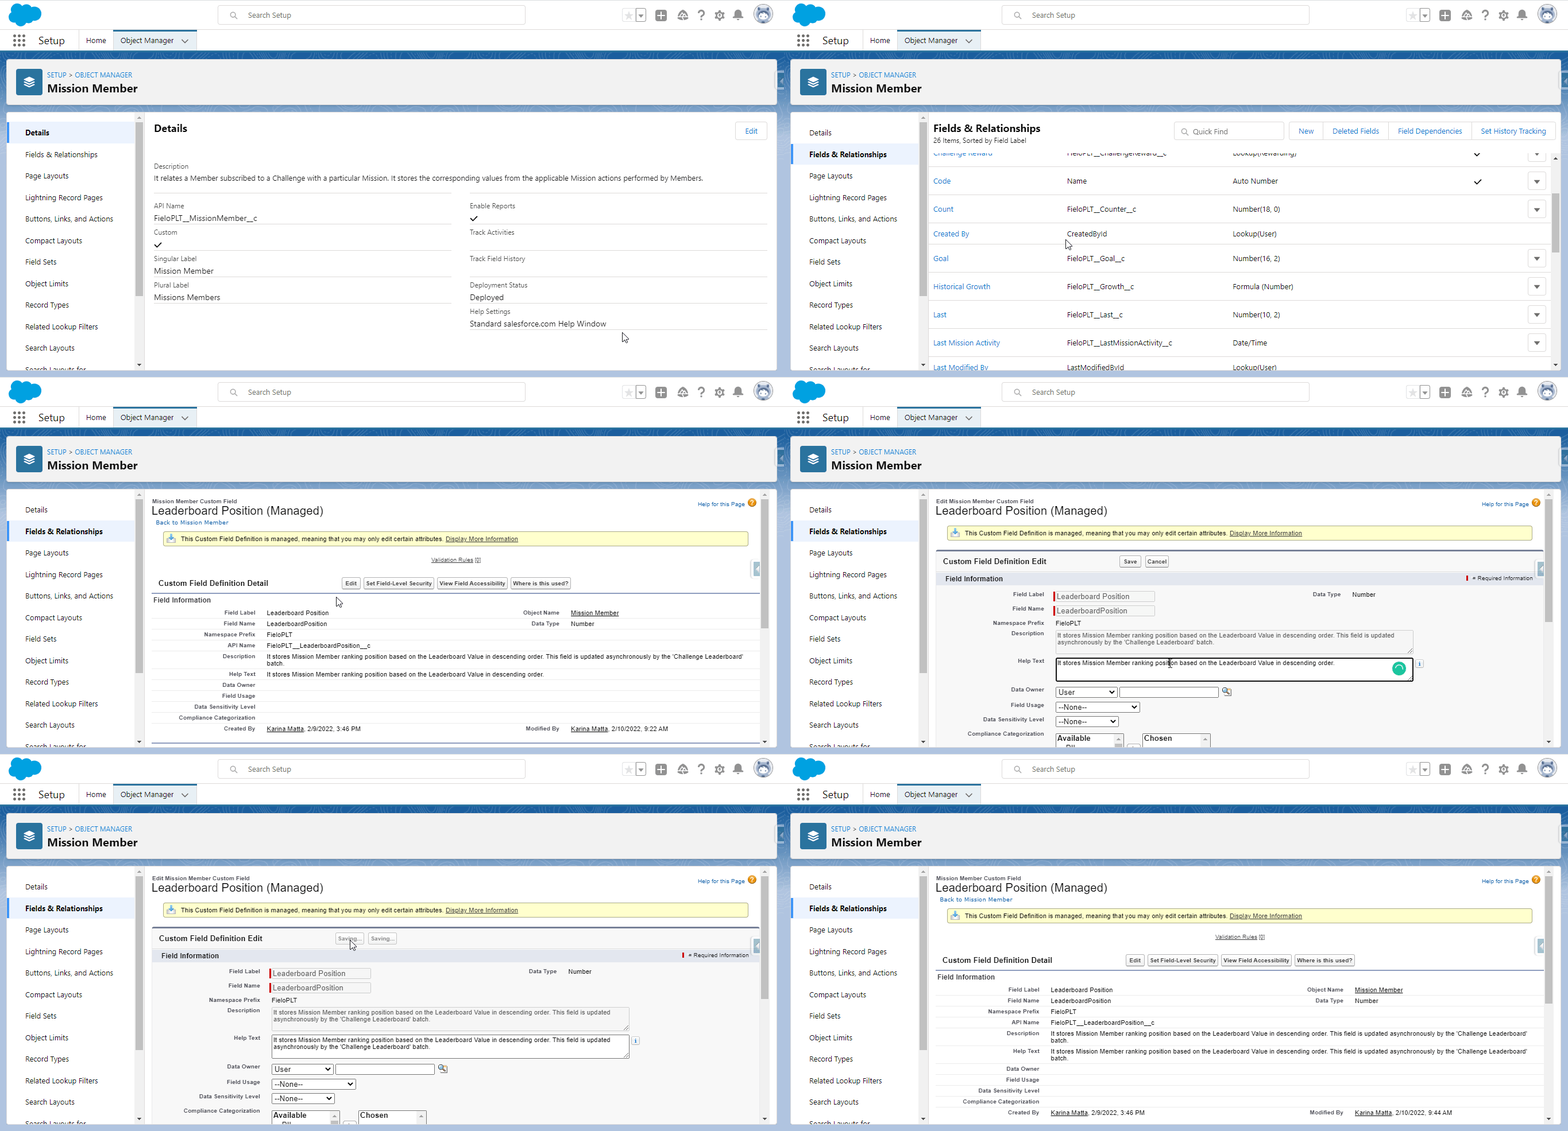
Editing Help Text in Leaderboard Position field
Update Report
One of the greatest new features that R1 2022 brings is the Command Center, with 21 reports that will make it easier to keep track of your program's metrics. As this is a feature that is built on top of Salesforce's default Reports, you will need to update one of the existing reports so that it works correctly on the Command Center's dashboard.
- Click on the App Launcher and look for "reports".
- On the menu on the left side, click on All Reports.
- Look for the "new members / month" report and access it. Once there, click on Edit.
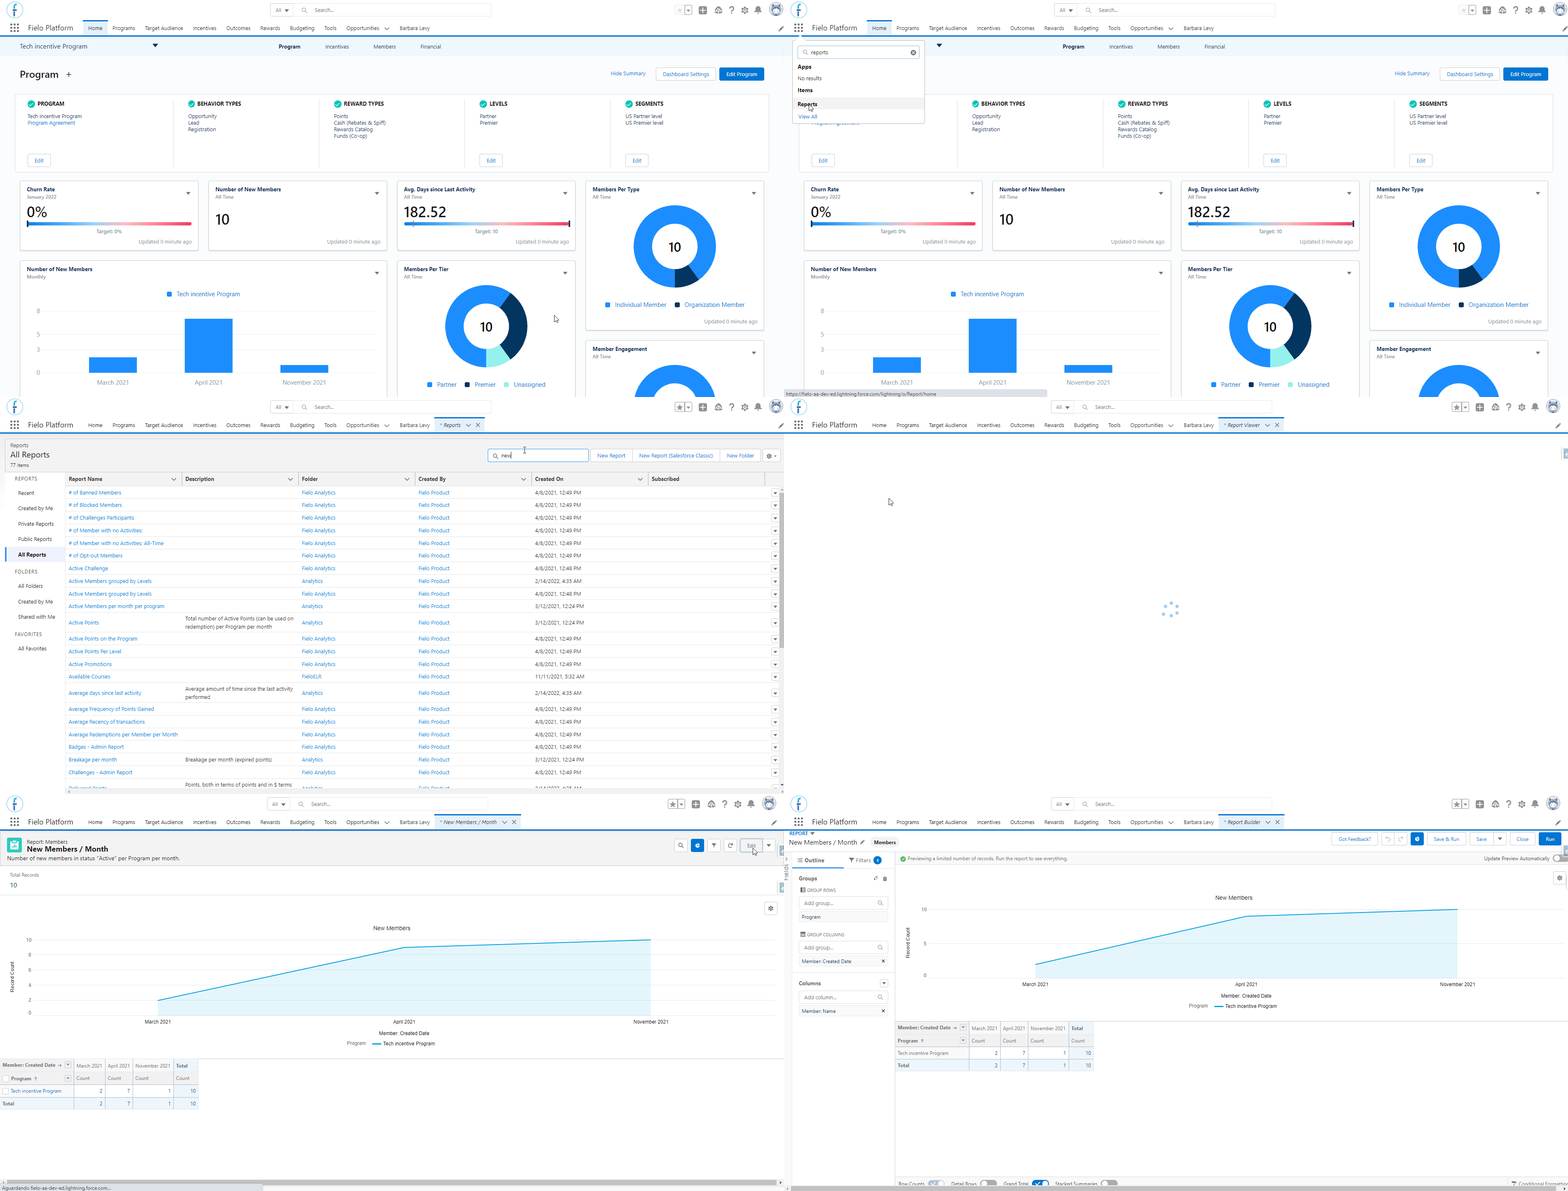
Accessing the New Members / Month report
- On Group Columns, look for Join Date, select it, and remove Member: Created Date.
- Go to the Filters section. Click on the Last Transaction Date - All Time tile and change the date to Join Date. Click on Apply.
- Turn on the Update Preview Automatically option on the top right corner.
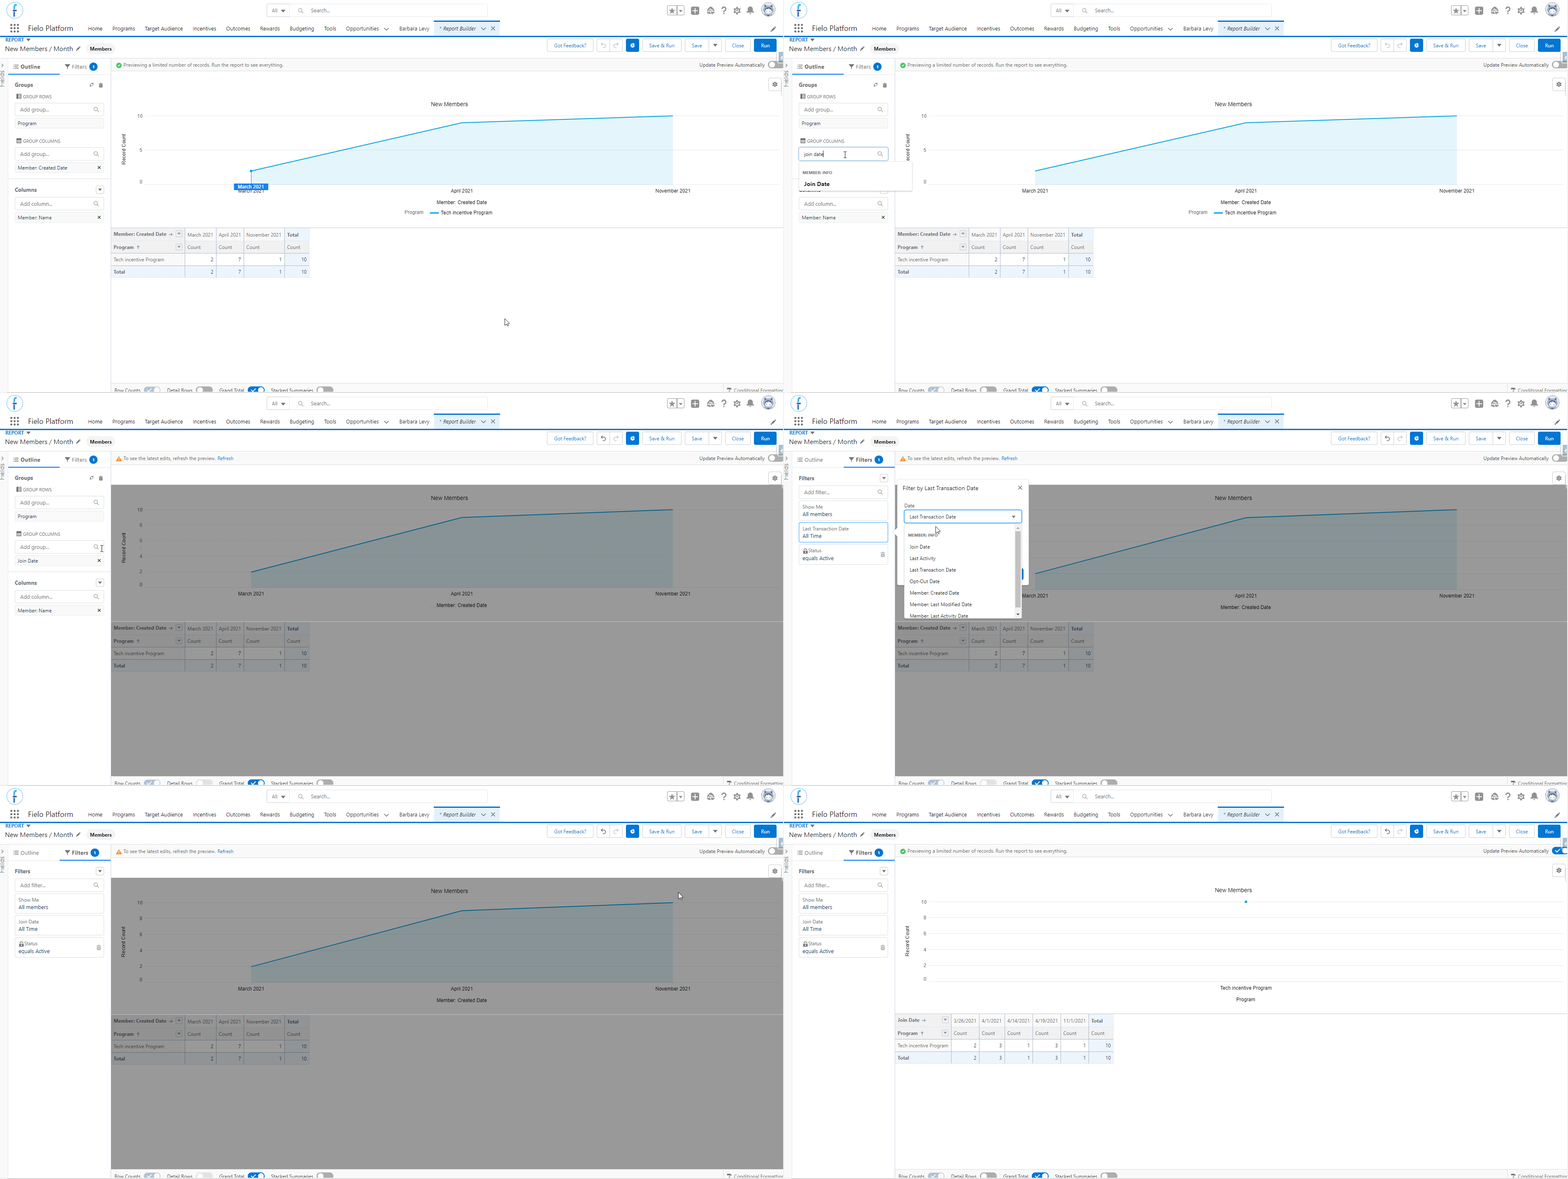
Editing the report (part 1)
- On the report preview, click on the next to Join Date.
- Select the Sort Descending option. In Group Date By, select Calendar Month.
- Save the report.
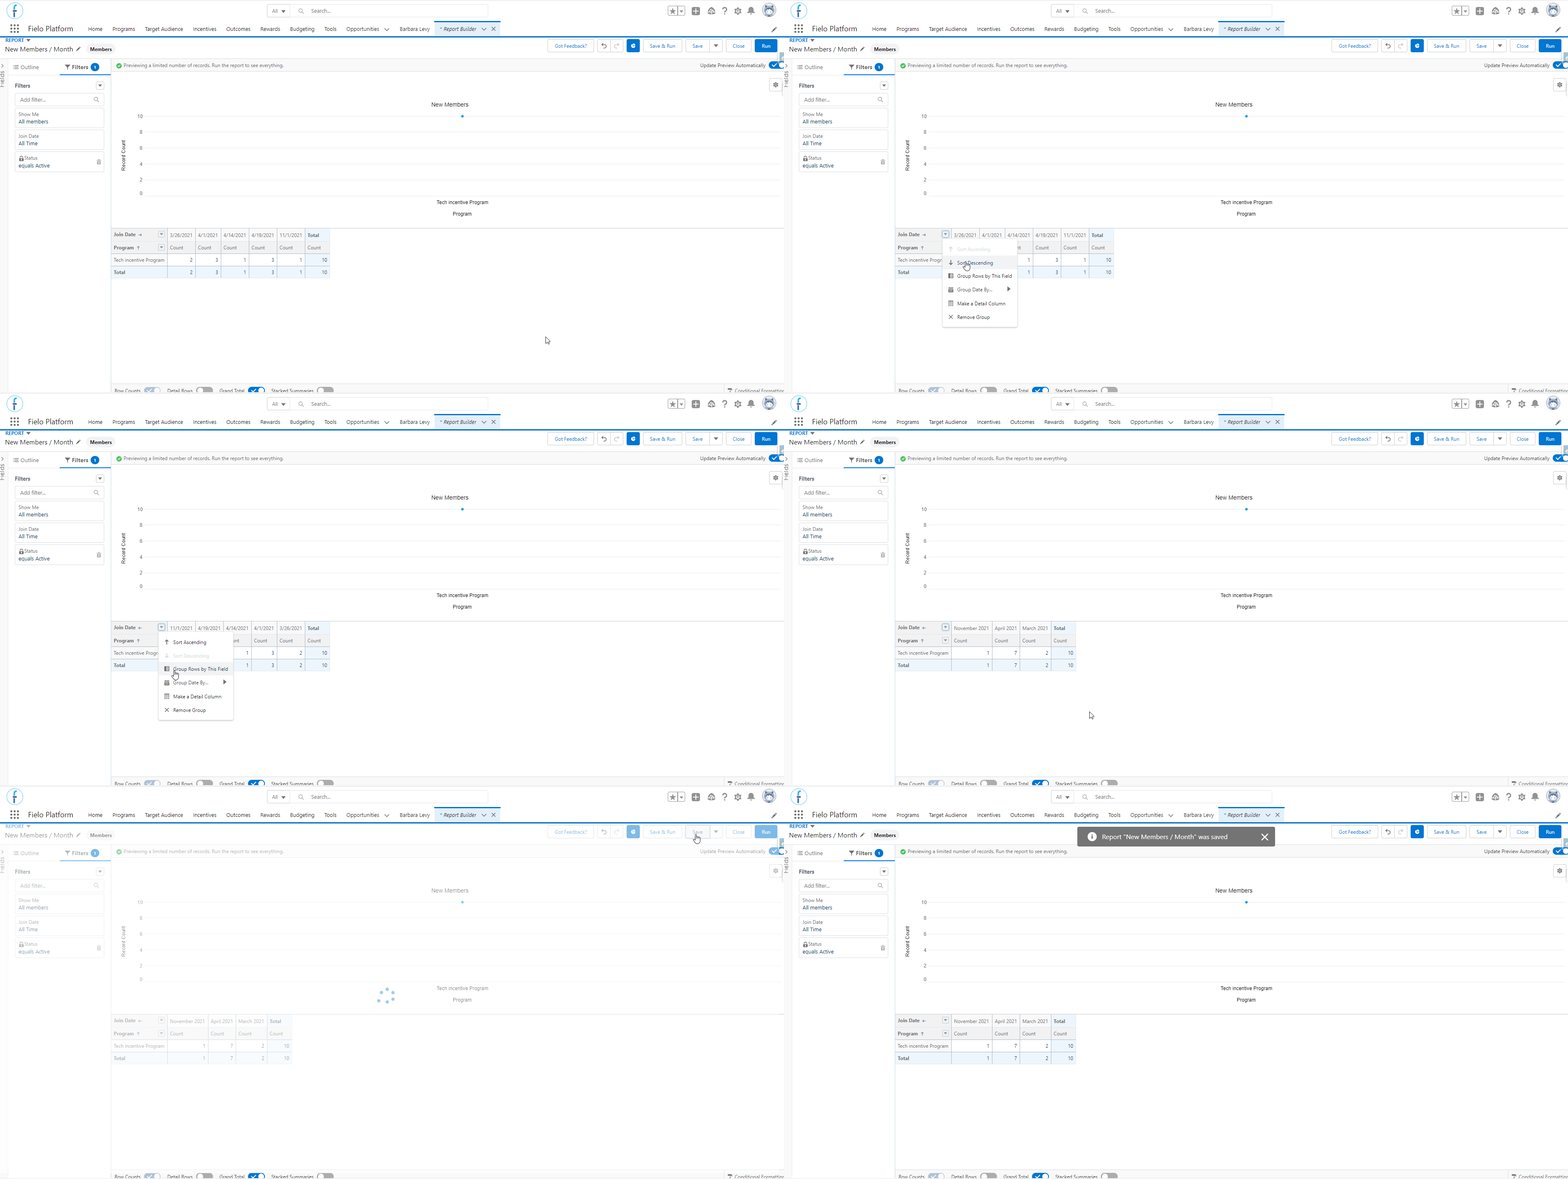
Editing the report (part 2)
Experience Cloud Permissions
If you use Fielo's Registration Lightning Component in your Salesforce Experience Cloud Site, you will need to review the permissions needed for the Site's guest profile. The new Fielo version requires some more permissions than it did in Spring '21.
Custom Object Permissions & Field-Level Security
The Event object and all of its fields need Read and Create/Edit permissions. Go through these steps to set up the necessary permissions:
- From Salesforce's Setup, look for and access the Experience Builder.
- Select on the left, and click on the link under Guest User Profile.
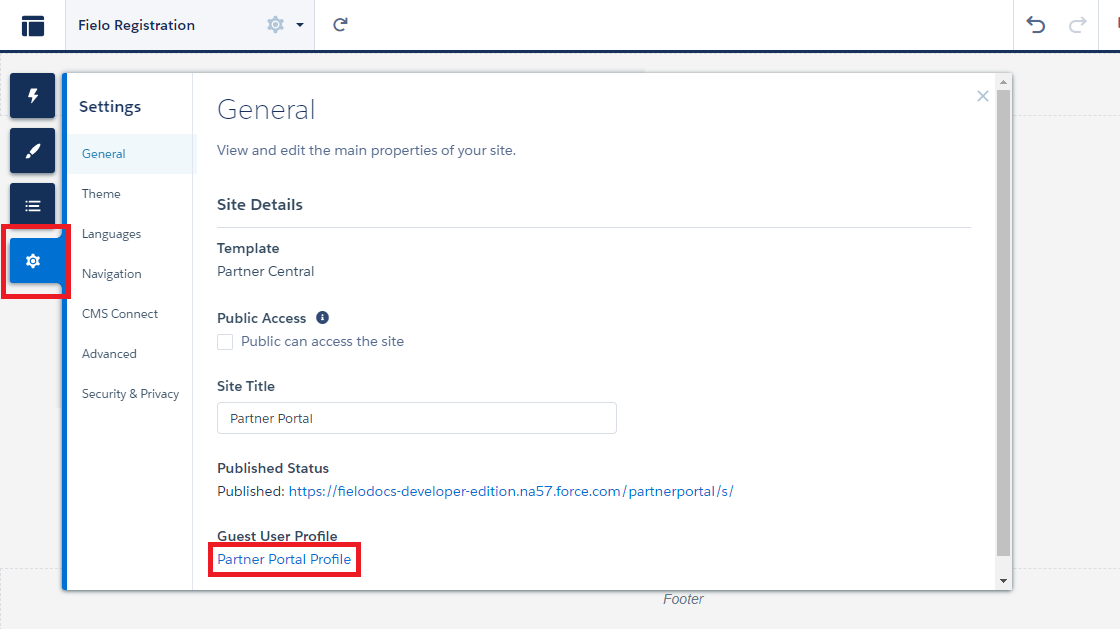
Accessing the guest profile
- On the Profile page for your Site's Guest User Profile click Edit.
- Under Custom Object Permissions, find the Event object, and check the checkboxes related to the Read and Create permissions.
- Save.
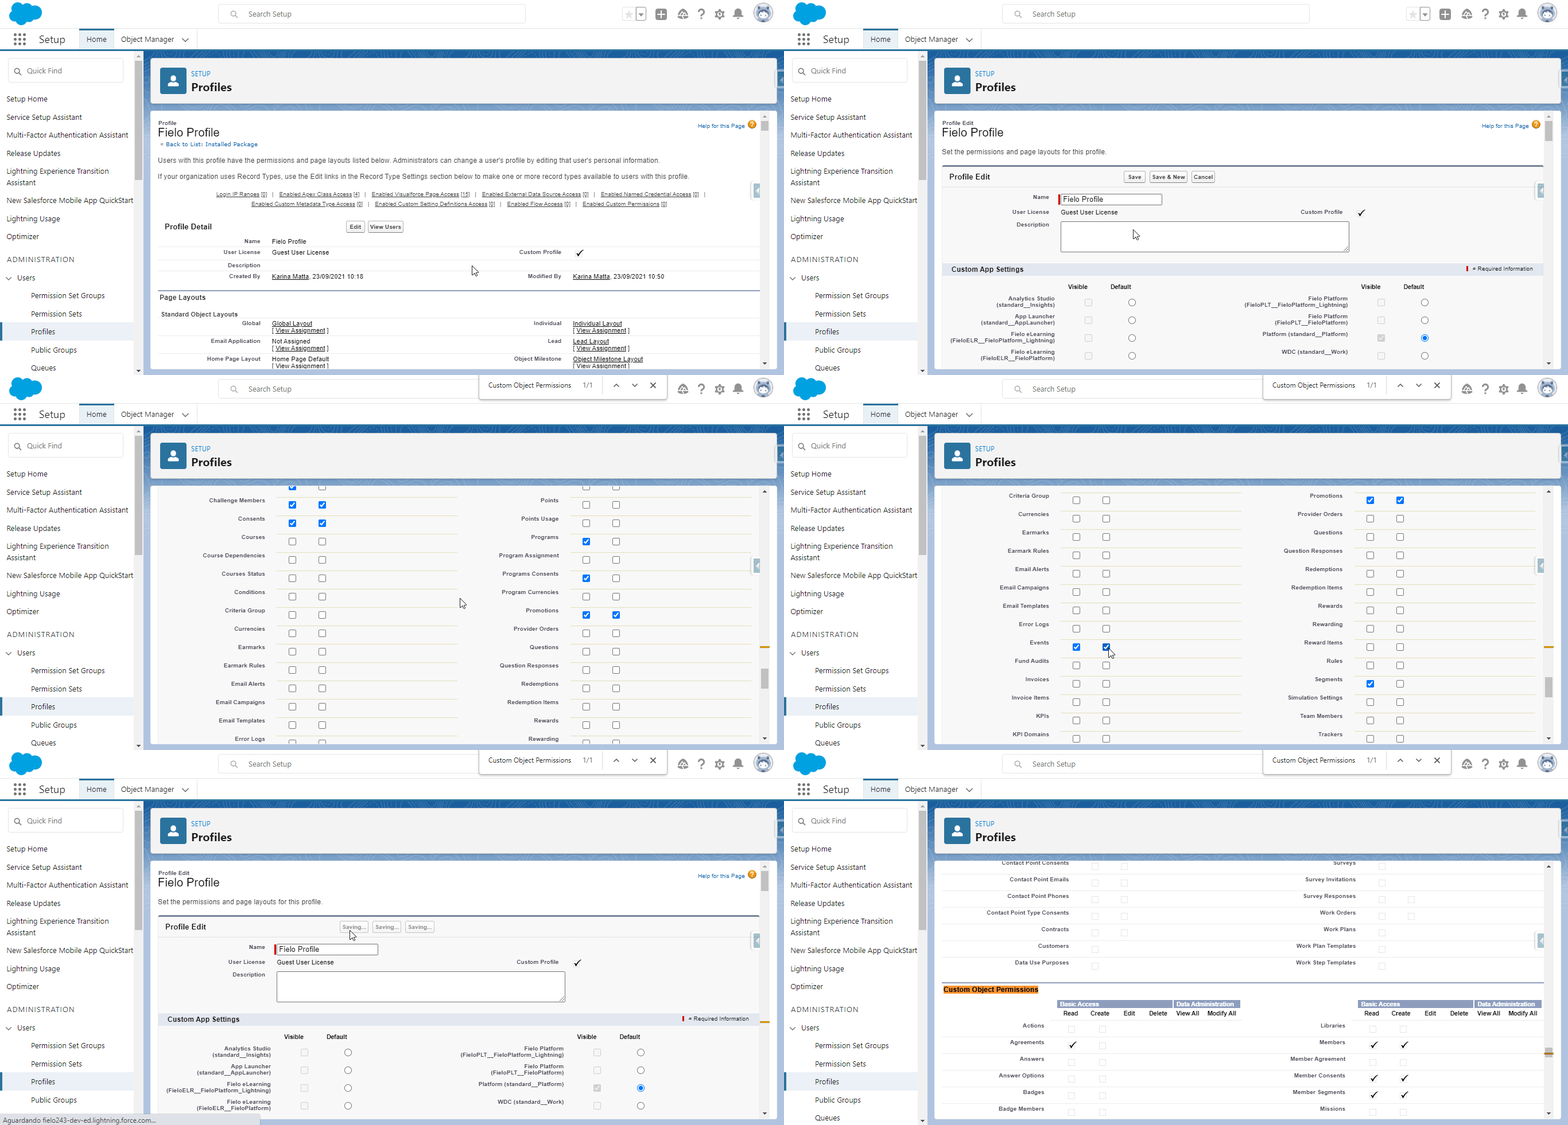
Giving permissions to the guest profile.
- Back on the Guest Profile page, scroll down to Custom Field-Level Security and, next to the Event object, click on View.
- Click Edit and make sure to check the Read and Edit checkboxes to all of the fields.
- When that's done, Save.
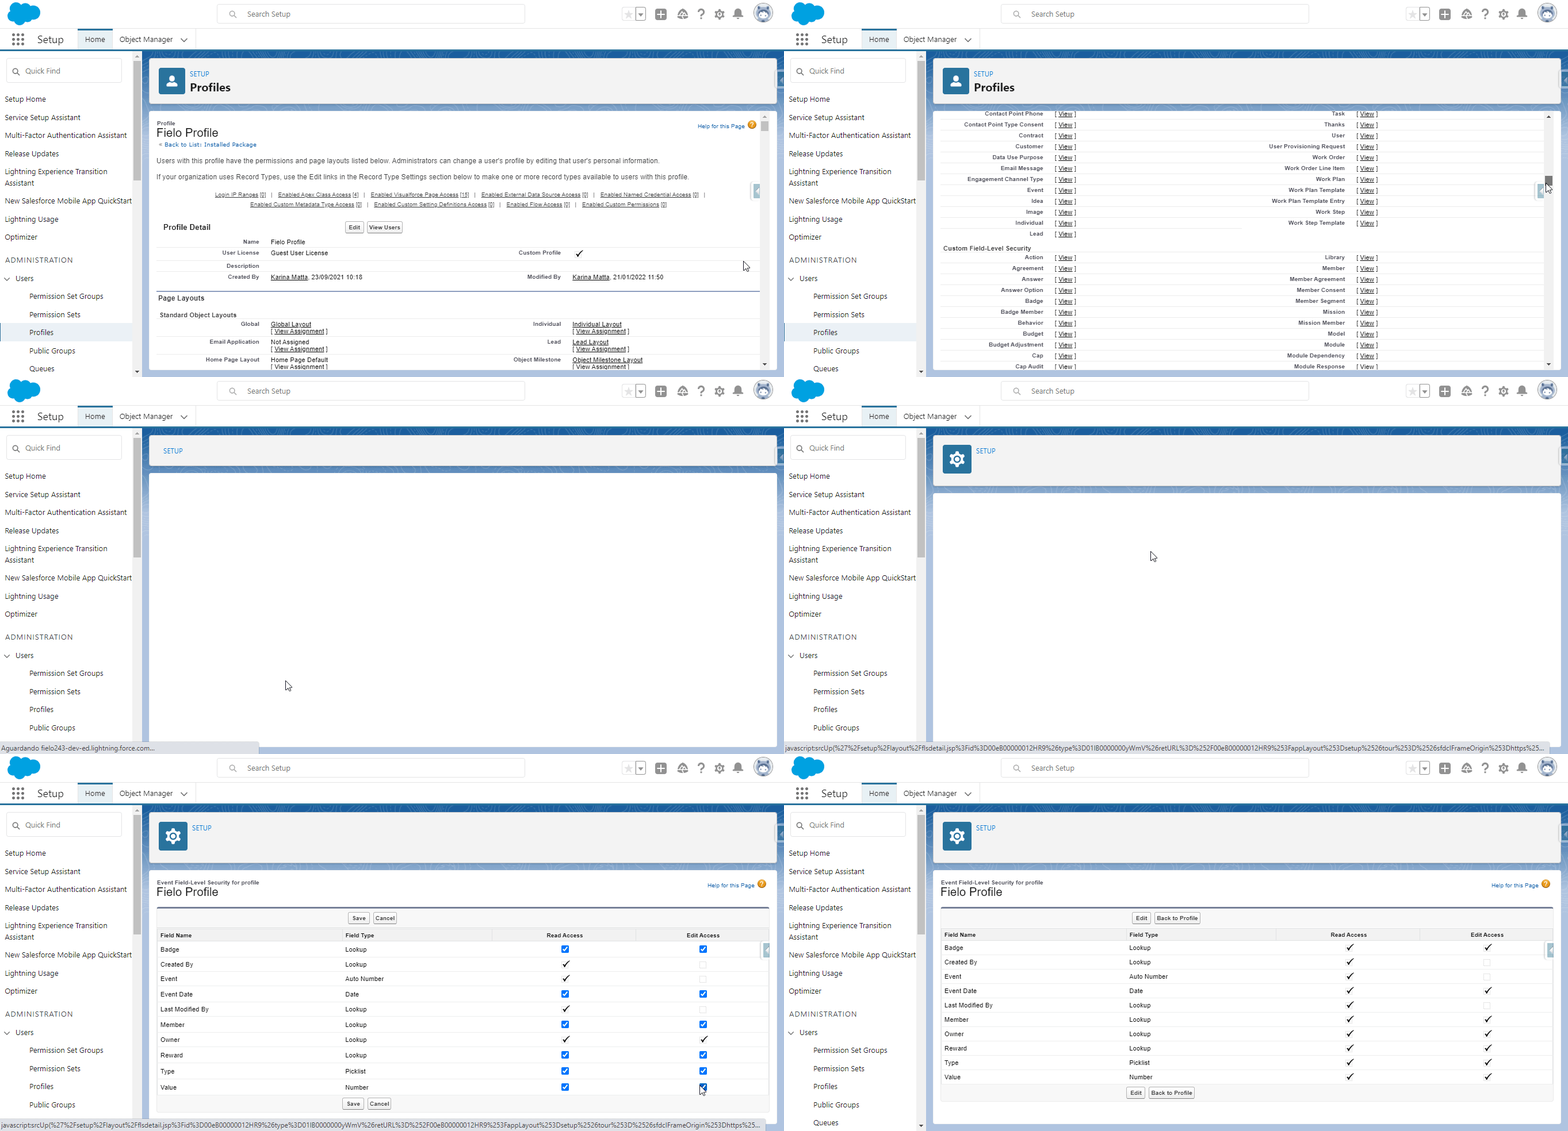
Giving permissions to the Event object's fields.
Enable Apex Class Acess
After giving Read access to all the fields, it is also necessary to enable guest profile access to two new Apex Classes: FieloPLT.SObjectDomain and FieloPLT.SecurityUtils.
- Within the Guest Profile page, find the Enabled Apex Class Access list and click on Edit.
- Once there, select the following classes from the left column and add them to the right column:
- FieloPLT.SObjectDomain
- FieloPLT.SecurityUtils
- Don't forget to Save after adding them.
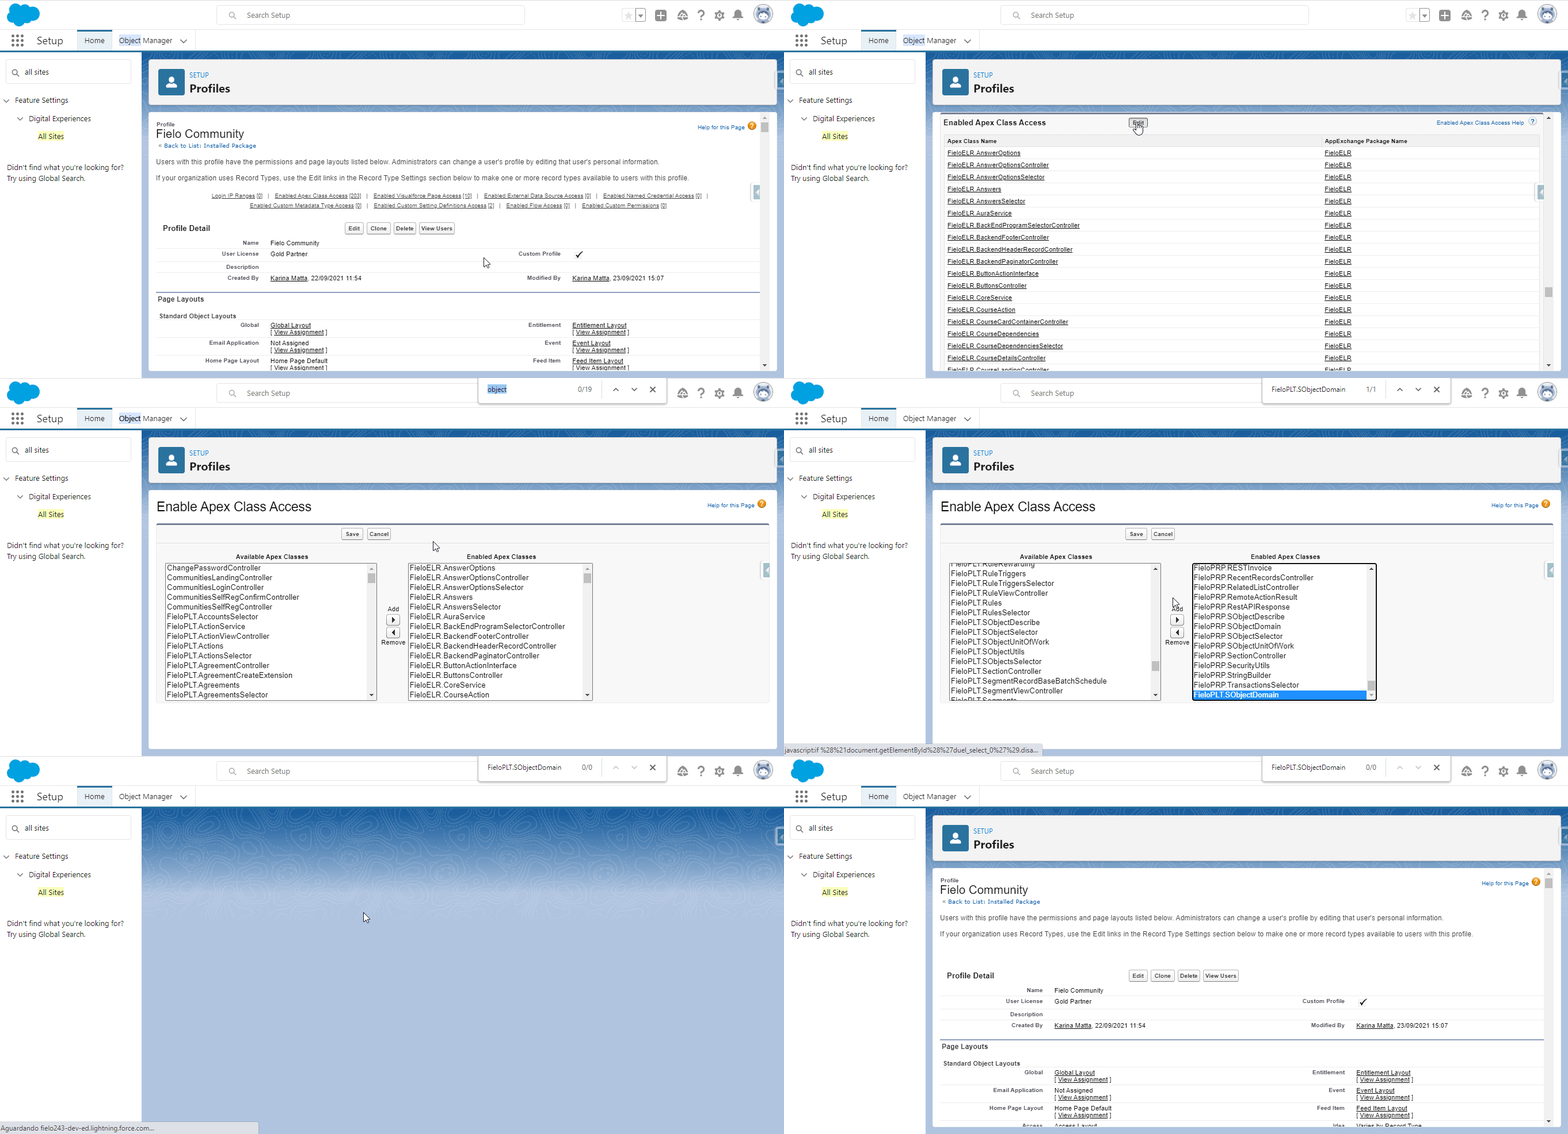
Site's ProfileIf you use a profile for the Site's users, you will also need to enable the FieloPLT.SObjectDomain Apex Class for it. For that, follow the same steps detailed above.
That's all. You are ready to use the R1 2022 Fielo release!
Updated over 1 year ago