
Global Reward Solutions
An expanded Rewards universe for your loyalty portal
Global Reward Solutions (GRS) utilizes a diverse array of partners and automatic customization to ensure that your Rewards Catalog is highly relevant and enticing to your Program Members. Let's begin the configuration and accelerate your Member engagement!
Contact GRS
Implementation is carried out jointly with GRS. Before starting, you'll need to get in touch with your GRS account manager and obtain the following information:
- Gallery domain.
- Admin username.
- Admin password.
- API key.
You can also ask your account manager about the GRS Storefront Implementation Guide, which you'll need to follow afterwards to complete your implementation.
Enable State and Country/Territory Picklists
In order to ensure that Rewards are highly relevant to your Members, GRS requires your Salesforce ORG to use State and Country/Territory Picklists. This way, GRS can offer your
Members the best rewards available in their area. Let's get going.
In Setup, start to enter "State and Country/Territory Picklists" in the Quick Find box and select State and Country/Territory Picklists. Carefully read and follow Salesforce's instructions on enabling this feature. It will involve adapting state and country data already in your ORG to picklist format. Once you've finished this process, go ahead and click Enable.
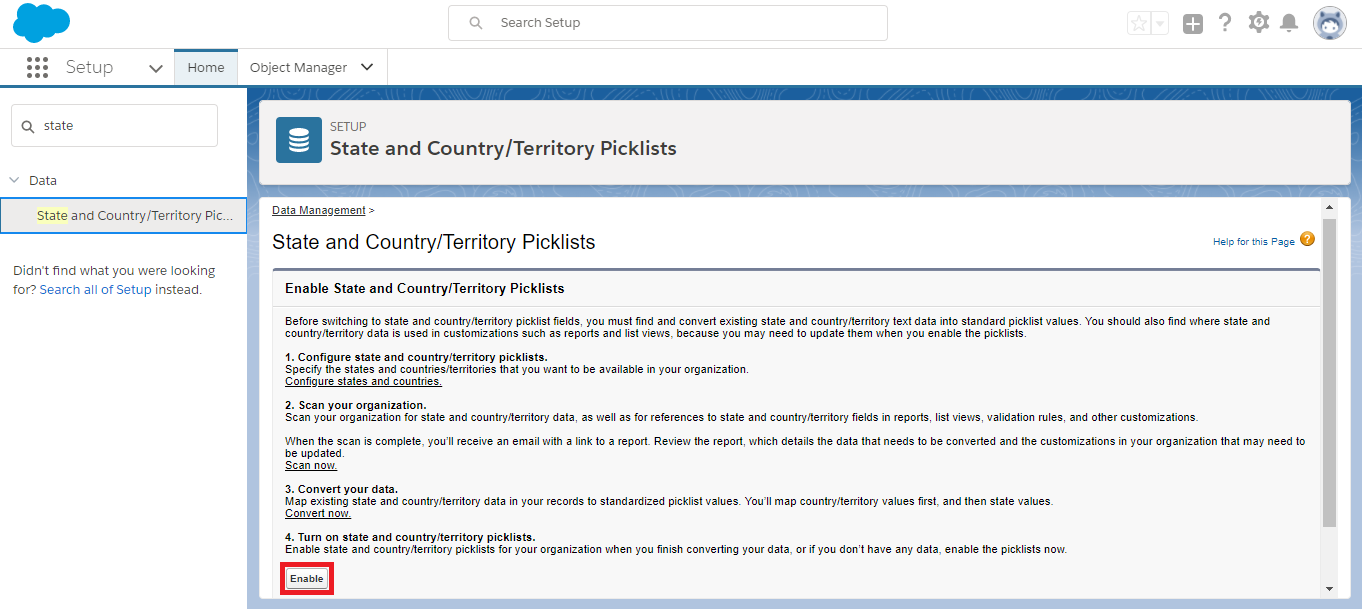
Enable State and Country/Territory Picklists
For more information, see Salesforce's Enable and Disable State and Country Picklists doc.
Create an Account for GRS
Integration with GRS requires an Account for internal use in Platform. In Salesforce Setup, go to the App Launcher and click Accounts. In Accounts, click New. You can give this new account any name you'd like and you don't need to fill in any other fields. Take note of the name you've given it and click Save.
Install the Fielo-GRS Connector
After logging into your Salesforce ORG, click here to access the installation link for the Latest Release of the Fielo-GRS Connector.
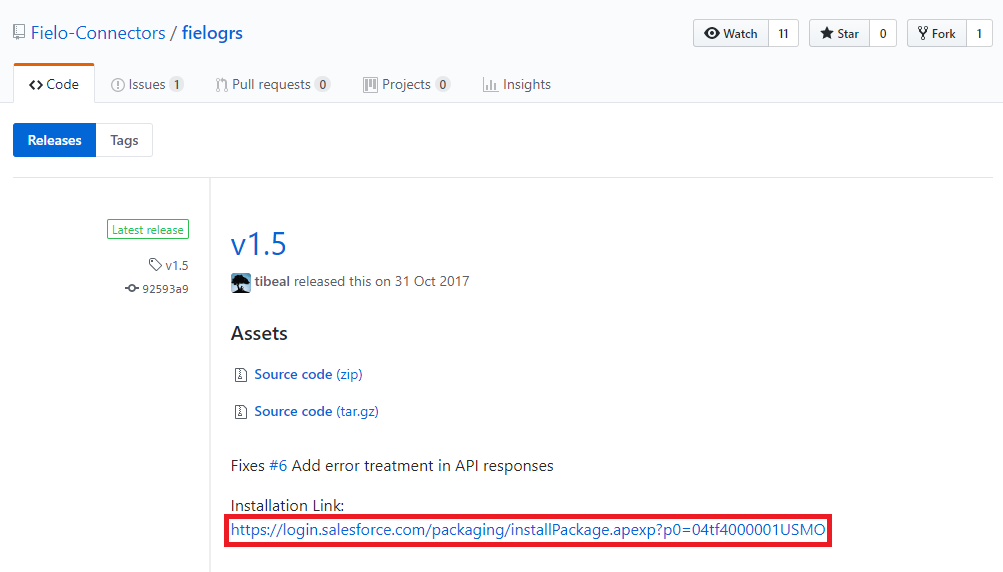
Fielo-GRS Connector Latest Release
Select Install for Admins only and click Install. When process is completed, the ORG Administrator will be notified by email.
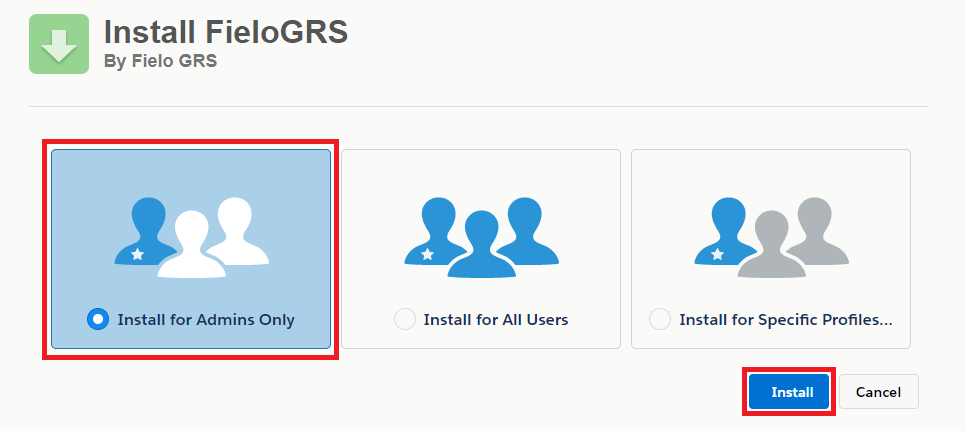
Fielo-GRS Connector Installation
Activate the FieloGRS Library
Once you've successfully installed the Fielo-GRS Connector, you can activate the FieloGRS Library.
In the Libraries tab of Platform, under Inactive Libraries, find the FieloGRS library and click Activate.
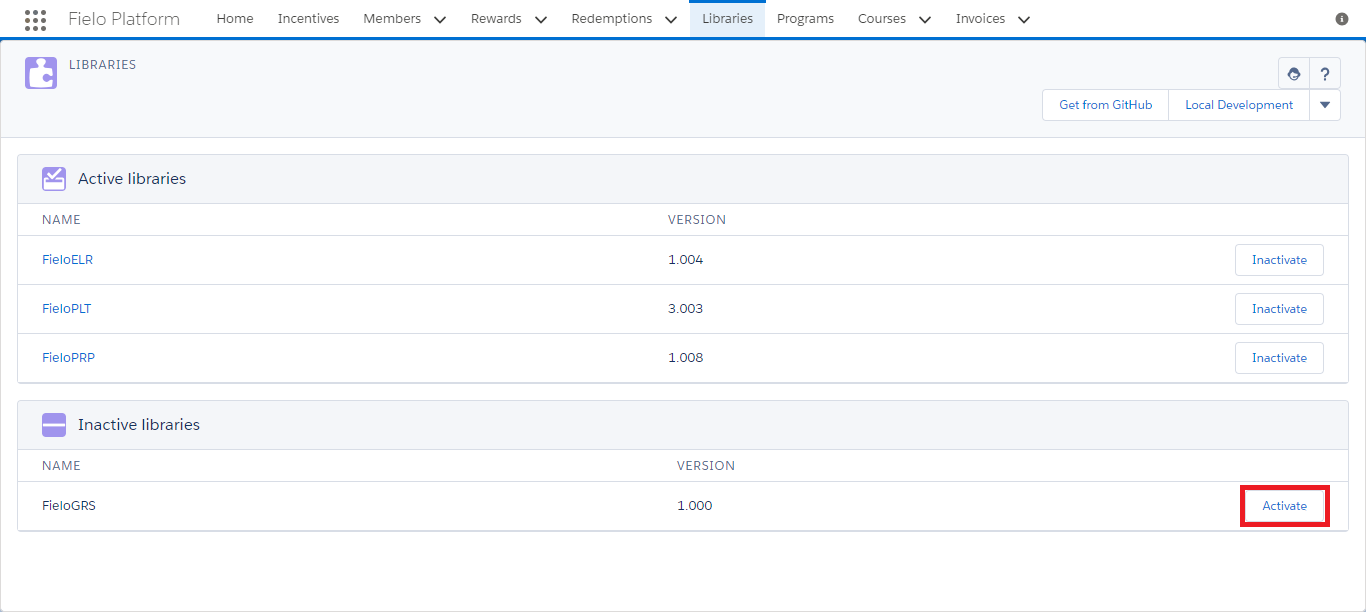
Activate FieloGRS Library
Fill In Custom Fields
with the FieloGRS Library activated, you're ready to fill in the custom Program fields provided for GRS integration. You will need to fill in these fields in each Program you plan on using GRS with.
- In Fielo Platform, go to Programs and select the Program in which you'd like to use GRS.
- On the Program page, click Edit.
- Set GRS Point Type to the Program Point Type you'd like to use with GRS.
- Set GRS Account to the Account you created for GRS.
- Set GRS Member Fieldset to the following value:
[
  {"grsFieldName":"employeeId","sfFieldName":"Id"},
  {"grsFieldName":"firstName","sfFieldName":"FieloPLT__Contact__r.FirstName"},
  {"grsFieldName":"lastName","sfFieldName":"FieloPLT__Contact__r.LastName"},
  {"grsFieldName":"email","sfFieldName":"FieloPLT__Email__c"},
  {"grsFieldName":"address1","sfFieldName":"FieloPLT__Contact__r.MailingStreet"},
  {"grsFieldName":"city","sfFieldName":"FieloPLT__Contact__r.MailingCity"},
  {"grsFieldName":"postalCode","sfFieldName":"FieloPLT__Contact__r.MailingPostalCode"},
  {"grsFieldName":"provinceState","sfFieldName":"FieloPLT__Contact__r.MailingStateCode"},
  {"grsFieldName":"country","sfFieldName":"FieloPLT__Contact__r.MailingCountryCode"},
  {"grsFieldName":"telephone","sfFieldName":"FieloPLT__Contact__r.Phone"},
  {"grsFieldName":"language","sfFieldName":"FieloPLT__User__r.LanguageLocaleKey", "isLocale":true}
]- If using Levels with GRS, set GRS Metadata FieldSet to
[{"id":"enterIDhere", "name":"enterNameHere", "fieldName":"FieloPLT__CurrentLevelMember__r.FieloPLT__Level__r.Name"}], whereenterIDhereandenterNameHereare the ID and name of the metadata field you've created in GRS for leveling. For more information on configuring metadata, contact GRS. - When you're ready, click Save.
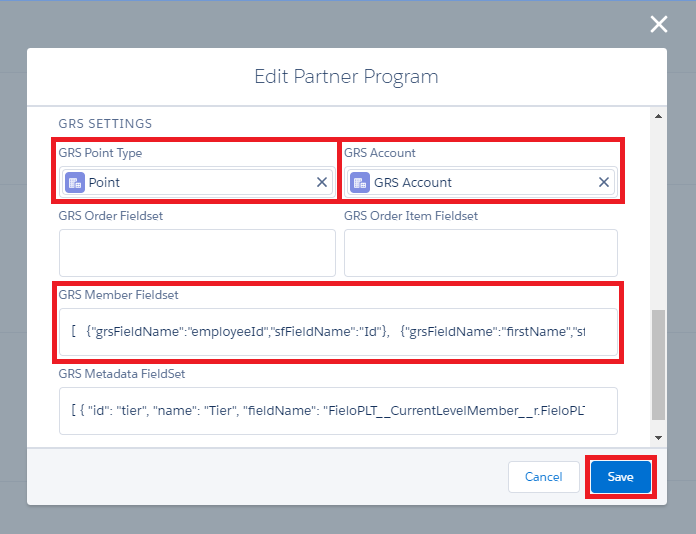
Edit Program
Edit Custom Settings
Next, head over to Setup in your Salesforce ORG and enter Custom Settings in the Quick Find box. In Custom Settings, next to GRS Allowed Fields, click Manage.
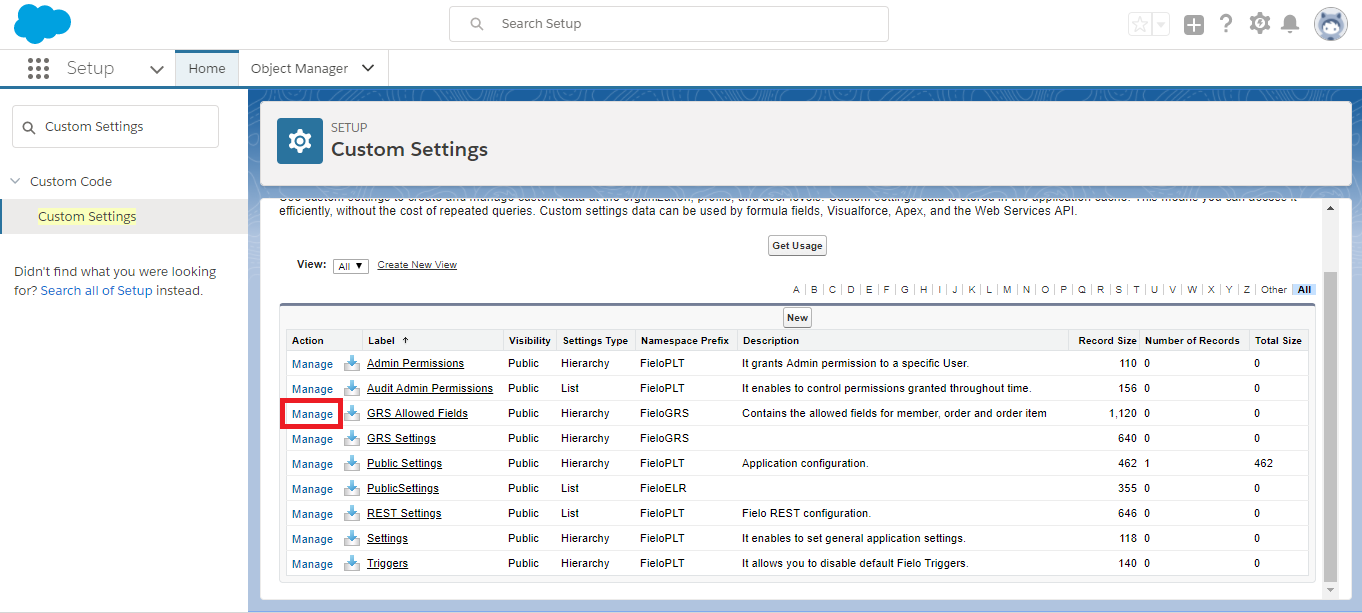
Custom Settings
On the GRS Allowed Fields page, click New. Then, fill in the following properties as indicated:
- GRS Member Allowed Fields:
firstName, lastName, email, address1, address2, country, city, provinceState, telephone, language, employeeId, postalCode, balance - GRS Order Allowed Fields 1:
businessAddress, totalPointCost, totalPointCostLessPointsPurchased, pin, pointsPurchased, pointsPurchasedCost, pointsPurchasedCurrency, shipAddress1 - GRS Order Allowed Fields 2:
shipAddress2, shipCity, shipCompany, shipCountry, shipEmail, shipName, shipPostal, shipProvinceState, shipTelephone, discountCoupon - GRS Order Item Allowed Fields:
catalogCode, catalogName, description, lineItemId, name, orderedAt
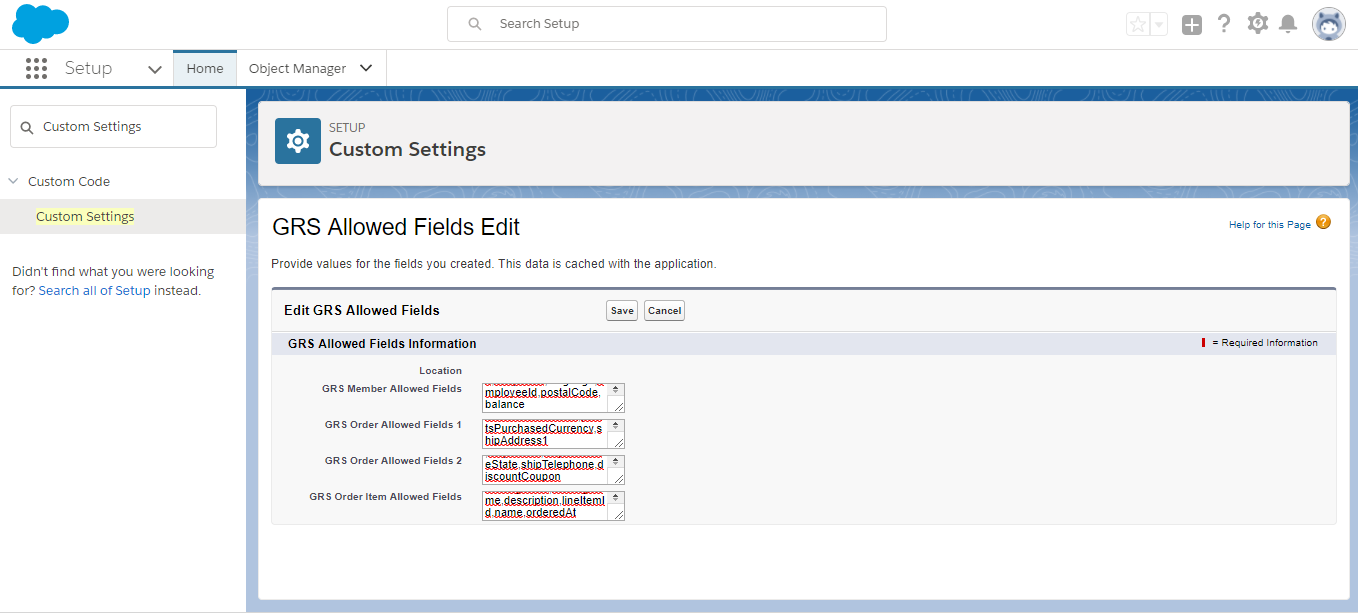
GRS Allowed Fields Edit
Click Save.
Now, go back to Custom Settings and, next to GRS Settings, click Manage. Click New to access the GRS Settings Edit page and enter the following properties:
- Admin ID: (Provided by GRS).
- Api Key: (Provided by GRS).
- Domain: (Provided by GRS).
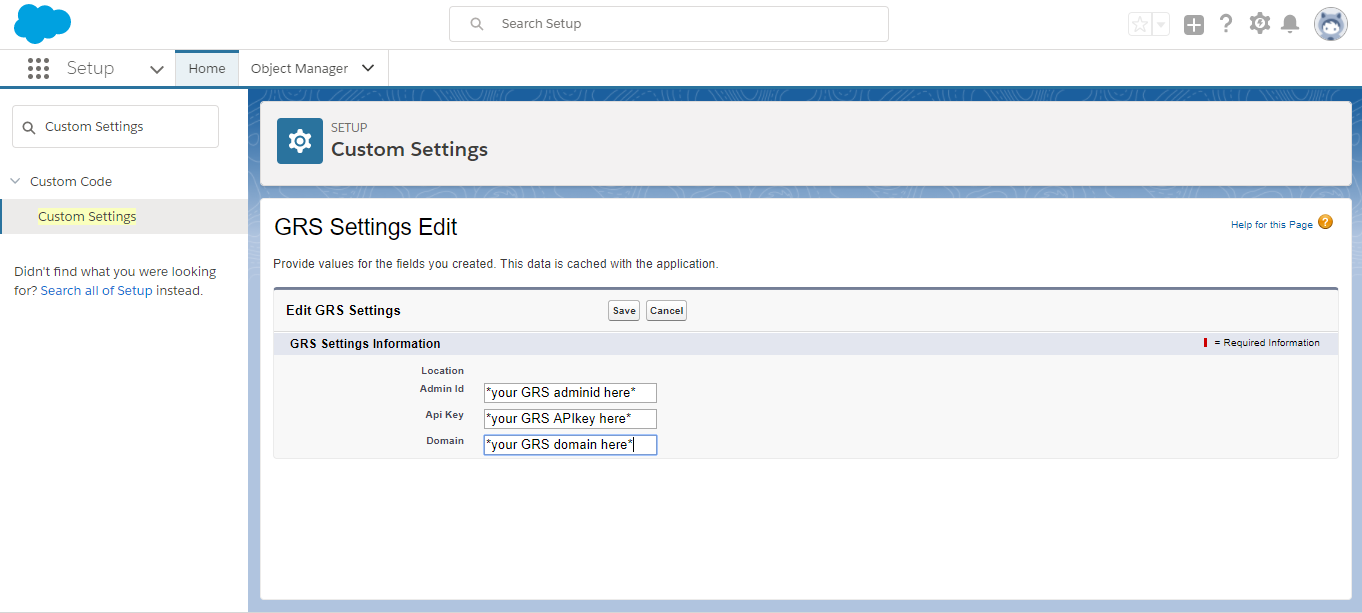
GRS Settings Edit
Click Save.
Profile Configuration
For GRS Gallery to display properly for your Member portal users, the Profile assigned to portal users must have access to certain data.
In Setup, enter Profiles in the Quick Find box and select Profiles. Click on the Profile that you use for your Member portal users.
At the top of the Profile Detail page, click Edit. Then, on the Profile Edit page, under Administrative Permissions, make sure Apex REST Services and API Enabled are ticked .
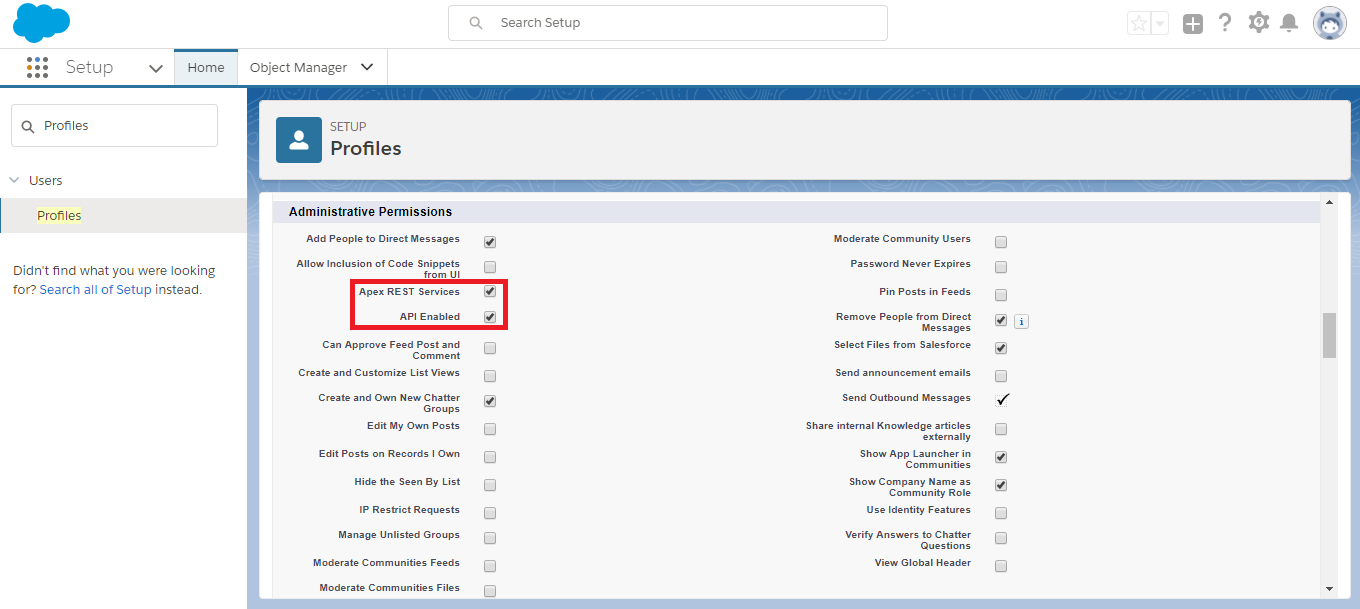
Profile Edit - API Enabled
Click Save.
Now, back on the Profile Detail page, scroll down to the section called Enabled Apex Class Access and, in this section, click Edit.
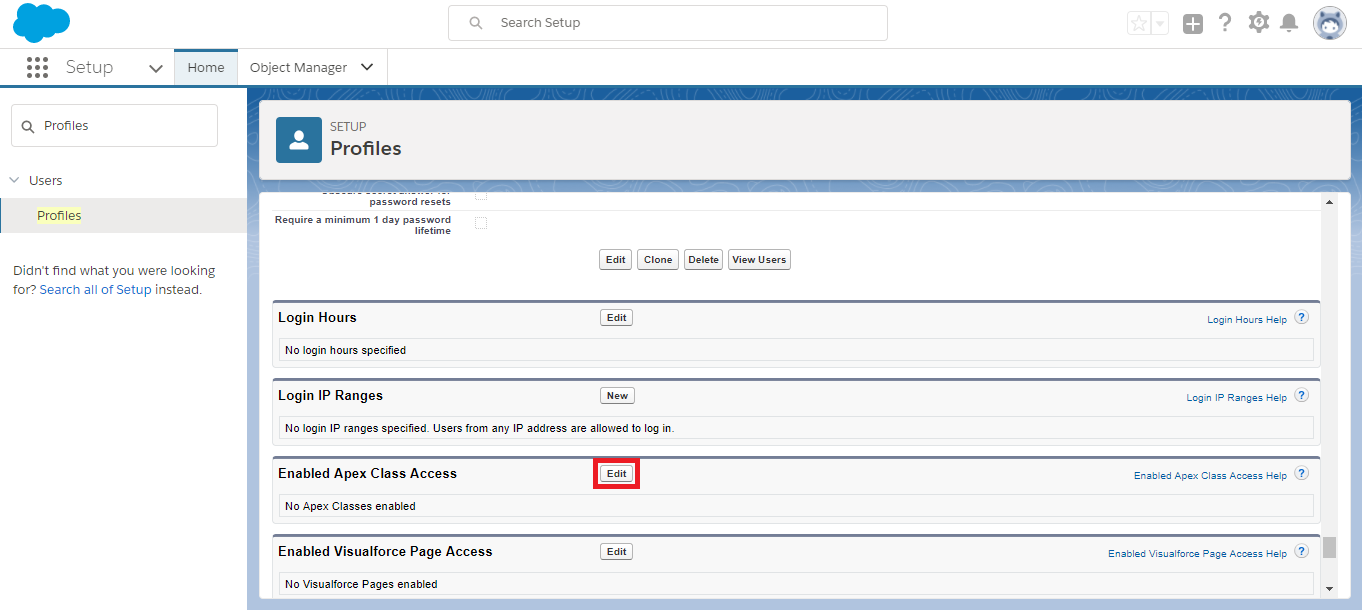
Profile Details - Enabled Apex Class Access
In the Available Apex Classes list, select all classes that begin with FieloGRS and click Add . They should now appear in the Enabled Apex Classes list. Click Save.
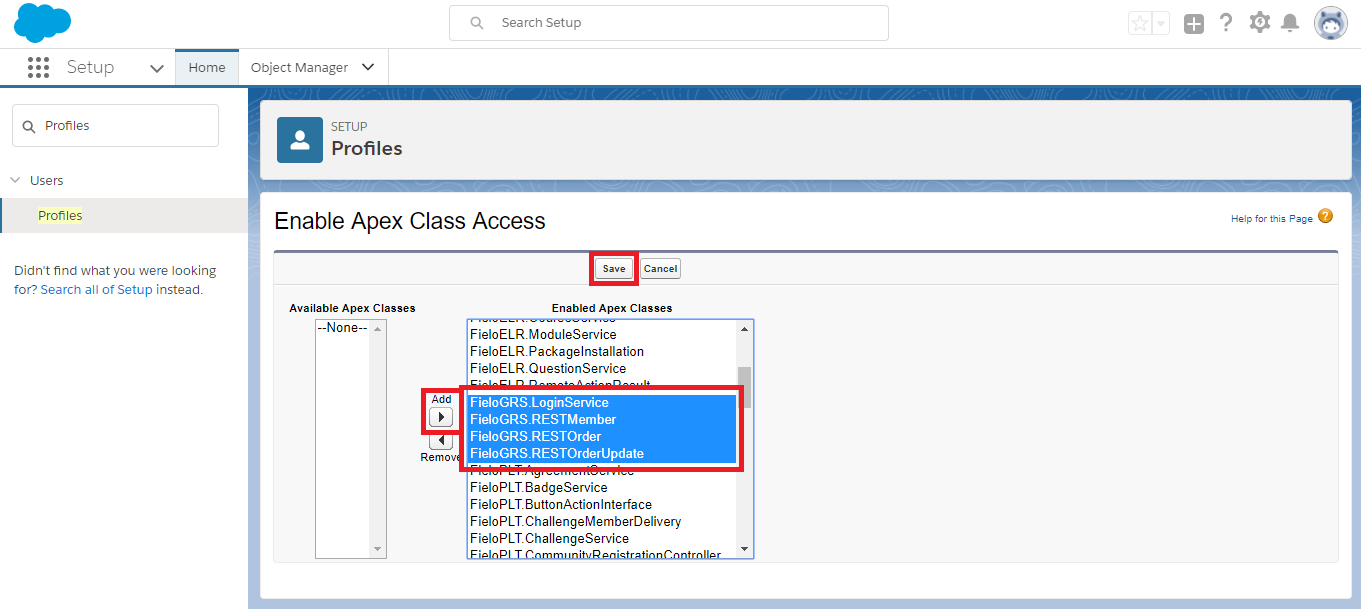
Add FieloGRS Classes to Enabled Apex Class Access
Audit Permission
Before moving forward, your Salesforce Administrator User needs a special permission.
In Setup, enter Visualforce Pages in the Quick Find box and select Visualforce Pages. Click A to see all pages beginning with A, then select Audit Permission.
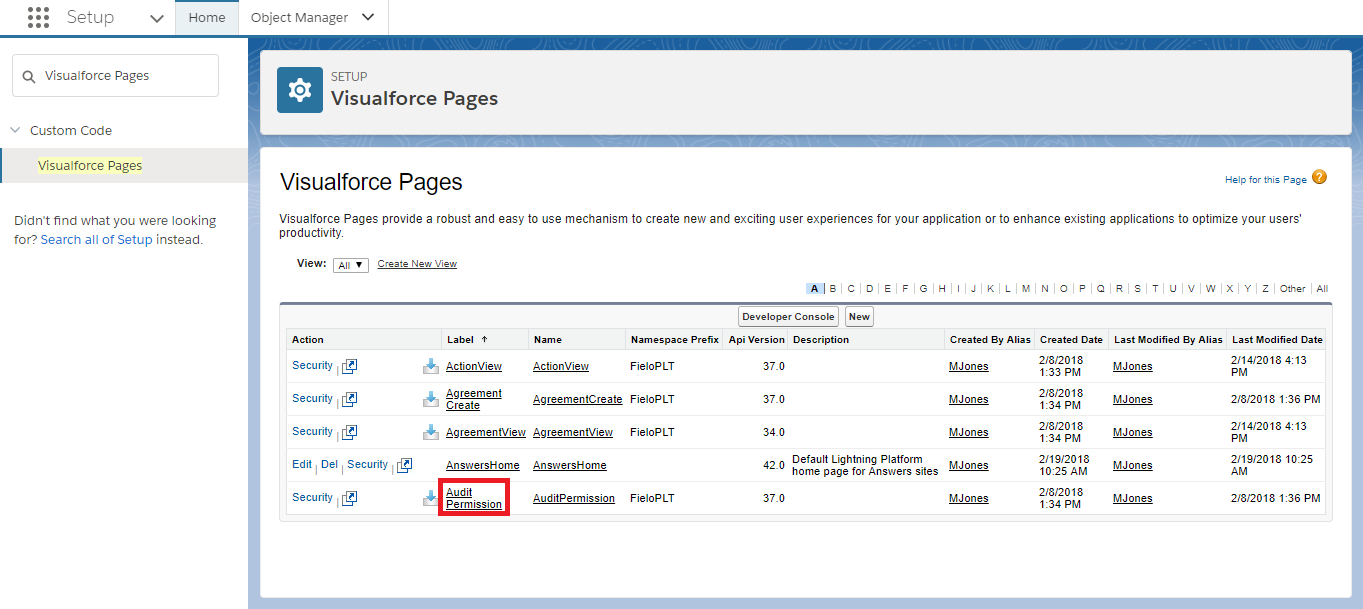
Audit Permission Visualforce Page
Click Preview.
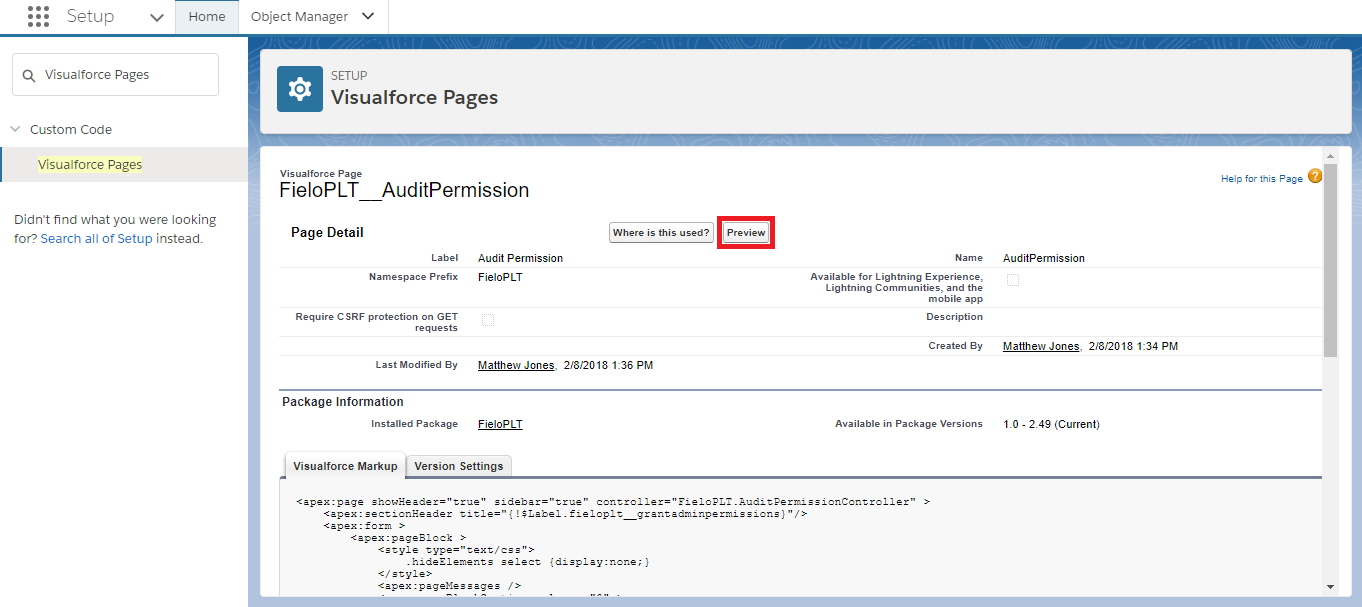
Audit Permission - Preview
In User, using Lookup, enter the name of your own System Administrator User. Then, click inside the To field and choose a date for the permission to end. This can be tomorrow or any other date in the future. Finally, click Save.

Grant Admin permissions
Member Setup
In order for GRS to function, certain Salesforce fields will need to be properly completed for each and every Member who might use GRS Gallery. Let's see how.
Be sure to carry out these steps for all Members who will participate in GRS Rewards.
Before StartingBe sure that the Contact and User lookup fields are visible in your Member > Detail page settings. For more information on adding fields to your pages in Platform, see Page Settings.
Starting in Platform, go to Members and select the Member that will participate in GRS Rewards. On the Member page, confirm that E-mail contains a valid e-mail address.
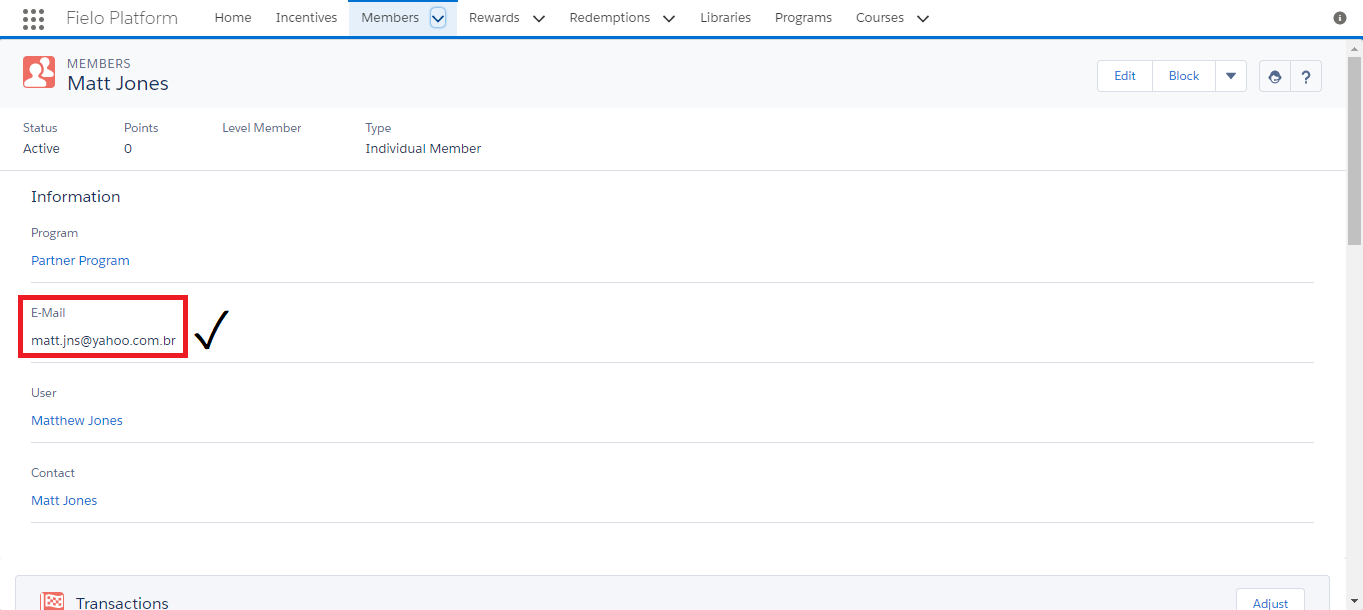
Next, click on the Contact record for the Member. On the Contact page, click 🔽 and then Edit. Make sure the following fields are properly filled in:
- First Name
- Last Name
- Phone
- Mailing Country
- Mailing Street
- Mailing City
- Mailing State/Province
- Mailing Zip/Postal Code
Click Save and return to the Member page.
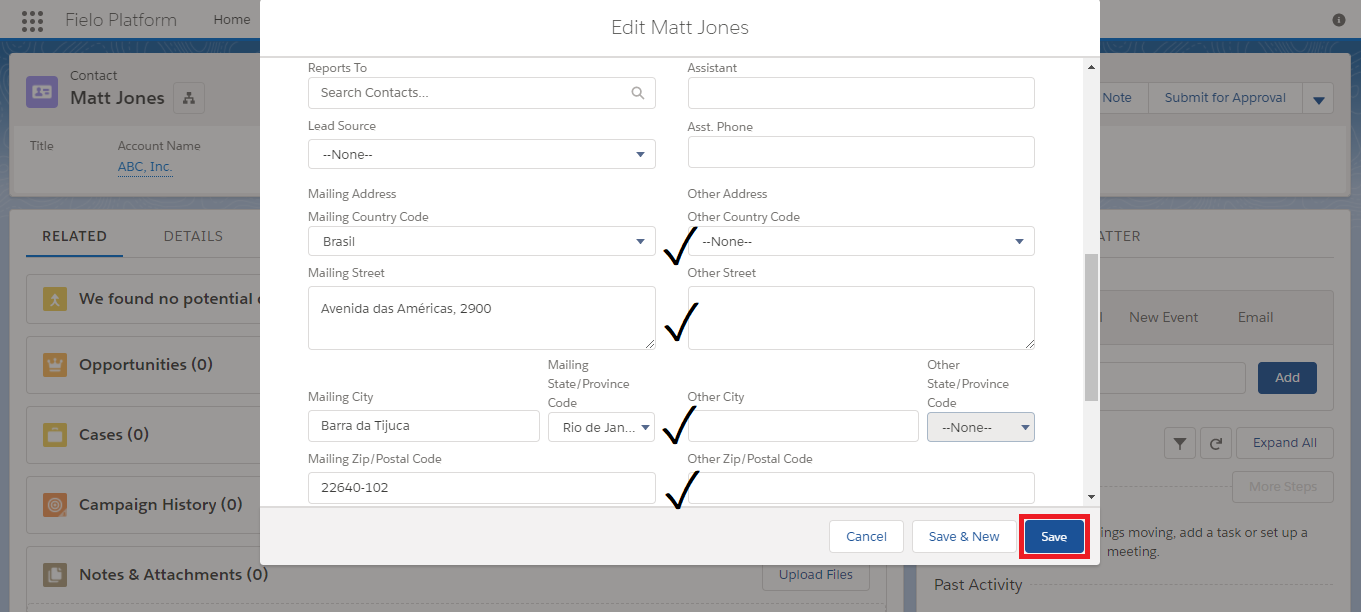
User Setup
The following steps are only required for Members created before installing the Fielo-GRS Connector. They are completed automatically for new Members going forward.
On the Member detail page, copy the Member ID. This 18-character alphanumeric ID can be found in the URL of the Member page in between sObject/ and /view.
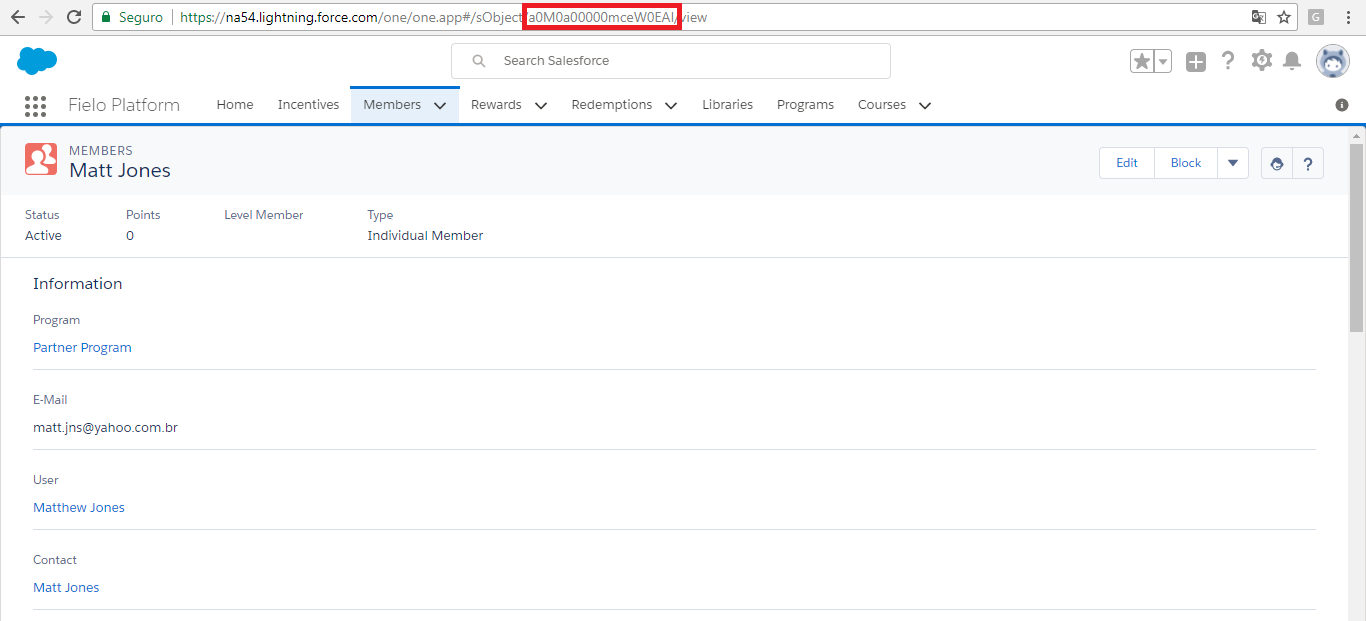
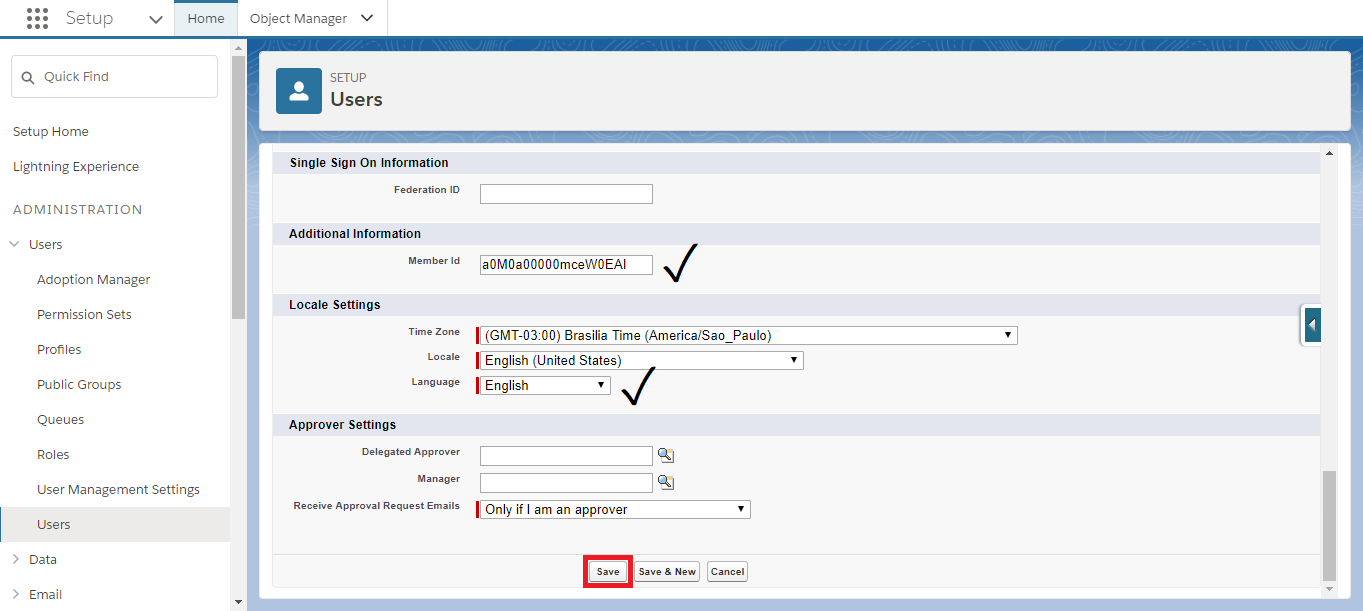
Next, click on the User record for the Member. On the User page, click User Detail and then Edit. In the Member Id field, paste the Member ID that you copied in Step 7. Confirm that Language is set to the Member's preferred language and click Save.
Next Steps
Fielo Platform is now ready for GRS integration. Next, you'll need to complete some additional steps required by GRS, including Connected App and SAML configuration. Contact your GRS account manager for details on completing your implementation.
Updated over 1 year ago
What's next
Once you've completed the configuration required by GRS, check out the FieloGRS component, which integrates your GRS Storefront with core Fielo features.