
Transactions and Points
Generate and manage Transactions and Points
Transactions
Transactions are the result of processing the Actions you've encouraged your Members to perform within your incentive and loyalty program.
Transactions can be the result of processing a Single Action in a Rule or a set of Actions - Multi-Action - in a Mission.
In most cases, Transactions are automatically generated when the Action (Rule) Engine processes a Rule or a Mission online, but sometimes - depending on how you configure your Transaction Settings in your Program - you can process them offline in a batch.
Managing Transactions
You can see and manage Transactions directly by selecting any of your Members from the Members tab.
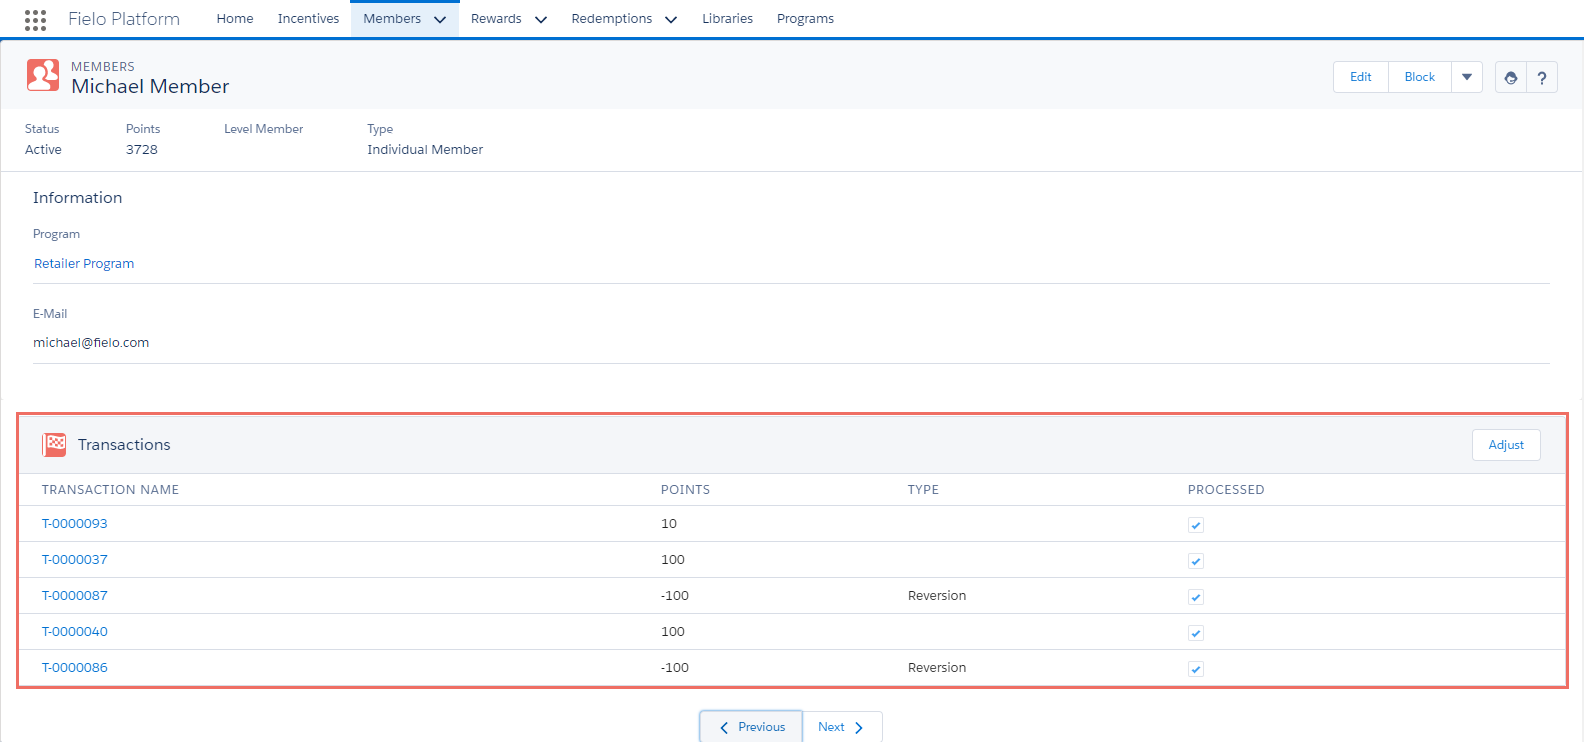
Member's Transactions
The Transactions related list gives you a quick overview of the most important information you need to know, such as:
- Transaction Name: this is an automatically generated reference name that identifies each Transaction uniquely.
- Points: Points each Transaction carries when it is processed.
- Type: this shows the different kind of existing Transactions depending on their origin and/or purpose, that is, when and why they were created. There are four types of Transactions:
- Adjustment: Transaction that gives or subtracts Points without a Member performing any particular Action.
- Challenge Reward: Transaction created when a Challenge Reward is granted to a Challenge Member.
- Expiration: Transaction created when Points reach their expiration date, if applicable.
- Reversion: Transaction which arises from reversing a previous created Transaction.
- Processed: This shows if the Transaction has already been processed () or not. Transactions can be processed either online or offline.
Transaction: Multiple Point TypesTransactions work with any kind of Point Types.
If you want to review the details of a given Transaction, simply click on the entry and you can see the elements which generated Points for your Member.
Adjusting Transactions
You can create a Transaction for Adjustment whenever you need to increase or decrease the number of Points your Members get.
To do this, just click Adjust on the Transaction related list and enter the number of Points you would like to give or take from your Member.
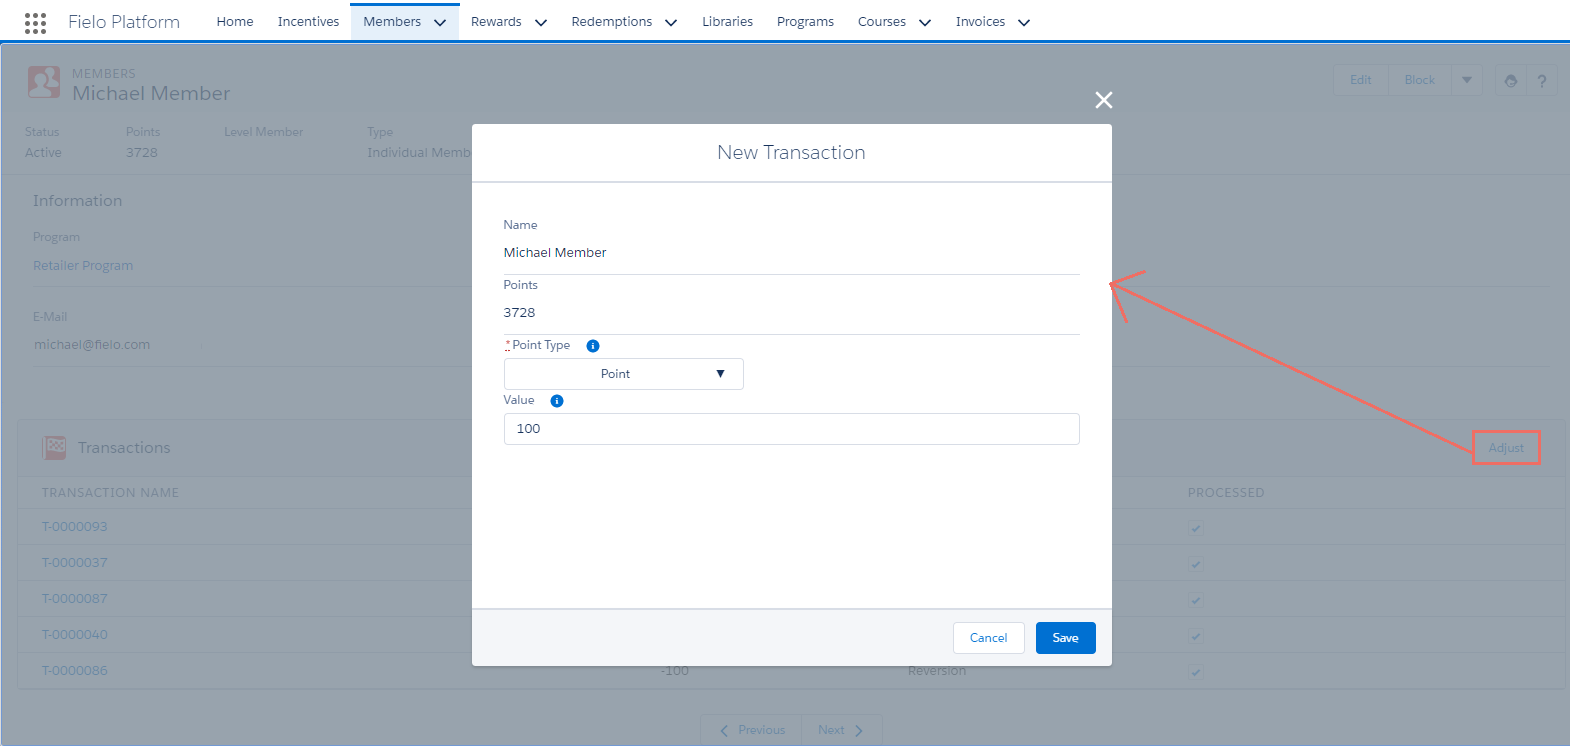
Creating a new Transaction for Adjustment
You'll see that a new Transaction is added to the list and Point running totals for the Member are updated.
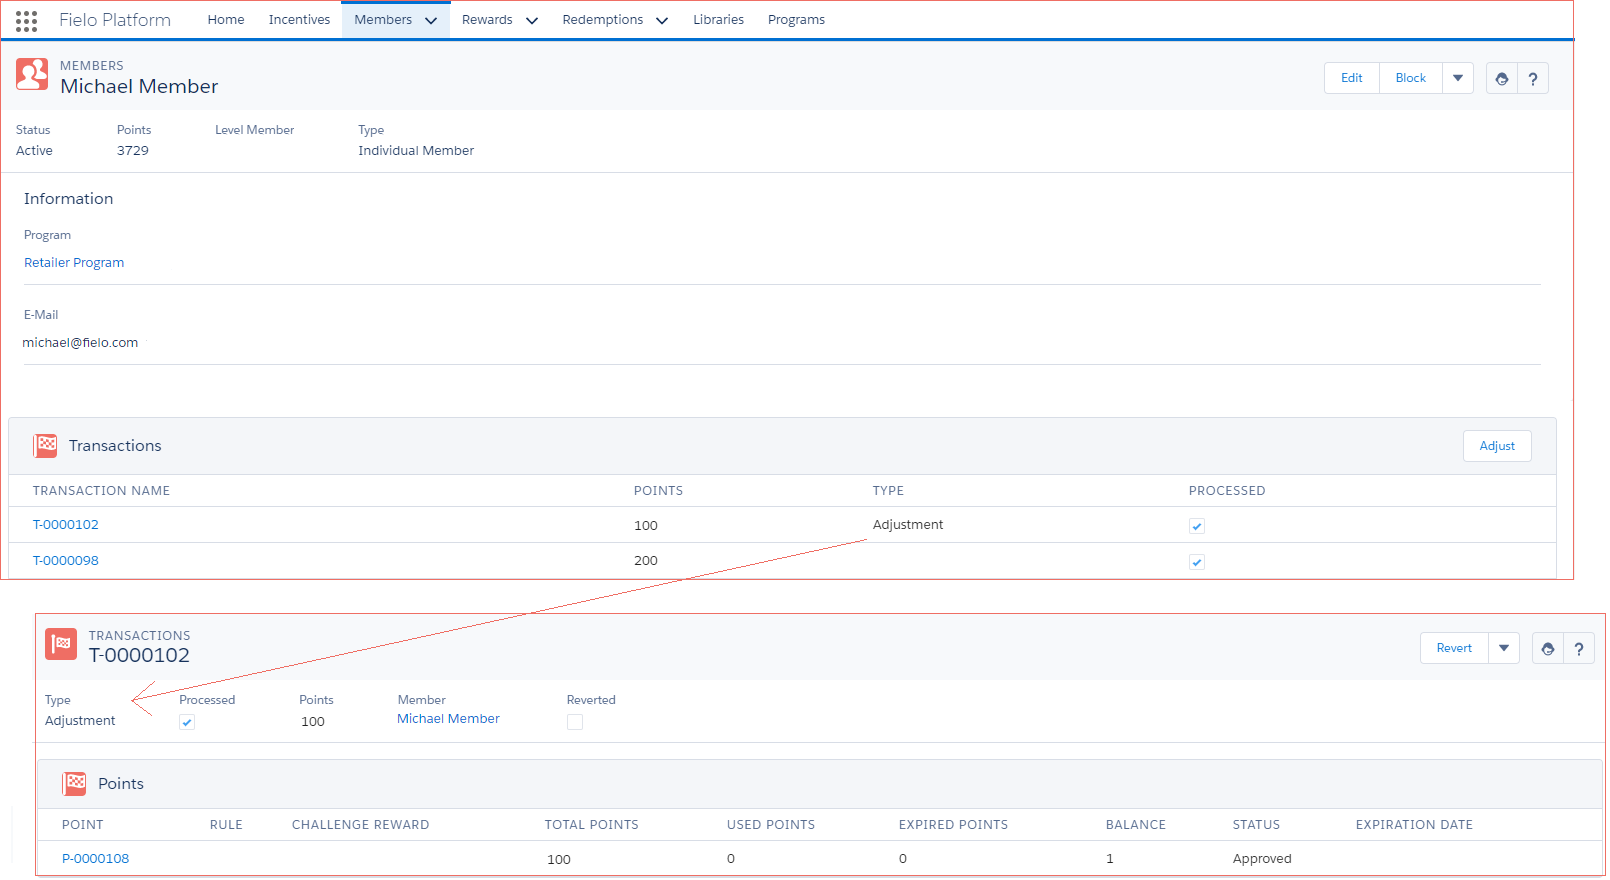
Adjustment Transaction details
Adjustment Transaction is really useful when you'd like to give your Members Points without the need for them to carry out a specific activity. For example, imagine a Member is complaining about receiving a faulty product as a Redemption. Apart from replacing the faulty product, you may want to compensate you Member by giving them 100 Points extra. How can you do that? Using an Adjustment Transaction.
Note that when you adjust a Transaction, the new Adjust Transaction is not linked to any processed Action from a Rule or Mission, unlike other types of Transactions.
Adjusting Transaction: Bulk Upload
Sometimes you may need to create several Adjust Transactions for different Members and doing so manually one by one is time-consuming. For those cases, you can upload all the Adjust Transactions you need in a bulk. For that, just follow the next steps:
Create a .CSV file
First, create a spreadsheet including Members ID, number of Points the Adjust Transaction gives the Member and confirm that is an Adjust by adding TRUE.
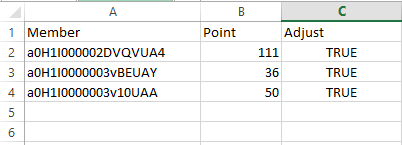
Transactions .CSV file
Member ID is an 18-character alphanumeric ID can be found between id= and & in the URL of the Member view page.
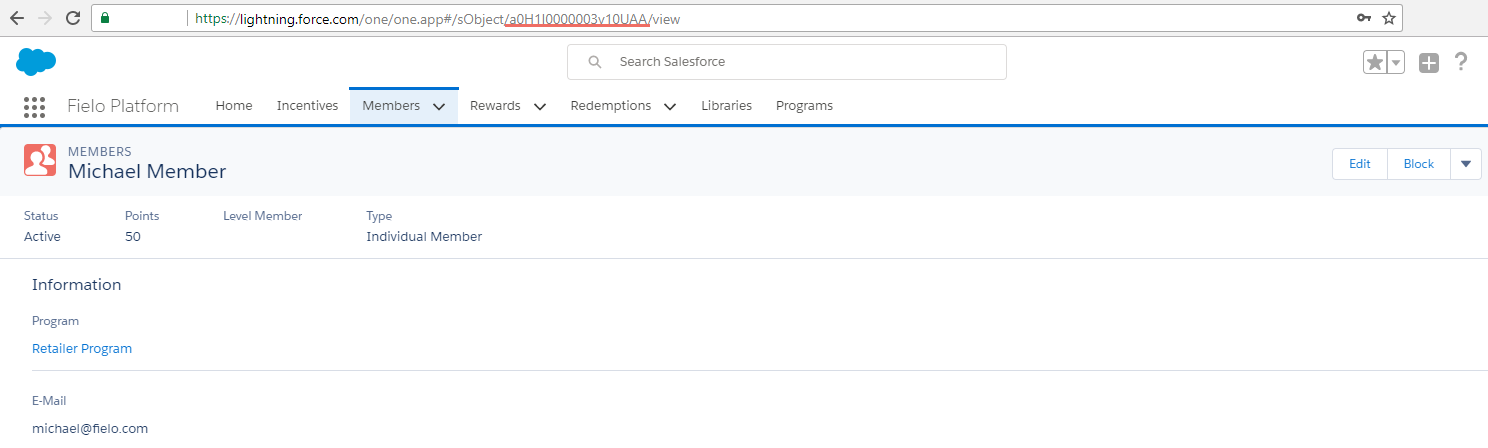
Member alphanumeric ID
If you're uploading Adjust Transactions using a Point Type different than Points - i.e. Miles - or both, standard Points and your own Point Type, make sure you add it as extra column in your spreadsheet:
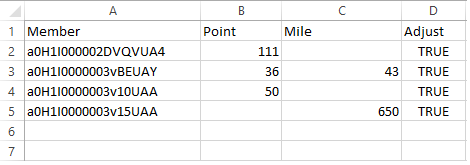
Transactions .CSV file with Multi Point Types
When ready, save your spreadsheet in Comma-Separated Values (.CSV) format.
Use Data Import Wizard
Now, from Setup, go to Data Import Wizard and click Launch Wizard!.
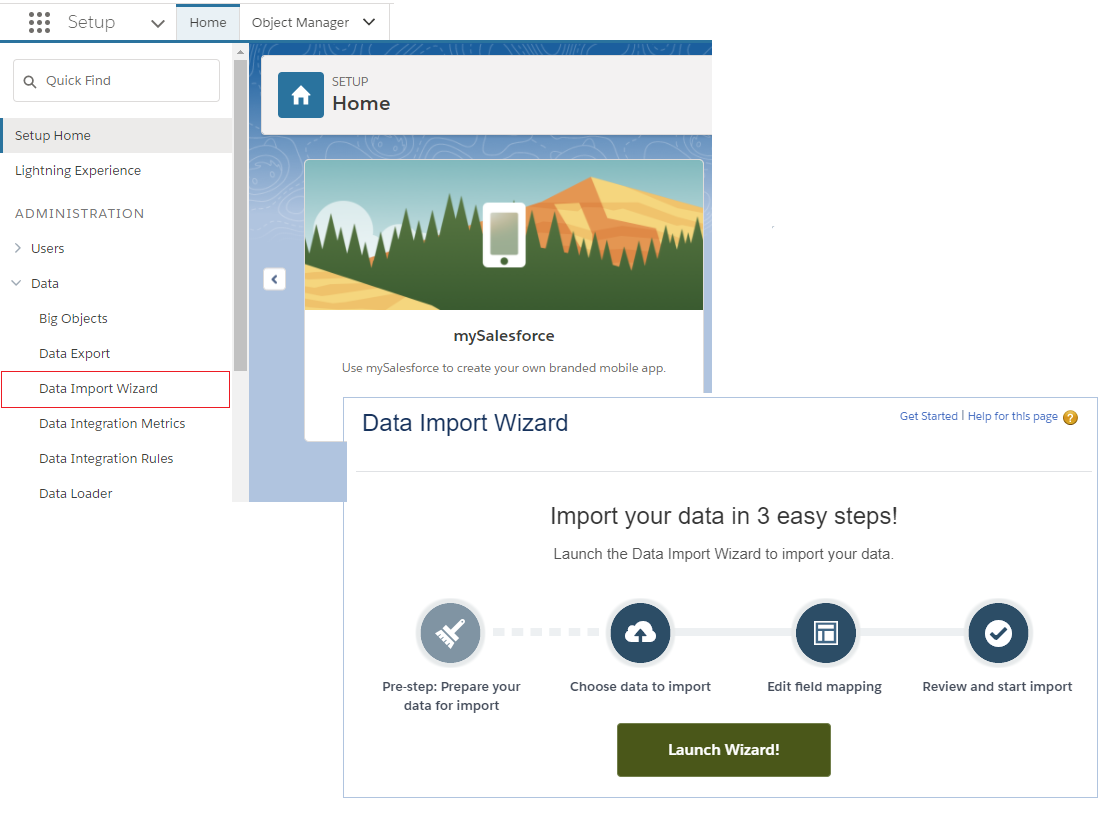
Data Import Wizard
- For What kind of data are you importing? question, choose Custom Objects tab and scroll down to Transactions.
- For What do you want to do? question, choose Add new records. Complete the
question Which Member field in your file do you want to match against to set the Member lookup field? with Salesforce.com ID. Leave all the other questions in None. - For Where is your data located? question, choose the .CSV file you've created in Create a .CSV file.
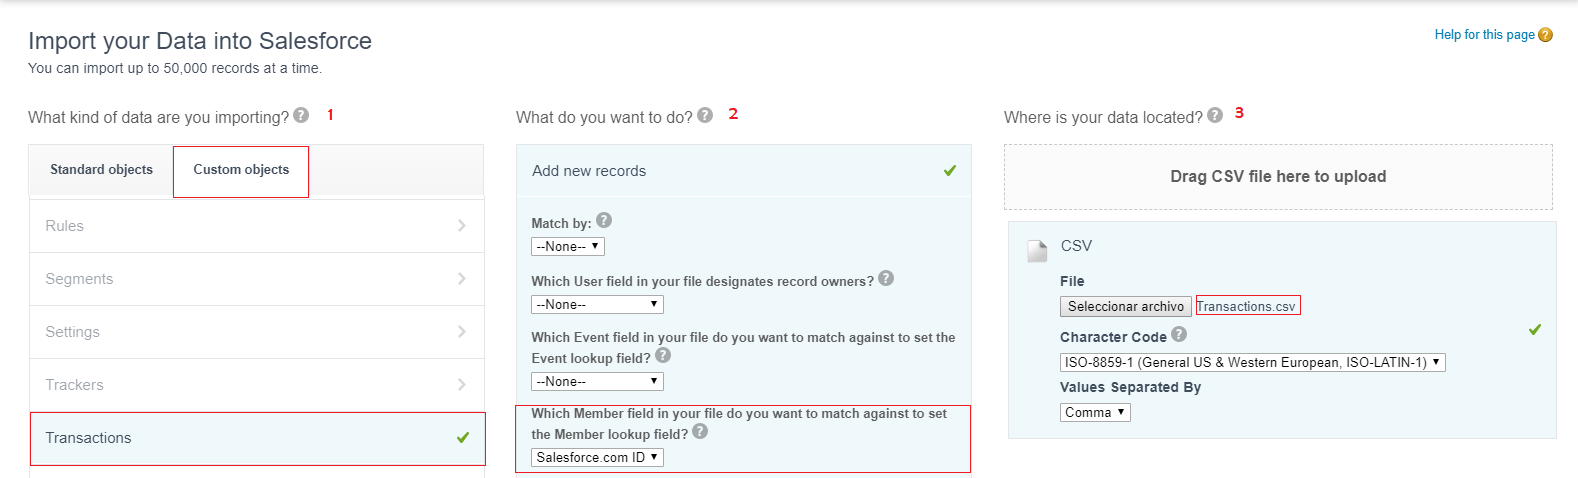
Importing Adjust Transactions into Salesforce
Once you've hit Next, confirm your field mapping and click Next again to start the importing process.
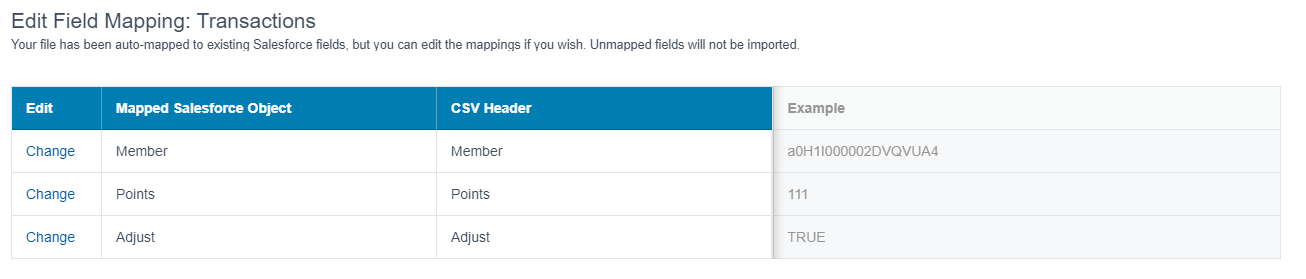
Field Mapping
After reviewing your import data, click Start Import. When finished, you'll be redirected to Bulk Data Load Jobs, which will include all the details of the imported job, such as Start and End Time, Total Processing Time, etc.
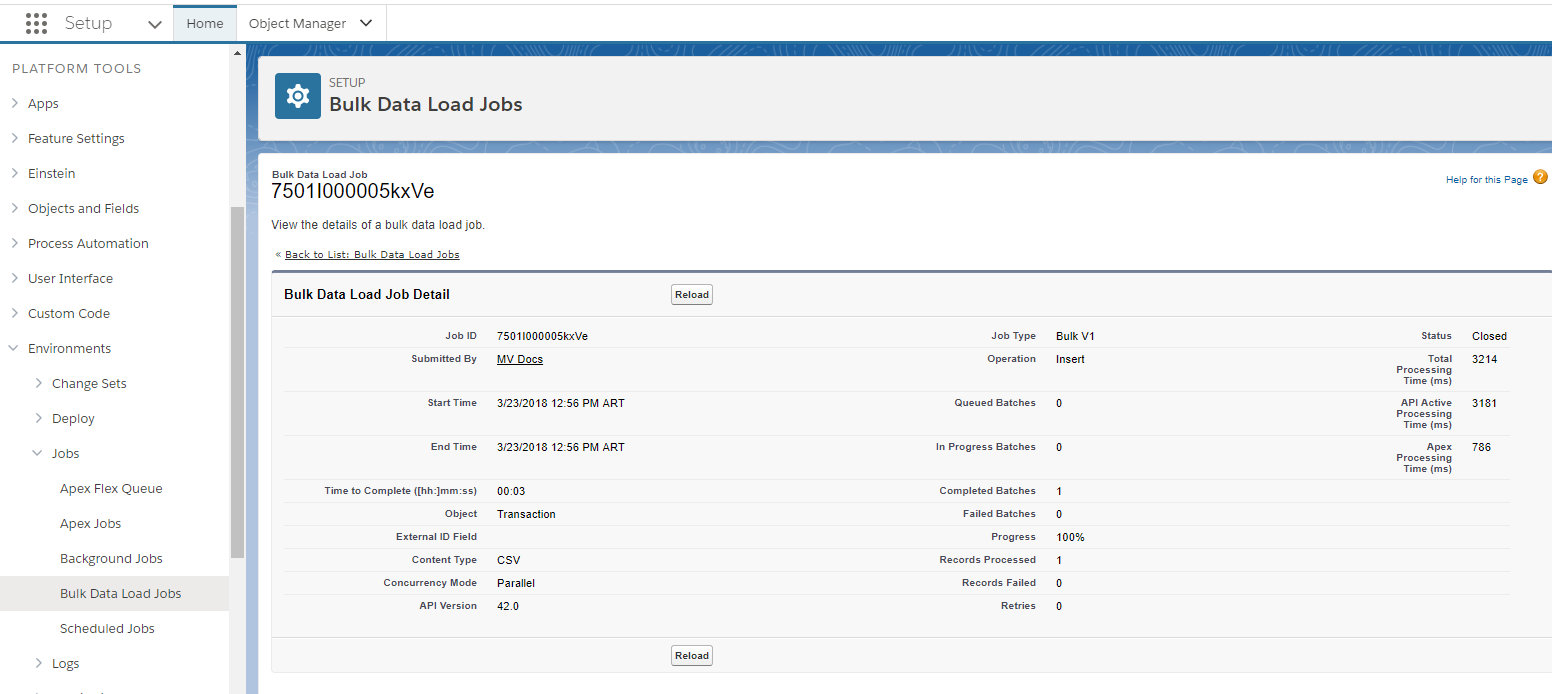
Bulk Data Load Job details
Using Salesforce Data LoaderIf you're using Data Loader instead of Data Import Wizard, don't forget to:
- Members must be referred by their Field API name.
Reverting Transactions
In case you realize there's been a mistake when giving Points to your Members - i.e. a Rule or Mission was processed wrongly, a Member obtained Points by fraudulent activities, etc. - you can revert a specific Transaction.
To do so, first you need to identify which Transaction the Action (Rule) Engine will need to revert. Once you've identified it, just click Revert
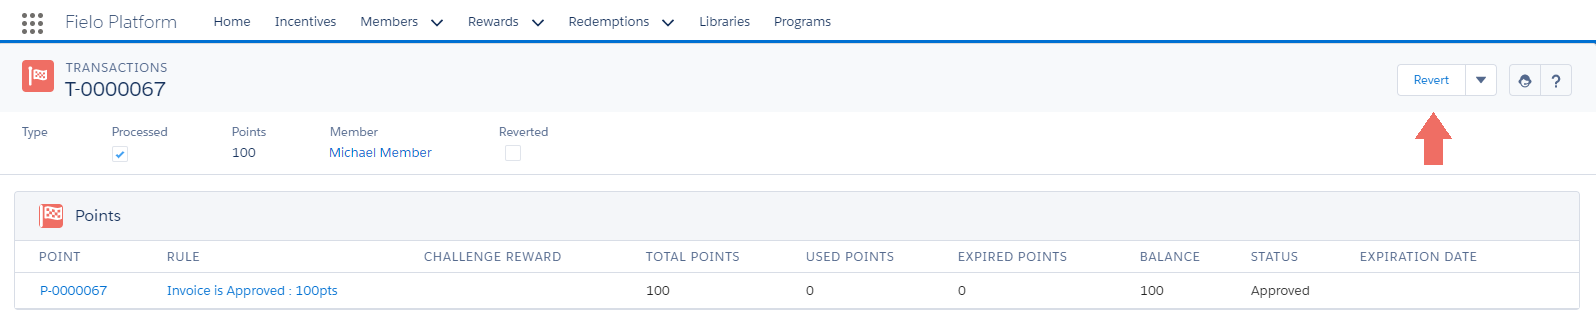
Transaction to revert
You'll see that the selected Transaction has a on Reverted and there's no Revert possibility anymore.

Reverted Transaction
Then, another Transaction - of Reversion type - will be generated, thereby substracting the same number of Points involved in the original Transaction.
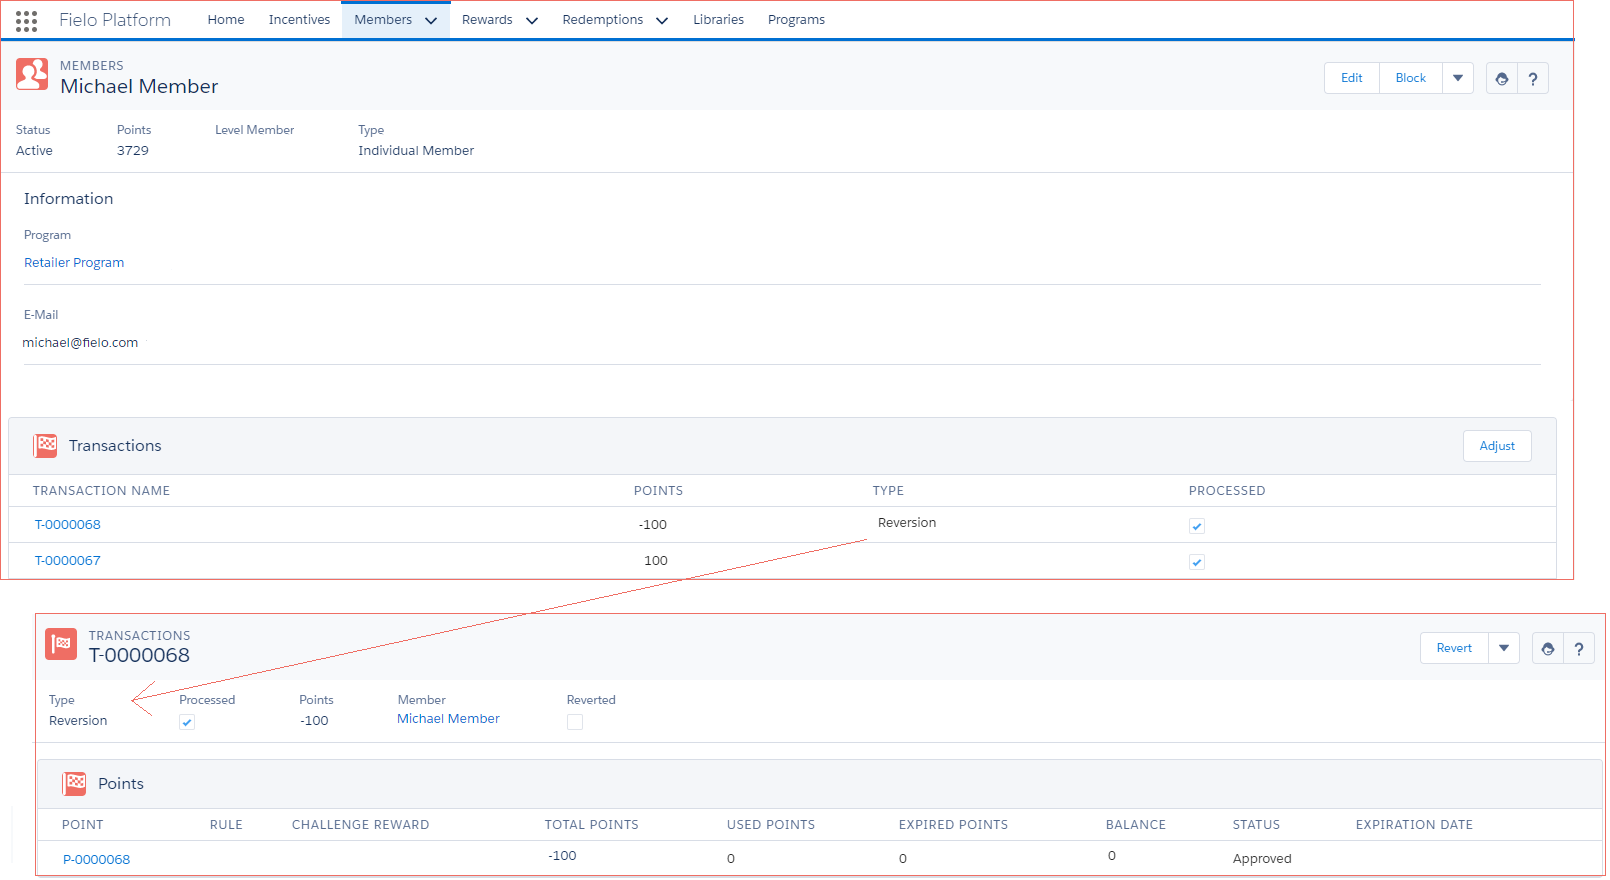
New Transaction: Reversion type
You cannot revert a Transaction that results from a previous reversion
Transaction Management Tools
Page Settings Management
You can customize the Transactions page design by using the applicable Page Settings for Transactions).
Points
Points are single units Members can obtain as an outcome for performing specific activities. You can manage and configure Points in several ways, and you can use them in Rules and Missions to redeem them for Rewards.
Managing Points
You can get a general overview of Points directly by selecting any of your Members from the Members tab.
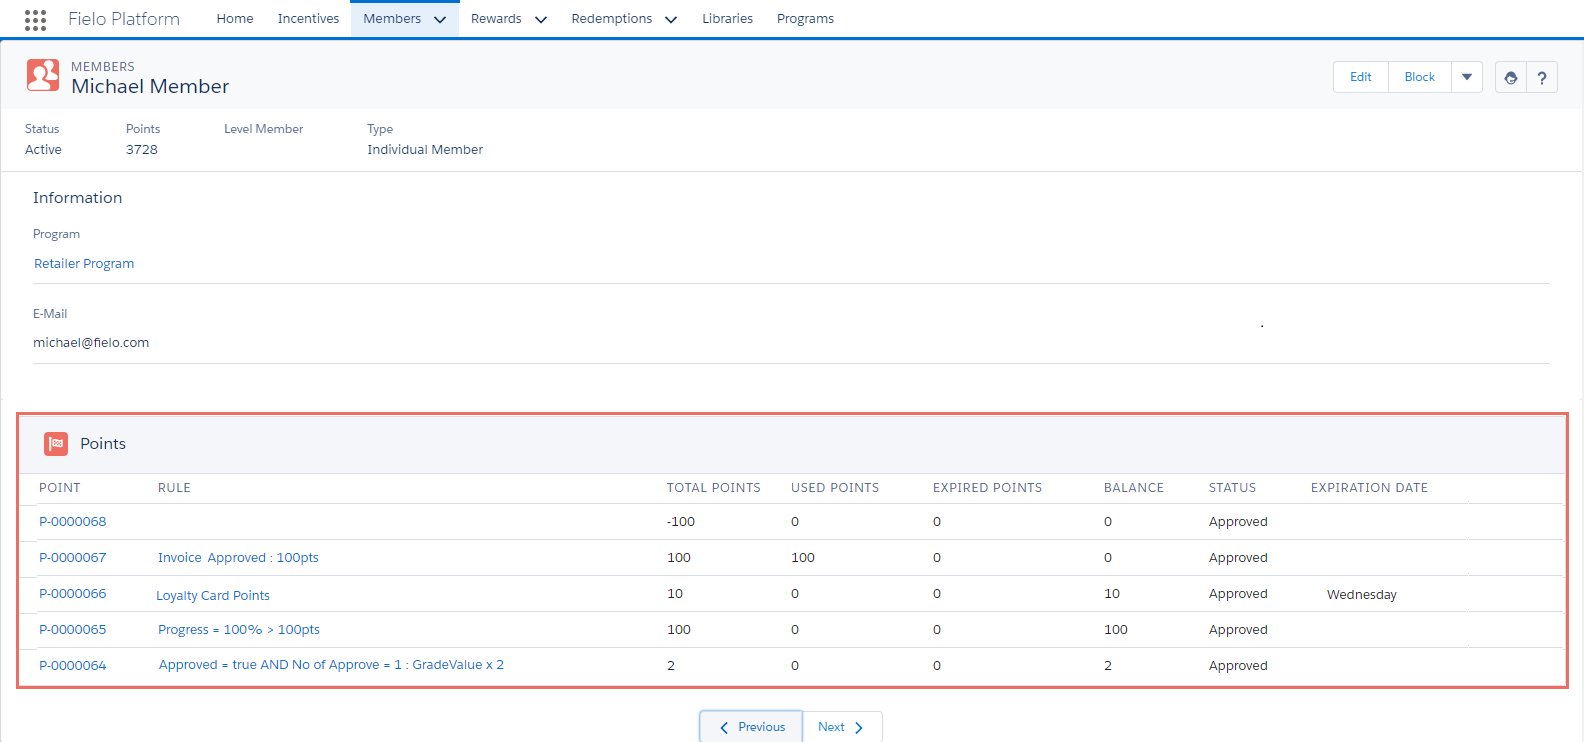
Member's Points
The Points related list gives you a quick overview of the most important information you need to know, such as:
- Point Name: this is an automatically generated reference name that identifies uniquely each Point or set of Points records the Members obtained when completing a Rule or a Mission.
- Rule: this shows the name of the Rule that grants the Points. In the case of Missions, you can also set this to show the Challenge and/or Mission Reward that gives the Points to the Member.
- Total Points: this represents the total number of Points that the specific Point record includes.
- Used Points: Points that have already been used in redeeming a Reward. Used Points are substracted from the Total Points record.
- Expired Points: if you've decided you want Points to expire, either in Partial or Total mode, you may show when Points have already expired.
- Balance: this displays all Points available to be used after substracting the Used Points and/or the Expired Points (if applicable) from the Total Points. If no Points were used or expired, Balance should be exactly the same as Total Points. Only Points with status Approved are included in the balance.
- Status: Depending on how you've set Points, they may have any of the following statuses:
- Pending: Points which have been generated and which require Request Point Approval. Note that Points with Pending status are not included in the Balance.
- Approved: Points which either originally had Pending status and were later approved by the ORG System Administrator, or Points which were generated and there is no Request Point Approval required.
- Rejected: Points whose initial status was Pending but were not approved by the ORG System Administrator.
- Expiration Date: if Points have an Expiration Mode established, you see the date when the Points will expire.
Point details
You can deep-dive into Points information to find out more about their source, when and how they were used. You can get to this overview just by clicking on the Point Name record you want.
Point details are also available from the Redemptions tab when choosing a specific Redemption.
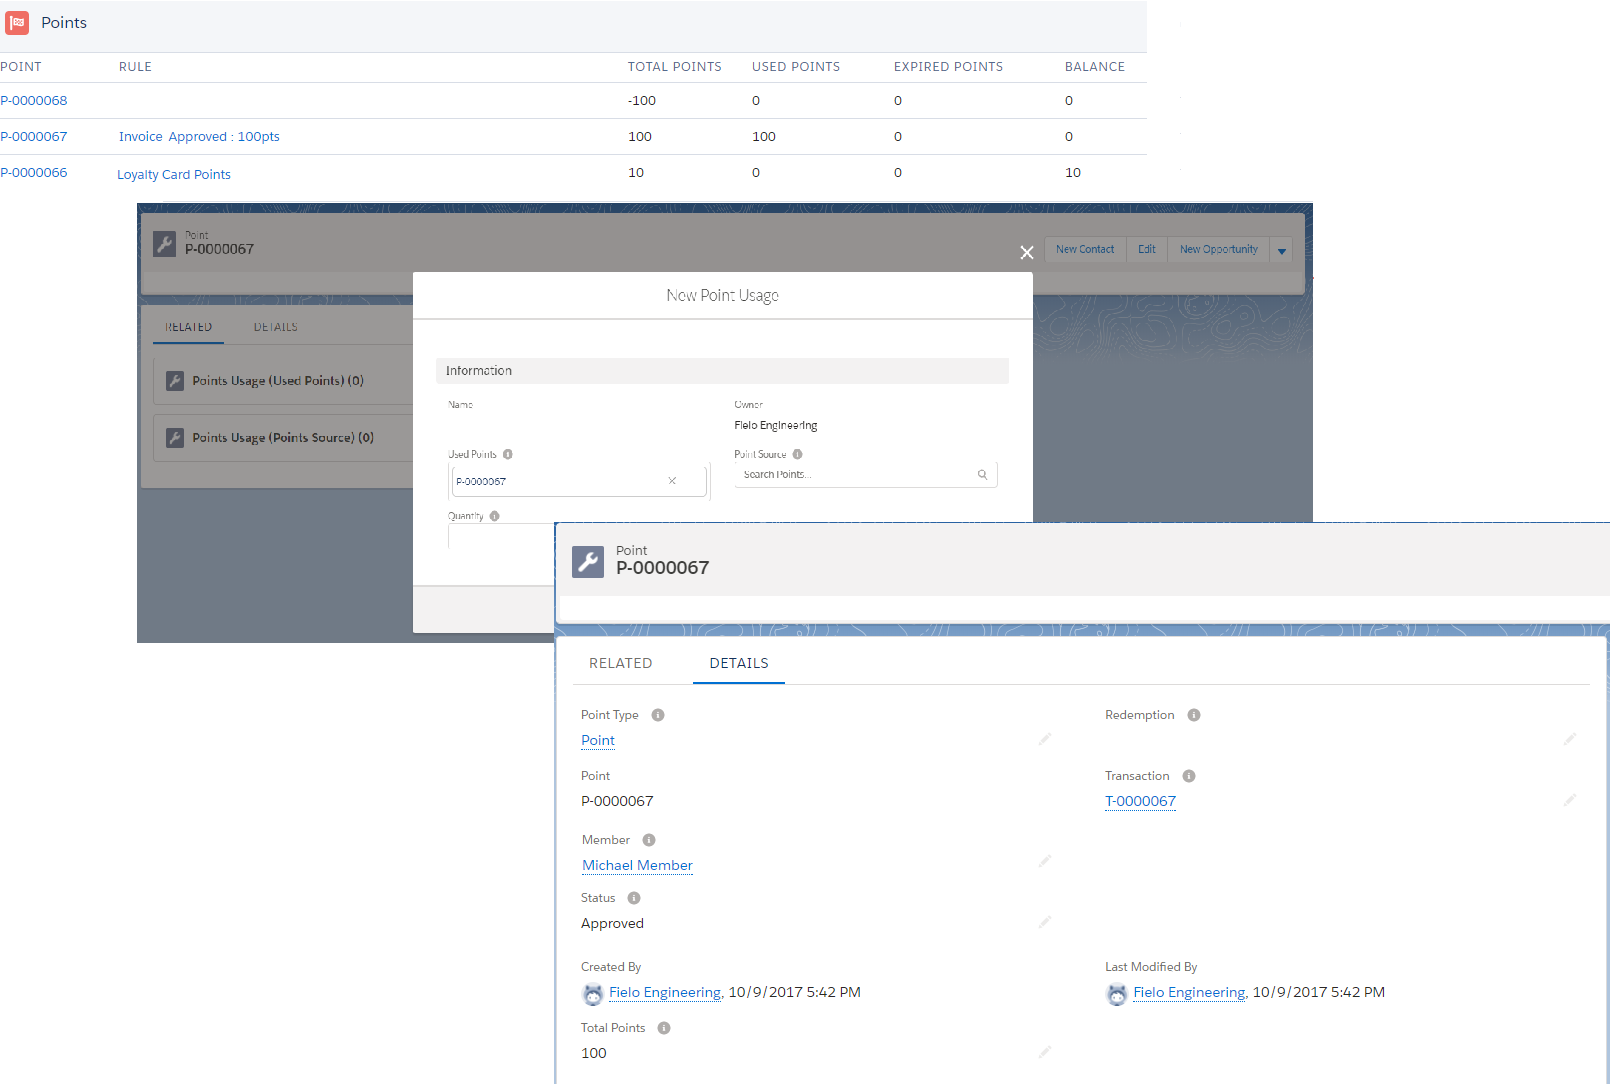
Points details
You'll see some of the elements of the Point record, such as:
- Point Type: This refers to what kind of Point this record is giving. By default, it's always Point but it may be set to be another Point Type, if applicable.
- Point Name.
- Member.
- Status.
- Total Points: This shows the total number of Points the Point record gives to the Member.
- Redemption: If applicable, this will show the Redemption where the Points were used by the Member.
- Transaction: This displays the Transaction that gave the Points.
Updated over 1 year ago